
When it comes to controlling your heating and cooling system, a thermostat plays a vital role. One popular brand in the field of thermostats is Lennox. Lennox offers a wide range of innovative and technologically advanced thermostats that are designed to provide maximum comfort and energy efficiency.
Understanding the wiring diagram of a Lennox thermostat is essential for proper installation and troubleshooting. The diagram showcases the various wires that connect the thermostat to the heating and cooling system, including the power supply, fan control, heating and cooling stages, and more.
Installing a Lennox thermostat requires following the wiring diagram carefully and ensuring each wire is connected to the appropriate terminal. This ensures that the thermostat can effectively communicate and control the heating and cooling system, allowing you to set and maintain the desired temperature in your home.
Whether you are a homeowner, HVAC technician, or simply curious about thermostat installation, having a clear understanding of the Lennox thermostat wiring diagram can help you make informed decisions and troubleshoot any potential issues that may arise.
Understanding Lennox Thermostat Wiring Diagram: A Complete Guide
Lennox thermostats are an essential component of any heating and cooling system. Understanding the wiring diagram for your Lennox thermostat is crucial for properly installing and configuring your HVAC system. This complete guide will help you navigate through the various wires and connections in your Lennox thermostat wiring diagram.
The first step in understanding the Lennox thermostat wiring diagram is to familiarize yourself with the different components and symbols used in the diagram. The wiring diagram typically includes symbols for the thermostat, furnace, air conditioner, and other components of the HVAC system. Each symbol represents a specific wire or connection, and understanding these symbols will help you identify the correct wires and connections.
In a Lennox thermostat wiring diagram, you will commonly find wires labeled with letters such as R, C, W, Y, G, and O. These letters represent the different wires used to connect the thermostat to the HVAC system. For example, the R wire is typically the power wire, the C wire is the common wire, the W wire is the heat wire, the Y wire is the cooling wire, the G wire is the fan wire, and the O wire is the reversing valve wire.
It is important to note that the wiring diagram may vary depending on the specific model of the Lennox thermostat and HVAC system you have. Therefore, it is essential to consult the user manual or contact a professional HVAC technician if you have any doubts or questions about the wiring diagram.
Here is a basic example of a Lennox thermostat wiring diagram:
| Wire Color | Letter | Description |
|---|---|---|
| Red | R | Power Wire |
| Blue | C | Common Wire |
| White | W | Heat Wire |
| Yellow | Y | Cooling Wire |
| Green | G | Fan Wire |
| Orange | O | Reversing Valve Wire |
This example provides a basic understanding of how the wires are labeled and their functions in the Lennox thermostat wiring diagram. However, it is important to remember that the actual wiring diagram may differ depending on your specific HVAC system. Always refer to the user manual or consult an HVAC technician for accurate and reliable information.
Importance of Lennox Thermostat Wiring Diagram
When it comes to installing or replacing a Lennox thermostat, it is crucial to have a clear understanding of the wiring diagram. The thermostat wiring diagram provides a visual representation of the electrical connections between the thermostat and the HVAC system. It helps to ensure proper installation and prevent any potential issues that may arise from incorrect wiring.
A Lennox thermostat wiring diagram typically includes labels or color-coded wires that correspond to specific terminals on both the thermostat and the HVAC system. This makes it easier to identify the correct connections and ensure that the thermostat functions properly. Without a wiring diagram, it can be challenging to determine which wire should go where, leading to incorrect connections and potential damage to the equipment.
Having a Lennox thermostat wiring diagram also helps when troubleshooting any issues with the thermostat or HVAC system. If there is a problem with the thermostat not functioning correctly, referring to the wiring diagram can help identify any wiring errors or faults that may be causing the issue. By following the diagram, it becomes easier to diagnose and fix any problems, saving time and money on unnecessary repairs or replacements.
Furthermore, a Lennox thermostat wiring diagram is also essential when upgrading or replacing an old thermostat with a new one. Different thermostat models may have different wiring configurations, and the diagram ensures that the new thermostat is wired correctly to work seamlessly with the HVAC system. It provides a guide for connecting the necessary wires and configuring any additional features or settings on the thermostat.
In conclusion, a Lennox thermostat wiring diagram is an invaluable tool for anyone installing or replacing a thermostat. It ensures proper installation, helps troubleshoot issues, and simplifies upgrades or replacements. By following the diagram, homeowners and HVAC professionals can ensure the thermostat works correctly and efficiently, providing optimal comfort and energy savings.
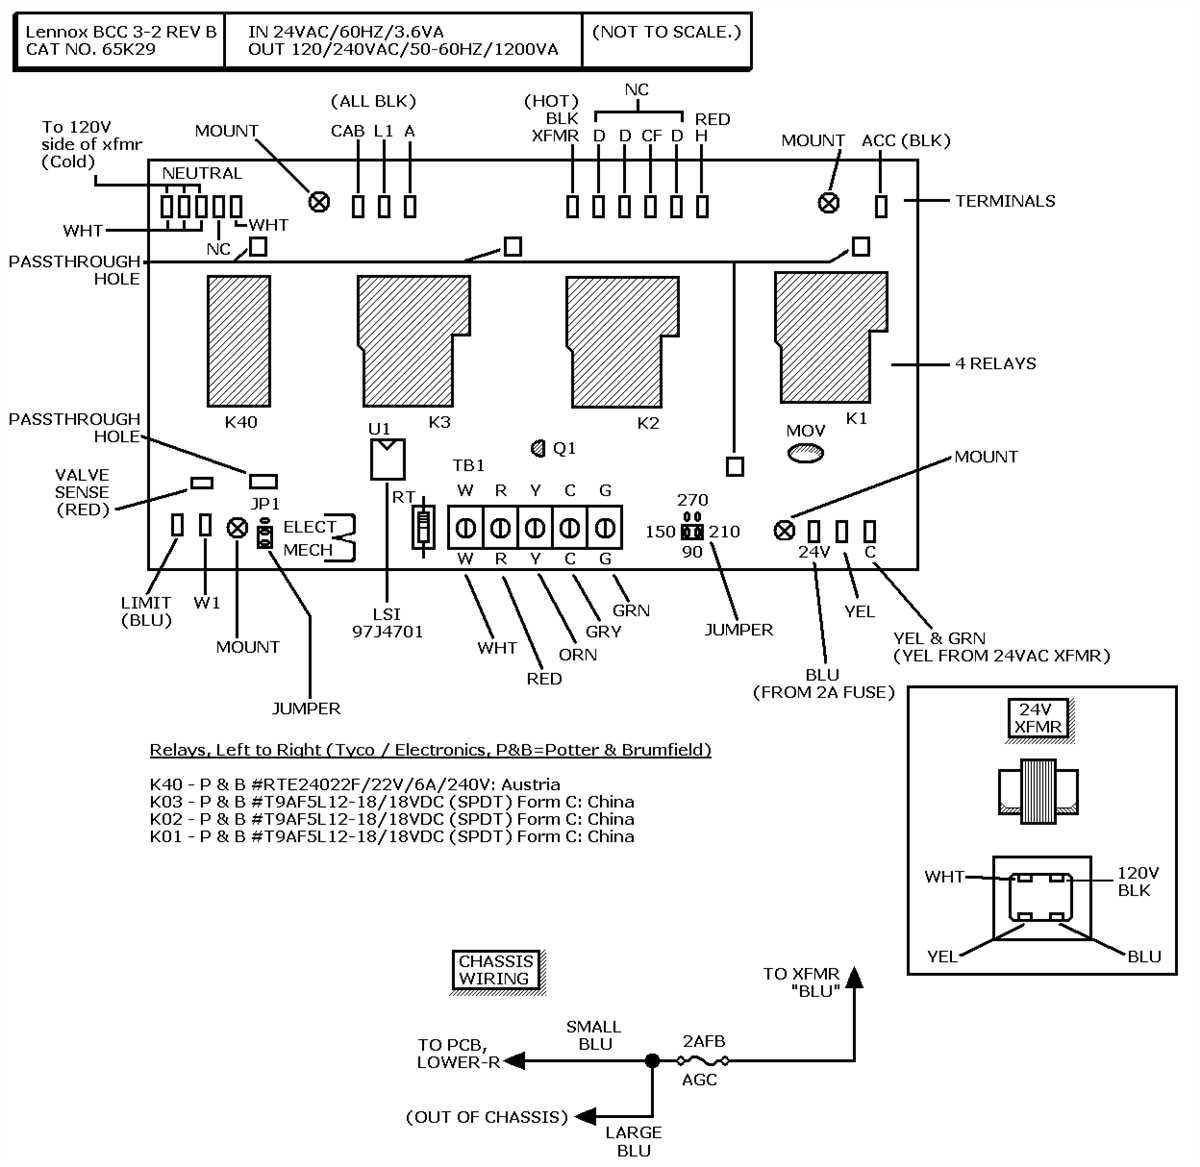
Components of a Lennox Thermostat Wiring Diagram
A Lennox thermostat wiring diagram is a visual representation of the electrical connections and components of a Lennox thermostat system. It provides a clear and organized overview of how the thermostat is wired, making it easier for technicians to identify and troubleshoot any issues that may arise.
The main components included in a Lennox thermostat wiring diagram are:
- Thermostat: The thermostat itself is the central control unit that allows the user to set and adjust the temperature in their home. It is connected to the HVAC system and sends signals to the heating or cooling system based on the desired temperature settings.
- Wires: The wiring in a Lennox thermostat system consists of multiple color-coded wires that connect the thermostat to the HVAC system. Each wire has a specific function and is connected to a corresponding terminal on the thermostat and the HVAC equipment.
- Terminals: A Lennox thermostat typically has multiple terminals where the wires are connected. These terminals are labeled with letters or numbers that correspond to the specific function of each wire. For example, the C terminal is for the common wire, the R terminal is for the power wire, and the Y terminal is for the cooling wire.
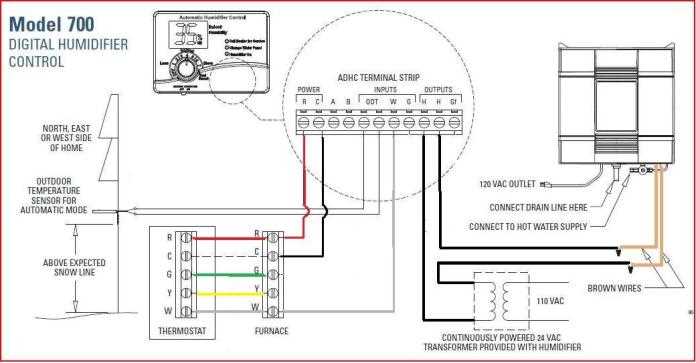
- HVAC Equipment: The Lennox thermostat wiring diagram also includes the HVAC equipment that the thermostat is connected to. This can include the heating and cooling systems, such as a furnace or air conditioner, as well as any other relevant components, such as an outdoor unit or heat pump.
- Transformers and Relays: The wiring diagram may also show transformers and relays that are used to control the flow of electricity within the thermostat system. These components help to regulate voltage levels and activate the heating or cooling system when needed.
Overall, a Lennox thermostat wiring diagram provides a comprehensive visual guide to the electrical connections and components of a Lennox thermostat system. It is essential for understanding the wiring configuration and ensuring proper installation and operation of the thermostat.
Common Lennox Thermostat Wiring Configurations
When it comes to wiring a Lennox thermostat, there are several common configurations that you may come across. Understanding these configurations can help you properly install and connect your thermostat. Here are a few of the most common wiring setups:
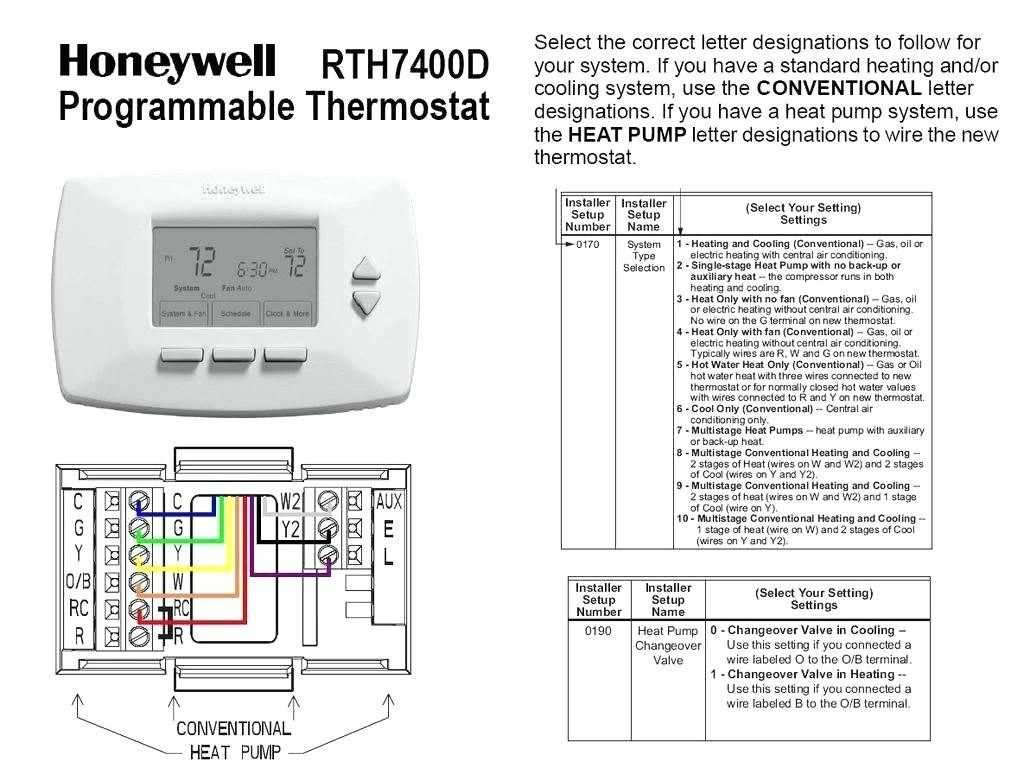
Single Stage Heat / Single Stage Cool

In this configuration, the thermostat controls a single-stage heating system and a single-stage cooling system. The wiring typically involves connecting the R (red) wire to the RC or RH terminal for power, the W (white) wire to the W terminal for heating, and the Y (yellow) wire to the Y terminal for cooling. The G (green) wire is usually connected to the G terminal for fan control.
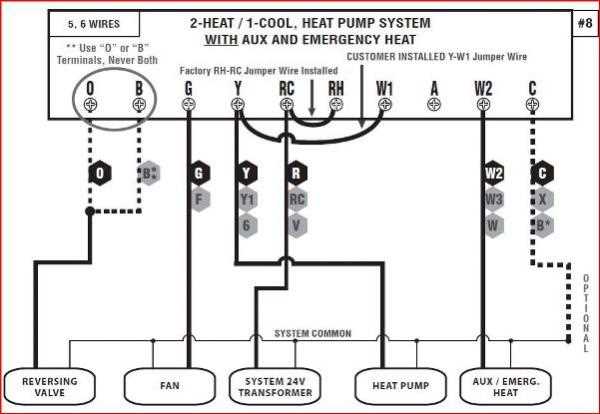
Multi-Stage Heat / Single Stage Cool
This configuration is used when the heating system has multiple stages, but the cooling system only has one stage. The wiring is similar to the single stage heat/cool configuration, but with additional wires for the additional heating stages. The primary stage wire (usually W1 or W) is connected to the W terminal, and the secondary stage wire (usually W2) is connected to the W2 terminal. The cooling wiring remains the same as the single stage setup.
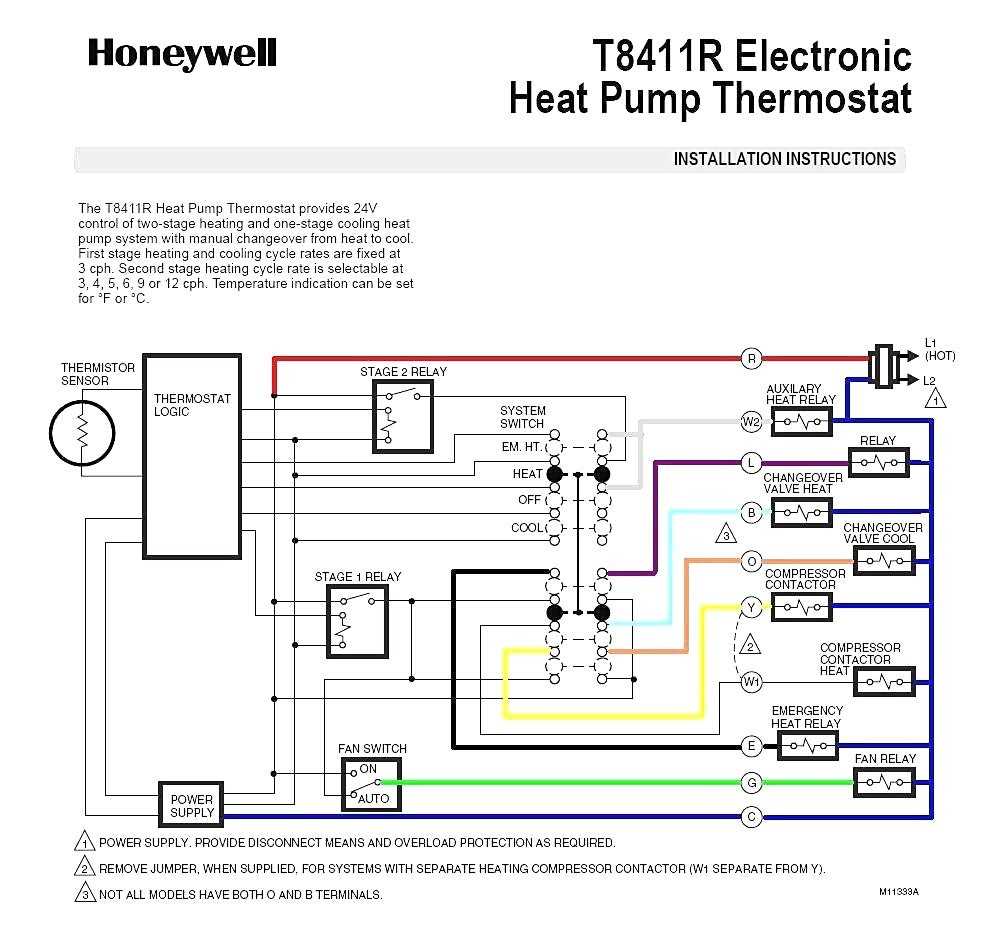
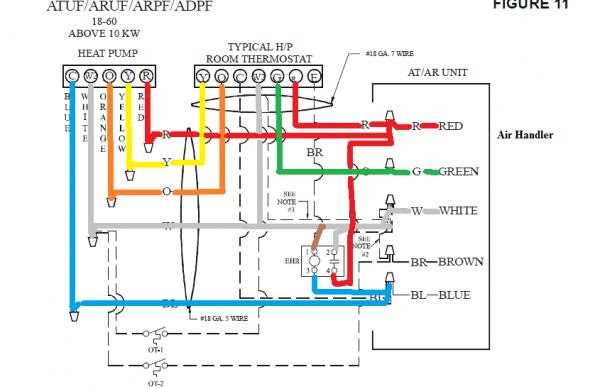
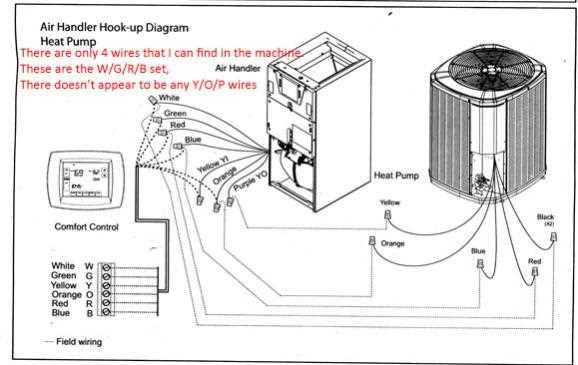
Heat Pump System
For homes with a heat pump system, the thermostat wiring is a bit different. The R (red) wire is still used for power, but the O (orange) wire is used to switch the reversing valve for heating or cooling. The W (white) wire is used for auxiliary heat, the Y (yellow) wire is used for compressor control, and the G (green) wire is used for fan control. Additionally, there may be a C (blue) wire for common connection.
These are just a few examples of common Lennox thermostat wiring configurations. It’s important to consult the specific wiring diagram for your thermostat model and system to ensure proper installation and operation. If you’re unsure about the wiring or need assistance, it’s recommended to consult with a professional HVAC technician.
How to Read and Interpret a Lennox Thermostat Wiring Diagram
When it comes to installing or troubleshooting a Lennox thermostat, it’s important to understand how to read and interpret the wiring diagram. This diagram provides a visual representation of the electrical connections between the thermostat and the heating or cooling system. By understanding the diagram, you can correctly wire the thermostat and troubleshoot any potential issues that may arise.
The first step in reading a Lennox thermostat wiring diagram is to identify the different wires and their corresponding terminals. Typically, the wires will be labeled with letters or numbers that correspond to specific terminals on the thermostat and the heating or cooling system. By cross-referencing the wire labels with the diagram, you can determine where each wire should be connected.
Next, it’s important to understand the symbols and lines used in the diagram. Different symbols represent different components or devices, such as the thermostat itself, the heating or cooling system, and any additional equipment or accessories. Lines or arrows indicate the flow of electrical current between the different components. By following the lines and symbols, you can understand how the various parts of the system are connected.
Once you have a clear understanding of the wiring diagram, you can begin to wire the thermostat according to the instructions provided. It’s important to follow the diagram closely to ensure that the thermostat is wired correctly and that it will function properly. If you encounter any issues during the installation or troubleshooting process, referring back to the wiring diagram can help you identify the problem and find a solution.
In conclusion, reading and interpreting a Lennox thermostat wiring diagram is an essential skill for installing and troubleshooting a Lennox thermostat. By understanding the different wires, symbols, and lines used in the diagram, you can correctly wire the thermostat and ensure that it will function properly. If you’re unsure about any aspect of the diagram, it’s always best to consult a professional HVAC technician for guidance.
Troubleshooting Lennox Thermostat Wiring Issues
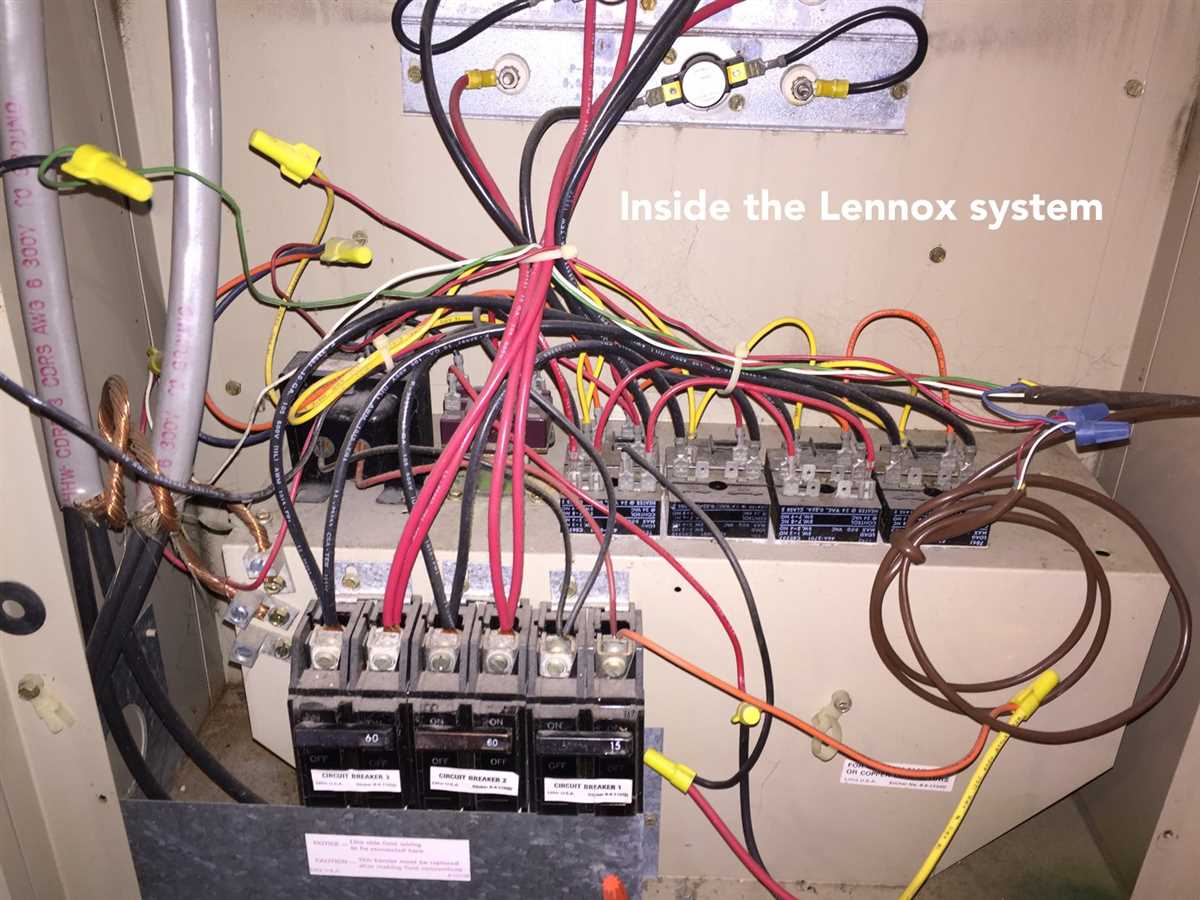
Lennox thermostats are an essential component of any HVAC system, allowing homeowners to control the temperature and settings of their heating and cooling units. However, like any electrical device, thermostats can experience wiring issues that may cause them to malfunction. Understanding common wiring problems and troubleshooting techniques can help homeowners diagnose and resolve these issues.
One common issue with Lennox thermostat wiring is loose connections. Over time, wires can become loose or disconnected, leading to intermittent or complete loss of thermostat functionality. If the thermostat is not responding, the first step is to inspect the wiring connections. Start by turning off the power to the thermostat and opening the access panel. Check for any loose or disconnected wires and reattach them securely. It’s also helpful to label each wire before disconnecting it to ensure proper reconnection.
- Thermostat wiring O/B wire wrong: If the heat pump or air conditioner is not turning on, it may be due to incorrect wiring of the O/B wire. This wire controls the reversing valve in heat pumps and determines if the system is in heating or cooling mode. Verify that the O/B wire is correctly connected to the appropriate terminal on both the thermostat and the HVAC system.
- Incompatible thermostat and HVAC system: If the thermostat is not functioning properly or displaying incorrect readings, it could be due to incompatibility between the thermostat and the HVAC system. Check the model and compatibility requirements of both devices to ensure they are compatible with each other. If they are not, consider replacing either the thermostat or the HVAC system.
- Short-circuited wires: Another common issue is short-circuited wires. If the thermostat is not responding or displaying erratic readings, it may be due to a short circuit caused by exposed or damaged wires. Carefully inspect all the wiring and look for any signs of damage or exposed wires. If any issues are found, contact a professional electrician to repair or replace the wiring.
It’s important to note that working with electrical wiring can be dangerous and should only be done by qualified professionals. If you are unsure about troubleshooting or resolving any wiring issues with your Lennox thermostat, it is best to contact a licensed HVAC technician for assistance.
The Importance of Professional Installation of Lennox Thermostat Wiring
When it comes to installing a Lennox thermostat and wiring system, it’s crucial to seek professional help. Hiring a licensed technician ensures the installation is done correctly and efficiently, providing peace of mind and optimal performance for your HVAC system.
Lennox thermostats require specific wiring configurations to function properly. Professional technicians are trained and experienced in handling complex wiring setups and can ensure that the thermostat is installed correctly according to manufacturer guidelines. They also have the necessary tools and knowledge to troubleshoot any potential issues that may arise during the installation process.
- Avoid Costly Mistakes: Incorrect thermostat wiring can lead to system malfunction or even damage. By hiring a professional, you can avoid costly mistakes that may arise from improper installation.
- Ensure Compatibility: Lennox thermostats come in different models and have unique wiring requirements. A professional installer can determine the compatibility of your current system and recommend the best thermostat option for your needs.
- Optimize Energy Efficiency: Properly installed thermostat wiring can help maximize energy efficiency and reduce utility costs. A professional can ensure that all the wiring connections are accurate, allowing your HVAC system to run efficiently.
- Warranty Coverage: Many Lennox thermostats come with a warranty that may require professional installation for the warranty to remain valid. By hiring a licensed technician, you can ensure that your warranty remains intact.
Overall, professional installation of Lennox thermostat wiring is essential for a seamless and reliable HVAC system. Hiring a licensed technician guarantees that the job is done correctly, minimizing potential issues and maximizing the performance of your thermostat and HVAC system.