
When it comes to electrical installations, having a clear understanding of the wiring diagram is essential. In this article, we will explore the Leviton 14-50r wiring diagram, which is commonly used in residential and commercial settings. This diagram provides a detailed illustration of how to wire a Leviton 14-50r receptacle, ensuring a safe and efficient electrical connection.
The Leviton 14-50r receptacle is a popular choice for applications that require a 50 Amp, 125/250 Volt power outlet. It is commonly used for electric range and dryer installations. Understanding how to correctly wire this receptacle will allow you to safely connect your appliances, ensuring they receive the necessary power without any issues.
This article will break down the Leviton 14-50r wiring diagram step by step, providing clear instructions and explanations along the way. Whether you are a seasoned electrician or a novice DIY enthusiast, this guide will help you navigate the wiring process with ease. So let’s dive in and explore the Leviton 14-50r wiring diagram in detail!
Understanding the Leviton 14-50r Wiring Diagram
The Leviton 14-50r wiring diagram is a helpful reference for understanding the proper installation and wiring of a Leviton 14-50r receptacle. This receptacle is commonly used for electric vehicle charging stations or for connecting high-powered electrical devices.
The wiring diagram provides a visual representation of the different components and connections involved in the installation. It typically includes labels and color-coded wires to make it easier to understand the proper wiring sequence.
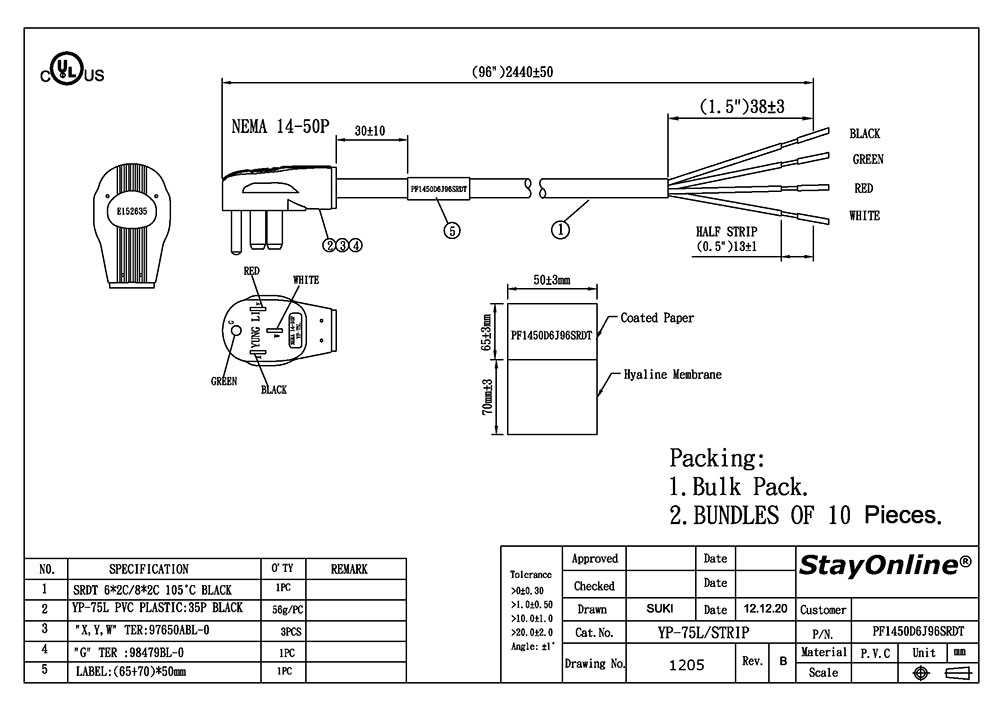
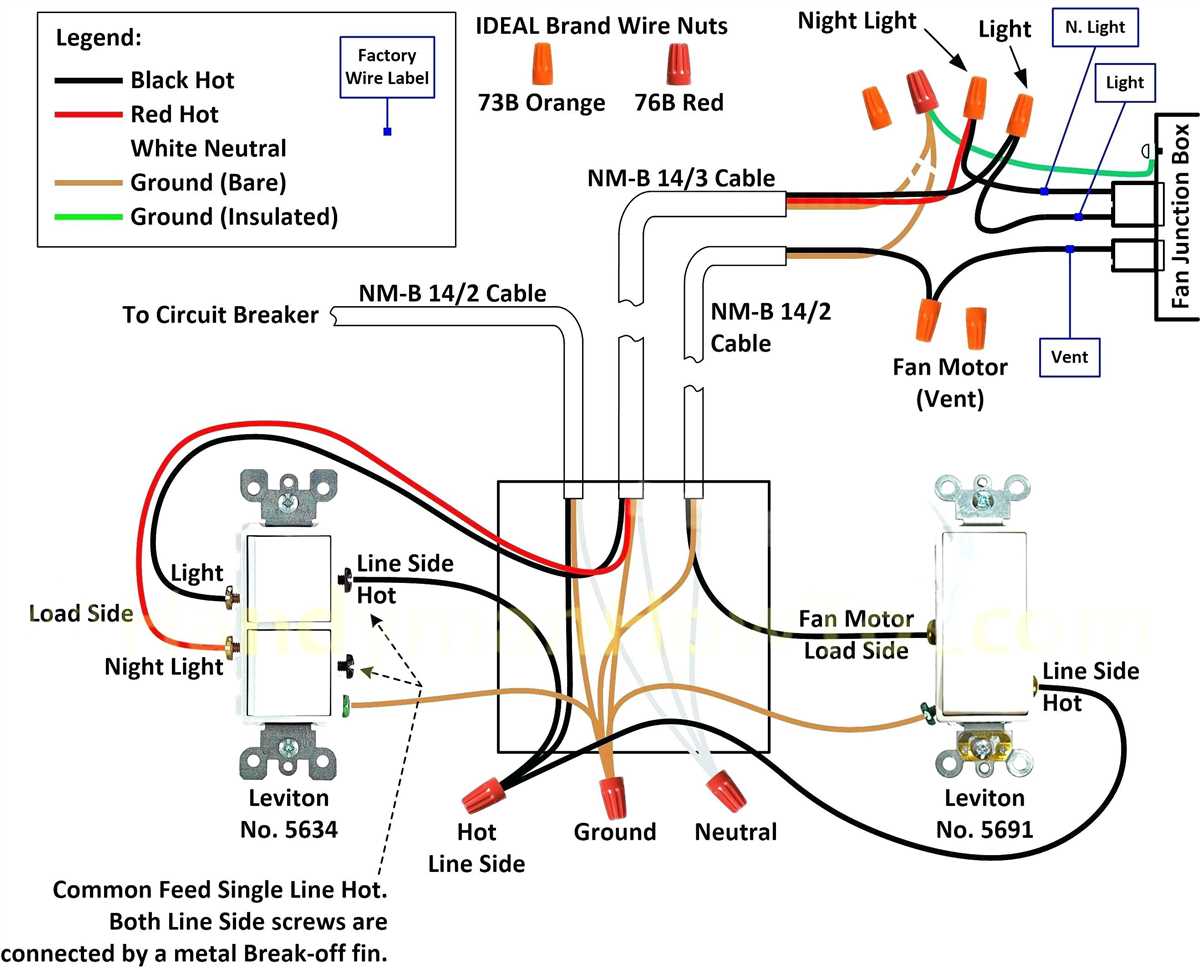
In the Leviton 14-50r wiring diagram, you will see four wires: a black wire, a red wire, a white wire, and a green wire. These wires correspond to specific functions and must be connected correctly for safe and efficient operation.
- The black wire is the hot wire and carries the current from the electrical panel to the receptacle.
- The red wire is also a hot wire and is used for 240-volt circuits.
- The white wire is the neutral wire and provides a return path for the current.
- The green wire is the ground wire and is used for grounding protection.
It is important to follow the Leviton 14-50r wiring diagram closely to ensure that the receptacle is installed correctly and meets all safety requirements. If you are unsure about any aspect of the installation, it is recommended to consult a licensed electrician.
What is a 14-50r Outlet?
A 14-50R outlet refers to a specific type of electrical outlet that is commonly used for high-powered appliances and devices. The “14” in the designation refers to the gauge of the wire used in the outlet, while the “50” indicates that it is capable of handling up to 50 amps of current. The “R” stands for receptacle, meaning that it is a female outlet that is designed to receive and provide power to a plug.
This type of outlet is commonly used for electric ranges, large air conditioners, and electric car chargers. It provides a higher voltage and amperage compared to standard outlets, allowing for faster charging or greater power output.
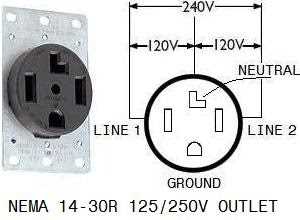
A 14-50R outlet typically has a three-prong configuration, with two vertical flat slots and a round ground hole. It is designed to be wired directly to a dedicated circuit breaker in an electrical panel, ensuring that it can handle the high-powered load without overloading the system.
When installing or wiring a 14-50R outlet, it is important to follow the proper electrical codes and consult a qualified electrician if you are unsure. Safety precautions should always be taken when working with electricity to avoid the risk of electrical shock or fire.
Exploring the Function and Purpose
In order to understand the function and purpose of the Leviton 14-50r wiring diagram, it is important to first have a basic understanding of what the 14-50r refers to. The 14-50r is a type of electrical receptacle, commonly used for electric ranges and clothes dryers. It is a four-prong, 50 amp receptacle that provides both heating and air conditioning capabilities.
The wiring diagram for the Leviton 14-50r provides a visual representation of the electrical connections required to properly install and operate the receptacle. It shows the various wires and connections, including the hot, neutral, and ground wires, as well as any additional connections required for specific applications.
Understanding the Wiring Diagram
The wiring diagram typically includes a diagram of the receptacle itself, with labeled terminals for each wire connection. It may also include additional information, such as wire colors or specific circuit requirements.
By following the wiring diagram, electricians and homeowners can ensure that the receptacle is properly connected and functioning. This helps to prevent electrical hazards and ensures that the appliance or equipment connected to the receptacle operates safely and efficiently.
- The wiring diagram also serves as a reference tool for troubleshooting and maintenance purposes. By referring to the diagram, individuals can easily identify and address any issues with the electrical connections.
- Additionally, the wiring diagram can be helpful for individuals who are installing or replacing the Leviton 14-50r receptacle themselves. It provides step-by-step instructions on how to properly connect the wires, ensuring a successful installation.
- Overall, the Leviton 14-50r wiring diagram serves as an essential resource for those working with this type of receptacle. It provides clarity and guidance, ensuring that the electrical connections are made correctly and that the receptacle operates safely.
Leviton 14-50r Wiring Diagram Components
The Leviton 14-50r wiring diagram consists of several components that are essential for the proper installation and functionality of the electrical outlet. These components include:
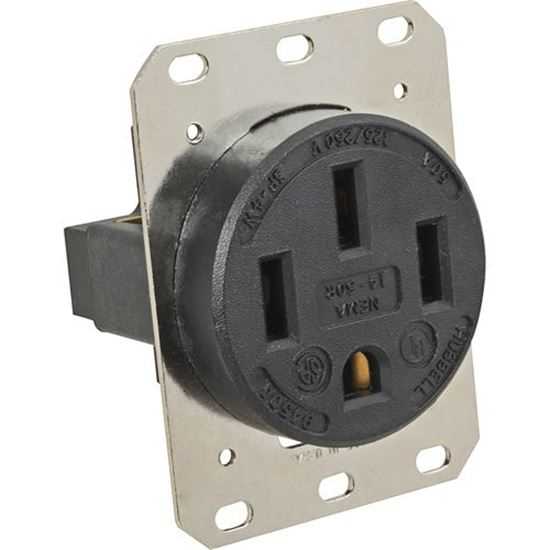
- Leviton 14-50r receptacle: This is the main component of the wiring diagram. It is a 50-amp, 125/250-volt, NEMA 14-50R receptacle that is designed to provide a reliable and durable power outlet for electric vehicles and other high-powered devices.
- Ground wire: The ground wire is an important safety feature that helps protect against electric shock. It is usually green and connects the grounding terminal of the Leviton 14-50r receptacle to the grounding system of the electrical circuit.
- Line wires: These are the wires that carry the electrical current from the power source to the Leviton 14-50r receptacle. In a typical wiring diagram, there are two line wires – a hot wire (usually black or red) and a neutral wire (usually white).
- Breaker panel: The breaker panel is where the circuit breakers are located. It is responsible for controlling the flow of electricity to different parts of the electrical system. In the wiring diagram, the line wires are connected to the appropriate circuit breaker in the panel.
- Conduit: Conduit is a protective tube that is used to house and protect the electrical wires. It helps prevent damage to the wires and also provides a neat and organized appearance. In the wiring diagram, the line wires may be routed through conduit for added protection.
By properly connecting and configuring these components according to the Leviton 14-50r wiring diagram, you can ensure a safe and reliable power supply for your electric vehicle or other high-powered devices. It is important to follow the wiring diagram carefully and to consult a qualified electrician if you have any questions or concerns.
A Breakdown of the Wiring Diagram
The Leviton 14-50r wiring diagram provides a clear visual representation of the electrical connections and components needed to properly install a 14-50r receptacle. This diagram is essential for anyone who wants to understand the wiring process and ensure a safe and efficient installation.
The diagram begins with a depiction of the incoming power supply, typically a 240-volt, 50-amp circuit. This is represented by two hot wires, a neutral wire, and a ground wire. Each wire is color-coded for easy identification, with red and black for the hot wires, white for the neutral wire, and green for the ground wire.
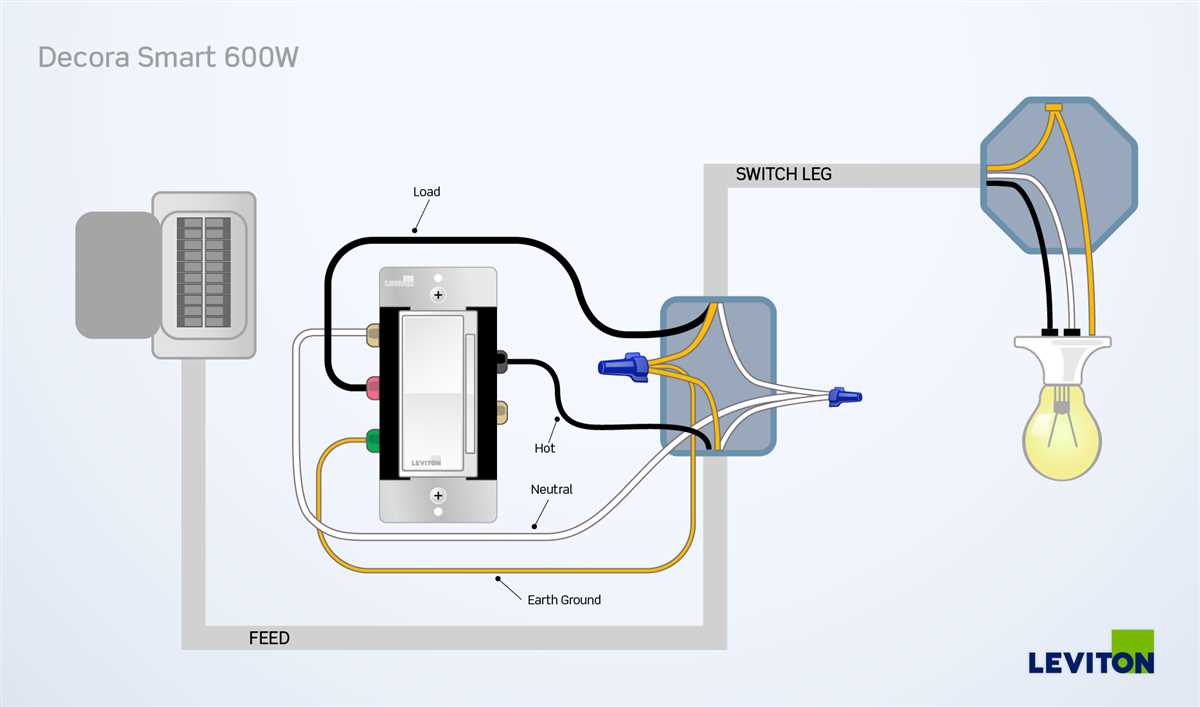
Next, the diagram shows the connections to the 14-50r receptacle itself. The hot wires are connected to the two brass terminal screws on the receptacle, while the neutral wire is connected to the silver terminal screw. The ground wire is connected to the green grounding screw on the receptacle.
It is important to follow the specific wiring instructions provided in the diagram, as incorrect connections can lead to electrical hazards and equipment malfunction. The diagram may also include additional information, such as recommended wire sizes and installation tips.
By carefully studying and understanding the Leviton 14-50r wiring diagram, individuals can confidently install the receptacle and ensure a safe and reliable electrical connection for their specific needs.
Step-by-Step Guide to Wiring a Leviton 14-50r Outlet
Wiring a Leviton 14-50r outlet is a straightforward process that requires proper planning and attention to detail. This step-by-step guide will help you navigate through the process and ensure a safe and functional installation.
Before you begin, gather all the necessary tools and materials. You will need a flat-head screwdriver, a wire stripper, wire nuts, electrical tape, and a Leviton 14-50r outlet.
Step 1: Turn off the Power
Start by turning off the power to the circuit you will be working on. Locate the correct breaker in your electrical panel and flip it to the “off” position. Test the circuit with a voltage tester to ensure that the power is indeed off.
Step 2: Remove the Old Outlet
Using a flat-head screwdriver, remove the cover plate and unscrew the mounting screws that hold the old outlet in place. Carefully pull the outlet out of the electrical box, making sure not to touch any live wires.
Step 3: Prepare the Wires
Strip the outer sheathing of the incoming wires using a wire stripper, exposing about half an inch of insulation. Separate the black, white, and green (or bare copper) wires. If there is a red wire, leave it untouched as it is most likely a traveler wire.
Step 4: Connect the Wires
Using wire nuts, connect the black wire (hot) to the brass screw on the Leviton 14-50r outlet. Connect the white wire (neutral) to the silver screw. Connect the green or bare copper wire (ground) to the green screw. Make sure the connections are secure by gently tugging on each wire.
Step 5: Secure the Outlet
Carefully push the wires back into the electrical box, ensuring that none of the wires are pinched or touching other terminals. Screw the Leviton 14-50r outlet onto the electrical box using the mounting screws. Replace the cover plate.
Step 6: Test the Outlet
Turn the power back on at the electrical panel and test the Leviton 14-50r outlet using a voltage tester. Insert a plug into the outlet and verify that it is receiving power. Double-check all connections and tighten any loose screws.
By following these steps, you can successfully wire a Leviton 14-50r outlet. Always prioritize safety and consult a licensed electrician if you have any doubts or questions.
How to Safely Install and Connect the Leviton 14-50r Outlet
When it comes to installing and connecting the Leviton 14-50r outlet, it’s important to follow proper procedures to ensure safety and functionality. Here is a step-by-step guide to help you through the process:
Gather the necessary materials:
- Leviton 14-50r outlet
- Electrical wires (according to local codes and regulations)
- Wire connectors
- Wire strippers
- Screwdriver
- Electrical tape
- Electrical tester
Prepare the electrical circuit:
- Turn off the power to the circuit you will be working on.
- Check the voltage with an electrical tester to ensure there is no power running through the wires.
- Remove the existing outlet or blank plate from the electrical box.
- Connect the new outlet to the appropriate size electrical wire, following local codes and regulations.
- Strip the ends of the wires to expose the bare copper.
- Using wire connectors, connect the black wire from the circuit to the brass screw terminal on the outlet.
- Connect the white wire from the circuit to the silver screw terminal on the outlet.
- Connect the bare copper or green wire from the circuit to the green screw terminal on the outlet (for grounding).
- Securely tighten all the terminal screws to ensure a solid connection.
- Wrap electrical tape around the wire connectors for added insulation.
Final steps:
- Carefully push the outlet back into the electrical box, ensuring all wires are neatly tucked inside.
- Secure the outlet to the electrical box using the provided screws.
- Restore power to the circuit.
- Test the outlet with an electrical tester to make sure it is properly functioning.
By following these steps and adhering to local electrical codes and regulations, you can safely install and connect the Leviton 14-50r outlet. It is always recommended to consult a professional electrician if you are unsure or uncomfortable with any part of the installation process.
Common Issues and Troubleshooting
In spite of being a reliable solution for electric vehicle charging, the Leviton 14-50r outlet may encounter some common issues. Here are a few problems you may experience and troubleshooting steps to help resolve them.
1. Outlet not providing power
If your Leviton 14-50r outlet is not supplying power to your electric vehicle charger, there are a few steps you can take to troubleshoot the issue:
- Check the circuit breaker to ensure it has not tripped or is turned off.
- Inspect the wiring connections at the outlet for any loose or faulty connections.
- Test the outlet with a multimeter to determine if there is any voltage present.
- If none of these steps resolve the issue, it may be necessary to consult a professional electrician.
2. Charging cable not fitting securely
If the charging cable does not fit securely into the Leviton 14-50r outlet, follow these troubleshooting steps:
- Check for any debris or obstructions in the outlet that may be preventing the cable from connecting properly.
- Ensure that the charging cable is the correct type for the outlet and vehicle.
- If the issue persists, contact the manufacturer of the outlet or the electric vehicle for further assistance.
3. Overheating or burning smell
If you notice an overheating or burning smell coming from the Leviton 14-50r outlet, take the following steps to resolve the issue:
- Immediately disconnect any devices from the outlet.
- Check the wiring connections at the outlet for any loose or damaged wires.
- If any wires are loose or damaged, turn off the circuit breaker and consult a professional electrician for repair.
- If the outlet appears to be in good condition, but the issue persists, it may be necessary to replace the outlet.
Remember, working with electricity can be dangerous. If you are unsure or uncomfortable addressing any of these issues, it is always best to consult a qualified electrician to ensure that the problem is resolved safely and effectively.
In conclusion, the Leviton 14-50r outlet is a versatile and reliable solution for electric vehicle charging. By understanding the wiring diagram and following the correct installation procedures, you can ensure a successful and efficient charging setup. In the event of any common issues, troubleshooting steps can be taken to address and resolve the problem. Remember to always prioritize safety and consult a professional if needed.