
If you are a fan of classic rock and have ever wondered about the iconic guitar tones of bands like Led Zeppelin, Deep Purple, or AC/DC, chances are you have heard of the legendary Marshall Super Lead 100 amplifier. Renowned for its rich, crunchy sound and powerful output, this amplifier has become a staple in the world of rock and roll.
The Marshall Super Lead 100, also known as the 1959 Super Lead, was first introduced in the late 1960s and quickly gained popularity among guitarists. Its unique circuit design, known as the “Plexi” circuit, is responsible for its distinct and highly sought-after sound.
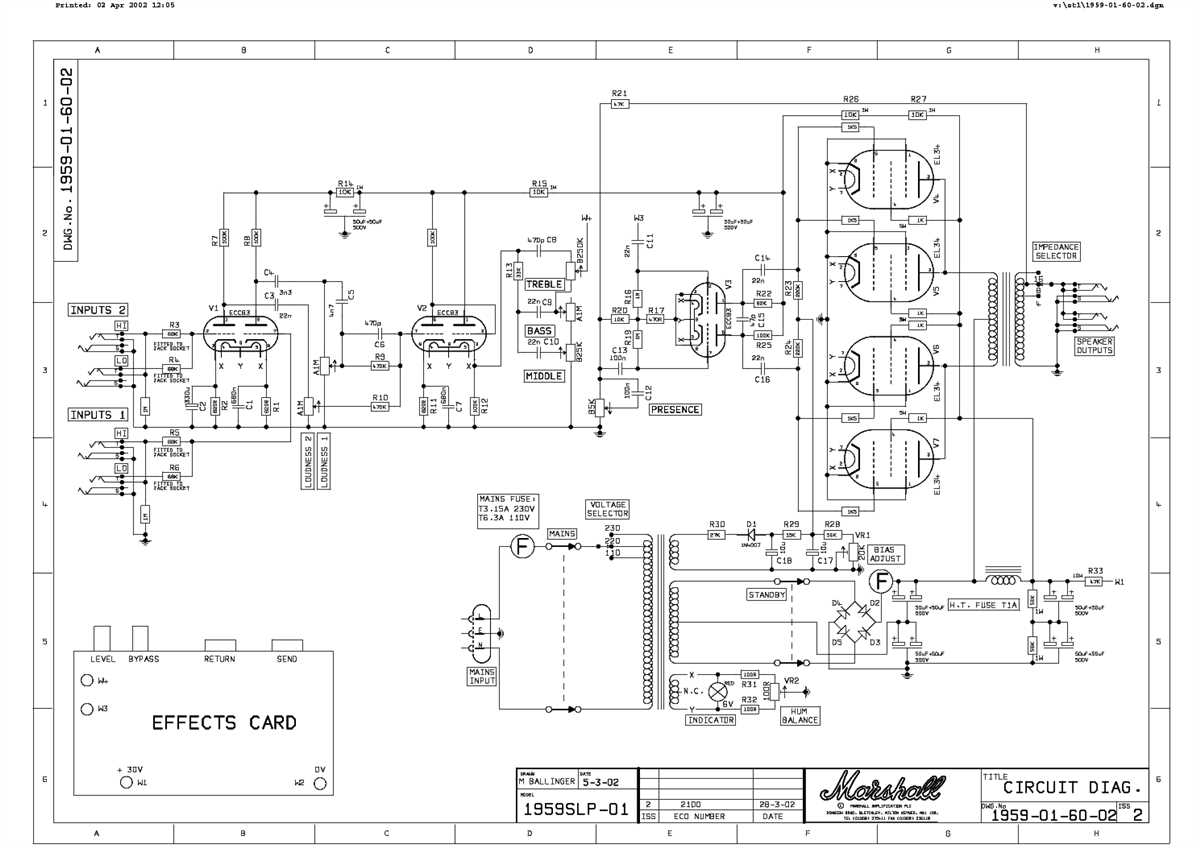
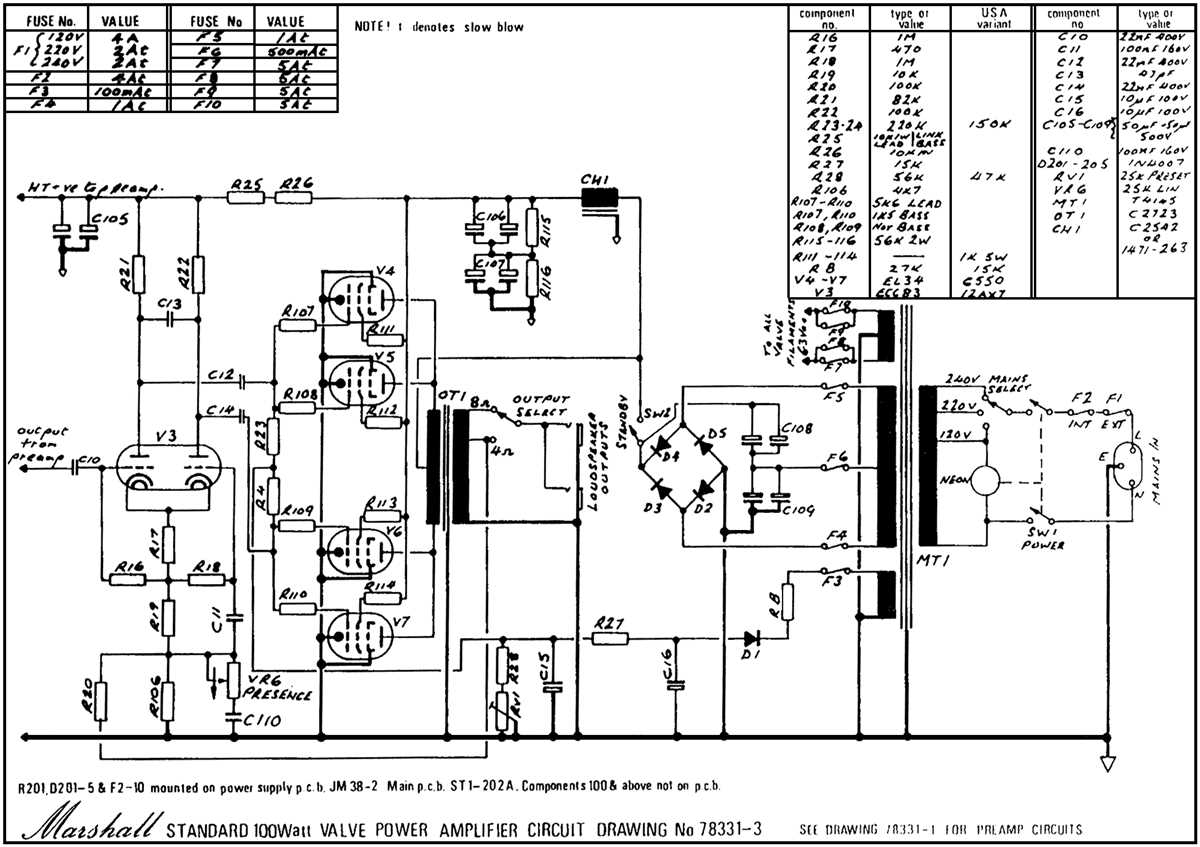
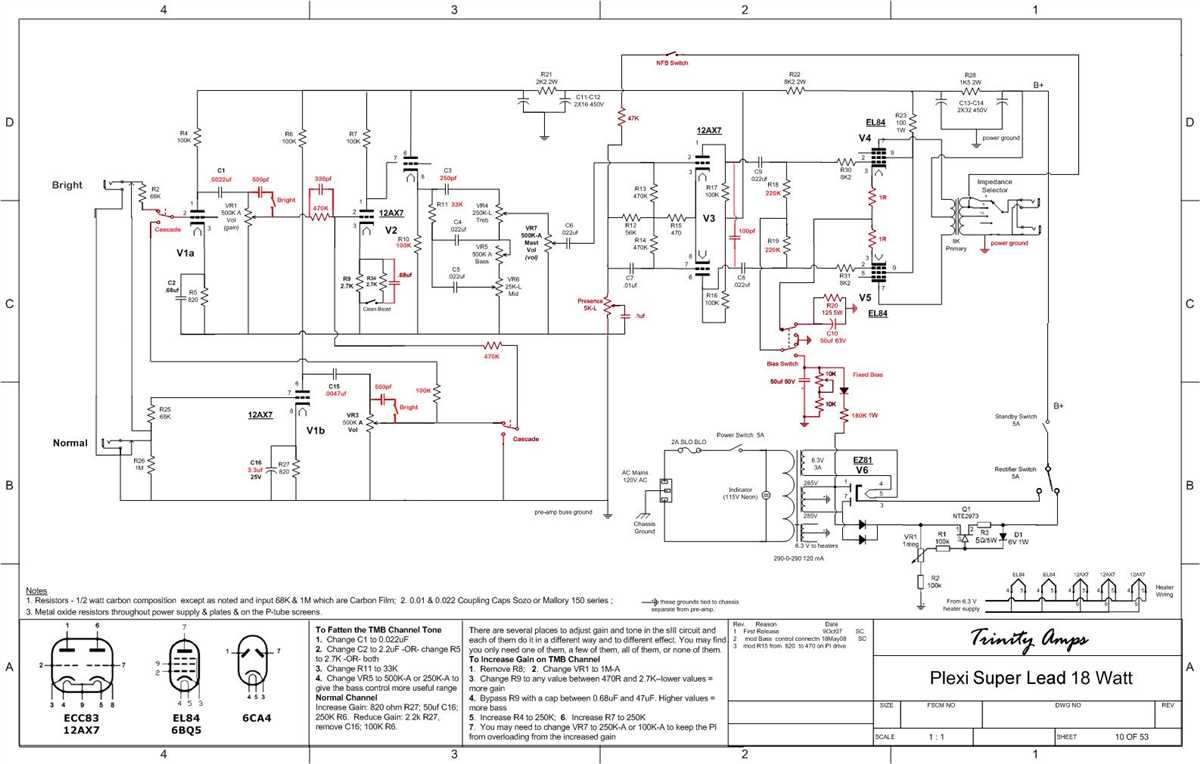
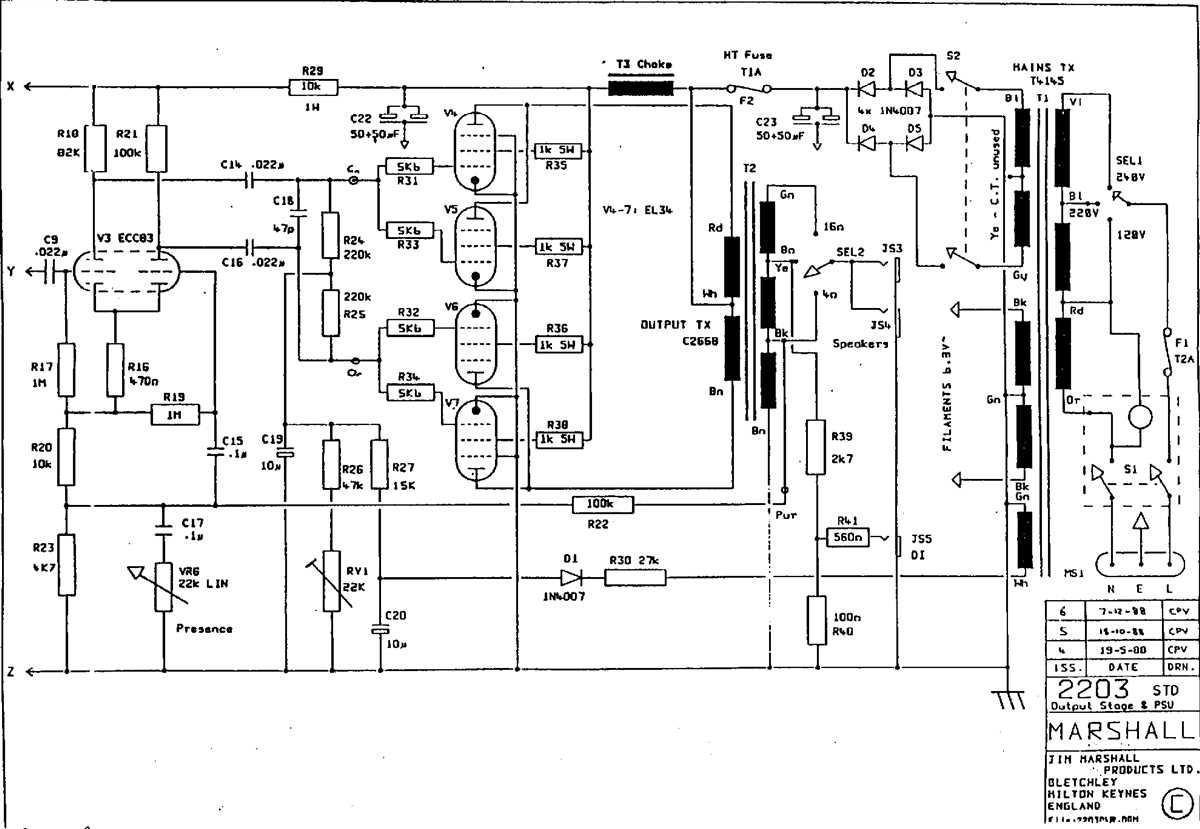
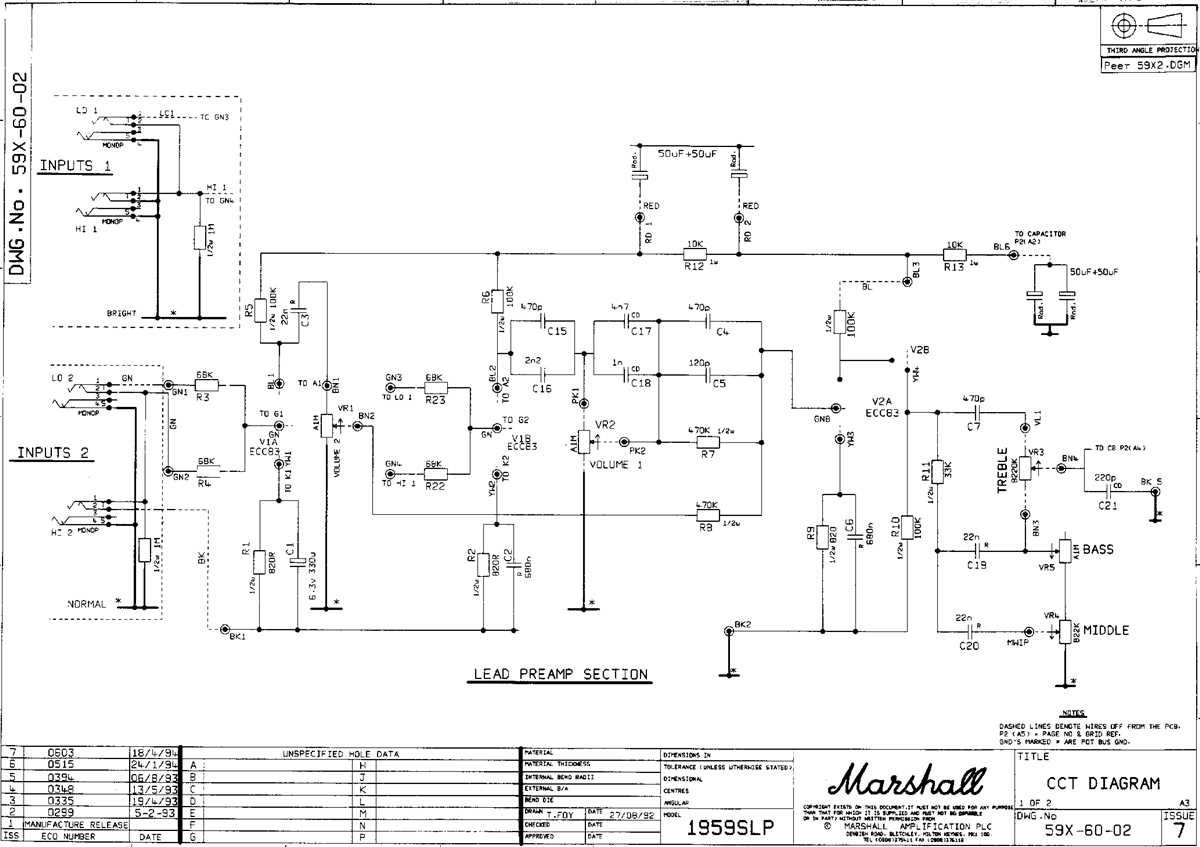
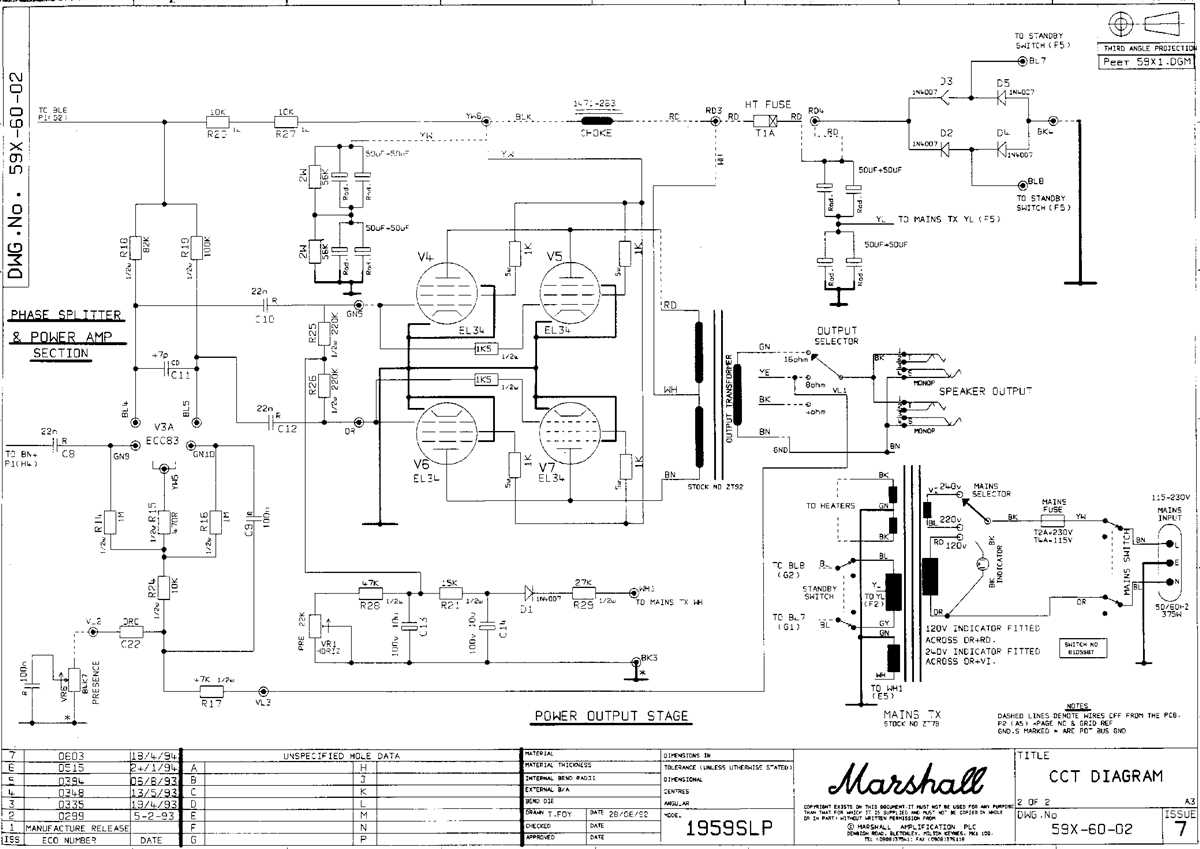
The schematic for the Marshall Super Lead 100 is a blueprint of its internal circuitry. It shows the different components and their connections, allowing technicians and amp enthusiasts to understand how the amplifier functions and make modifications if desired. The schematic typically includes information about the power supply, preamp, tone controls, and output stage.
Studying the Marshall Super Lead 100 schematic can be a fascinating endeavor for those interested in the inner workings of tube amplifiers. It provides insights into the amplifier’s design choices and reveals the reasons behind its unique tone and character. Whether you are a guitar player, a gear enthusiast, or a budding amp technician, exploring the Super Lead 100 schematic can be a rewarding and educational experience.
Marshall Super Lead 100 Schematic: A Comprehensive Guide
The Marshall Super Lead 100 is an iconic guitar amplifier that has been a staple in rock music for decades. Its distinct tone and powerful sound have made it a go-to choice for many guitarists. Understanding the schematic of the Super Lead 100 can help guitarists and technicians better grasp its inner workings and make necessary modifications or repairs.
The Super Lead 100 schematic provides a detailed diagram of the amplifier’s circuitry, including the preamp, power amp, and various control options. It shows the connections between the different components, such as resistors, capacitors, and tubes. The schematic also indicates the voltage and current flow throughout the circuit, helping to troubleshoot any issues that may arise.
Key Components

One of the key components in the Super Lead 100 is the ECC83 (12AX7) dual triode tube, which is used in the preamp stage. This tube is responsible for amplifying the guitar signal and shaping its tone. The schematic shows how the ECC83 tubes are wired and connected to the other parts of the preamp circuit to create the desired sound.
Another important component in the power amp section is the EL34 output tube. The Super Lead 100 uses four EL34 tubes in a push-pull configuration to deliver its signature high-gain distortion and powerful tone. The schematic illustrates the connection of these output tubes to the output transformer and the speaker, as well as the biasing circuitry.
Tone Control and Effects Loop
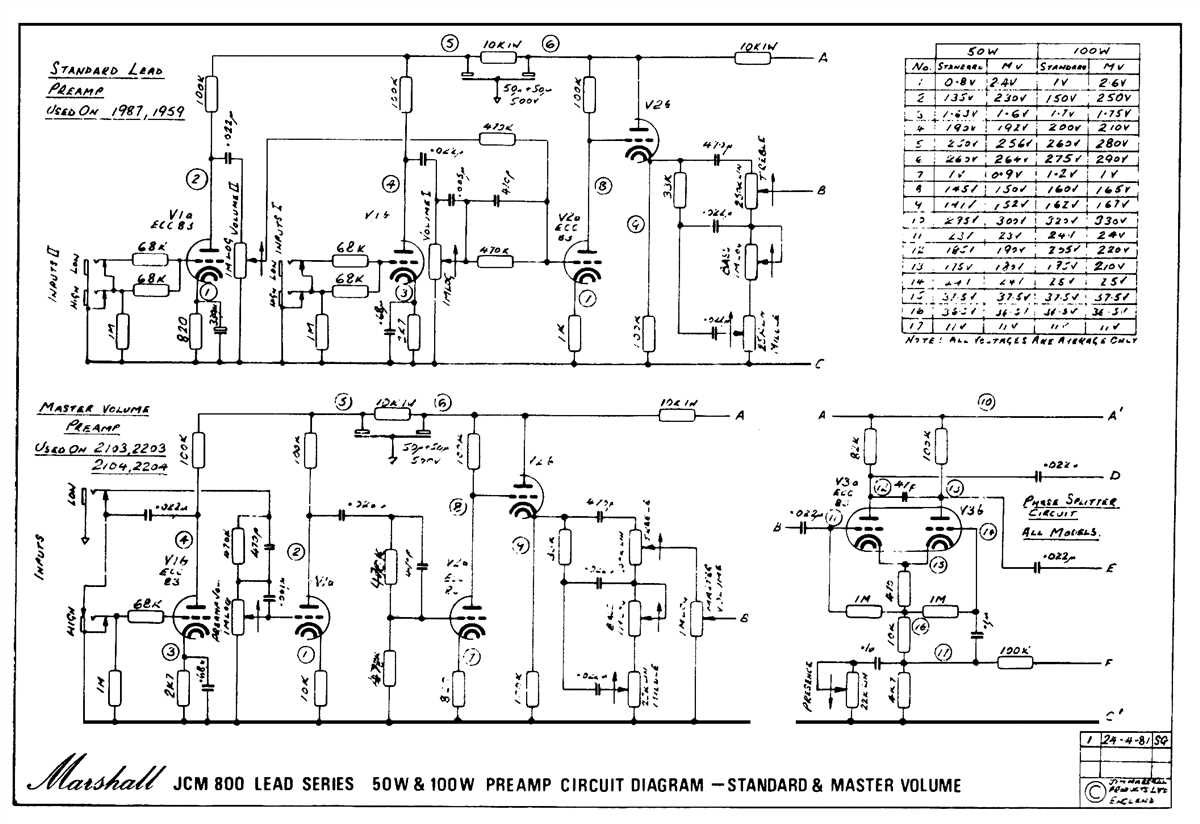
The Super Lead 100 schematic also includes the tone control section, which allows guitarists to shape the sound according to their preferences. This section consists of potentiometers and capacitors that control the bass, middle, and treble frequencies. The schematic shows how these components are connected to the preamp and power amp sections, allowing for precise tonal adjustments.
Additionally, the Super Lead 100 schematic may include an effects loop, which allows guitarists to connect external effects pedals or processors. The effects loop typically consists of send and return jacks, as well as a level control. The schematic reveals the location of these jacks and their connection to the preamp and power amp sections.
Modifications and Customizations
Understanding the Super Lead 100 schematic can be helpful for guitarists looking to modify or customize their amplifier. By studying the schematic, guitarists can identify different components and their values, allowing them to make informed changes to the circuitry. Whether it’s swapping out capacitors or adjusting resistor values, the schematic is a valuable resource for experimenting with different tonal possibilities.
In conclusion, the Marshall Super Lead 100 schematic is a comprehensive guide to understanding the inner workings of this iconic amplifier. It provides valuable information about the circuitry, key components, tone control options, and possible modifications. Whether you’re a guitarist or a technician, studying the schematic can help you gain a deeper appreciation for the Super Lead 100 and its legendary sound.
History of the Marshall Super Lead 100
The Marshall Super Lead 100, also known as the “Plexi,” is an iconic guitar amplifier that has played a significant role in the history of rock music. Developed by Jim Marshall in the 1960s, the Super Lead 100 became a staple for professional guitarists seeking a powerful and versatile sound.
The Super Lead 100 is a tube amplifier that was first introduced in 1965. Its design was influenced by the popular Fender Bassman, but Marshall added his own unique modifications to create a distinct sound. The amp featured four ECC83 preamp tubes and four EL34 power amp tubes, providing a rich and full-bodied tone.
One of the most notable features of the Super Lead 100 is its simple and straightforward control layout. It has separate controls for volume, treble, middle, and bass, allowing guitarists to easily dial in their desired tone. The amp also includes a presence control, which affects the overall brightness of the sound.
The Super Lead 100 quickly gained popularity among guitarists, especially in the emerging genre of rock music. Its high-gain capabilities and ability to produce a powerful, crunchy distortion made it the go-to choice for many iconic guitarists, including Jimi Hendrix, Eric Clapton, and Jimmy Page.
Over the years, the Super Lead 100 has undergone some modifications and updates, but its core design and tone have remained largely unchanged. It continues to be a highly sought-after amplifier among guitarists who crave the classic Marshall sound.
| Power Output | 100 watts |
|---|---|
| Tubes | 4 x ECC83, 4 x EL34 |
| Controls | Volume, Treble, Middle, Bass, Presence |
| Weight | Approximately 36kg |
In conclusion, the Marshall Super Lead 100 is a legendary guitar amplifier that has left a lasting impact on the world of rock music. Its powerful sound, simple controls, and association with iconic guitarists have solidified its place in amplifier history.
Understanding the Schematic Diagram
The schematic diagram is a crucial tool for understanding the inner workings of electronic circuits. It provides a visual representation of the connections between different components and their functions within the circuit. By studying the schematic diagram, engineers and technicians can gain insight into how the circuit operates and troubleshoot any issues that may arise.
Components: The schematic diagram includes various symbols to represent different components such as resistors, capacitors, transistors, and integrated circuits. Each component symbol is labeled with its corresponding value and polarity. Understanding these symbols is key to deciphering the circuit’s design.
Connections: The lines and arrows in the schematic diagram represent the electrical connections between the components. These lines indicate the flow of current through the circuit and show how the components are interconnected. By following the connections, one can trace the signal path and identify any potential issues or bottlenecks.
Power Supply: The power supply section of the schematic diagram shows how the circuit is powered and regulated. It includes symbols for transformers, rectifiers, voltage regulators, and capacitors. Understanding the power supply section is essential for ensuring proper voltage levels and stable operation of the circuit.
Signal Flow: The schematic diagram also depicts the signal flow through the circuit. It shows how the input signals are processed, amplified, and transformed into the desired output signals. By analyzing the signal flow, engineers can optimize the circuit’s performance and improve its functionality.
Grounding: The schematic diagram highlights the grounding points, which are essential for providing a reference voltage and ensuring proper signal integrity. Grounding points are typically represented by a horizontal line with arrows pointing downward. Understanding the grounding scheme is vital for reducing noise and interference in the circuit.
Function Blocks: In complex circuits, the schematic diagram often includes function blocks to simplify the representation. These blocks group together related components and show their interconnections. By analyzing these function blocks, technicians can focus on specific sections of the circuit and troubleshoot them individually.
Conclusion: The schematic diagram is an invaluable tool for understanding the inner workings of electronic circuits. It provides a visual representation of the components, connections, power supply, signal flow, grounding, and function blocks within the circuit. By studying the schematic diagram, engineers and technicians can gain a comprehensive understanding of the circuit and effectively diagnose and troubleshoot any issues that may arise.
Key Components in the Super Lead 100
The Marshall Super Lead 100 amplifier is known for its iconic sound and powerful performance. It has been a staple in the music industry for decades, thanks to its high-quality components that contribute to its distinct tone and versatility.
One of the key components in the Super Lead 100 is the power transformer. This transformer plays a crucial role in converting the incoming AC voltage into the required voltages for different stages of the amplifier. It provides the necessary power for the tubes and other components, ensuring reliable and consistent performance.
Another important component is the preamp section, which consists of various tubes and circuitry. The preamp tubes, such as the ECC83 or 12AX7, are responsible for amplifying the guitar signal and shaping its tone. They add warmth, gain, and dynamics to the sound, allowing for different levels of distortion and overdrive.
The power tubes are also critical in the Super Lead 100. These tubes, typically EL34 or 6550, handle the amplified signal from the preamp section and deliver it to the speakers. They contribute to the amplifier’s overall power, volume, and headroom. The choice of power tubes can greatly affect the amp’s tone, with EL34 tubes known for their British rock sound and 6550 tubes providing a tighter, more modern tone.
Other key components include the output transformer, which matches the impedance between the power tubes and the speakers, and the tone stack, which controls the amplifier’s EQ settings. The tone stack consists of various capacitors, resistors, and potentiometers that allow for adjustments in bass, midrange, and treble frequencies, giving the player more control over their sound.
In summary, the Super Lead 100’s key components, such as the power transformer, preamp tubes, power tubes, output transformer, and tone stack, all work together to create its legendary tone. Each component plays a crucial role in shaping the sound and performance of the amplifier, making it a favorite among guitarists in various genres.
Troubleshooting Common Issues
When using a Marshall Super Lead 100 amplifier, it’s not uncommon to encounter certain issues. However, with proper troubleshooting, most problems can be resolved quickly and easily.
One common issue is a loss of sound or a weak signal. This can be caused by various factors, such as a faulty input jack or a problem with the preamp tubes. To troubleshoot this issue, start by checking the connections and cables. Make sure all cables are securely plugged in and that the input jack is not loose or damaged. If the connections are fine, the next step is to examine the preamp tubes. Check if any of the tubes are burnt out or damaged, and replace them if necessary.
Another common issue is unwanted noise, such as buzzing or humming. This can be caused by ground loop problems or interference from external sources. To troubleshoot this issue, try plugging the amplifier into a different power outlet to eliminate any potential grounding issues. If the noise persists, try using shielded cables or relocating the amplifier away from other electronic devices or power sources that could be causing interference.
If the amplifier is not turning on or experiencing a complete power failure, there may be an issue with the power supply or the fuse. Check the power supply cable and ensure it is securely connected. If the cable is fine, check the fuse and replace it if necessary. If none of these steps resolve the issue, it may be best to consult a professional technician for further assistance.
In summary, troubleshooting common issues with a Marshall Super Lead 100 amplifier involves checking the connections, examining the tubes, addressing unwanted noise, and ensuring the power supply is functioning properly. By following these steps, many issues can be resolved, allowing you to enjoy your amplifier to its fullest potential.
Modifying the Super Lead 100 Schematic
The Super Lead 100 schematic is a popular choice for guitar amplifiers enthusiasts looking to modify and customize their sound. This iconic amplifier has been used by countless musicians and has a distinctive tone that many players want to enhance or tailor to their specific preferences.
There are several modifications that can be made to the Super Lead 100 schematic to achieve different tonal characteristics and improve the overall performance of the amplifier.
One common modification is adjusting the preamp gain stages. By changing the values of the resistors and capacitors in the preamp circuit, it is possible to alter the gain and frequency response of the amplifier. This can result in a brighter or darker tone, increased or decreased distortion, and improved clarity in the midrange.
Another popular modification is adding an effects loop to the amplifier. An effects loop allows you to connect external effects pedals, such as reverb or delay, directly into the amplifier’s circuitry. This can provide greater flexibility and control over your sound, allowing you to easily switch between clean and distorted tones, or integrate modulation effects into your playing.
Additionally, changing the power amp section of the Super Lead 100 can also have a significant impact on the amplifier’s sound.
One option is to replace the stock output transformer with a higher quality one. This can result in improved overall tone, enhanced bass response, and increased power and headroom. Upgrading the tubes in the power amp section, such as the power tubes or rectifier tube, can also have a noticeable effect on the amplifier’s performance and tone. Different types of tubes can produce variations in warmth, compression, and dynamic response, allowing you to further shape your sound.
In conclusion, modifying the Super Lead 100 schematic can be a rewarding process for those looking to personalize and improve their guitar amplifier. Whether it’s adjusting the preamp gain stages, adding an effects loop, or upgrading the power amp section, these modifications can help you achieve the desired tonal characteristics and enhance your playing experience.
Tips for Using and Maintaining the Super Lead 100
The Marshall Super Lead 100 is a legendary amplifier that has been loved by guitarists for decades. To get the most out of your Super Lead 100 and ensure its longevity, here are some tips for using and maintaining this iconic piece of gear:
1. Use the Appropriate Power Source
Make sure to use the correct power source for your Super Lead 100. Using the wrong voltage or current can damage the amplifier and void any warranty. Always check the voltage specifications provided by Marshall and use a reliable power supply.
2. Keep the Amplifier Well-Ventilated
The Super Lead 100 produces a significant amount of heat during operation. It’s important to provide adequate ventilation to prevent overheating. Avoid placing the amplifier in enclosed spaces or covering it with cloth or other materials that can restrict airflow. This will help to prolong the life of the tubes and components inside.
3. Clean the Tubes Regularly
The tubes are a critical component of the Super Lead 100’s sound. Regularly cleaning the tubes can help maintain their performance and extend their lifespan. Consult the owner’s manual or a professional technician for the appropriate cleaning method and schedule.
4. Check and Replace Tubes as Needed
Tubes naturally wear out over time and can affect the overall performance of the amplifier. It’s important to periodically check the tubes and replace any that are no longer functioning properly. If you’re unsure about tube replacement, consult with an experienced technician.
5. Use a Surge Protector
Power surges can damage sensitive electronic components inside the amplifier. To protect your Super Lead 100 from power spikes, use a reliable surge protector. This will help to safeguard the amplifier from potential damage caused by electrical instability.
6. Avoid Extreme Temperatures
Extreme temperatures can negatively impact the performance and lifespan of the Super Lead 100. Avoid exposing the amplifier to extreme heat or cold, and store it in an environment with a stable temperature. Sudden temperature changes can cause condensation, which can be harmful to the internal components.
7. Regularly Clean the Exterior
Keep the exterior of the Super Lead 100 clean using a soft, dry cloth. Avoid using abrasive materials or cleaners that can damage the finish. Regular cleaning can help maintain the aesthetic appeal of the amplifier and prevent dust buildup.
By following these tips, you can ensure a long and successful partnership with your Marshall Super Lead 100. Proper care and maintenance will not only help the amplifier perform at its best but also preserve its value over time.