
When it comes to electrical wiring, one of the most important aspects is understanding the various connectors and their respective wiring diagrams. One such connector is the Nema L14-20P, which is commonly used in residential and commercial settings.
The Nema L14-20P is a 3-pole, 4-wire grounding device with a maximum voltage rating of 125/250V. It consists of two hot wires, a neutral wire, and a ground wire. Understanding how these wires are connected is crucial for ensuring proper electrical functionality and safety.
In this article, we will delve into the wiring diagram of the Nema L14-20P connector. We will explain the purpose of each wire and provide a step-by-step guide on how to properly wire this connector. Whether you’re an electrician or a DIY enthusiast, this information will equip you with the knowledge needed to tackle Nema L14-20P wiring projects with confidence.
Nema L14-20P Wiring Diagram: A Comprehensive Guide
When it comes to connecting electrical equipment, having a clear understanding of the wiring diagram is essential. In this guide, we will explore the Nema L14-20P wiring diagram which is commonly used for connecting electrical devices such as generators and transfer switches.
The Nema L14-20P is a 20-amp, 125/250-volt, 4-prong plug that provides a secure and reliable connection for high-powered electrical equipment. Understanding the wiring diagram will ensure that the plug is installed correctly and that the equipment operates safely and efficiently.
Step 1: Gather the necessary tools and materials:
- Nema L14-20P plug
- Wire strippers
- Wire cutters
- Screwdriver
Step 2: Prepare the wires:
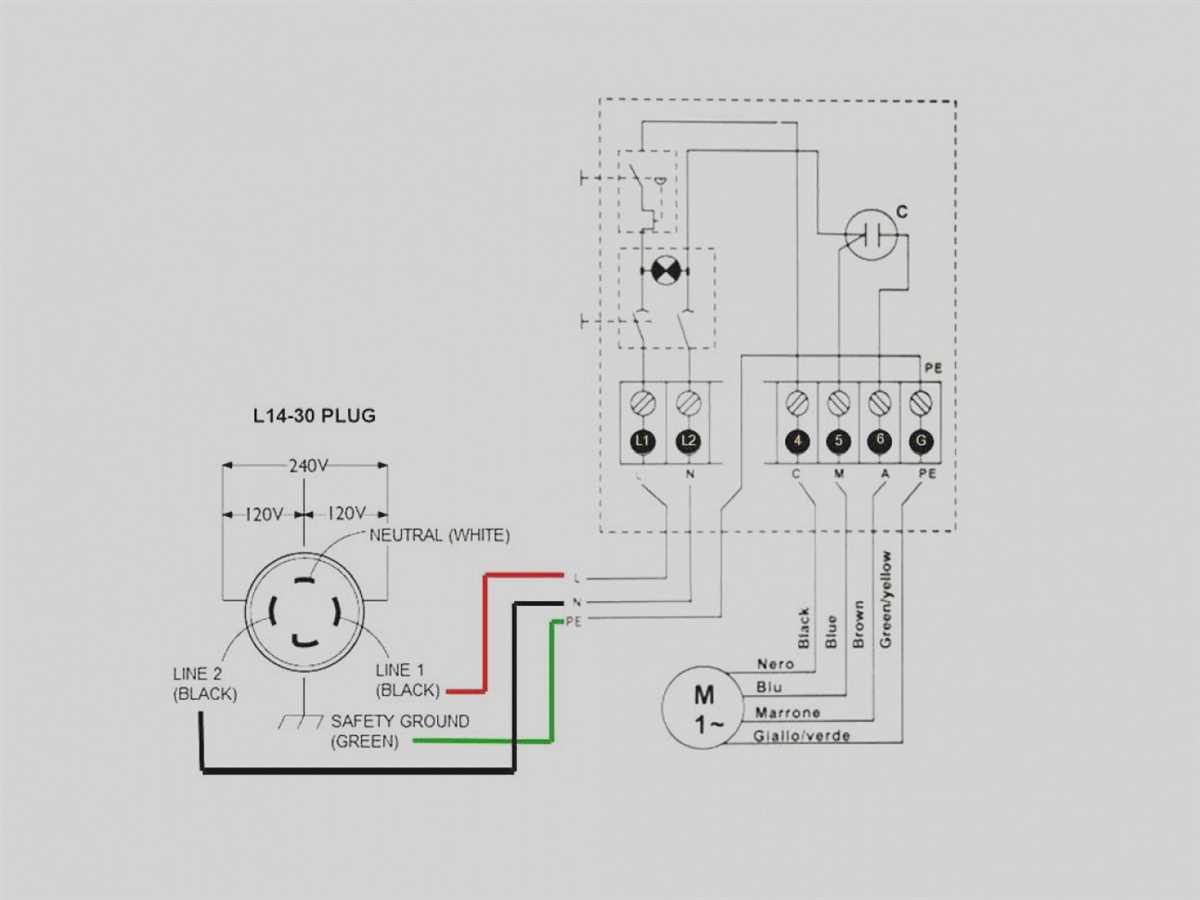
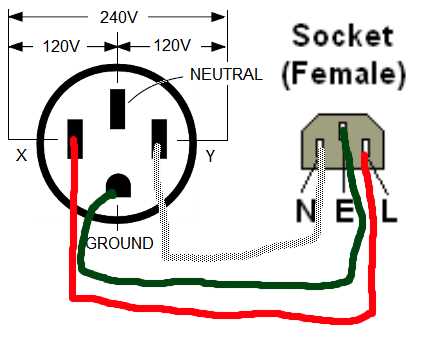
Using the wire strippers, strip the outer insulation of the electrical cord to expose the individual wires. The Nema L14-20P plug has four prongs, so you will need to identify the hot wires (usually black and red), the neutral wire (usually white or gray), and the ground wire (usually green or bare copper).
Step 3: Connect the wires to the plug:
Refer to the Nema L14-20P wiring diagram to determine which wire connects to each prong. The diagram will show the specific configuration for the four wires. Typically, the black and red hot wires will connect to the brass-colored prongs, the white or gray neutral wire will connect to the silver-colored prong, and the green or bare copper ground wire will connect to the green-colored prong.
Step 4: Secure the connections:
Using the screwdriver, tighten the terminal screws on the plug to securely fasten the wires in place. Ensure that each wire is tightly connected without any exposed strands.
Step 5: Double-check the connections:
Before plugging in the equipment, carefully inspect the wiring connections to make sure they are correct and secure. Double-check the Nema L14-20P wiring diagram to ensure everything is in the proper configuration.
Following these steps and referring to the Nema L14-20P wiring diagram will help you properly connect electrical equipment and ensure safe and efficient operation. It is always recommended to consult a professional electrician if you are unsure or uncomfortable working with electrical wiring.
What is Nema L14-20P and its Significance in Electrical Wiring?
In electrical wiring, the Nema L14-20P is a type of electrical receptacle that is commonly used for connecting portable generators or other power sources to electrical systems. This Nema configuration is specifically designed for 20 ampere, 125/250 volt applications.
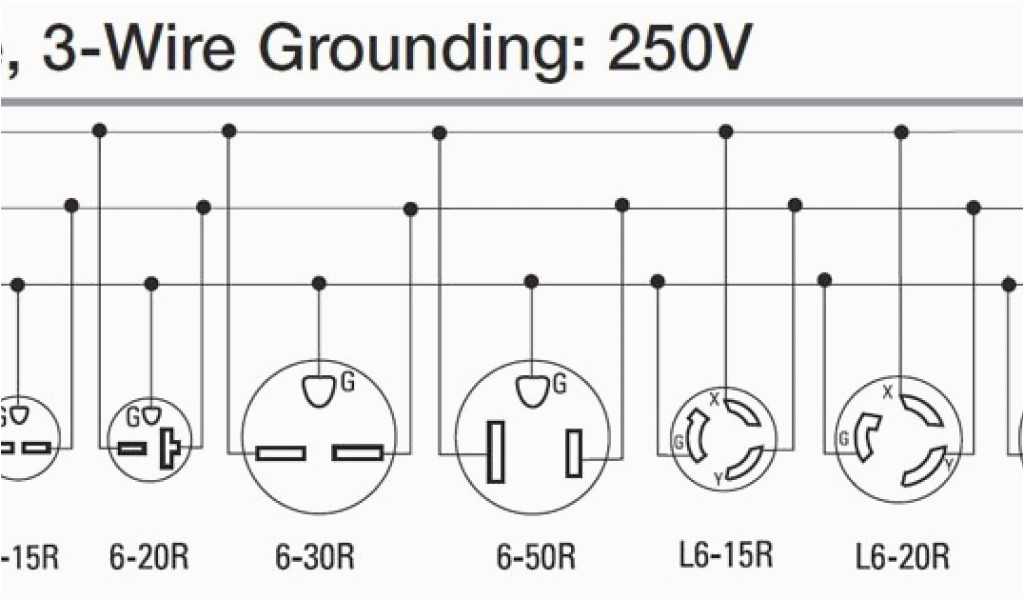
The Nema L14-20P receptacle consists of four prongs, with two straight prongs, one L-shaped prong, and one right-angle prong. The straight prongs are the hot wires, while the L-shaped prong is the neutral wire, and the right-angle prong is the ground wire. This configuration ensures proper grounding and prevents electrical shocks.
The significance of the Nema L14-20P in electrical wiring lies in its compatibility and safety features. By using this specific Nema configuration, it allows for the safe and efficient connection of portable generators to electrical systems, especially during power outages or in remote locations.
When installing the Nema L14-20P receptacle, it is crucial to adhere to the corresponding wiring diagram. This diagram illustrates the correct placement and connection of the wires to ensure proper functionality and safety. Following the wiring diagram accurately helps prevent electrical hazards and ensures the compatibility of the receptacle with the connected devices.
In conclusion, the Nema L14-20P receptacle plays a significant role in electrical wiring, particularly when connecting portable generators. Its specific configuration and wiring diagram ensure safe and efficient electrical connections, making it an essential component in electrical systems.
Understanding the Nema L14-20P Pinout for Correct Wiring
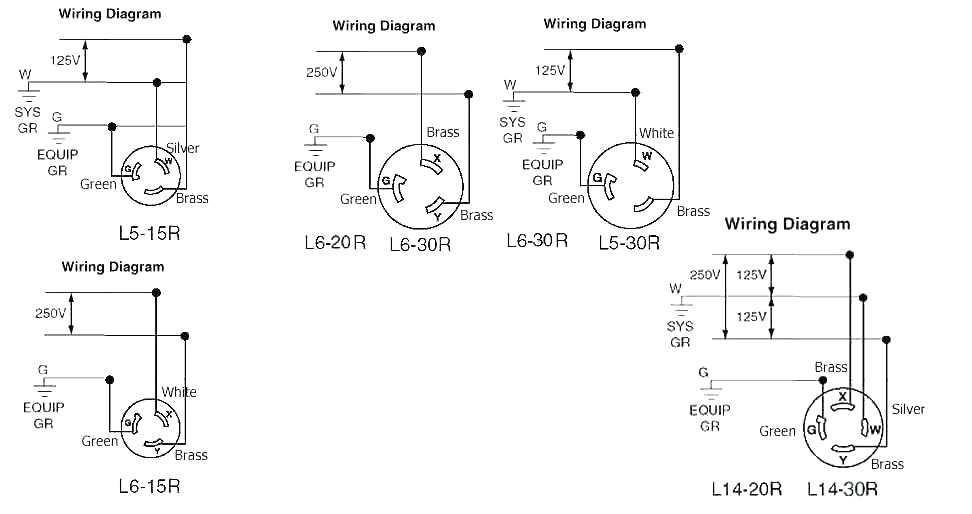
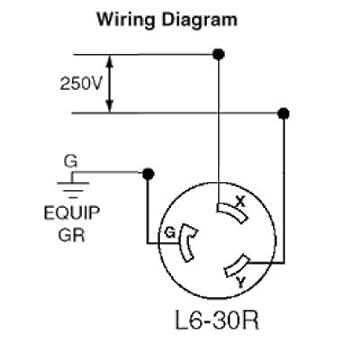
The Nema L14-20P is a specific type of electrical plug that is commonly used for power connections in industrial and commercial settings. It is a 4-prong twist-lock plug that provides a secure and reliable connection for devices requiring a 120/240-volt power supply. To ensure the correct and safe wiring of the Nema L14-20P plug, it is important to understand its pinout configuration.
The Nema L14-20P plug consists of four pins or terminals, each with its own designated function. These pins are labeled as X, Y, W, and G. The X, Y, and W terminals are the hot wires, while the G terminal is the ground wire. The L14-20P plug utilizes a 120/240-volt configuration, meaning that it has two 120-volt hot wires (X and Y) and one 240-volt hot wire (W). The ground wire (G) provides a safe path for electrical current in case of a fault or short circuit.
When wiring the Nema L14-20P plug, it is crucial to connect each wire to the correct terminal to ensure the proper functioning of the connected device and to prevent electrical hazards. The X and Y terminals should be connected to the 120-volt hot wires, while the W terminal should be connected to the 240-volt hot wire. The G terminal should be connected to the ground wire.
It is important to note that the Nema L14-20P plug should only be used with devices that are compatible with its voltage rating and pinout configuration. Using the plug with incompatible devices can lead to electrical failures, damage to equipment, and even electrical shocks. Always consult the manufacturer’s instructions and guidelines when wiring and using the Nema L14-20P plug to ensure safe and correct installation.
Step-by-Step Guide to Wiring a Nema L14-20P Receptacle
Wiring a Nema L14-20P receptacle is a straightforward process that requires a basic understanding of electrical wiring. This receptacle is commonly used in commercial and industrial settings to provide a power source for heavy-duty equipment and machinery. By following a few simple steps, you can safely and effectively wire a Nema L14-20P receptacle in your desired location.
To begin, gather all the necessary tools and materials for the wiring process. This includes a Nema L14-20P receptacle, electrical wiring, wire connectors, a screwdriver, wire strippers, and a voltage tester. It is essential to ensure that all equipment is in good condition and suitable for the job.
1. Start by turning off the power at the circuit breaker that supplies electricity to the area where you will be installing the receptacle. Use a voltage tester to confirm that the power is off before proceeding.
2. Once you have confirmed that the power is off, remove the cover plate from the existing electrical box that you will be connecting the receptacle to.
3. Carefully remove the wires from the existing outlet, making note of which wires are hot (black or red), neutral (white), and ground (green or bare copper).
4. Use wire strippers to remove about 1/2 inch of insulation from the ends of the wires. This will expose the bare copper conductors.
5. Connect the hot wire (black or red) to the brass-colored terminal on the Nema L14-20P receptacle. Tighten the terminal screw securely to ensure a solid connection.
6. Connect the neutral wire (white) to the silver-colored terminal on the receptacle and tighten the screw securely.
7. Connect the ground wire (green or bare copper) to the green screw on the receptacle. Again, tighten the screw securely to establish a good connection.
8. Carefully tuck the wires back into the electrical box, making sure there are no exposed or loose wires. Secure the receptacle to the box using the provided screws.
9. Once the receptacle is securely installed, replace the cover plate and ensure that all connections are properly enclosed.
10. Finally, turn the power back on at the circuit breaker and use a voltage tester to confirm that the receptacle is receiving electrical power.
Following these steps will allow you to safely and effectively wire a Nema L14-20P receptacle. It is essential to always adhere to electrical safety guidelines and consult a professional if you are unsure about any aspect of the wiring process.
Common Mistakes to Avoid When Wiring a Nema L14-20P
When it comes to wiring a Nema L14-20P, there are several common mistakes that people often make. These mistakes can lead to electrical problems, safety hazards, or even damage to the equipment. It is important to be aware of these mistakes and take the necessary precautions to avoid them.
1. Incorrect wiring connections: One of the most common mistakes is making incorrect wiring connections. It is crucial to follow the wiring diagram provided for the Nema L14-20P and ensure that the wires are connected properly. Improper wiring can result in short circuits, overheating, or electrical shock.
2. Wrong wire size: Another mistake to avoid is using the wrong wire size for the Nema L14-20P. The wire size should be appropriate for the current rating and length of the circuit. Using an undersized wire can cause overheating and risk of fire, while an oversized wire can be wasteful and inefficient.
3. Lack of proper grounding: Proper grounding is essential for electrical safety. It is important to ensure that the Nema L14-20P is properly grounded according to the wiring diagram. Neglecting proper grounding can lead to electrical shock hazards and equipment damage.
4. Overloading the circuit: Overloading the circuit is another common mistake that can lead to electrical problems. The Nema L14-20P has a specific current rating, and exceeding this rating can result in overheating and potential damage to the equipment. It is important to calculate the total current demand of the connected devices and ensure that it does not exceed the Nema L14-20P’s rating.
5. Ignoring safety precautions: Lastly, it is crucial to follow all safety precautions when wiring a Nema L14-20P. This includes wearing protective gear, shutting off power before making any connections, and using appropriate tools. Ignoring safety precautions can lead to accidents, injuries, or even fatalities.
To ensure a safe and reliable electrical connection, it is recommended to consult a qualified electrician or refer to a trusted wiring guide when wiring a Nema L14-20P. It is better to be cautious and avoid these common mistakes to prevent any potential problems or hazards.
How to Test the Wiring of a Nema L14-20P for Proper Functioning
When it comes to electrical installations, it is crucial to ensure that the wiring is done correctly to avoid any potential hazards or malfunctioning. In the case of a Nema L14-20P, which is a type of electrical plug commonly used for generators and other heavy-duty equipment, testing the wiring for proper functioning is essential. Here are a few steps you can follow to test the wiring of a Nema L14-20P:
1. Ensure safety precautions: Before starting the testing process, it is crucial to take safety precautions. Make sure to wear appropriate protective gear, such as insulated gloves, and turn off the power supply to the circuit you will be working on.
2. Inspect the plug: Begin by inspecting the Nema L14-20P plug for any visible signs of damage, such as frayed wires or loose connections. If you notice any issues, it is important to address them before proceeding with the testing.
3. Check the wiring connections: Use a multimeter to check the continuity of the wiring connections within the plug. Start by setting the multimeter to the continuity or resistance mode. Then, touch one probe to the ground terminal and the other probe to each of the remaining terminals (X, Y, and W). Make sure the multimeter displays a low resistance reading, indicating a good connection.
4. Test for proper voltage: Once you have verified the wiring connections, you can test for proper voltage. Set the multimeter to the AC voltage mode and plug the Nema L14-20P into a power source. Touch one probe to the ground terminal and the other probe to each of the remaining terminals (X, Y, and W) to measure the voltage. The readings should match the expected voltage for your specific application.
5. Repeat the process: Repeat the testing process for each individual Nema L14-20P plug that you have installed to ensure that all the connections are functioning correctly.
By following these steps, you can test the wiring of a Nema L14-20P plug to ensure that it is functioning properly and safely. If you encounter any issues or are unsure about the testing process, it is recommended to consult a qualified electrician for assistance.
Safety Guidelines for Handling Nema L14-20P Wiring
When working with Nema L14-20P wiring, it is important to follow certain safety guidelines to ensure a safe and successful installation. These guidelines will help prevent accidents, electrical hazards, and potential damage to equipment. Here are some important safety tips to keep in mind:
- Turn off the power: Before starting any work on the wiring, always make sure to turn off the power to the circuit. This can be done by switching off the circuit breaker or removing the corresponding fuse.
- Verify the power is off: After turning off the power, use a voltage tester to confirm that there is no voltage present in the wiring or outlet. This will prevent accidental electric shock.
- Wear protective gear: Always wear appropriate safety gear, such as insulated gloves and safety glasses, when working with electrical wiring. This will protect you from potential electrical hazards.
- Use correct wiring techniques: Follow the manufacturer’s instructions and wiring diagram when connecting the Nema L14-20P plug. Make sure to use the correct size and type of wires, and ensure that all connections are secure and properly insulated.
- Avoid overloading the circuit: Make sure the circuit you are connecting the Nema L14-20P plug to can handle the load. Overloading the circuit can lead to overheating, fire, and damage to electrical devices.
- Regularly inspect the wiring: After completing the installation, periodically inspect the wiring and connections to ensure they are in good condition. Look for signs of wear, loose connections, or any other abnormalities. Promptly address any issues that you find.
By following these safety guidelines, you can minimize the risk of accidents and ensure a safe and reliable Nema L14-20P wiring installation.
Conclusion

In conclusion, handling Nema L14-20P wiring requires adherence to certain safety guidelines to ensure a safe and successful installation. Always remember to turn off the power, wear protective gear, use correct wiring techniques, avoid overloading the circuit, and regularly inspect the wiring. Following these guidelines will help prevent accidents, electrical hazards, and potential damage to equipment. Safety should always be the top priority when working with electrical wiring.
Q&A:
What is Nema L14-20P wiring?
Nema L14-20P is a type of electrical plug and receptacle used for 20 amp, 125/250 volt applications. It is commonly used in industrial settings and for backup power supplies.
How should I handle Nema L14-20P wiring if I am not a qualified electrician?
If you are not a qualified electrician, it is recommended to hire a professional to handle Nema L14-20P wiring. Electrical work can be dangerous and requires knowledge and experience to ensure safety. Hiring a qualified electrician will help to prevent accidents and ensure the wiring is installed correctly.