
If you own a Razor e175 electric scooter, it’s important to have a good understanding of its electrical system. The wiring diagram is a crucial tool that helps you navigate through the complex network of wires and components, ensuring that everything is properly connected and functioning as it should. In this article, we will explore the Razor e175 wiring diagram and provide you with the information you need to better understand your scooter’s electrical system.
What is a wiring diagram?
A wiring diagram is a visual representation of the electrical connections and layout of a device or system. It uses symbols and lines to depict the various components and their interconnections. In the case of the Razor e175 electric scooter, the wiring diagram shows how the battery, motor, controller, and other electrical components are wired together to provide power and control the scooter’s operation.
Understanding the components
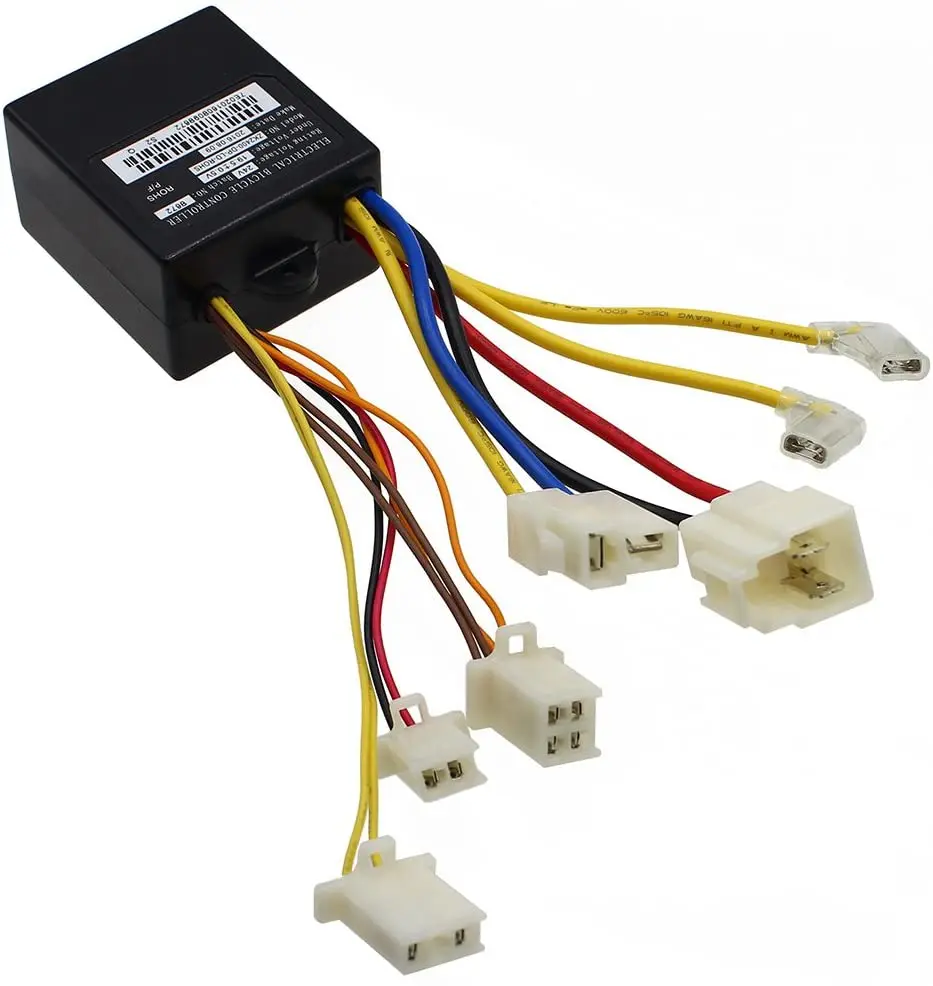
Before delving into the wiring diagram, it’s essential to have a basic understanding of the key components in the Razor e175 electric scooter. The main components include the battery, motor, controller, throttle, and charger. The battery provides the power to operate the scooter, while the motor converts that power into motion. The controller regulates the power flow and controls the scooter’s speed and acceleration. The throttle allows the rider to control the scooter’s speed, and the charger replenishes the battery’s power supply when it is low.
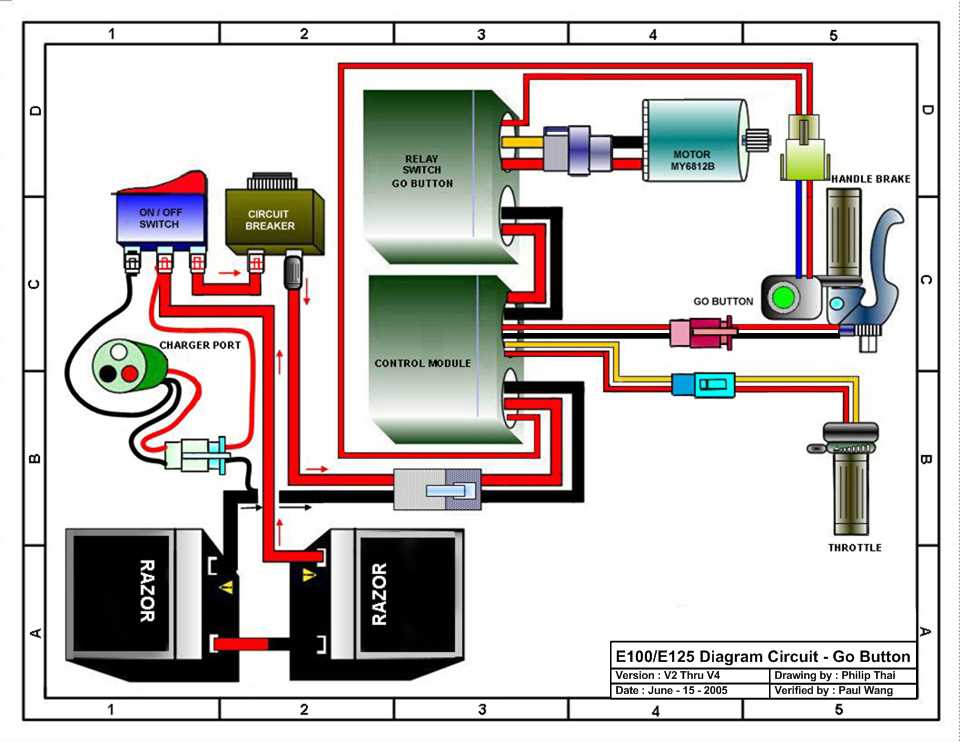
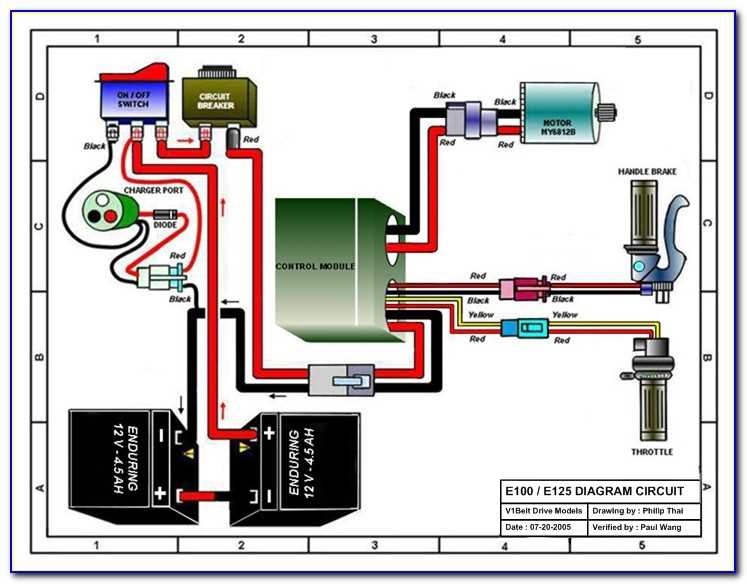
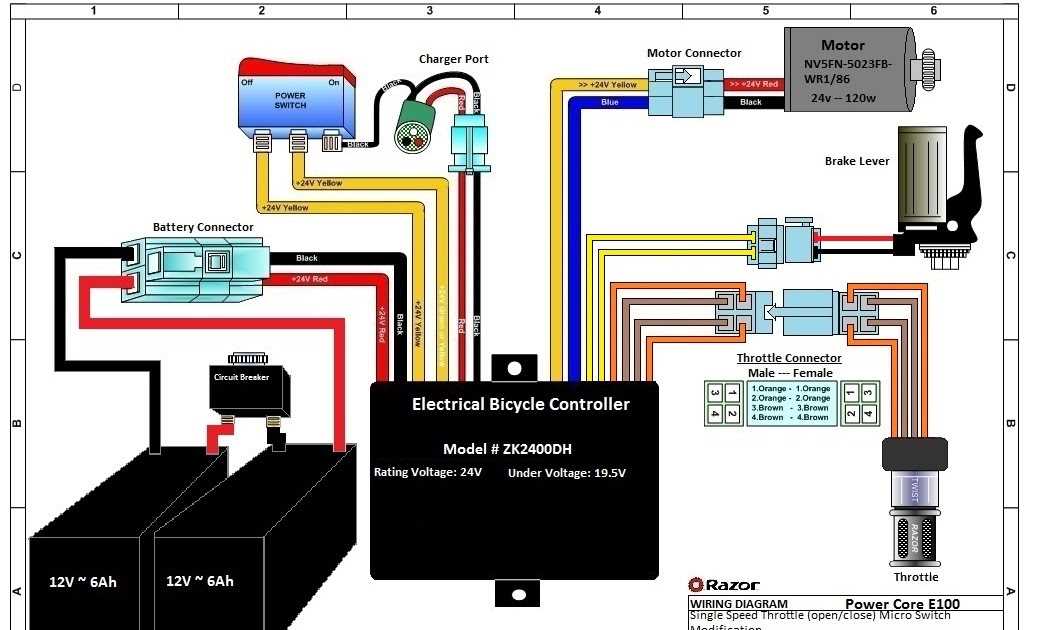
Razor e175 Wiring Diagram

The Razor e175 is a popular electric scooter for kids that provides a fun and eco-friendly way to get around. Understanding the wiring diagram is essential for troubleshooting and making any necessary repairs or modifications to the scooter.
The wiring diagram for the Razor e175 typically includes detailed information about the various electrical components and their connections. It helps to identify the wires, connectors, switches, and other parts of the scooter’s electrical system.
In general, the wiring diagram will show how the battery, motor, throttle, controller, and other components are wired together. It may also indicate the color-coding of the wires, which can be useful for troubleshooting or replacing damaged wires.
Here is a basic outline of the typical wiring diagram for the Razor e175:
- Battery: The wiring diagram should show the connection between the battery and the controller. It may also indicate any additional wiring for charging the battery.
- Motor: The diagram should show how the motor is connected to the controller and any other relevant components, such as the throttle.
- Controller: The wiring diagram should provide details about the connections between the controller and other components, such as the throttle and motor.
- Throttle: The diagram should show how the throttle is connected to the controller and any other relevant components.
- Other components: Depending on the scooter’s features, the wiring diagram may include additional information about lights, brakes, and other accessories.
By referring to the wiring diagram, scooter owners and technicians can easily identify and troubleshoot any electrical issues. It is important to follow the diagram carefully and ensure all connections are secure and properly insulated to maintain the safety and performance of the Razor e175 electric scooter.
Overview

The Razor e175 is an electric scooter designed for young riders. It features a rechargeable battery, a twist-grip throttle, and a hand-operated rear brake. The scooter is equipped with a sturdy frame and pneumatic tires, providing a smooth and comfortable ride. It is suitable for riders aged 8 and up, with a maximum weight capacity of 120 pounds.
The wiring diagram of the Razor e175 provides a visual representation of the electrical system of the scooter. It includes the various components and their connections, allowing for easy troubleshooting and repair. The wiring diagram is an essential tool for technicians and DIY enthusiasts who want to understand how the scooter’s electrical system works and how to fix any issues that may arise.
Key components:
- Battery pack: The e175 is powered by a 24V lead-acid battery pack. The wiring diagram shows the connections between the battery pack, the controller, and the charger.
- Controller: The controller is responsible for regulating the power flow from the battery pack to the motor. It is connected to the throttle and the brake, allowing for speed control and stopping power.
- Motor: The scooter is equipped with a chain-driven motor that provides propulsion. The wiring diagram illustrates the connections between the motor and the controller.
- Throttle: The twist-grip throttle allows the rider to control the speed of the scooter. The wiring diagram shows how the throttle is connected to the controller.
- Brake: The hand-operated rear brake is an important safety feature of the e175. The wiring diagram indicates the connections between the brake and the controller.
By referring to the wiring diagram, users can easily identify the components of the scooter’s electrical system and understand how they are interconnected. This knowledge can be invaluable when it comes to troubleshooting electrical issues or making modifications to the scooter.
Battery and Charger
The Razor e175 electric scooter is powered by a rechargeable battery pack. The battery pack consists of two 12-volt sealed lead-acid batteries. These batteries provide the scooter with the necessary power to operate and can be easily replaced when needed. It is important to properly maintain and charge the batteries to ensure optimal performance and longevity.
Charger:
The e175 electric scooter comes with a charger that is specifically designed for the scooter’s battery pack. The charger plugs into a standard electrical outlet and has a connector that attaches to the scooter’s charging port. When the battery pack is plugged into the charger, it will begin to charge. The charger has a built-in safety feature that prevents overcharging, so you can leave the battery pack plugged in without worrying about damaging the batteries. It is recommended to always use the charger provided by Razor to ensure compatibility and safety.
Charging the battery:
To charge the battery pack, simply plug the charger into an electrical outlet and connect the charging port to the scooter. The charger will have an indicator light that shows when the battery pack is charging. It is important to fully charge the battery pack before each use to ensure maximum ride time. It is recommended to charge the battery pack for at least 12 hours for a full charge. However, if you need to quickly charge the battery pack, you can charge it for a minimum of 4 hours. It is important to not overcharge or undercharge the battery pack, as this can affect its performance and lifespan.
Battery replacement:
If the battery pack no longer holds a charge or does not provide enough power, it may be time to replace the batteries. To replace the batteries, you will need to remove the battery cover located at the bottom of the scooter. Once the cover is removed, disconnect the old batteries and connect the new ones in the same manner. It is important to follow the wiring diagram provided by Razor to ensure the correct connection. Once the new batteries are connected, replace the battery cover and your scooter will be ready to ride again.
Proper maintenance and care of the battery pack and charger will help extend the overall lifespan of your Razor e175 electric scooter. Always follow the manufacturer’s guidelines for charging and replacing the batteries, and be sure to use the correct charger provided by Razor.
Motor and Controller
The motor and controller are essential components of the Razor e175 electric scooter. The motor is responsible for converting electrical energy into mechanical energy, which propels the scooter forward. It is an electric, brushless DC motor that operates on a nominal voltage of 24V. The motor is typically located near the rear wheel and is connected to the controller through a wiring harness.
The controller acts as the brain of the system, receiving inputs from the throttle and sending appropriate signals to the motor. It regulates the speed and direction of the scooter based on the user’s input. The controller also ensures the safety of the system by implementing features such as over-current protection and under-voltage protection. It is equipped with various connectors, including a throttle connector, battery connector, and motor connector.
Throttle: The throttle is the interface between the user and the controller. It is typically a twist-grip style throttle, similar to those found on motorcycles. When the user twists the throttle, it sends a signal to the controller, instructing it to increase or decrease the motor output accordingly. The throttle is connected to the controller through a throttle connector.
Battery: The battery supplies the electrical power needed to run the motor and controller. The e175 scooter uses two 12V sealed lead acid batteries connected in series to provide a total voltage of 24V. The battery is connected to the controller through a battery connector.
Motor: The motor receives the electrical signals from the controller and converts them into mechanical energy. It is a brushless DC motor, which means it uses an electronic commutation system rather than brushes to control the motor’s rotation. The motor is connected to the controller through a motor connector.
Overall, the motor and controller work together to power and control the Razor e175 electric scooter. The motor converts electrical energy into mechanical energy, while the controller regulates the speed and direction of the scooter based on user input. Understanding the wiring diagram for these components is essential for troubleshooting and repair.
Throttle and Brake
The throttle and brake are two crucial components of the Razor e175 electric scooter. They work together to control the speed and stopping of the scooter.
The throttle is a hand-controlled lever located on the handlebars of the scooter. When the lever is pulled back, it increases the speed of the scooter by providing power to the motor. The further the lever is pulled back, the faster the scooter will go. It is important to note that the throttle should be used gradually and not abruptly to prevent jerky movements or loss of control.
The brake is another hand-controlled lever located on the handlebars. When the lever is squeezed, it activates the brake system, which slows down and ultimately stops the scooter. The brake lever should be used with caution and applied gradually to ensure a smooth and controlled stop. It is important to regularly check the brake pads and replace them if they are worn out to maintain optimal braking performance.
Note: When using the throttle and brake, it is important to follow the manufacturer’s instructions and guidelines. Always wear appropriate safety gear, such as a helmet and knee pads, and ride in a safe and controlled manner.
Lights and Switches
In the Razor e175 wiring diagram, lights and switches play an important role in controlling the electric scooter’s functionality. The lights are responsible for providing visibility and indicating the scooter’s presence to other vehicles or pedestrians. The switches, on the other hand, allow the rider to control various aspects of the scooter, such as turning it on/off or activating the lights.
The wiring diagram shows the connections between the lights and switches, indicating how they are interconnected and function together. The diagram includes labels for the various components involved, such as the headlight, taillight, brake light, and indicator lights. It also shows the wiring connections for the power switch, brake lever switch, and other switches present on the scooter.
Understanding the wiring diagram is essential for troubleshooting any issues related to the lights or switches on the Razor e175. For example, if the lights are not turning on, the diagram can help identify potential wiring or switch problems. It can also guide users in replacing faulty components or making necessary repairs.
In addition to providing a visual representation of the connections, the wiring diagram may also include information about the electrical specifications of the lights and switches. This information can be useful when replacing components or upgrading the scooter’s lighting system.
In summary, the lights and switches in the Razor e175 wiring diagram are crucial for maintaining proper functionality and safety. Understanding the diagram can help users troubleshoot issues, make repairs, and ensure the scooter operates correctly.
Troubleshooting
If you are experiencing issues with your Razor e175 electric scooter, follow these troubleshooting steps to identify and resolve the problem:
- Check the power supply: Ensure that the scooter is properly charged and the battery is not depleted. Plug the charger into a working power outlet and connect it to the scooter. Allow the battery to charge for the recommended amount of time.
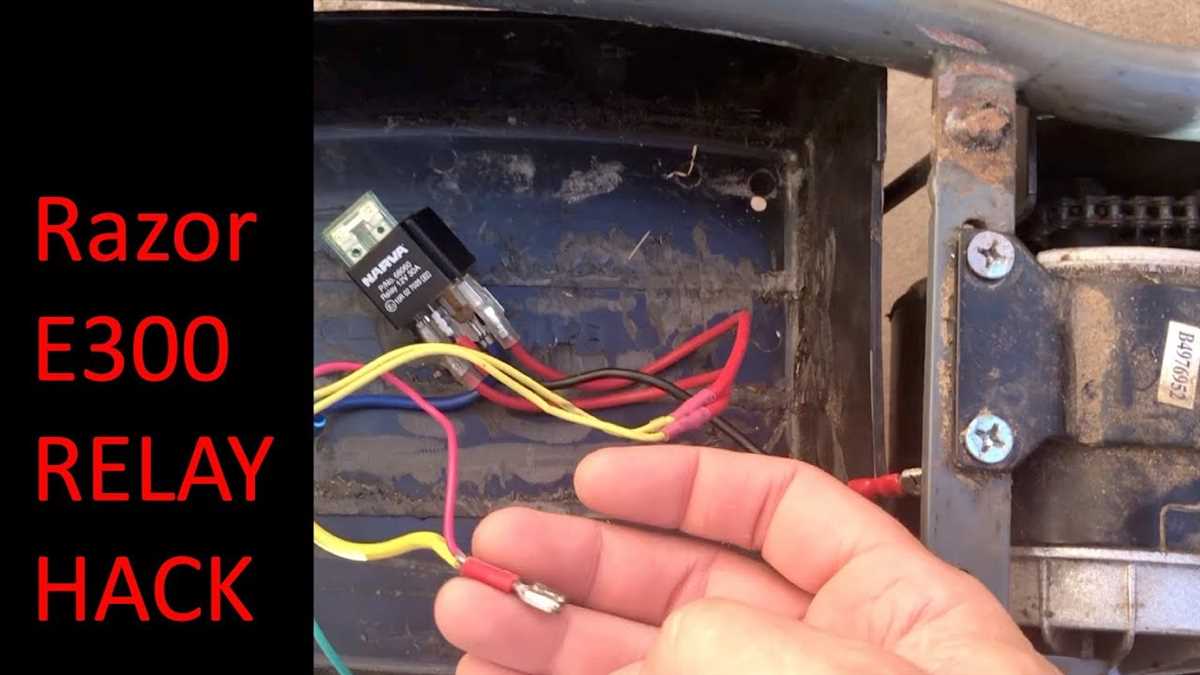
- Inspect the wiring: Inspect the wiring harness of the scooter for any visible signs of damage or loose connections. Ensure that all wires are securely connected and in good condition. If there are any damaged wires, they should be replaced.
- Test the battery: Use a multimeter to test the voltage of the battery. If the voltage is significantly lower than the recommended range, the battery may need to be replaced.
- Check the motor: Test the motor by disconnecting it from the wiring harness and directly connecting it to a power source. If the motor does not run, it may be faulty and require replacement.
- Inspect the throttle and brake: Check the throttle and brake mechanisms for any signs of damage or malfunction. Ensure that the throttle is smoothly engaging the motor and the brake is functioning properly.
- Inspect the controller: Inspect the electric controller for any signs of damage or loose connections. Check if the controller is receiving power and sending signals to the motor and other components. If the controller is not functioning properly, it may need to be replaced.
If you have followed these troubleshooting steps and are still unable to resolve the issue with your Razor e175 electric scooter, it is recommended to seek professional assistance or contact the manufacturer for further support.