
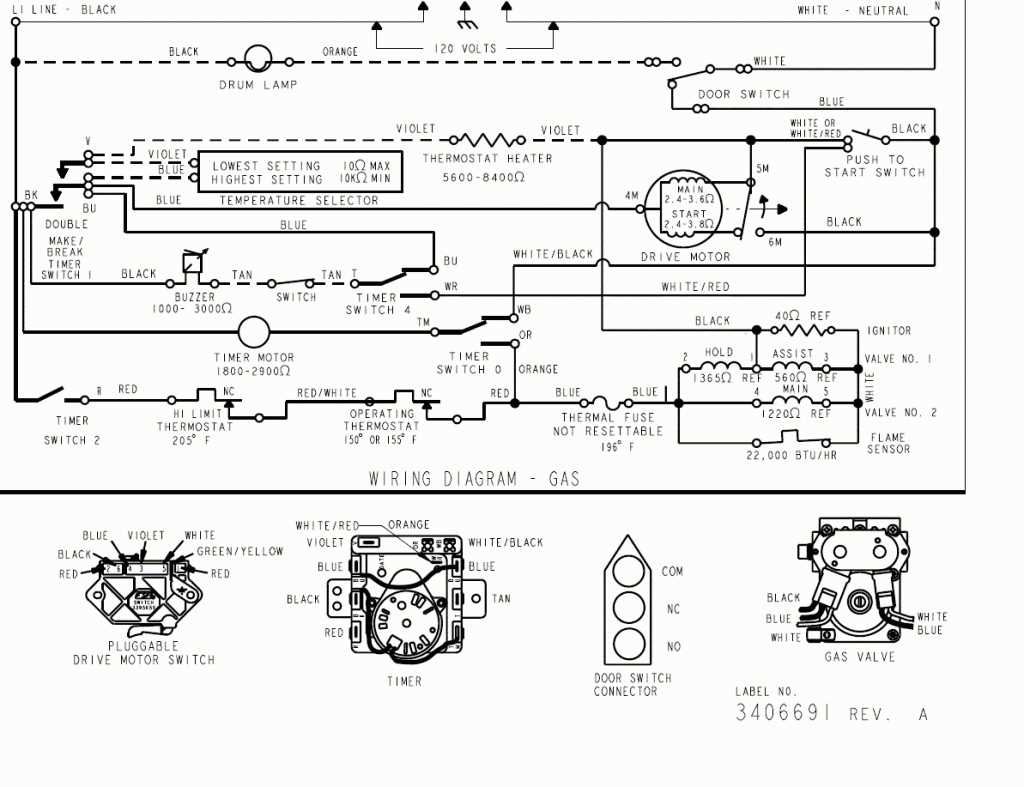
When it comes to installing or wiring your Roper dryer, having a comprehensive diagram can make the process much easier and more efficient. Whether you’re a seasoned DIY enthusiast or a beginner, understanding how to properly connect the wires can ensure that your dryer operates safely and effectively.
One of the most important things to keep in mind when wiring your Roper dryer is to always follow the manufacturer’s instructions. These instructions can often be found in the user manual or on the back of the dryer. They will guide you through the process step by step and provide you with the necessary information for a successful installation.
Additionally, it’s crucial to have a clear understanding of the different parts of the wiring diagram. This includes identifying the various colored wires and their corresponding functions. Typically, the Roper dryer wiring diagram will indicate which wires are responsible for powering the motor, heating element, and other essential components.
By familiarizing yourself with the Roper dryer wiring diagram and following the provided instructions, you can ensure that your dryer is properly connected and ready to use. This will not only prevent any potential accidents or malfunctions but also prolong the lifespan of your dryer. So, take the time to study the diagram and make sure you have all the necessary tools and materials before beginning the installation process.
Understanding the components of a Roper dryer
A Roper dryer is a complex appliance that is designed to efficiently dry clothes. It is important to understand the various components of a Roper dryer in order to properly troubleshoot and repair any issues that may arise. Whether you are a homeowner or a professional appliance technician, having a clear understanding of the different parts of a Roper dryer is essential.
Heating element: The heating element is one of the key components of a Roper dryer. It is responsible for generating the heat needed to dry the clothes. The heating element is typically located at the back or bottom of the dryer and is connected to the dryer’s power supply. If the heating element malfunctions, the dryer may not produce enough heat to properly dry the clothes.
Thermostat: The thermostat is another important component of a Roper dryer. It is designed to regulate the temperature inside the dryer and ensure that it stays within a safe range. The thermostat is usually located near the heating element and is connected to it through a series of wires. If the thermostat fails, it can cause the dryer to overheat or not heat up at all.
Timer: The timer is responsible for controlling the different cycles and settings of a Roper dryer. It allows users to select the desired drying time and also controls other functions, such as the cool-down period at the end of a drying cycle. The timer is typically located on the dryer’s main control panel and is connected to various other components, such as the motor and heating element.
Motor: The motor is what powers the drum of a Roper dryer and makes it rotate. It is usually located at the back or bottom of the dryer and is connected to the dryer’s power supply. The motor is controlled by the timer and is responsible for starting, stopping, and reversing the rotation of the drum. If the motor fails, the dryer may not start or the drum may not rotate.
Drum: The drum is the part of the dryer where the clothes are placed for drying. It is typically made of durable stainless steel or porcelain-coated steel and is designed to withstand high temperatures and constant rotation. The drum is supported by a set of rollers or
Gathering the necessary tools and materials

Before attempting to wire your Roper dryer, it is important to gather all the necessary tools and materials to ensure a successful installation. Having the right tools and materials on hand will make the process easier and more efficient.
Here is a list of the essential tools and materials you will need:
- Screwdriver: You will need a screwdriver to remove and install the terminal block cover on the back of the dryer. Depending on the type of screw used, you may need Phillips or flathead screwdriver.
- Wire stripper: A wire stripper is required to remove the insulation from the wires, allowing for proper connections to be made.
- Wire cutter: A wire cutter is needed to cut the wires to the appropriate lengths.
- Electrical tape: Electrical tape is used to secure the wire connections and provide insulation to prevent any electrical faults.
- Wire connectors: Wire connectors, such as wire nuts or crimp connectors, are used to join the different wires together securely.
- Voltage tester: A voltage tester is essential to ensure that there is no electricity running through the wires before working on them.
- Roper dryer wiring diagram: Having the specific wiring diagram for your Roper dryer model is crucial. This diagram will guide you on how to correctly connect the wires.
- Electrical wire: You will need the appropriate gauge and length of electrical wire to connect the dryer to the power source.
- Protective gloves and safety glasses: It is important to protect yourself while working with electrical appliances. Wear gloves and safety glasses to prevent any potential injuries.
By gathering these tools and materials before starting the wiring process, you can ensure a smooth and safe installation of your Roper dryer.
Turning off the power supply
When working with electrical appliances such as a Roper dryer, it is essential to ensure that the power supply is turned off properly to avoid any potential hazards or accidents. Follow the steps below to safely turn off the power supply before working on the dryer:
- Step 1: Locate the circuit breaker or fuse for the dryer in your electrical panel.
- Step 2: Turn off the circuit breaker or remove the fuse that corresponds to the dryer. You may need to consult the panel directory or use a voltage tester to identify the correct circuit.
- Step 3: Double-check that the power is truly off by using a non-contact voltage tester or a multimeter. This will help confirm that there is no electrical current flowing to the dryer.
- Step 4: Once you have confirmed that the power is off, you can proceed with any necessary repairs or maintenance on the Roper dryer.
Remember, turning off the power supply is a crucial safety precaution to protect yourself from electrical shock or injury while working on any electrical appliance. Always handle electrical components with care and consult a professional if you are unsure or uncomfortable with any electrical work.
Removing the old wiring
When replacing or repairing a Roper dryer, it is important to start by removing the old wiring. This process involves disconnecting the dryer from the power source and detaching the wires that connect the dryer to the electrical system.
To begin, ensure that the dryer is completely powered off and unplugged from the electrical outlet. This will eliminate the risk of electric shock during the wiring removal process. Next, locate the main power supply for the dryer, which is typically found behind the machine or in a designated electrical panel.
Once the main power supply is located, use a voltage tester to confirm that there is no electrical current running through the wires. This step is crucial for personal safety. After confirming that the power is off, carefully remove the cover of the main power supply to expose the wiring connections. Take note of the existing wire configuration and make a diagram or take a picture for reference before disconnecting any wires.
Using a pair of wire cutters or strippers, carefully remove the wires one by one from their respective terminals. Pay close attention to the labeling on the terminals to ensure that they are properly identified and labeled for reconnection later on. It is important to handle the wires with care and avoid damaging them during removal.
With all the wires disconnected, carefully remove any wire nuts or connectors that may be securing the wires together. These nuts or connectors may vary depending on the specific dryer model, so refer to the dryer’s wiring diagram or the manufacturer’s instructions for guidance.
Once all the wiring has been removed, properly dispose of any damaged or worn-out wires. Inspect the terminals for any signs of damage or corrosion, and clean them if necessary. This will ensure a secure and efficient connection when installing the new wiring.
It is important to follow the proper safety precautions and guidelines when removing the old wiring from a Roper dryer. If you are unsure or uncomfortable with this process, it is recommended to seek professional assistance to avoid any potential risks or hazards.
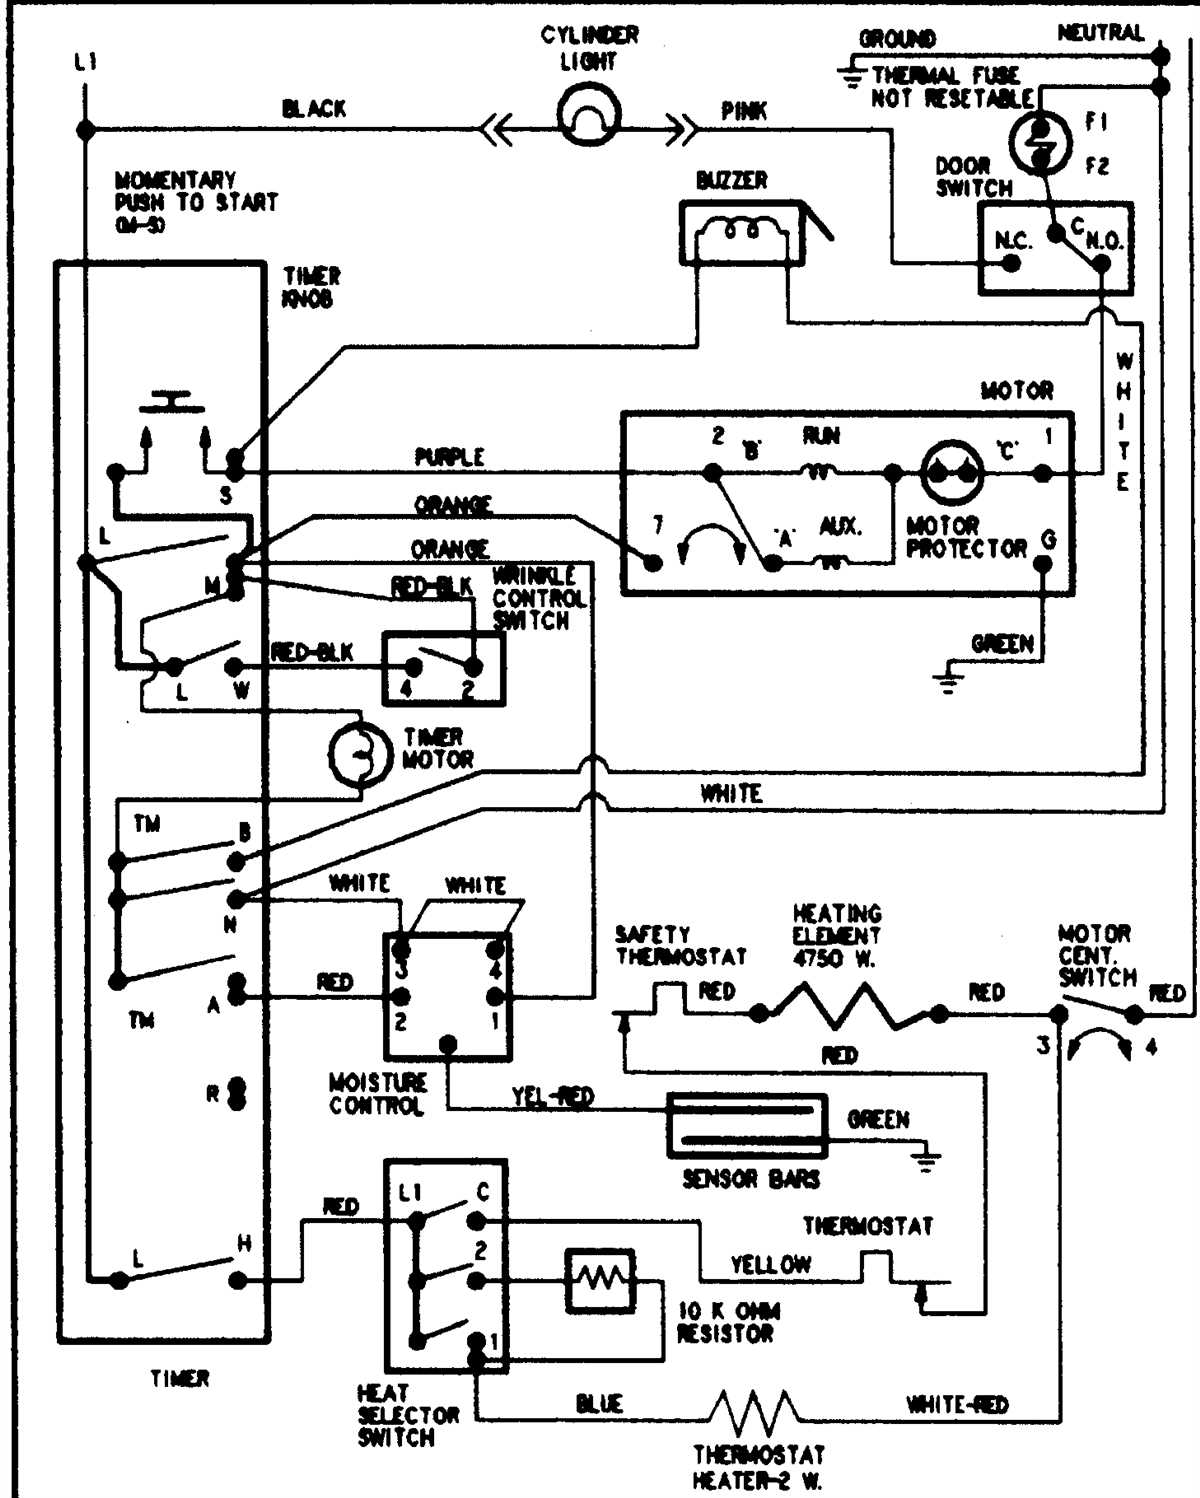
Connecting the new wiring
When replacing or installing new wiring for your Roper dryer, it is important to follow the correct steps to ensure safety and proper functionality. Here is a step-by-step guide on how to connect the new wiring:
- Disconnect the power: Before starting any electrical work, make sure to disconnect the power to the dryer. This can be done by unplugging the dryer from the outlet or switching off the circuit breaker that supplies power to the dryer.
- Remove the access panel: Locate the access panel on the back of the dryer and remove it. This panel typically covers the wiring connections.
- Identify the wires: Take note of the existing wires and their connections. There should be three main wires – a red wire, a black wire, and a white wire. The red and black wires are the hot wires, while the white wire is the neutral wire.
- Disconnect the old wiring: Carefully disconnect the old wiring connections by unscrewing the wire nuts or removing any other connectors. Make sure to keep track of which wire was connected to which terminal.
- Connect the new wiring: Strip the ends of the new wires to expose the bare copper. Match the colors of the wires – red to red, black to black, and white to white. Twist the ends of the wires together and secure them using wire nuts or other suitable connectors.
- Reinstall the access panel: Once the new wiring is securely connected, reattach the access panel to the back of the dryer.
It is important to ensure that all connections are tight and secure before restoring power to the dryer. Double-check your work to make sure there are no loose wires or exposed copper. Once everything is in place, you can safely reconnect the power and test the dryer to ensure it is working properly.
Testing the wiring and ensuring proper functionality
Once you have completed the wiring of your Roper dryer according to the wiring diagram, it is important to test the connections and ensure that everything is working properly. Follow these steps to test and troubleshoot any potential issues:
1. Make sure that the dryer is properly plugged into a functioning power outlet. Check the circuit breaker and make sure it is not tripped.
2. Turn on the dryer and listen for any abnormal noises or vibrations. If you notice any unusual sounds, stop the dryer immediately and disconnect it from the power source. Inspect the wiring connections and make sure they are secure and properly connected.
3. Check the heating element by running the dryer on a heat cycle. Feel the air temperature coming out of the dryer vent. It should be hot. If the air is not heating up, there may be an issue with the heating element or the wiring connected to it.
4. Test the control panel functions by selecting different settings and observing how the dryer responds. Make sure that all the buttons and knobs are working properly and that the dryer is functioning as expected.
5. If you encounter any issues during the testing process, consult the Roper dryer wiring diagram and double-check your wiring connections. Compare your connections to the diagram to ensure that they are correct. If necessary, rewire any connections that may be incorrect or loose.
Overall, testing the wiring and ensuring proper functionality of your Roper dryer is crucial to ensure safe and efficient operation. By following the wiring diagram and conducting thorough testing, you can identify and address any potential issues before they become major problems.