
When it comes to powering your RV, having a reliable and efficient electrical system is crucial. One important component of this system is the battery isolator, which allows you to charge your RV battery while also providing power to other electrical devices. Understanding how to properly wire a battery isolator is essential for ensuring that your RV’s electrical system functions smoothly and reliably.
A battery isolator is a device that allows you to charge your RV battery with the vehicle’s alternator while also preventing the battery from draining when the engine is off. It essentially acts as a one-way valve for electrical current, allowing power to flow from the alternator to the battery, but not the other way around.
To properly wire a battery isolator in your RV, you will need a few basic tools, including wire strippers, crimpers, and electrical tape. You will also need to determine the appropriate gauge of wire to use, based on the distance between your battery and the isolator. Additionally, you will need to ensure that all connections are secure and that the wires are properly grounded.
Overall, understanding the proper wiring of a battery isolator is essential for maintaining a reliable and efficient electrical system in your RV. By following the correct wiring techniques and using the right tools and materials, you can ensure that your RV’s battery is properly charged and that power is distributed effectively to all of your electrical devices. So, take the time to learn about battery isolator wiring and ensure that your RV’s electrical system is in top-notch condition.
Rv Battery Isolator Wiring
In an RV, the battery isolator is an essential component that allows for the charging of the auxiliary batteries while the vehicle’s engine is running. It provides a way to separate the starter battery from the auxiliary batteries, ensuring that the starter battery is always charged and ready to go, while also powering other electrical components in the RV.
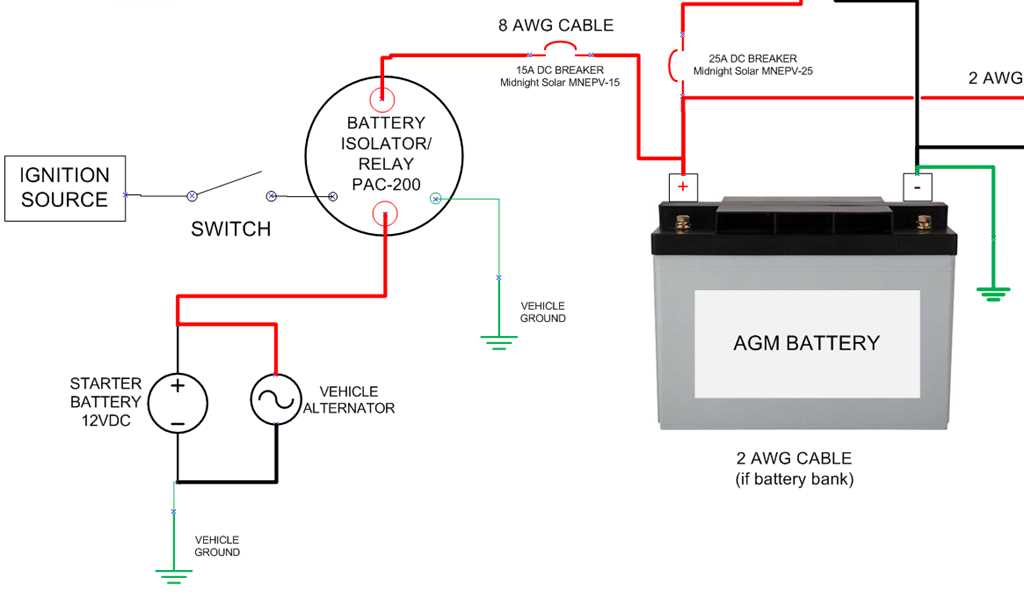
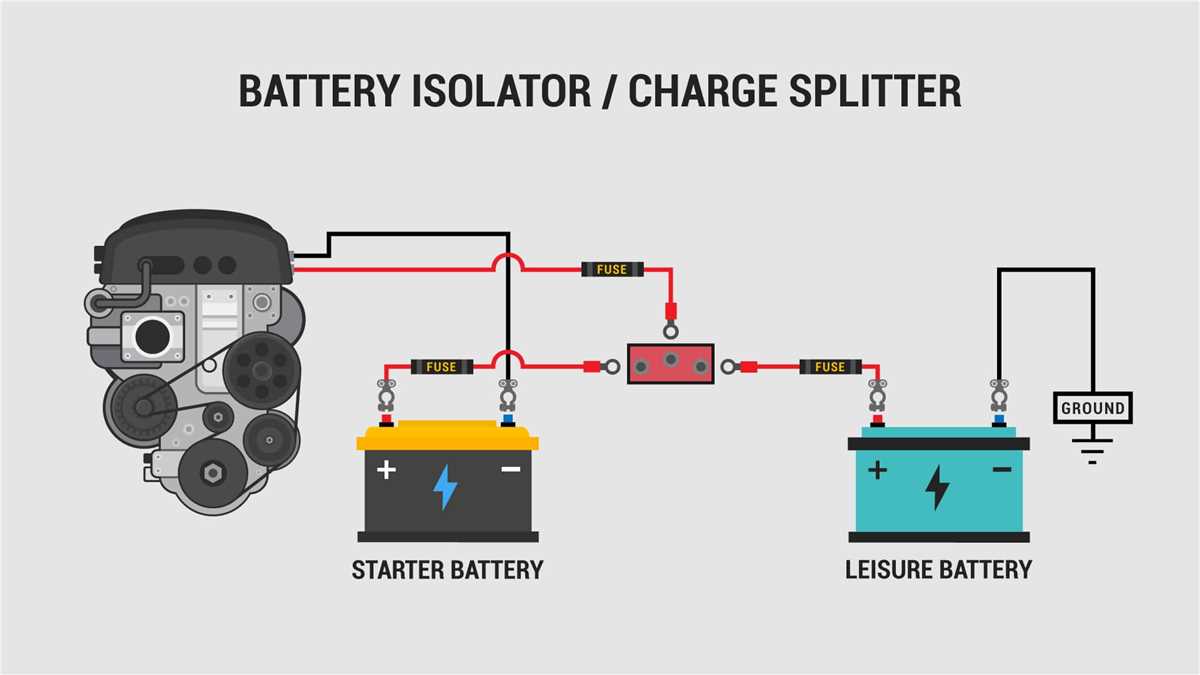
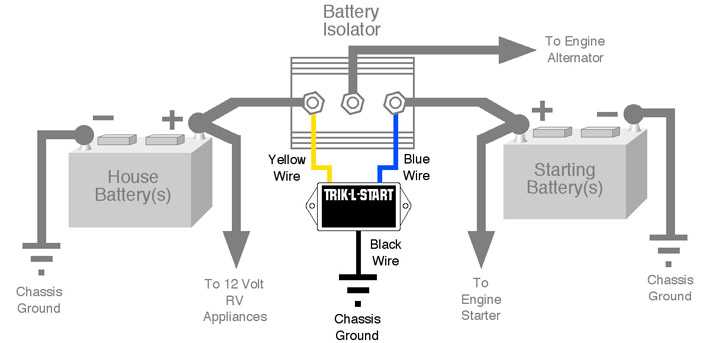
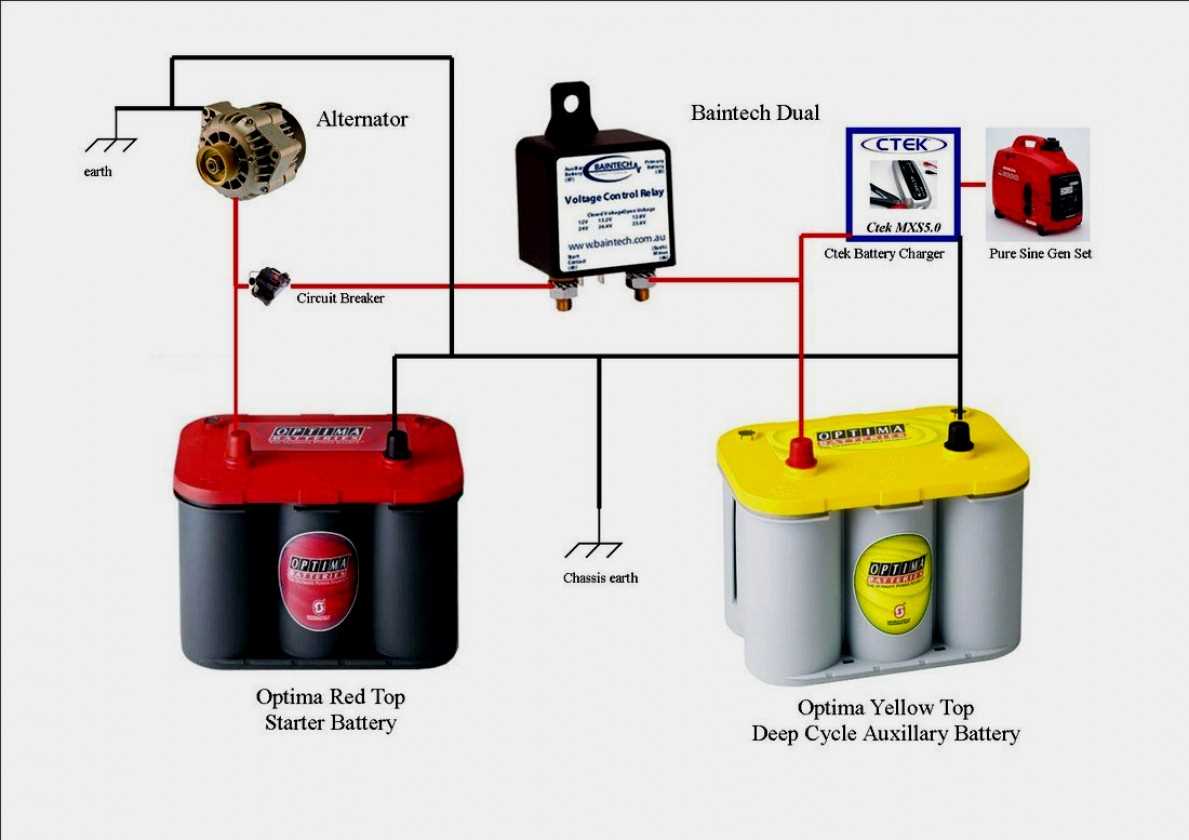
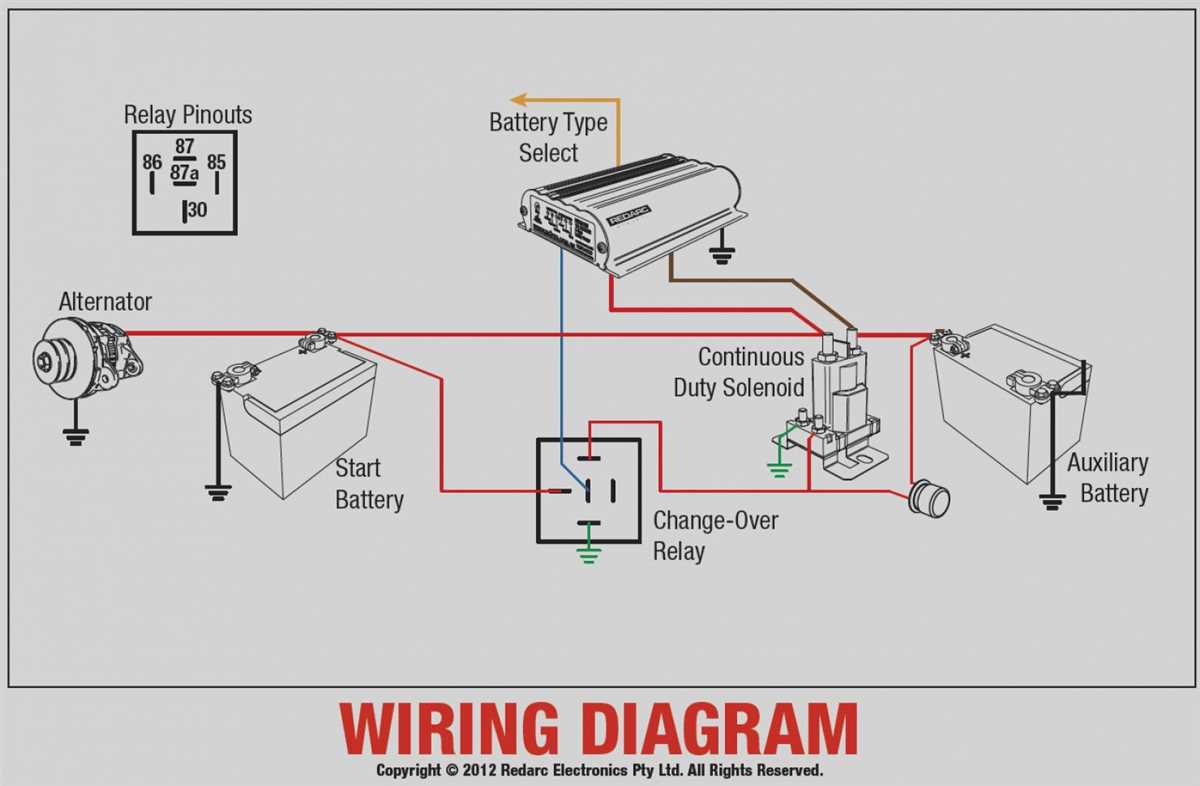
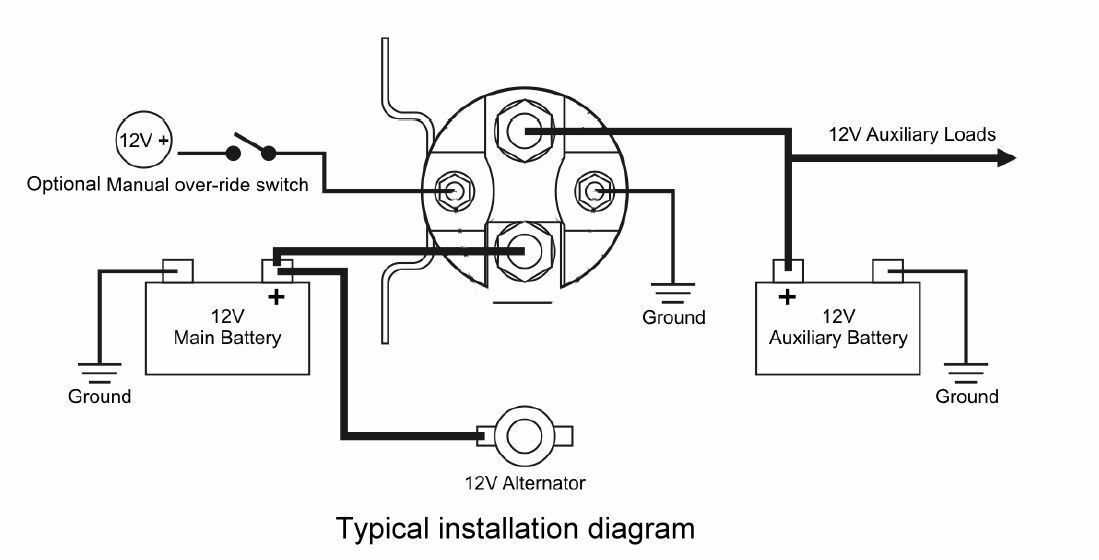
The wiring of the battery isolator involves connecting the starter battery, auxiliary batteries, and the alternator. Typically, the starter battery is connected to one side of the isolator, while the auxiliary batteries are connected to the other side. The alternator is then connected to the isolator, allowing it to charge both the starter battery and the auxiliary batteries simultaneously.
It is important to follow the manufacturer’s instructions and guidelines when wiring the battery isolator to ensure proper functionality and safety. The wiring should be done using appropriate gauge wires that can handle the current load, and all connections should be secure and insulated to prevent any potential electrical hazards.
Properly wiring the RV battery isolator is crucial for maintaining a reliable power supply in the vehicle. It allows for efficient charging of the auxiliary batteries, which are often used to power various appliances, lights, and other electrical devices in the RV. With the correct wiring setup, the battery isolator ensures that all batteries are charged and ready to provide power whenever needed.
What Is an RV Battery Isolator?
An RV battery isolator is a device that allows you to charge multiple batteries from a single power source while keeping them isolated from each other.
When you have multiple batteries in your RV, such as a starter battery and one or more house batteries, it can be difficult to keep them all charged and properly maintained. That’s where a battery isolator comes in.
An RV battery isolator is typically installed between the alternator and the batteries. It works by allowing the alternator to charge all the batteries at once, but then prevents them from discharging into each other. This means that even if one battery is drained, it won’t affect the others, ensuring that you always have power when you need it.
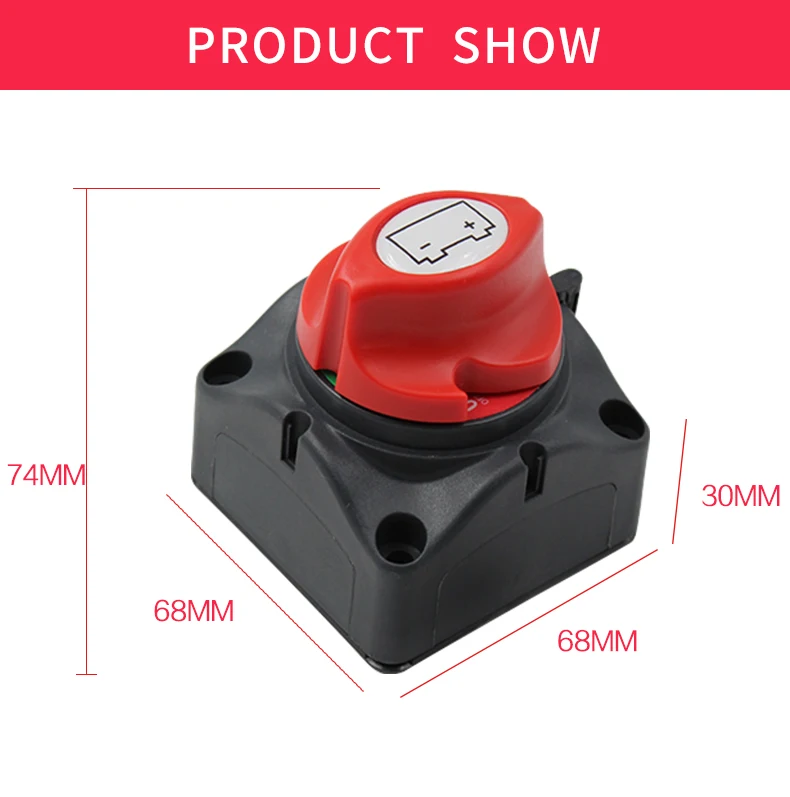
There are different types of RV battery isolators available, including diode isolators, solenoid isolators, and electronic isolators. Diode isolators use diodes to prevent current flow in the wrong direction, while solenoid isolators use mechanical relays. Electronic isolators, on the other hand, use solid-state technology to control the charging and discharging of the batteries.
Having an RV battery isolator can be essential if you frequently use your RV off-grid or if you have a lot of power-consuming appliances. It helps to extend the lifespan of your batteries and ensures that you always have reliable power for your adventures.
Why Is Rv Battery Isolator Wiring Important?
The wiring of an RV battery isolator is a crucial aspect of the electrical system in a recreational vehicle. It plays a vital role in ensuring the efficient and safe operation of your RV’s electrical components and power supply.
One of the main reasons why RV battery isolator wiring is important is because it allows for the proper distribution of power between the various batteries in your RV. An RV typically has multiple batteries, including the engine battery and the house batteries. The battery isolator ensures that these batteries are charged and discharged independently, preventing one battery from draining all the power and leaving you stranded.
Proper wiring also helps in maximizing the overall battery life and performance. When the batteries in an RV are wired correctly, they are less likely to experience overcharging, which can lead to premature battery failure. Additionally, a well-wired battery isolator allows for efficient charging, preventing power wastage and ensuring that your batteries are always ready to provide the necessary power for your RV’s electrical appliances and systems.
Furthermore, RV battery isolator wiring is important for safety reasons. When the wiring is done correctly, it minimizes the risk of electrical shorts, which can lead to fires or other electrical hazards. It also helps to prevent excessive voltage drops and fluctuations, which can damage sensitive electrical components in your RV.
In summary, RV battery isolator wiring is important because it ensures the proper distribution of power between batteries, maximizes battery life and performance, and enhances safety. It is essential to have a professional inspect and install the wiring to ensure that it is done correctly and to prevent any potential issues that could arise from improper wiring.
Step-by-Step Guide for Rv Battery Isolator Wiring
When it comes to wiring an RV battery isolator, it is essential to follow the correct steps to ensure proper installation and functionality. The battery isolator plays a crucial role in managing the charging and discharging of multiple batteries, allowing them to function independently without draining each other. Here is a step-by-step guide to help you with RV battery isolator wiring:
1. Determine the Battery Isolator Type:
There are two main types of RV battery isolators: diode-based isolators and solenoid-based isolators. Diode-based isolators utilize diodes to prevent battery discharge, while solenoid-based isolators use relays to separate the batteries. Determine which type of isolator you have or plan to install.
2. Locate the Batteries:
Identify the location of the primary battery and the secondary battery(s) in your RV. The primary battery is typically the starter battery, while the secondary battery(s) are used for auxiliary power. Make sure you have access to these batteries for wiring.
3. Disconnect the Batteries:
Before starting the wiring process, disconnect all the batteries from any power source to ensure safety. This includes turning off the RV’s main power switch and disconnecting any external power sources.
4. Wire the Battery Isolator:
Refer to the manufacturer’s instructions for your specific battery isolator model. Typically, you will need to connect the positive (+) terminal of the primary battery to the positive terminal of the isolator. Then, connect the positive terminal of the secondary battery(s) to the respective positive terminal(s) on the isolator. Repeat this process for the negative terminals (-).
5. Double-Check the Wiring:
After completing the wiring connections, double-check all the connections to ensure they are secure and properly connected. Inspect for any loose wires or exposed connections that could present a safety hazard.
6. Reconnect the Batteries:
Once you are confident that the wiring is correct, you can reconnect the batteries. Start by reconnecting the positive terminals, followed by the negative terminals. Ensure that the connections are tight and secure.
By following these step-by-step instructions, you can successfully wire an RV battery isolator. Remember to exercise caution and consult the manufacturer’s instructions for your specific model to ensure proper installation and functionality.
Common Mistakes to Avoid When Wiring RV Battery Isolator
When it comes to wiring an RV battery isolator, there are several common mistakes that people often make. These mistakes can lead to electrical issues or even damage to your RV’s electrical system. To ensure proper installation and functionality of your battery isolator, it’s important to avoid these common mistakes.
1. Incorrect wiring connections: One of the most common mistakes is making incorrect wiring connections. It’s essential to carefully follow the manufacturer’s instructions and wiring diagram to ensure that all connections are made correctly. Incorrect wiring connections can result in a malfunctioning isolator or even damage to your RV’s batteries.
2. Overloading the isolator: Another common mistake is overloading the isolator by connecting too many batteries or high-powered electrical devices. The isolator has a specific amp rating and it’s important to not exceed that rating. Overloading the isolator can lead to overheating, decreased performance, and even potential damage.
3. Failure to properly ground the isolator: Grounding is an essential step in the installation of an RV battery isolator. Failure to properly ground the isolator can result in electrical grounding issues, which can cause shorts or other electrical problems. Always ensure that the isolator is grounded according to the manufacturer’s instructions.
4. Using insufficient wire gauge: Using insufficient wire gauge is another common mistake that can lead to voltage drop and poor performance. It’s important to use the correct wire gauge based on the amp rating and length of the wire run. Using a wire gauge that is too small can result in excessive resistance, heat buildup, and potential damage.
5. Neglecting to use protective fuses: Protective fuses are crucial to prevent electrical faults and damage. It’s important to install the appropriate fuses on both the positive and negative sides of the isolator to protect your RV’s electrical system. Neglecting to use protective fuses can result in damage to the isolator and other electrical components.
By avoiding these common mistakes and taking the time to properly wire your RV battery isolator, you can ensure the efficiency and longevity of your RV’s electrical system. If you’re unsure about the process, it’s always a good idea to consult a professional or refer to the manufacturer’s instructions.
Troubleshooting Tips for Rv Battery Isolator Wiring
Having a reliable battery isolator wiring system in your RV is crucial for ensuring that you have a steady power supply while on the road. However, problems can arise with the wiring, causing issues with your battery charging and isolating functions. Here are some troubleshooting tips to help you identify and fix common issues with your RV battery isolator wiring.
1. Check for loose or corroded connections
One of the most common causes of problems with battery isolator wiring is loose or corroded connections. Over time, the connections can become loose or corroded, which can interrupt the flow of electricity and prevent the battery from charging properly. Inspect all the connections in your battery isolator system, including the cables, terminals, and connectors. Tighten any loose connections and clean off any corrosion using a wire brush.
2. Test the battery isolator solenoid
The battery isolator solenoid is responsible for opening and closing the circuit between the batteries. If the solenoid is faulty, it can prevent the batteries from charging or isolating correctly. To test the solenoid, disconnect the power source and use a multimeter to check for continuity across the solenoid terminals. If there is no continuity, the solenoid may be faulty and needs to be replaced.
3. Inspect the fuses and circuit breakers
Fuses and circuit breakers are essential safety features in your RV battery isolator wiring system. If a fuse is blown or a circuit breaker is tripped, the flow of electricity to your batteries can be interrupted. Check all the fuses and circuit breakers in your system and replace any that are blown or reset any tripped breakers.
4. Test the battery voltage
Low battery voltage can be a sign of a problem with your battery isolator wiring. Use a voltmeter to check the voltage of your batteries. If the voltage is consistently low, it may indicate a problem with the wiring or the batteries themselves. Check for any loose or damaged wires and ensure that the batteries are in good condition.
5. Consult the manufacturer’s documentation
If you’re still experiencing issues with your RV battery isolator wiring, consult the manufacturer’s documentation for your specific system. The documentation may provide troubleshooting steps and wiring diagrams for your system, which can help you identify and resolve any problems.
By following these troubleshooting tips, you can identify and fix common issues with your RV battery isolator wiring system. Remember to always prioritize safety when working with electrical systems and consult a professional if you are unsure or uncomfortable performing any repairs or replacements yourself.
Benefits of Proper Rv Battery Isolator Wiring

Proper RV battery isolator wiring provides a range of benefits for RV owners. When you have your battery isolator system set up correctly, you can enjoy:
- Efficient charging: A properly wired battery isolator allows your vehicle’s alternator to charge the RV house batteries while the engine is running. This ensures the batteries are receiving a consistent and efficient charge, maximizing their lifespan and avoiding premature battery failure.
- Extended battery life: With a battery isolator, you can ensure that your house batteries are only being used to power the RV’s interior appliances and systems. This prevents the starter battery from being drained, which can lead to reduced battery life. By keeping the house and starter batteries separate, you can prolong the overall lifespan of both battery types.
- Increased power availability: Properly wiring your RV battery isolator system allows you to have separate battery banks for different applications. This means you can dedicate one battery bank solely for starting the engine, while the other battery bank is reserved for powering the interior appliances. This ensures that you always have a reliable power source for starting your vehicle and running your RV’s electrical systems.
- Reduction in electrical issues: A well-designed and properly installed battery isolator system helps minimize electrical issues in your RV. By isolating the batteries, you can prevent power surges or irregular voltage levels from affecting the different systems and appliances, reducing the risk of electrical malfunctions.
- Flexibility and convenience: When your RV battery isolator system is wired correctly, you have the flexibility to use different power sources, such as solar panels or shore power, to charge your house batteries. This allows you to take advantage of alternative energy sources and ensures that you always have a reliable power supply regardless of your location or access to traditional charging methods.
In conclusion, proper RV battery isolator wiring provides numerous benefits for RV owners. From efficient charging and extended battery life to increased power availability and reduced electrical issues, a well-installed battery isolator system enhances the overall functionality and reliability of an RV’s electrical system. By ensuring the correct wiring and setup of your battery isolator, you can maximize the performance and lifespan of your RV’s batteries, while enjoying the convenience and flexibility of multiple power sources.
Q&A:
What is an RV battery isolator?
An RV battery isolator is a device that allows multiple batteries on an RV to be charged simultaneously and prevents one battery from draining the others when not in use.
What are the benefits of proper RV battery isolator wiring?
Proper RV battery isolator wiring ensures that all batteries in the RV are charged efficiently and evenly. This extends the lifespan of the batteries and ensures they are ready to use when needed. It also prevents any power loss or drain from one battery to another, maximizing the overall battery capacity.
Can improper RV battery isolator wiring cause damage?
Yes, improper RV battery isolator wiring can cause damage to the batteries, the isolator itself, and other electrical components in the RV. It can lead to uneven charging, power loss, and potential short circuits. It is important to follow proper wiring guidelines to prevent any damage.
Why is it important to have a reliable RV battery isolator?
A reliable RV battery isolator ensures consistent and efficient charging of all batteries in the RV. This is crucial for uninterrupted power supply and reliable operation of various RV electrical systems and appliances. It also helps prevent overcharging or undercharging of batteries, which can significantly reduce their lifespan.
Can I install an RV battery isolator myself?
While it is possible to install an RV battery isolator yourself, it is recommended to have it done by a professional or someone with electrical wiring experience. Improper installation can lead to wiring mistakes, faulty connections, and potential damage to the electrical system. It is best to seek expert advice or assistance to ensure a proper and safe installation.
What is an RV battery isolator?
An RV battery isolator is a device that allows multiple batteries to be charged simultaneously from a single power source, while preventing the batteries from discharging into each other.
Why is proper RV battery isolator wiring important?
Proper RV battery isolator wiring is important for several reasons. Firstly, it ensures that the batteries are connected correctly and are being charged and discharged properly. This helps to extend the life of the batteries and ensure that they are always ready for use. Additionally, proper wiring can help prevent electrical issues and potential damage to the RV’s electrical system.