
One of the essential features of any recreational vehicle (RV) is its water system. Having a well-designed water line diagram is crucial for a smooth and hassle-free trip. Whether you are a seasoned RV owner or a newbie, understanding the layout and functionality of your RV’s water system is essential.
A water line diagram provides a visual representation of how water is supplied, distributed, and disposed of in your RV. It includes various components such as the fresh water tank, water pump, water heater, faucets, and drains. Understanding the diagram allows you to troubleshoot problems, perform maintenance tasks, and upgrade your water system if needed.
Knowing how the water lines are connected and where the valves and connections are located can save you time, money, and headaches. With a well-documented water line diagram, you can easily identify potential leaks, blockages, or faulty components. Additionally, it helps you understand the water flow, which is important when hooking up your RV to different water sources, such as campsites or water fill stations.
In this comprehensive guide, we will walk you through the key components of an RV water line diagram and explain their functions. We will also provide tips on how to maintain and troubleshoot your water system, ensuring that you have a smooth and enjoyable camping experience. So, let’s dive into the world of RV water systems and learn how to keep your water flowing smoothly on your next adventure!
Understanding the basics of an RV water system
An RV water system is a crucial component of any recreational vehicle, providing vital water supply for various purposes such as drinking, cooking, and sanitation. It is important for RV owners to understand the basic workings of their water system to ensure proper usage and maintenance.
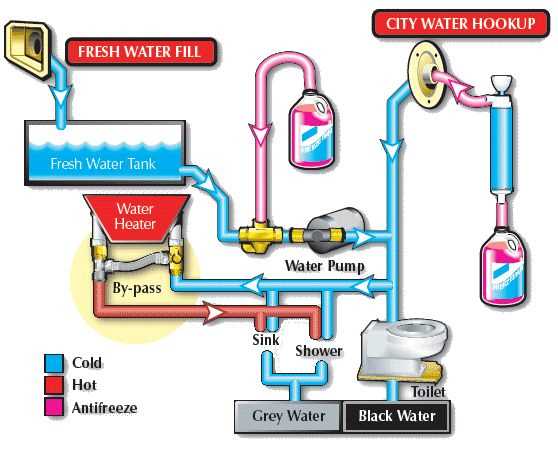
Water sources: An RV water system can typically be connected to two water sources – an onboard fresh water tank and an external water hookup. The fresh water tank stores potable water that can be sourced from external locations such as campsites or from public water supplies. The external water hookup allows you to connect your RV directly to a water source for a continuous supply of fresh water.
Fresh water distribution:
The fresh water distribution in an RV water system is managed through a series of pipes and valves. A water pump, usually located near the fresh water tank, is responsible for pressurizing the water and distributing it throughout the vehicle. This pressurized water is then sent to various fixtures such as faucets, showers, toilets, and appliances.
Hot water system: Many RVs are equipped with a hot water system that provides heated water for showers and washing dishes. The hot water tank, which can be powered by propane or electricity, heats up the water before it reaches the fixtures. It is important to ensure the proper functioning of the hot water system to prevent any issues with temperature control and energy efficiency.
Water waste management:
RV water systems also include mechanisms for managing wastewater, including sinks, showers, and toilets. A network of pipes guides the wastewater to a holding tank, commonly known as a gray water tank. This tank collects all the wastewater from sinks and showers, while a separate tank, known as a black water tank, collects waste from the toilet. It is essential to regularly empty and clean these tanks to maintain proper hygiene and prevent odors.
System maintenance: Regular maintenance of an RV water system is crucial to ensure its longevity and proper functioning. This includes regular cleaning and sanitization of tanks, checking for leaks or blockages, and replacing any worn-out components. Understanding the basics of your RV water system will equip you with the knowledge to troubleshoot any issues that may arise during your travels.
Components of an RV Water System
An RV water system consists of several components that work together to provide clean and reliable water for use in the vehicle. These components include:
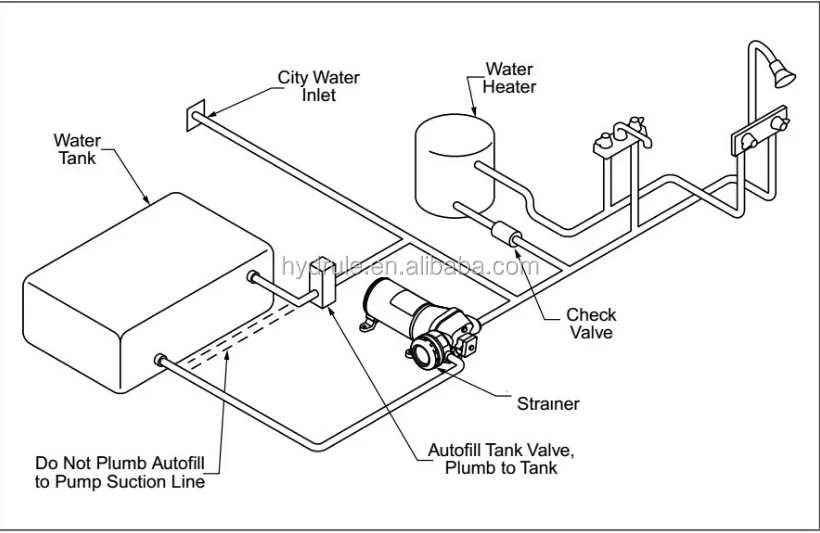
- Water Tank: The water tank is the main storage container for fresh water in the RV. It is typically located underneath the vehicle and is filled with water before a trip. The tank is equipped with a sensor that indicates the current water level.
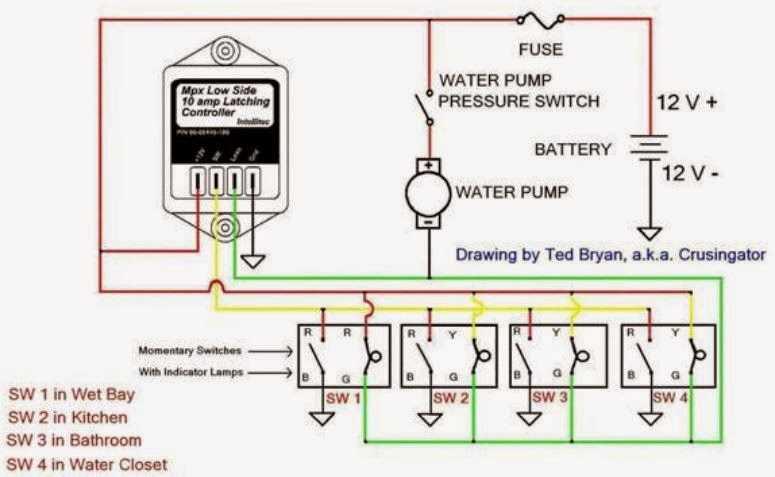
- Pump: The water pump is responsible for pressurizing the water system and delivering water to the faucets and fixtures throughout the RV. It is usually located near the water tank and is activated by a switch.
- Filter: A water filter is essential for ensuring clean and safe drinking water in an RV. It is typically installed near the water pump and removes impurities and contaminants from the water.
- Hot Water Heater: Many RVs are equipped with a hot water heater that provides hot water for showering and washing dishes. The hot water heater is connected to the RV’s plumbing system and is powered by propane or electricity.
- Pipes and Fittings: The water system in an RV is made up of pipes and fittings that carry water from the tank to the faucets and fixtures. These pipes and fittings should be inspected regularly for leaks or damage.
- Faucets and Fixtures: RVs are equipped with faucets and fixtures for accessing water. These include kitchen and bathroom sinks, showerheads, and toilets. It is important to check these fixtures for any issues or leaks.
- Drain Valves: RVs have drain valves that allow for the easy disposal of wastewater from the sink and shower. These valves should be opened to drain the wastewater into a designated dump station.
An understanding of these components is important for RV owners to ensure that their water system is functioning properly and to address any issues that may arise. Regular maintenance and inspections are key to keeping the RV water system in good condition and providing clean water for a comfortable camping experience.
Common issues with RV water lines
RV water lines are an essential part of every recreational vehicle’s plumbing system. However, like any other component, they can develop issues over time. It’s important to be aware of these common problems and know how to address them to avoid any water-related mishaps during your travels.
1. Leaks
One of the most common issues with RV water lines is leaks. Leaks can occur due to various reasons, such as loose connections, damaged fittings, or wear and tear over time. It’s important to regularly inspect your RV’s water lines for any signs of leakage and address them promptly. Using a leak detection spray or checking for water stains can help identify the source of the leak.
2. Frozen water lines
In colder climates, frozen water lines can be a major concern for RV owners. When the temperature drops below freezing, the water in the lines can freeze, causing blockages and potential damage to the pipes. To prevent frozen water lines, it’s important to insulate the pipes, use heat tape or heated hoses, and ensure proper drainage of the water system when not in use.
3. Water pressure issues

Issues with water pressure can also arise in RV water lines. Low water pressure can be caused by clogged filters, faulty pressure regulators, or restrictions in the water lines. On the other hand, high water pressure can put stress on the pipes and fittings, leading to leaks or bursts. Regularly checking and maintaining the water pressure and ensuring proper filtration can help prevent these problems.
4. Contamination
Contamination of the RV’s water lines can occur due to various factors, such as dirty water sources or a lack of proper filtration. This can lead to unpleasant tastes or odors in the water and may pose health risks. Installing a reliable water filtration system and regularly sanitizing the water lines can help prevent contamination and ensure clean and safe water for your RV.
5. Aging and deterioration
Over time, RV water lines can deteriorate or become damaged due to age and constant use. The materials used in the construction of the water lines can degrade, leading to leaks or other issues. Regularly inspecting the water lines and replacing any aging or deteriorating components can help maintain the integrity of the plumbing system and avoid costly repairs in the future.
In conclusion, being aware of the common issues with RV water lines and taking proactive measures to prevent or address them can help ensure the reliability and efficiency of your RV’s plumbing system. Regular inspections, maintenance, and the use of proper equipment and techniques are crucial in keeping your RV water lines in optimal condition.
How to Troubleshoot RV Water Line Problems
If you’re experiencing issues with your RV’s water line, it’s important to troubleshoot the problem as soon as possible to prevent further damage. Here are some steps you can take to identify and fix common water line problems in your RV:
1. Check for leaks
Start by inspecting all visible water lines in your RV for any signs of leakage. Look for dripping or pooling water, wet spots, or mold and mildew growth. If you find a leak, locate the source and tighten any loose connections or replace damaged sections of the water line. Remember to turn off your water supply before making any repairs.
2. Test water pressure
If you’re experiencing low water pressure in your RV, it could be due to a clogged filter or water line. Remove and clean the filter, and then test the water pressure again. If the problem persists, you may need to inspect the water line for any obstructions or kinks. Straighten out any kinks or remove any debris that may be blocking the flow of water.
3. Insulate your water lines
If you’re camping in cold weather, your RV’s water lines may be at risk of freezing. Insulating your water lines can help prevent frozen pipes and potential damage. You can purchase pipe insulation sleeves from your local RV supply store and wrap them around the exposed water lines. Additionally, consider using heat tape or a heated water hose for extra protection against freezing temperatures.
4. Check the water pump
If you’re not getting any water flow in your RV, the issue may be with the water pump. Check the pump for any obstructions or clogs that may be preventing water from being pumped through the system. If the pump is running but not delivering water, it may be a sign of a faulty pump or a problem with the water tank. In this case, it’s best to consult a professional RV mechanic.
- Regularly inspecting and maintaining your RV’s water lines can help prevent major problems down the line.
- When in doubt, it’s always a good idea to consult a professional for assistance with more complex water line issues.
Steps to Winterize an RV Water System
Winterizing your RV water system is an essential step to protect it from freezing temperatures, which can cause damage to the plumbing and water lines. By following these steps, you can ensure that your RV is properly prepared for the cold weather:
1. Drain the Water Tanks
The first step in winterizing your RV water system is to drain all the water from the tanks. Start by emptying the fresh water tank, followed by the gray and black water tanks. Make sure to open all the faucets and drains to remove any remaining water.
2. Bypass and Drain the Water Heater
To prevent the water heater from freezing, it’s important to bypass it and drain any residual water. Close the water inlet valve to the water heater and open the pressure relief valve to release any built-up pressure. Then, open the drain valve to empty the water heater completely.
3. Blow Out the Water Lines
Using an air compressor with a blow-out plug, connect it to the city water inlet of your RV. Open all the faucets one by one, including the shower, toilet, and outdoor shower, until you don’t see any water coming out. This will remove any remaining water from the water lines.
4. Add Antifreeze
To protect the plumbing system during freezing temperatures, it’s important to add antifreeze. Use a non-toxic RV antifreeze specifically designed for potable water systems. Pour the antifreeze into the fresh water tank and turn on the water pump to circulate it through the system. Open each faucet until you see the antifreeze flowing.
5. Check for Leaks
After completing the winterization process, it’s essential to check for any leaks in the system. Turn off the water pump and close all the faucets. Inspect all the connections and fittings for any signs of leakage. Repair any leaks before storing your RV for the winter.
By following these steps, you can ensure that your RV water system is properly winterized and protected from freezing temperatures. Always refer to your RV owner’s manual for specific instructions and recommendations.
Tips for Maintaining an RV Water System
Proper maintenance of your RV water system is essential to ensure clean and safe drinking water on your travels. Here are some tips to help you maintain your RV water system:
- Regularly sanitize your water system: Clean and sanitize your water system at least once a year, or as recommended by the manufacturer. This will help remove any bacteria, mold, or other contaminants that may be present in the system.
- Use a water filter: Install a water filter in your RV to remove impurities and improve the taste and quality of the water. This will also help prolong the life of your water system by preventing sediment buildup.
- Check for leaks: Inspect your RV water system regularly for any leaks or drips. These can lead to water damage and promote the growth of mold and mildew. Repair any leaks promptly to prevent further damage.
- Drain and winterize your system: Before storing your RV for the winter, make sure to drain and winterize your water system to prevent freezing and damage. Follow the manufacturer’s instructions or consult a professional if you are unsure how to do this.
- Monitor water pressure: Use a water pressure regulator to prevent excessive water pressure from damaging your system. High water pressure can cause leaks and other issues with your plumbing.
- Use potable water hoses: Use hoses specifically designed for drinking water (potable water hoses) to fill your RV’s water tank. Regular garden hoses may contain chemicals that can contaminate your water.
By following these maintenance tips, you can keep your RV water system in good working condition and enjoy clean and safe water on your travels.