
When it comes to installing or repairing a Samsung dryer, it’s essential to understand the wiring diagram. The wiring diagram is a visual representation of the electrical components and connections in the dryer. It shows how the wires are connected and where they go, ensuring the proper functioning of the dryer. In the case of a Samsung dryer, the 4-wire diagram is commonly used, and understanding it is crucial for any DIY repair or installation.
By referring to the Samsung dryer 4-wire diagram, you can identify the different components in the dryer and how they are connected. This includes the power supply, heating elements, motor, thermostat, and other key parts. Each wire has a specific color and purpose, which is clearly outlined in the diagram. This knowledge is especially important when replacing a faulty component, as it ensures that you connect the wires correctly and prevent further damage.
Additionally, understanding the Samsung dryer 4-wire diagram allows you to troubleshoot issues more effectively. If your dryer is not heating or not starting, for example, you can follow the diagram to identify the possible causes and check the relevant components. This saves time and effort by providing a clear roadmap to diagnose and fix the problem. Whether you’re a beginner or an experienced DIYer, having access to the wiring diagram can make all the difference in successfully repairing your Samsung dryer.
Samsung Dryer 4 Wire Diagram
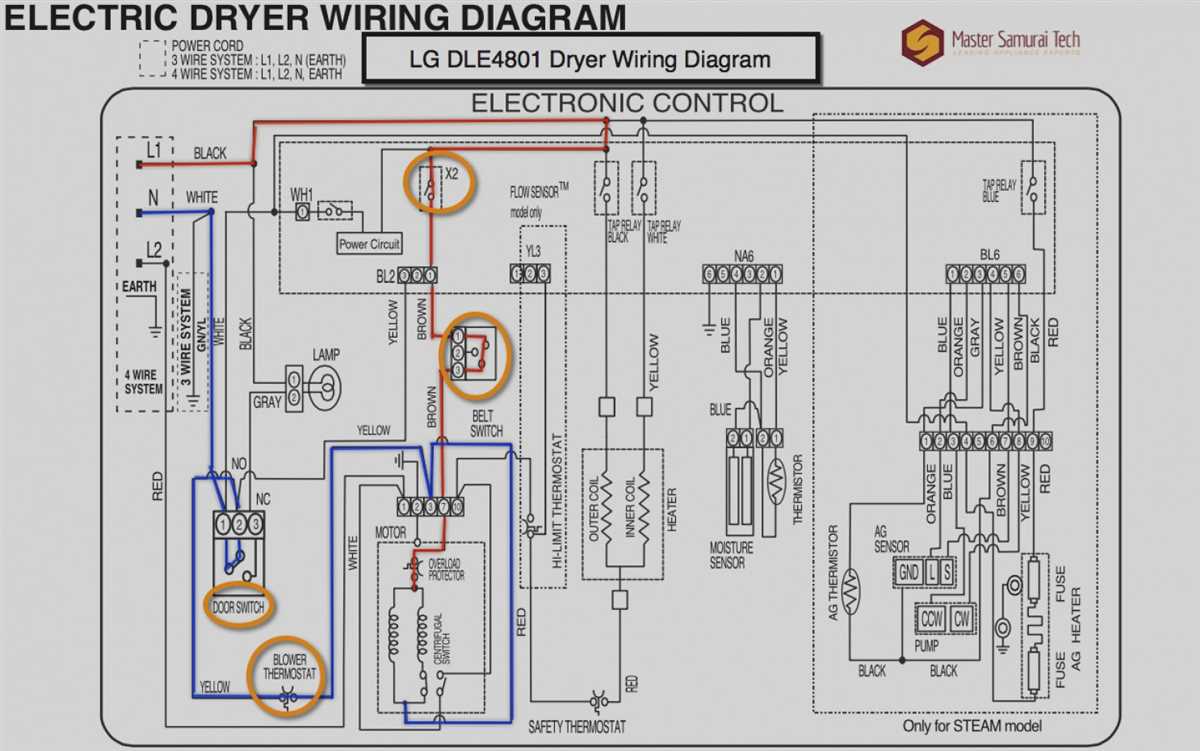
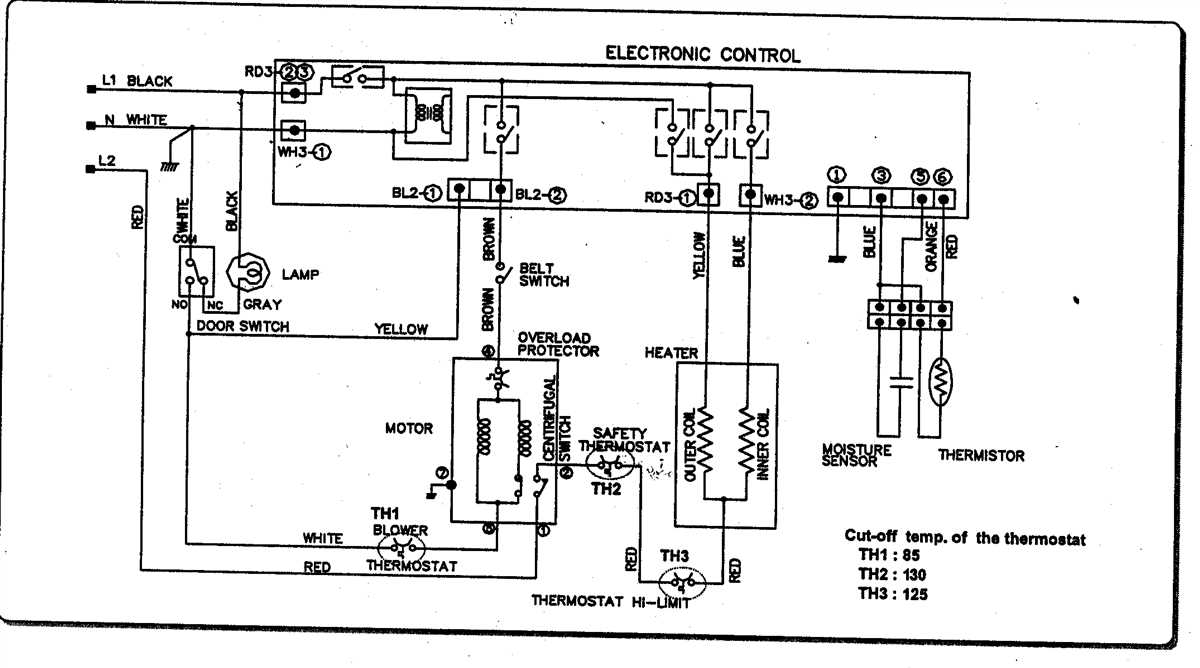
The Samsung dryer 4 wire diagram shows the internal wiring and electrical connections of a Samsung dryer that uses a 4-wire power cord. This diagram is essential for anyone who needs to troubleshoot or repair their Samsung dryer.
The diagram includes detailed information on each wire and its corresponding connection point. It shows how the four wires (black, red, white, and green) from the power cord are connected to different components inside the dryer, such as the heating element, motor, and control panel. Understanding this diagram is crucial for ensuring proper and safe electrical connections.
Black Wire: The black wire is typically connected to the L1 terminal on the dryer’s terminal block. This wire carries the 120VAC power supply from one of the hot lines in the electrical panel to the dryer. It is responsible for providing power to the heating element, motor, and other electrical components.
Red Wire: The red wire is usually connected to the L2 terminal on the dryer’s terminal block. Like the black wire, it carries 120VAC power supply from the second hot line in the electrical panel to the dryer. The red wire also powers various components inside the dryer.
White Wire: The white wire, often called the neutral wire, is connected to the N terminal on the dryer’s terminal block. This wire carries the electrical current back to the electrical panel. It is essential for completing the electrical circuit and ensuring safe operation.
Green Wire: The green wire, also known as the ground wire, is connected to the dryer’s grounding screw. It provides a path for excess electrical current to safely discharge into the ground, preventing electrical shocks and other safety hazards.
In summary, the Samsung dryer 4 wire diagram is a valuable resource for understanding the internal wiring and electrical connections of a Samsung dryer. It helps users troubleshoot and repair their dryers safely and effectively. It is crucial to follow the diagram and ensure correct wiring to prevent accidents and ensure proper functioning of the dryer.
Understanding the 4 Wire Configuration
When it comes to wiring a Samsung dryer, it is important to understand the 4 wire configuration. This configuration is commonly used in modern dryers and is designed to provide a safe and efficient electrical connection. By understanding the different wires and their functions, you can ensure that your dryer is properly wired and operating correctly.
The 4 wire configuration consists of four separate wires: a ground wire, a neutral wire, and two hot wires. The ground wire is typically green or bare copper and is used to provide a safe path for electrical current to flow in the event of a fault or short circuit. The neutral wire is typically white and carries the return current from the dryer back to the electrical panel. The two hot wires, typically black and red, carry the current from the electrical panel to the dryer.
To properly wire a Samsung dryer, make sure to follow the manufacturer’s instructions and consult a professional if you are unsure. It is important to ensure that the wires are securely connected and that all connections are properly insulated. Additionally, make sure to turn off the power to the dryer before attempting to wire it to prevent any risk of electrical shock.
Overall, understanding the 4 wire configuration in a Samsung dryer is essential for safe and effective operation. By familiarizing yourself with the different wires and their functions, you can ensure that your dryer is wired correctly and operating efficiently.
Identifying the Different Wires
When it comes to understanding the wiring diagram of a Samsung dryer, it is important to be able to identify the different wires and their purposes. The diagram provides a visual representation of the electrical connections in the dryer, helping users troubleshoot any issues that may arise.
Neutral wire: One of the most important wires in the diagram is the neutral wire, which is usually colored white. This wire carries the current back to the electrical panel, completing the circuit and ensuring that electricity flows properly through the dryer. It is important to ensure that the neutral wire is correctly connected to its designated terminal.
Hot wires: The diagram may also include hot wires, which are typically colored black or red. These wires carry the current from the electrical panel to various components in the dryer, such as the heating element or motor. It is crucial to correctly identify and connect the hot wires to the appropriate terminals to avoid any electrical issues.
Ground wire: Another important wire that may be present in the diagram is the ground wire, typically colored green or bare copper. This wire is responsible for providing an alternate path for electricity in case there is a fault or short circuit in the dryer. Proper grounding is essential for safety, and it is important to ensure that the ground wire is securely connected to its designated terminal.
By understanding and correctly identifying the different wires in the Samsung dryer’s wiring diagram, users can ensure that their dryer operates safely and efficiently. It is always recommended to consult the manufacturer’s instructions or a professional electrician if there are any doubts or concerns regarding the wiring of the dryer.
Connection Diagram for a 4-Wire Samsung Dryer
A 4-wire connection diagram is commonly used for Samsung dryers. This type of setup allows for both a ground and neutral wire to be connected separately, ensuring safe and reliable operation of the appliance. The 4-wire configuration is important for adhering to electrical codes and reducing the risk of electric shock.
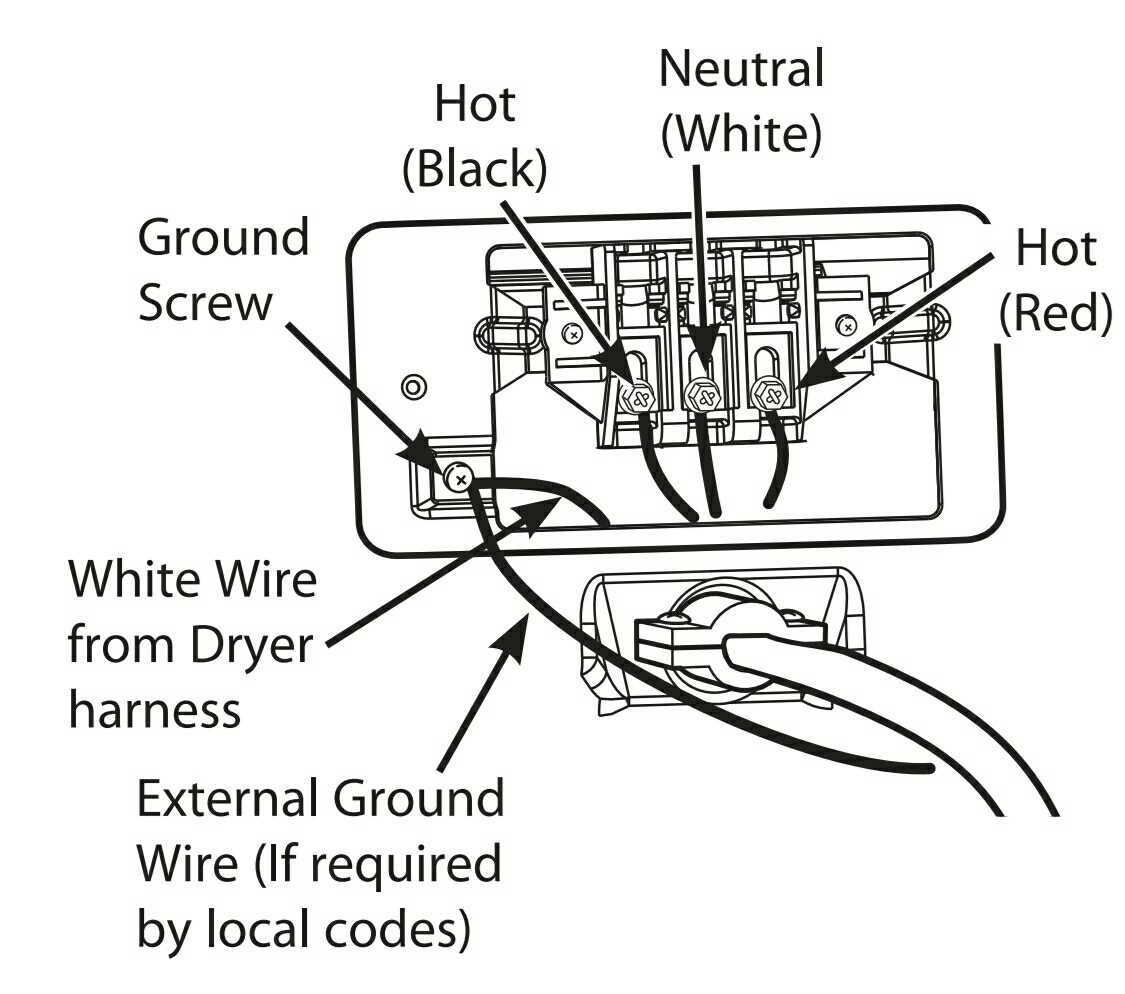
The 4-wire connection diagram typically includes the following components: a black wire for hot or supplying power, a red wire for another hot or power supply, a white wire for neutral, and a green or copper wire for ground. Each wire has a specific purpose and must be connected correctly for the dryer to function properly.
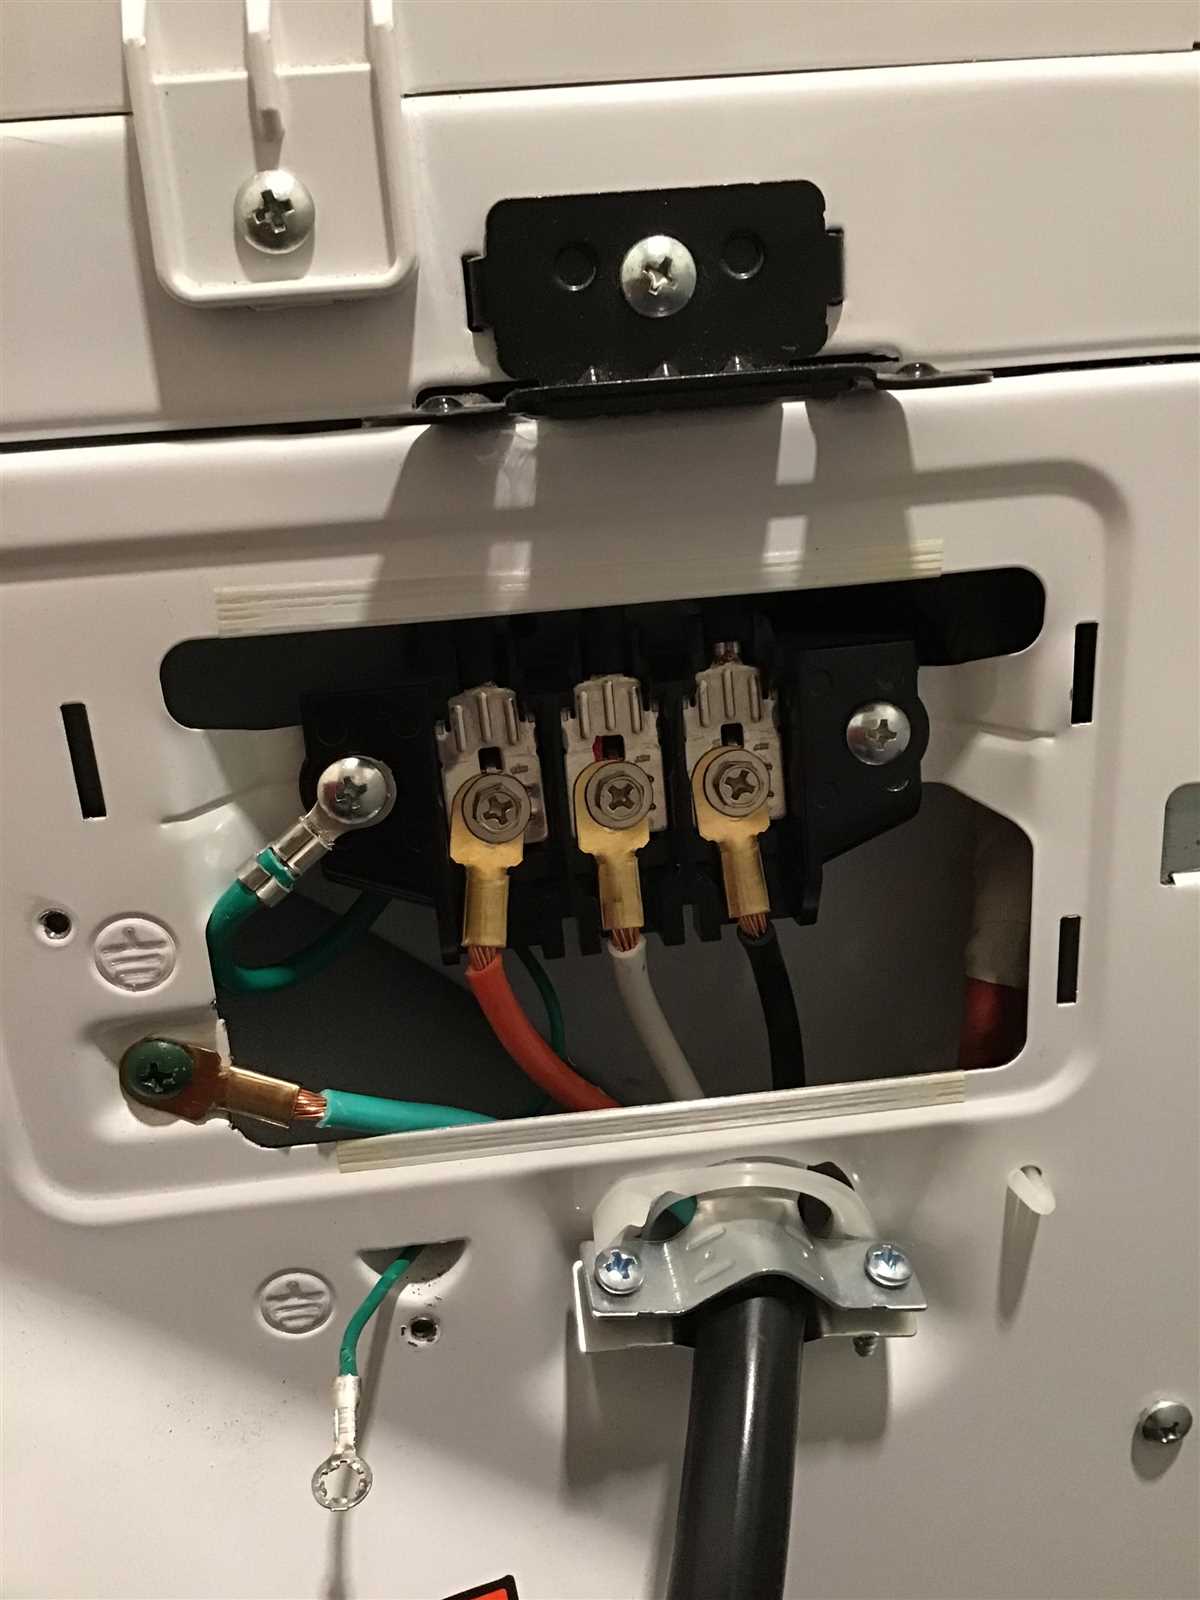
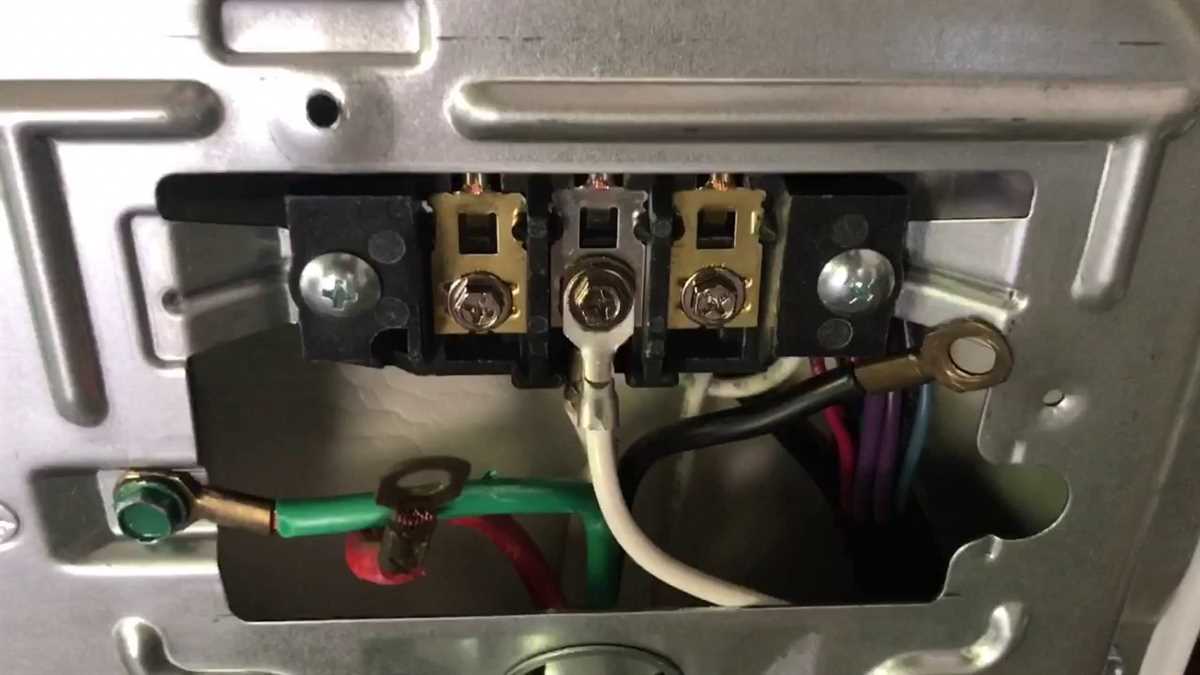
In a typical connection diagram, the black and red wires are connected to the outer terminal blocks labeled L1 and L2. The white wire is connected to the center terminal block labeled N for neutral, and the green or copper wire is connected to the grounding screw or terminal on the dryer chassis.
It’s essential to follow the diagram provided by the manufacturer and consult the dryer’s installation manual for specific instructions. Improper wiring can lead to electrical issues, damage to the dryer, or even fire hazards. If you are not confident in your electrical skills, it is recommended to seek the assistance of a professional electrician to ensure a safe and correct connection.
Summary:
- A 4-wire connection diagram is used for Samsung dryers.
- The diagram includes black and red wires for power, white wire for neutral, and green or copper wire for ground.
- Proper connection is crucial for safe and reliable operation.
- Follow the manufacturer’s diagram and consult the installation manual for correct wiring instructions.
- If unsure, it is recommended to hire a professional electrician for assistance.
Step-by-Step Installation Guide
Installing a Samsung dryer can be a simple task if you follow the correct steps and have the necessary tools. Here is a step-by-step guide to help you with the installation process:
1. Preparation
Gather the required tools: Before you begin the installation, make sure you have all the necessary tools handy. This may include a Phillips screwdriver, pliers, wire stripper, electrical tape, and a level.
Check the electrical requirements: Make sure you have the appropriate power outlet available for the dryer. Samsung dryers typically require a 240V, 30 amp electrical connection. Verify that your home’s electrical system can meet these requirements.
2. Unpacking and setup
Unpack the dryer: Carefully unpack the dryer and remove any packaging materials. Ensure that all needed accessories and installation materials are present.
Choose the installation location: Select a suitable location for the dryer, taking into consideration the ventilation requirements and proximity to the power outlet.
Leveling the dryer: Use a level to ensure that the dryer is positioned evenly. Adjust the feet of the dryer as needed to achieve a level installation.
3. Electrical connection
Turn off power: Before proceeding with the electrical connection, turn off the power to the circuit you will be working on at the circuit breaker.
Wire connection: Follow the provided wiring diagram to properly connect the wires from the dryer to the power supply. Typically, a four-wire connection is required, consisting of two hot wires, a neutral wire, and a grounding wire.
Secure the connection: Use pliers to securely tighten the wire connections and ensure there are no loose or exposed wires. Cover the wire connections with electrical tape for added safety.
4. Ventilation setup
Connect the exhaust vent: Attach the exhaust vent to the back of the dryer using a clamp. Ensure that the vent is properly connected and secure.
Install the lint filter: Place the lint filter in the designated area inside the dryer. Make sure it is securely seated and can be easily accessed for cleaning.
Check for obstruction: Verify that the exhaust vent is not obstructed and is properly routed to the outside of your home. This will ensure proper airflow and ventilation.
5. Final checks
Double-check all connections: Go through all the electrical and venting connections again to make sure everything is properly installed and secured.
Turn on the power: After confirming that everything is set up correctly, turn on the power to the dryer at the circuit breaker.
Test the dryer: Run a test cycle on the dryer to ensure it is functioning properly and that hot air is being vented correctly.
By following these step-by-step instructions, you can successfully install your Samsung dryer and have it ready for use in no time. If you encounter any difficulties or have specific questions, refer to the user manual or contact Samsung’s customer support for further assistance.
Common Issues and Troubleshooting with Samsung Dryer
Like any appliance, Samsung dryers can experience common issues that may require troubleshooting. Here are some of the most common problems you may encounter with your Samsung dryer and how to troubleshoot them:
1. Dryer not heating
If your Samsung dryer is not heating, there may be several reasons for this issue. First, check if the dryer is properly plugged in and the circuit breaker is not tripped. Make sure the dryer door is closed and the lint screen is clean. Check the heating element and thermostat for any signs of damage or malfunction. If necessary, replace these components to restore heat to your dryer.
2. Dryer not tumbling
If your Samsung dryer is not tumbling, the problem may be with the drive belt. Inspect the belt for any signs of wear or damage. If the belt is broken, it will need to be replaced. Additionally, check the motor and motor pulley for any issues. If the motor is not functioning properly, it may need to be repaired or replaced.
3. Dryer producing unusual noises
If your Samsung dryer is making unusual noises, such as squeaking or rattling, there may be a problem with the drum rollers or idler pulley. Inspect these components for any signs of wear or damage. Lubricate the drum rollers if necessary, or replace them if they are worn out. Similarly, check the idler pulley for any issues and replace it if needed.
4. Dryer not drying clothes completely
If your Samsung dryer is not drying clothes completely, check the exhaust vent for any obstructions or restrictions. Clear any lint buildup or debris that may be blocking the vent. Ensure that the dryer is not overloaded with clothes, as this can affect drying efficiency. If necessary, adjust the drying settings to a higher heat or longer duration to ensure proper drying.
5. Dryer not turning on
If your Samsung dryer is not turning on, check if it is properly plugged into a working power outlet. Test the outlet with another appliance to ensure it is functioning correctly. Check the power cord for any damage or loose connections. If necessary, replace the power cord. Additionally, check the control panel for any error codes or indicators that may indicate a malfunctioning component.
Remember, if you are unsure about any of these troubleshooting steps or if the issue persists, it is recommended to contact a professional technician or Samsung customer support for further assistance.
Important Safety Considerations

Safety should always be a top priority when working with electrical appliances, such as a Samsung dryer. Here are some important safety considerations to keep in mind:
1. Turn off the power:
- Before attempting any repairs or maintenance on your Samsung dryer, always make sure to turn off the power supply. This can be done by unplugging the dryer from the electrical outlet or turning off the circuit breaker that controls the dryer.
2. Wear protective gear:
- When working on your Samsung dryer, it is important to wear appropriate protective gear, such as gloves and safety goggles. This will help protect you from any potential electrical shocks or injuries.
3. Follow the manufacturer’s instructions:
- Always refer to the manufacturer’s instructions and user manual when working on your Samsung dryer. These instructions will provide important safety guidelines and specific procedures that should be followed.
4. Be cautious of sharp edges:
- When disassembling or reassembling parts of the Samsung dryer, be cautious of any sharp edges. Use caution and handle with care to avoid injuries.
5. Do not attempt repairs beyond your skill level:
- If you are unsure or uncomfortable with any repairs or maintenance on your Samsung dryer, it is always best to seek professional assistance. Attempting repairs beyond your skill level can be dangerous and may cause further damage to the appliance.
6. Regularly inspect electrical connections:
- Regularly inspect the electrical connections of your Samsung dryer to ensure they are secure and free from any damage or wear. If you notice any issues, such as frayed wires or loose connections, it is important to address them immediately.
In conclusion, following these important safety considerations will help ensure a safe working environment when working on your Samsung dryer. Always prioritize safety and, when in doubt, seek professional assistance.