
If you are looking to upgrade your car audio system, installing a Sony car CD player is a great choice. With advanced features and superior sound quality, Sony car CD players are designed to enhance your driving experience. However, installing a new CD player might seem like a daunting task, especially if you are not familiar with car electronics. That’s where a wiring diagram comes in handy.
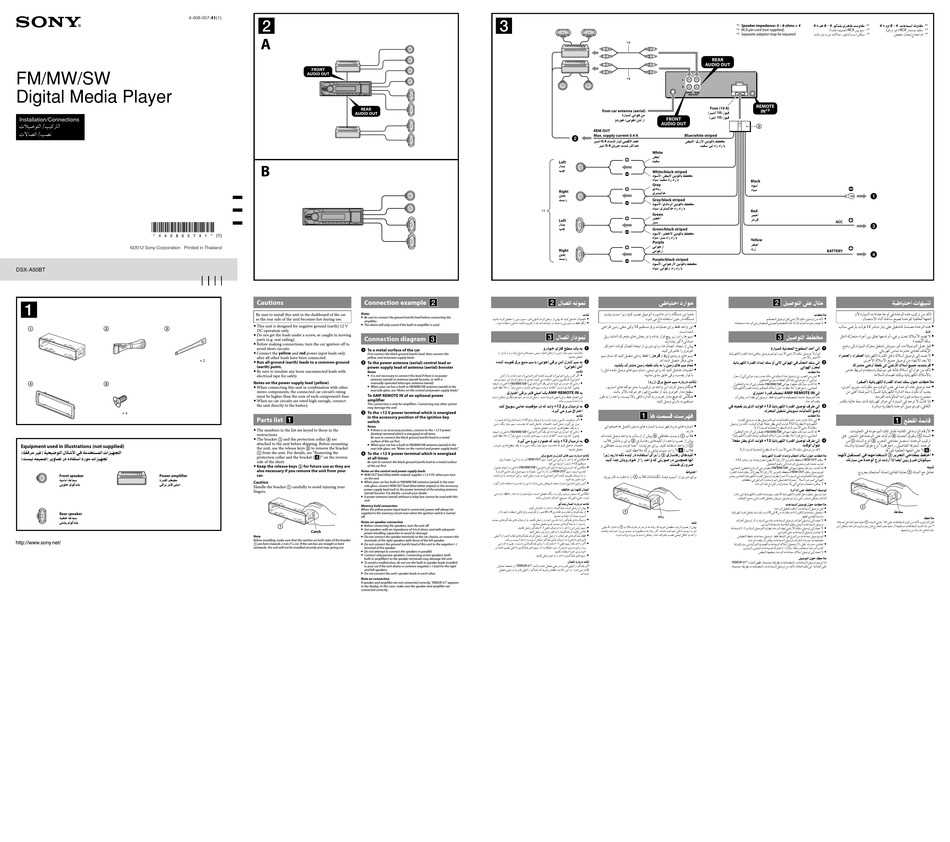
A wiring diagram is a visual representation of the electrical connections in a car. It shows you how to connect the wires from your car to the CD player, ensuring that everything is properly connected and functioning. The Sony car CD player wiring diagram is a valuable resource that can help you install your new CD player with ease.
Whether you are a car audio enthusiast or a beginner, having a wiring diagram will make the installation process much simpler. The diagram provides a clear and concise guide, indicating which wires should be connected to which terminals on the CD player. It eliminates any guesswork and ensures that you make the right connections.
In addition to the standard connections for power, ground, speakers, and antenna, the wiring diagram for a Sony car CD player may also include information on additional features such as Bluetooth connectivity, USB ports, and auxiliary inputs. This allows you to fully utilize the capabilities of your new CD player and enjoy a seamless audio experience in your car.
Sony Car CD Player Wiring Diagram
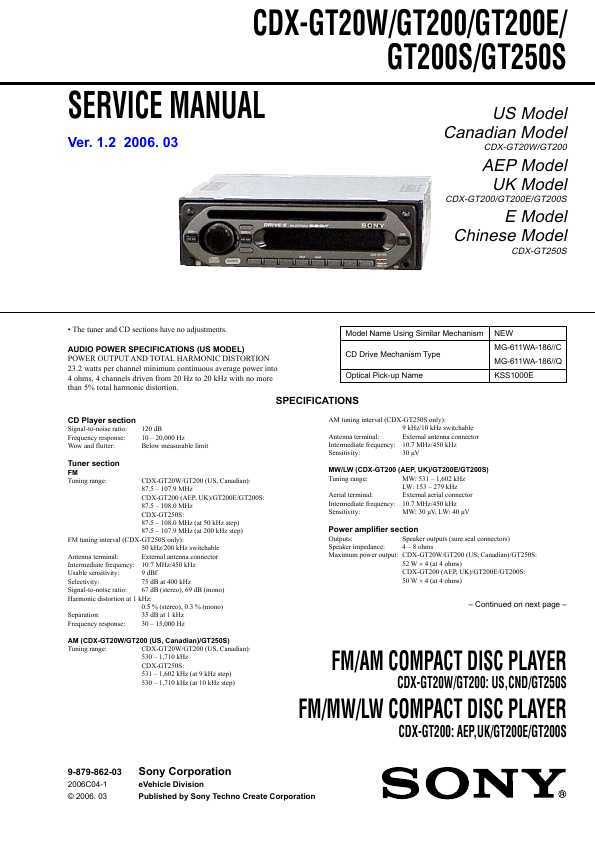
If you’re looking for a wiring diagram for a Sony car CD player, you’ve come to the right place. Sony car CD players are known for their high-quality sound and advanced features, and understanding the wiring diagram can help you properly install and connect your new device.
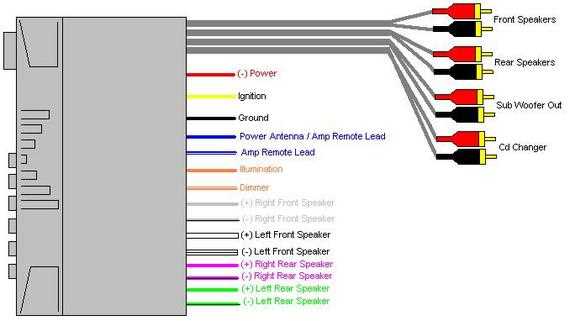
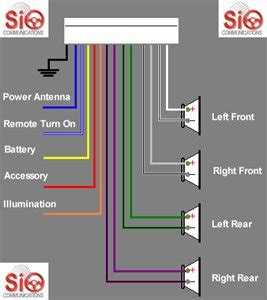
The wiring diagram for a Sony car CD player typically includes information about the power connections, speaker connections, and auxiliary inputs. It will show you which wires connect to the vehicle’s power supply, such as the battery or ignition switch, as well as the wires that connect to the speakers. Additionally, the diagram may include information about any extra features, such as steering wheel controls or Bluetooth connectivity.
Power Connections: The power connections are essential for the proper functioning of your Sony car CD player. The diagram will specify which wires connect to the battery, ground, and ignition switch. It’s important to follow these instructions carefully to avoid any damage to your vehicle’s electrical system.
Speaker Connections: The speaker connections are crucial for achieving optimal sound quality in your car’s audio system. The wiring diagram will indicate which wires connect to which speakers in your vehicle. It’s important to connect the positive and negative terminals correctly to ensure proper sound reproduction.
Auxiliary Inputs: Many Sony car CD players come with auxiliary input options, such as USB or AUX ports, for connecting external devices. The wiring diagram will show you how to properly connect these inputs to your car’s electrical system, allowing you to enjoy your favorite music or podcasts on the go.
In summary, understanding the wiring diagram for your Sony car CD player is crucial for a successful installation. By following the instructions provided in the diagram, you can ensure that your new device is properly connected and functioning optimally, providing you with an exceptional audio experience while on the road.
Understanding the Wiring Diagram
The wiring diagram for a Sony car CD player provides a visual representation of the electrical connections and components in the car’s audio system. It is essential for understanding how the system works and for troubleshooting any issues that may arise.
Power Connections: The wiring diagram will show the power connections for the CD player, including the main power source and any additional power sources that may be required. This helps ensure that the CD player receives the necessary power to function properly.
Speaker Connections: The diagram will also include the speaker connections, indicating how the CD player is connected to the speakers in the car. This allows for proper sound distribution and ensures that the audio signals are correctly transmitted to each speaker.
Signal Connections: Another important aspect of the wiring diagram is the signal connections. This shows how the CD player is connected to other components in the audio system, such as amplifiers or equalizers. Understanding these connections is crucial for achieving the desired sound quality and performance.
Grounding Connections: The wiring diagram will also indicate the grounding connections for the CD player. Proper grounding is essential for minimizing electrical interference and ensuring the stability of the audio system.
Overall, understanding the wiring diagram for a Sony car CD player is essential for proper installation, troubleshooting, and optimizing the audio system’s performance. It provides a roadmap of the electrical connections and components, allowing car owners and professionals to make informed decisions and effectively address any issues that may arise.
Identifying the Wiring Components

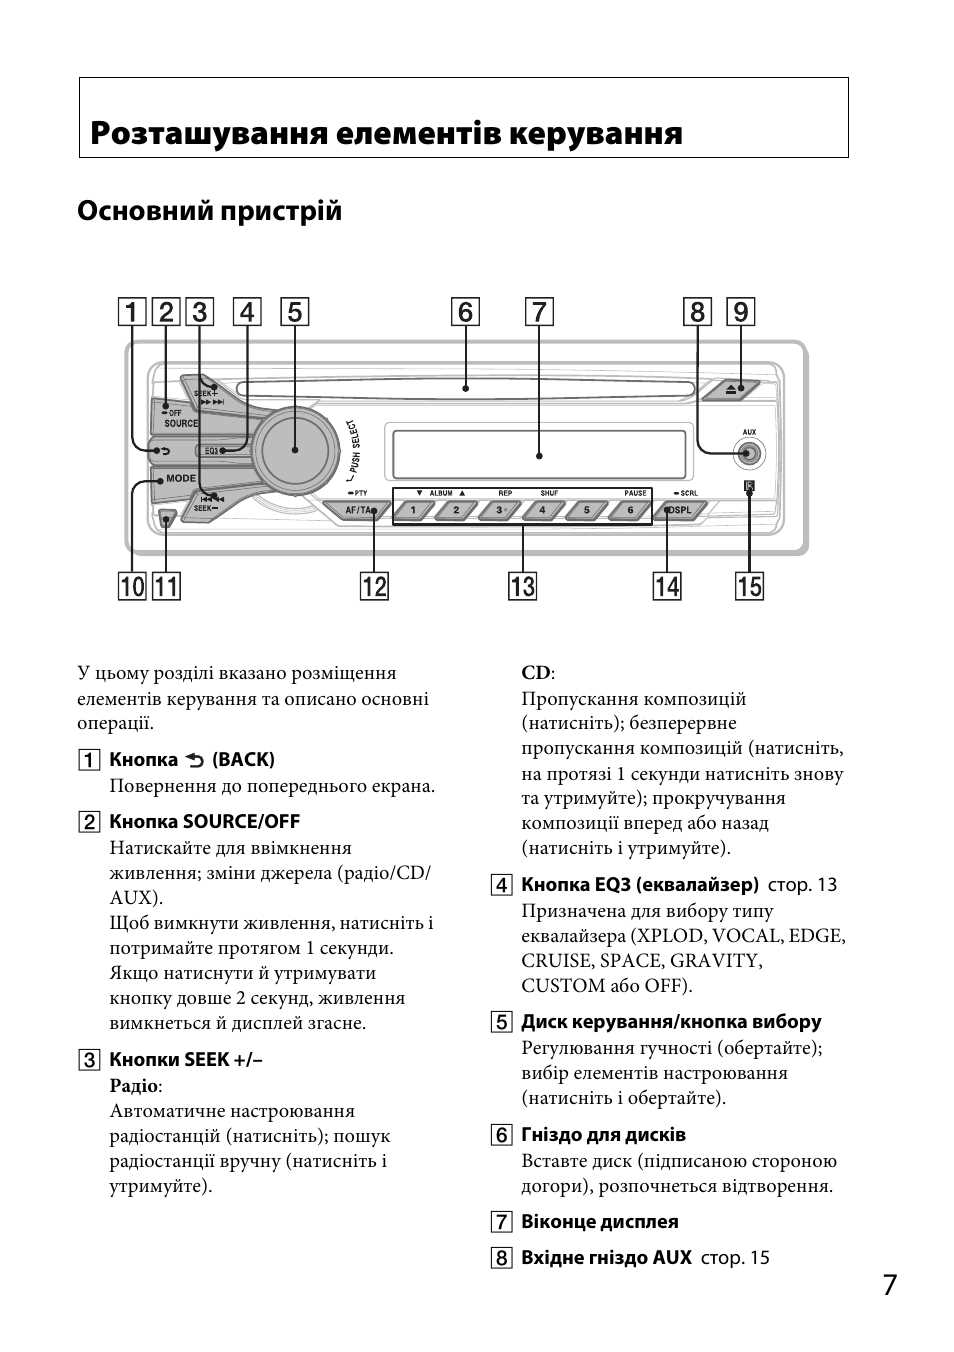
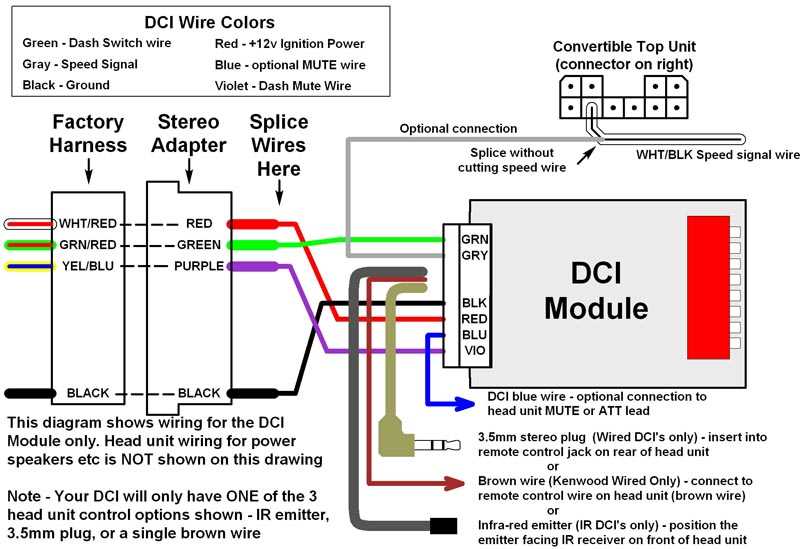
When it comes to understanding the wiring diagram for a Sony car CD player, it’s important to familiarize yourself with the different components and their functions. The wiring diagram typically includes information about the power supply, speakers, antenna, and other electrical connections.
Power Supply: The power supply is a crucial component in any car CD player. It provides the necessary electrical current to operate the player. In the wiring diagram, the power supply is usually represented by a positive (+) and negative (-) sign, indicating the battery or car’s electrical system.
Speakers: Another important component in the wiring diagram is the speakers. Speakers are responsible for producing sound output from the CD player. The diagram typically identifies the different speaker channels (left, right, front, rear) and their corresponding wire colors.
Antenna: The antenna is used to receive radio signals. In the wiring diagram, the antenna connection is usually indicated by a wire labeled “ant” or “antenna.” The diagram may also include information about connecting an external antenna for improved reception.
Electrical Connections: The wiring diagram may include various electrical connections, such as ground wires, ignition wires, and accessory wires. These connections are important for powering the CD player and ensuring proper functionality.
Understanding the wiring components in a Sony car CD player can help you diagnose and troubleshoot any issues that may arise. By referring to the wiring diagram and identifying the different components, you can ensure proper installation and operation of your car’s CD player.
How to Connect the Wiring Components
The wiring components of a Sony car CD player must be connected properly for it to function correctly. Here is a step-by-step guide on how to connect the various wiring components:
1. Disconnect the car battery:
Before starting any wiring work, it is important to disconnect the car battery to prevent any accidental short circuits or damage to the electrical system. Locate the car battery and disconnect the negative terminal by loosening the clamp with a wrench.
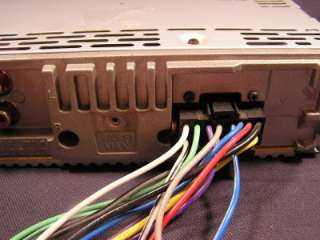
2. Identify the wiring harness:
The wiring harness is a bundle of wires that connects the car CD player to the car’s electrical system. It usually comes with the car CD player or can be purchased separately. Identify the wiring harness and match the wires according to their function (e.g., power, ground, speaker, etc.).
3. Connect the power wires:
Connect the power wires from the wiring harness to the corresponding power wires in the car. This usually involves connecting the yellow wire to a constant power source (usually the car’s battery) and the red wire to an ignition-switched power source. Use wire connectors or solder the wires together for a secure connection.
4. Connect the ground wire:
Locate a metal grounding point near the car CD player installation location. Strip the insulation off the ground wire from the wiring harness and securely connect it to the grounding point using a ring terminal or a grounding screw.
5. Connect the speaker wires:
Match the color-coded speaker wires from the wiring harness to the corresponding speaker wires in the car. Use wire connectors or solder the wires together for a secure connection. Make sure to connect the positive and negative terminals correctly.
6. Test the connections:
Before reinstalling the car CD player, double-check all the connections and make sure they are secure. Reconnect the car battery and turn on the car CD player to test the audio and functionality. If everything is working correctly, proceed with securely mounting the car CD player in the car.
Common Wiring Issues and Troubleshooting
When it comes to car CD players, wiring issues are relatively common and can cause a variety of problems. Here are some common wiring issues and troubleshooting steps to help you resolve them.
1. Incorrect Wiring Connections
One of the most common issues is incorrect wiring connections. Ensure that all the wires are properly connected according to the wiring diagram provided by Sony. Incorrect connections can lead to audio distortion, no sound, or even damage to the player or speakers. Double-check the connections and make sure they match the colors and labels indicated in the diagram.
2. Loose or Damaged Wires

If you’re experiencing intermittent audio or sudden cutouts, check for loose or damaged wires. Vibrations and regular wear and tear can cause wires to become loose or disconnected. Inspect the wiring harness, including the connectors and terminals, for any signs of damage or corrosion. Secure any loose connections and replace damaged wires to ensure a stable and reliable connection.
3. Power Supply Issues
If your CD player is not turning on or experiencing intermittent power issues, it could be due to power supply problems. Check the fuse box and ensure that the fuse for the CD player is not blown. Also, verify that the power and ground connections are secure and free from any corrosion. If necessary, consult the car’s manual or a professional to troubleshoot and fix any power supply issues.
4. Incorrect Wiring Compatibility
Sometimes, a car CD player’s wiring might not be compatible with your vehicle’s wiring system. This can result in issues like no sound, poor audio quality, or even damage to the player. Ensure that the CD player you are using is compatible with your car’s wiring system before installation. If in doubt, consult the manufacturer or a professional to get the correct wiring adapter or harness for your specific car model.
5. Grounding Problems
A common issue is poor grounding, which can cause various audio issues like noise, hum, or a weak signal. Check the ground wire connection and ensure that it is properly connected to a clean and sturdy metal surface in the car’s chassis. Make sure there is no paint, rust, or other insulating materials between the wire and the metal surface. Additionally, consider using a dedicated ground wire to minimize any potential grounding issues.
By addressing these common wiring issues and troubleshooting steps, you can ensure proper functionality and optimal performance of your Sony car CD player.
Tips for Installing a Sony Car CD Player
Installing a Sony car CD player can enhance your listening experience and allow you to enjoy your favorite music while on the road. However, it is important to follow proper installation procedures to ensure optimal performance and longevity of your CD player. Here are some tips to keep in mind when installing a Sony car CD player:
- Read the manual: Before starting the installation, make sure to read the manual provided by Sony. This will give you important information about the specific model you are installing and provide step-by-step instructions for proper installation.
- Gather the necessary tools: Ensure that you have all the necessary tools and equipment before starting the installation. This may include a screwdriver, wire cutters, electrical tape, and a wiring harness adapter.
- Disconnect the battery: Before making any electrical connections, it is important to disconnect the negative terminal of your vehicle’s battery. This will prevent any accidental short circuits and protect your CD player and vehicle’s electrical system.
- Use a wiring harness adapter: To simplify the installation process and ensure compatibility with your vehicle’s wiring, use a wiring harness adapter. This adapter will allow you to connect the CD player’s wiring harness to the vehicle’s existing wiring without the need for cutting or splicing.
- Secure the CD player: Make sure to securely mount the CD player in the dashboard or console of your vehicle. This will prevent any unnecessary vibrations and ensure proper functioning of the CD player while driving.
- Test the CD player: Once the installation is complete, test the CD player to ensure that it is functioning correctly. Check that all the features, such as the CD player, radio, and auxiliary input, are working properly.
By following these tips, you can successfully install a Sony car CD player and enjoy high-quality audio during your drives. Remember to take your time, follow the instructions, and be patient throughout the installation process. With proper installation, you can enhance your driving experience and enjoy your favorite music on the go.