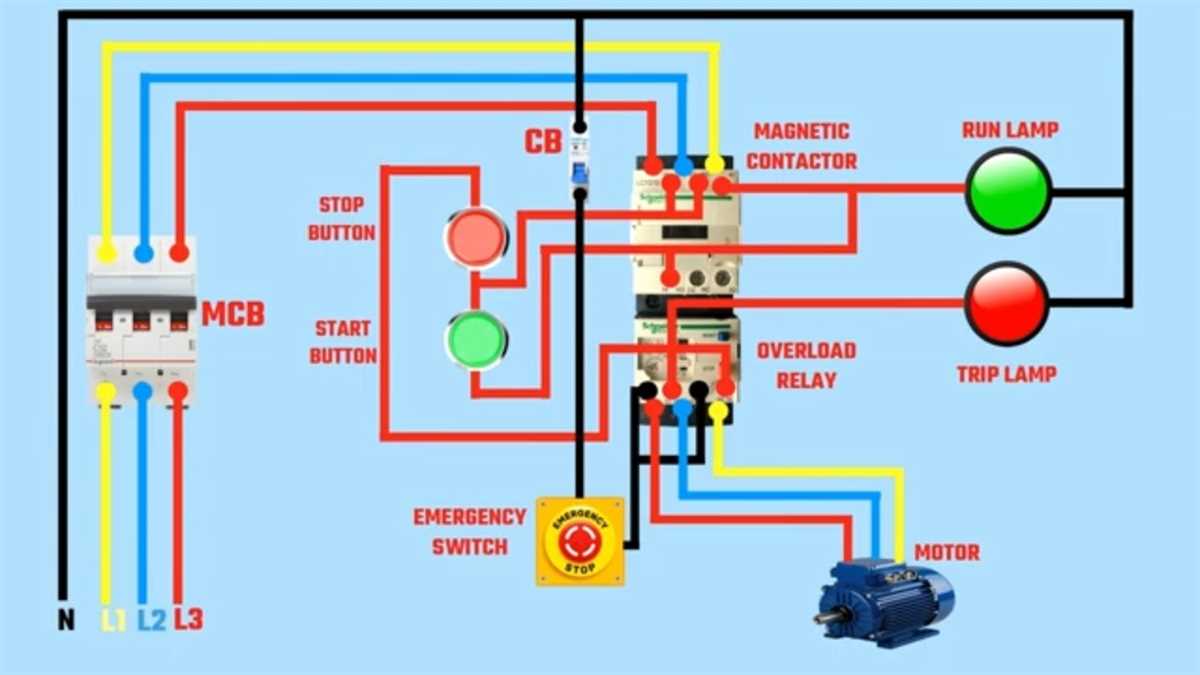
Three-phase motors are commonly used in industrial and commercial settings due to their efficiency and reliability. However, the wiring of these motors can be complex and requires a thorough understanding of electrical systems. In this article, we will discuss the basics of three-phase motor starter wiring and provide a step-by-step guide on how to properly wire a three-phase motor starter.
Before diving into the wiring process, it is important to understand the components of a three-phase motor starter. A typical motor starter consists of a contactor, overload relays, control power transformer, and a control circuit. The contactor is responsible for connecting and disconnecting the motor from the power source, while the overload relays protect the motor from excessive current and overheating.
When wiring a three-phase motor starter, it is crucial to follow the manufacturer’s instructions and adhere to the local electrical codes. The first step is to identify the incoming power supply and ensure that it matches the motor’s voltage and phase requirements. The next step is to connect the control power transformer to the power supply and establish a control circuit for the motor starter.
Understanding the Basics
In the field of electrical engineering, three-phase motors are commonly used in a variety of applications. To ensure the correct operation of a three-phase motor, it is important to understand the basics of how it is wired and controlled. This includes knowledge of the motor starter, which is an essential component in starting and protecting the motor.
Motor Starter
A motor starter is a device that controls the starting and stopping of a motor. It also provides protection against overloads and other electrical faults. The three main components of a motor starter are the contactor, overload relay, and control circuit.
The contactor is an electromechanical switch that connects or disconnects the motor from the power supply. It is controlled by the control circuit, which typically includes a start button, stop button, and a thermal overload relay. The overload relay senses the current flowing through the motor and protects it from overheating by tripping the contactor if the current exceeds a certain set value.
Wiring Diagram
Understanding the wiring diagram of a three-phase motor starter is essential for proper installation and troubleshooting. The diagram typically includes the main power supply, control circuit, motor, and protective devices. It shows how these components are interconnected and the correct wire connections.
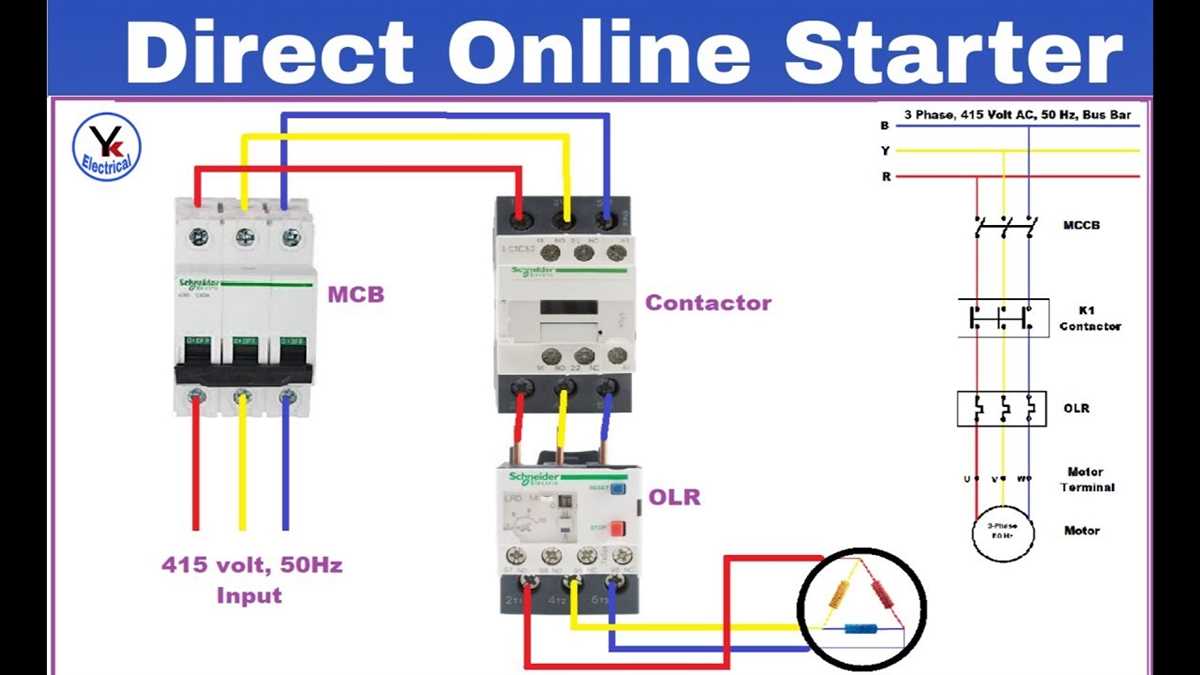
In a simplified diagram, the three-phase power supply is connected to the motor through the contactor. The control circuit controls the operation of the contactor, allowing the motor to start and stop. The overload relay is connected in series with the motor and detects excessive current flow. If an overload condition occurs, the overload relay will trip, disconnecting the motor from the power supply.
Conclusion
Understanding the basics of three-phase motor starter wiring is essential for ensuring the safe and efficient operation of motors. A motor starter is a crucial component in controlling and protecting the motor from electrical faults. By studying the wiring diagram and understanding the function of each component, engineers and technicians can install and troubleshoot three-phase motor starters with confidence.
Components of a Three Phase Motor Starter
A three phase motor starter is a device used to control the starting, stopping, and protection of a three phase electric motor. It ensures that the motor starts smoothly, operates at the desired speed, and is protected from electrical faults such as overcurrent or thermal overload. A typical three phase motor starter consists of several key components.
1. Contactor
The contactor is the main switching device in a three phase motor starter. It is an electromagnetic switch that controls the flow of electricity from the power supply to the motor. The contactor has a set of contacts that close or open depending on the control signal received. When the contacts close, the motor is energized and starts running. When the contacts open, the motor stops. The contactor is designed to handle the high currents and voltages of a three phase motor.
2. Overload Relay
The overload relay is a protective device in a three phase motor starter. It monitors the current flowing through the motor and protects it from overheating due to excessive current. If the current exceeds the predetermined threshold, the overload relay trips and opens the contacts of the contactor, stopping the motor. The overload relay provides an important safety feature, preventing damage to the motor and reducing the risk of electrical fires.
3. Control Circuit
The control circuit is responsible for controlling the operation of the three phase motor starter. It includes various components such as push buttons, selector switches, and control relays. The push buttons are used to start and stop the motor, while the selector switches are used to control the direction or speed of the motor. The control circuit interacts with the contactor and overload relay to ensure proper motor operation and protection.
4. Power Supply
The power supply provides the electrical energy needed to operate the three phase motor starter. It is typically connected to a three phase power source and supplies the necessary voltage and current to the contactor and control circuit. The power supply can be AC or DC depending on the specific requirements of the motor starter.
5. Wiring and Connections
The wiring and connections are essential components of a three phase motor starter. They provide the electrical pathways for the flow of current and voltage between the power supply, contactor, overload relay, and motor. The wiring must be properly sized and insulated to handle the high currents and voltages of a three phase system. The connections between the components must be secure to ensure reliable and safe operation of the motor starter.
In summary, a three phase motor starter consists of a contactor, overload relay, control circuit, power supply, and wiring connections. These components work together to control the starting, stopping, and protection of a three phase electric motor. By properly selecting and configuring these components, the motor can be operated safely and efficiently.
Wiring a Direct-On-Line (DOL) Starter
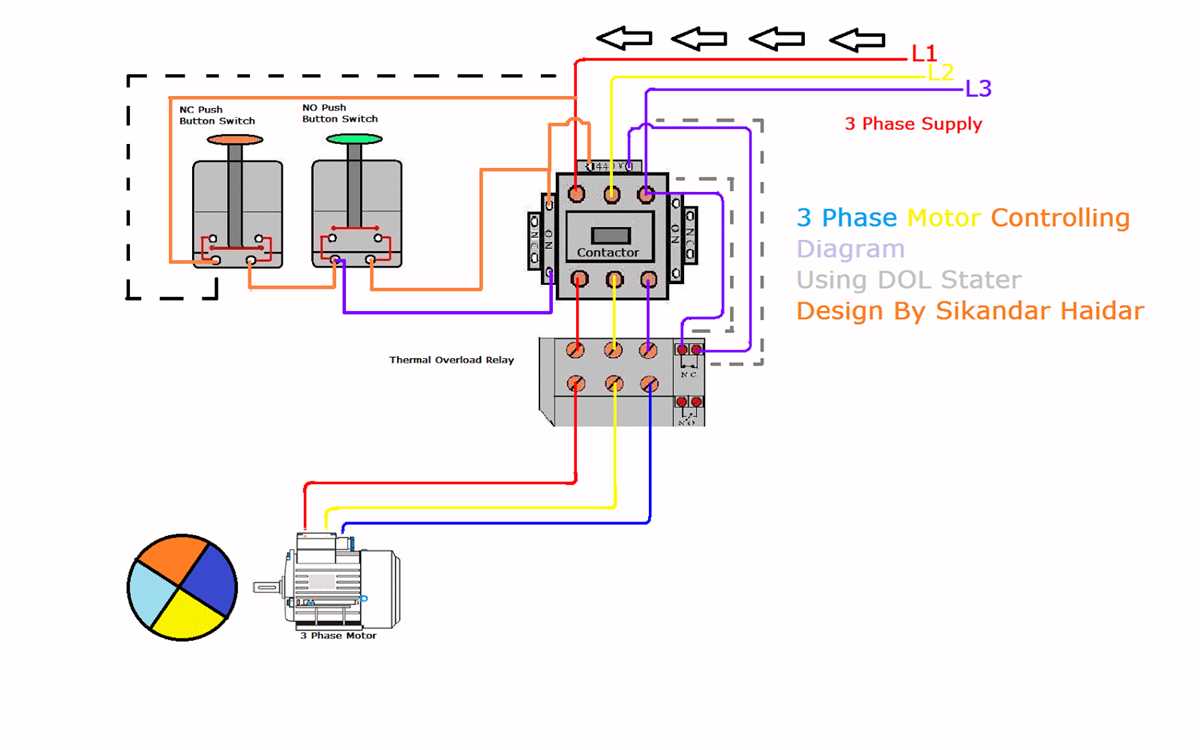
A Direct-On-Line (DOL) starter is a widely used method for starting three-phase motors, providing a simple and cost-effective solution. This type of starter is commonly used in industrial applications where the motor needs to be started and stopped frequently. The DOL starter consists of a contactor and an overload relay, connected in series with the motor.
To wire a DOL starter, you will need to follow a specific wiring diagram. The wiring diagram will vary depending on the type of motor you are using and the voltage rating of your electrical system. Ensure you have the correct diagram for your application.
Here are the key steps for wiring a DOL starter:
- Disconnect the power supply to the motor and ensure that it is locked out to prevent accidental startup.
- Connect the three-phase power supply to the terminals of the contactor.
- Connect the motor to the other set of contactor terminals.
- Connect the overload relay in series with the motor. The current rating of the overload relay should be selected based on the motor’s full-load current.
- Connect the control circuit to the control terminals of the contactor. This may include push buttons, switches, or other control devices.
- Ensure all connections are secure and properly tightened.
- Once the wiring is complete, close the control circuit and energize the motor to test the operation of the DOL starter.
It is important to follow safety guidelines when working with electrical systems. Always consult the wiring diagram and refer to relevant codes and regulations to ensure a safe and compliant installation.
Wiring a Star-Delta Starter
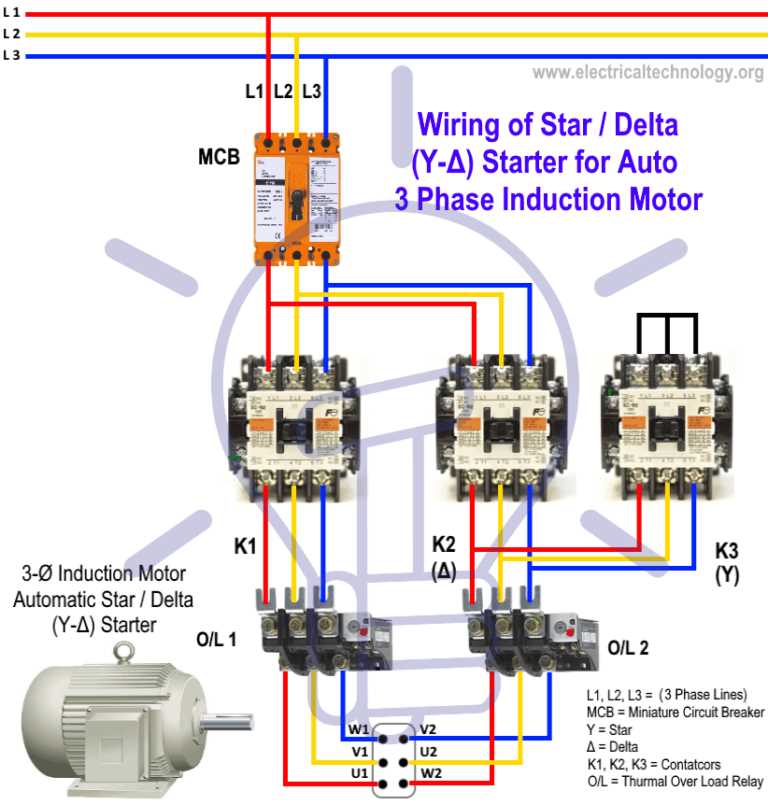
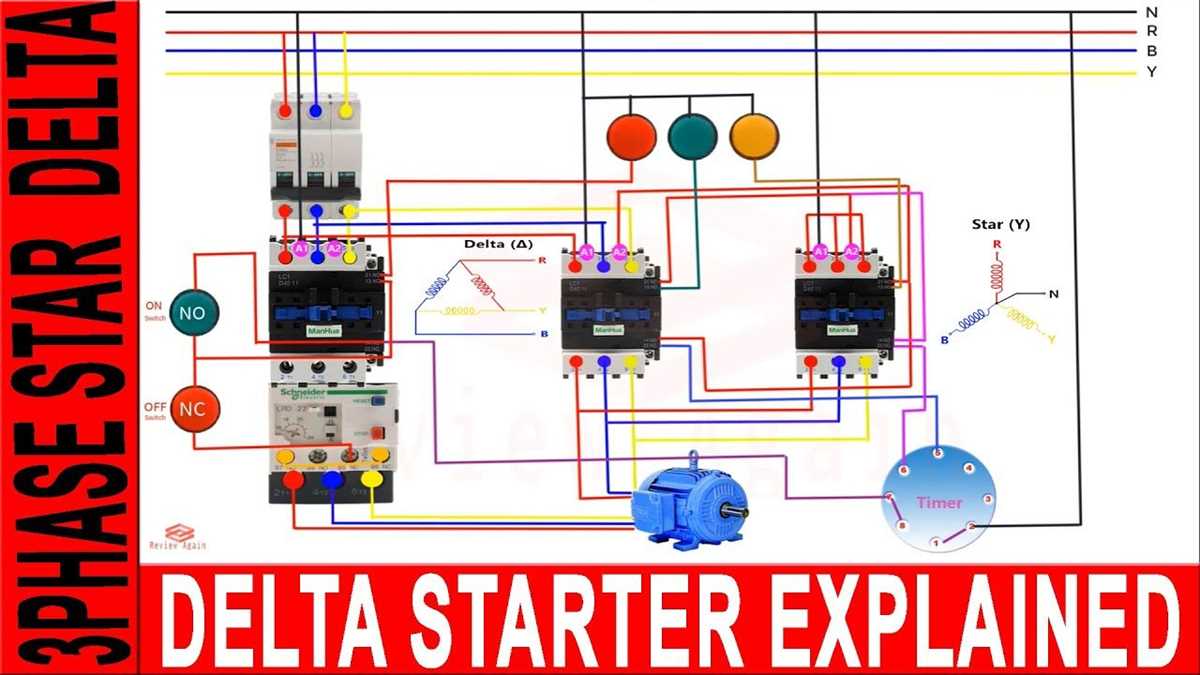
A star-delta starter is a type of motor starter that is used to start a three-phase induction motor. It is commonly used in applications where the motor needs to start with reduced voltage to minimize the starting current and mechanical stress on the motor windings. The star-delta starter achieves this by connecting the motor windings initially in a star configuration and then switching to a delta configuration once the motor has reached a certain speed.
To wire a star-delta starter, you will need to follow a specific wiring diagram. The diagram will typically show the three main terminals of the motor (U, V, and W), as well as the control circuitry, including the start and stop buttons, overload relay, and the timer for the star-delta switching. The wiring diagram will also indicate the different connections for the motor windings in the star and delta configurations.
When wiring the star-delta starter, it is important to pay attention to the correct sizing of the wires and the proper placement of the control devices. The size of the wires should be chosen based on the motor’s full load current, and the control devices should be properly rated to handle the current and voltage requirements of the motor.
Once the star-delta starter is wired correctly, it can be used to start the motor. When the start button is pressed, the motor windings are initially connected in a star configuration, which reduces the voltage applied to each winding. This helps reduce the starting current and torque, preventing excessive heating and mechanical stress on the motor. After a certain time delay, determined by the timer, the star-delta starter switches the motor windings to a delta configuration, which provides the full voltage and torque needed for normal operation.
In conclusion, wiring a star-delta starter requires following a specific wiring diagram and ensuring the correct sizing and placement of wires and control devices. This type of starter is commonly used to start three-phase induction motors with reduced voltage to minimize starting current and mechanical stress. It provides a reliable and efficient method for starting motors in various industrial applications.
Wiring a Auto-Transformer Starter
The auto-transformer starter is a type of motor starter that utilizes an auto-transformer to reduce the voltage applied to the motor during starting. This reduced voltage helps to minimize the initial high current drawn by the motor, thus protecting both the motor and the electrical system. The wiring of an auto-transformer starter involves connecting the motor, the auto-transformer, and the control circuit in a specific manner.
Firstly, the motor is connected to the auto-transformer starter via three separate conductors for each phase. These conductors are usually color-coded for ease of identification. The incoming power supply, typically three-phase AC, is then connected to the primary winding of the auto-transformer through a set of contacts controlled by the control circuit. The auto-transformer has several tapping points along its winding, which allows for the selection of different voltages for motor starting, depending on the requirements of the specific application.
Next, the control circuit is connected to the auto-transformer starter in order to control the starting and stopping of the motor. This control circuit typically consists of a start button, a stop button, and various interlocking contacts and relays to ensure proper sequencing and protection. When the start button is pressed, it energizes a coil in the control circuit, which closes the contacts supplying power to the primary winding of the auto-transformer. The auto-transformer then steps down the voltage and applies it to the motor, allowing it to start with reduced current draw.
In summary, wiring an auto-transformer starter involves connecting the motor, the auto-transformer, and the control circuit in a specific manner. This allows for the controlled reduction of voltage during motor starting, protecting both the motor and the electrical system. Proper wiring and sizing of the auto-transformer and control circuit are essential for the safe and efficient operation of the motor starter.
Common Mistakes to Avoid
Mistakes are common when it comes to wiring a three phase motor starter. However, avoiding these mistakes can help ensure the safety and proper operation of the motor. Here are some common mistakes to avoid:
- Inadequate wire sizing: One of the most common mistakes is using wires that are too small for the amperage of the motor. This can lead to overheating and potentially cause a fire. It is important to use the appropriate wire size according to the motor’s current rating.
- Incorrect connections: Another common mistake is making incorrect connections. This can result in the motor not functioning as intended or even causing damage to the motor. It is important to carefully follow the wiring diagram and ensure that all connections are made correctly.
- Failure to ground: Neglecting to properly ground the motor starter can lead to electrical issues and increase the risk of electrical shock. It is important to make sure that the motor starter is grounded according to the manufacturer’s guidelines.
- Ignoring safety precautions: Working with electricity can be dangerous, so it is crucial to follow safety precautions. This includes wearing appropriate personal protective equipment and disconnecting the power before starting any work on the motor starter.
By avoiding these common mistakes, you can ensure the proper operation and longevity of your three phase motor starter. Always consult the wiring diagram and follow the manufacturer’s instructions for the specific motor starter you are working with. Safety should be a top priority when dealing with electrical systems.
Q&A:
What are some common mistakes to avoid when learning a new language?
Some common mistakes to avoid when learning a new language include relying too heavily on translation, not practicing speaking enough, neglecting grammar and vocabulary building, and not immersing yourself in the language and culture.
Why is relying too heavily on translation a common mistake?
Relying too heavily on translation can hinder language learning because it keeps you tied to your native language. It is important to start thinking in the target language and not constantly translate everything in your head.
What can happen if I neglect grammar and vocabulary building?
If you neglect grammar and vocabulary building, you may struggle to communicate effectively in the target language. Grammar provides the structure and rules of a language, while vocabulary allows you to express your thoughts and ideas. Failing to focus on these areas can hinder your overall language proficiency.
Why is immersing yourself in the language and culture important?
Immersing yourself in the language and culture is important because it helps you develop a deeper understanding of the language, its nuances, and its context. It allows for real-life practice and exposure to different accents, dialects, and cultural customs, which can greatly enhance your language learning experience.