
A timer fan, also known as an exhaust fan, is an essential component in many homes and commercial buildings. It helps to remove moisture, odors, and pollutants from the air, ensuring a healthy and comfortable environment. A timer fan can be installed in bathrooms, kitchens, laundry rooms, and other spaces that require ventilation. This article will provide a wiring diagram for a timer fan, giving you an understanding of how the different components connect and function.
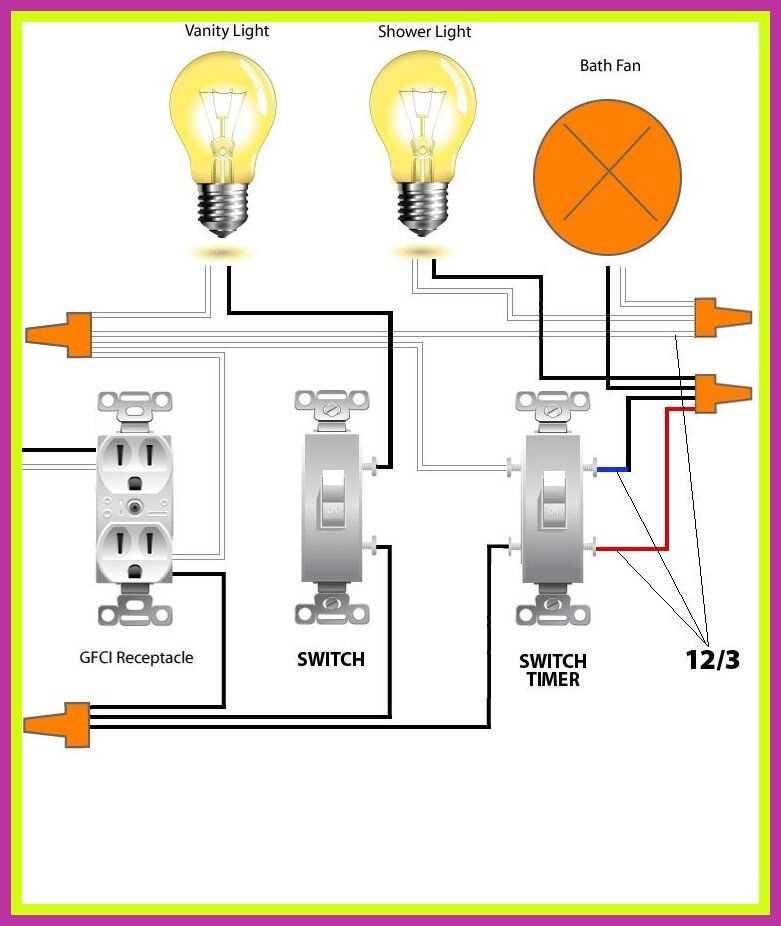
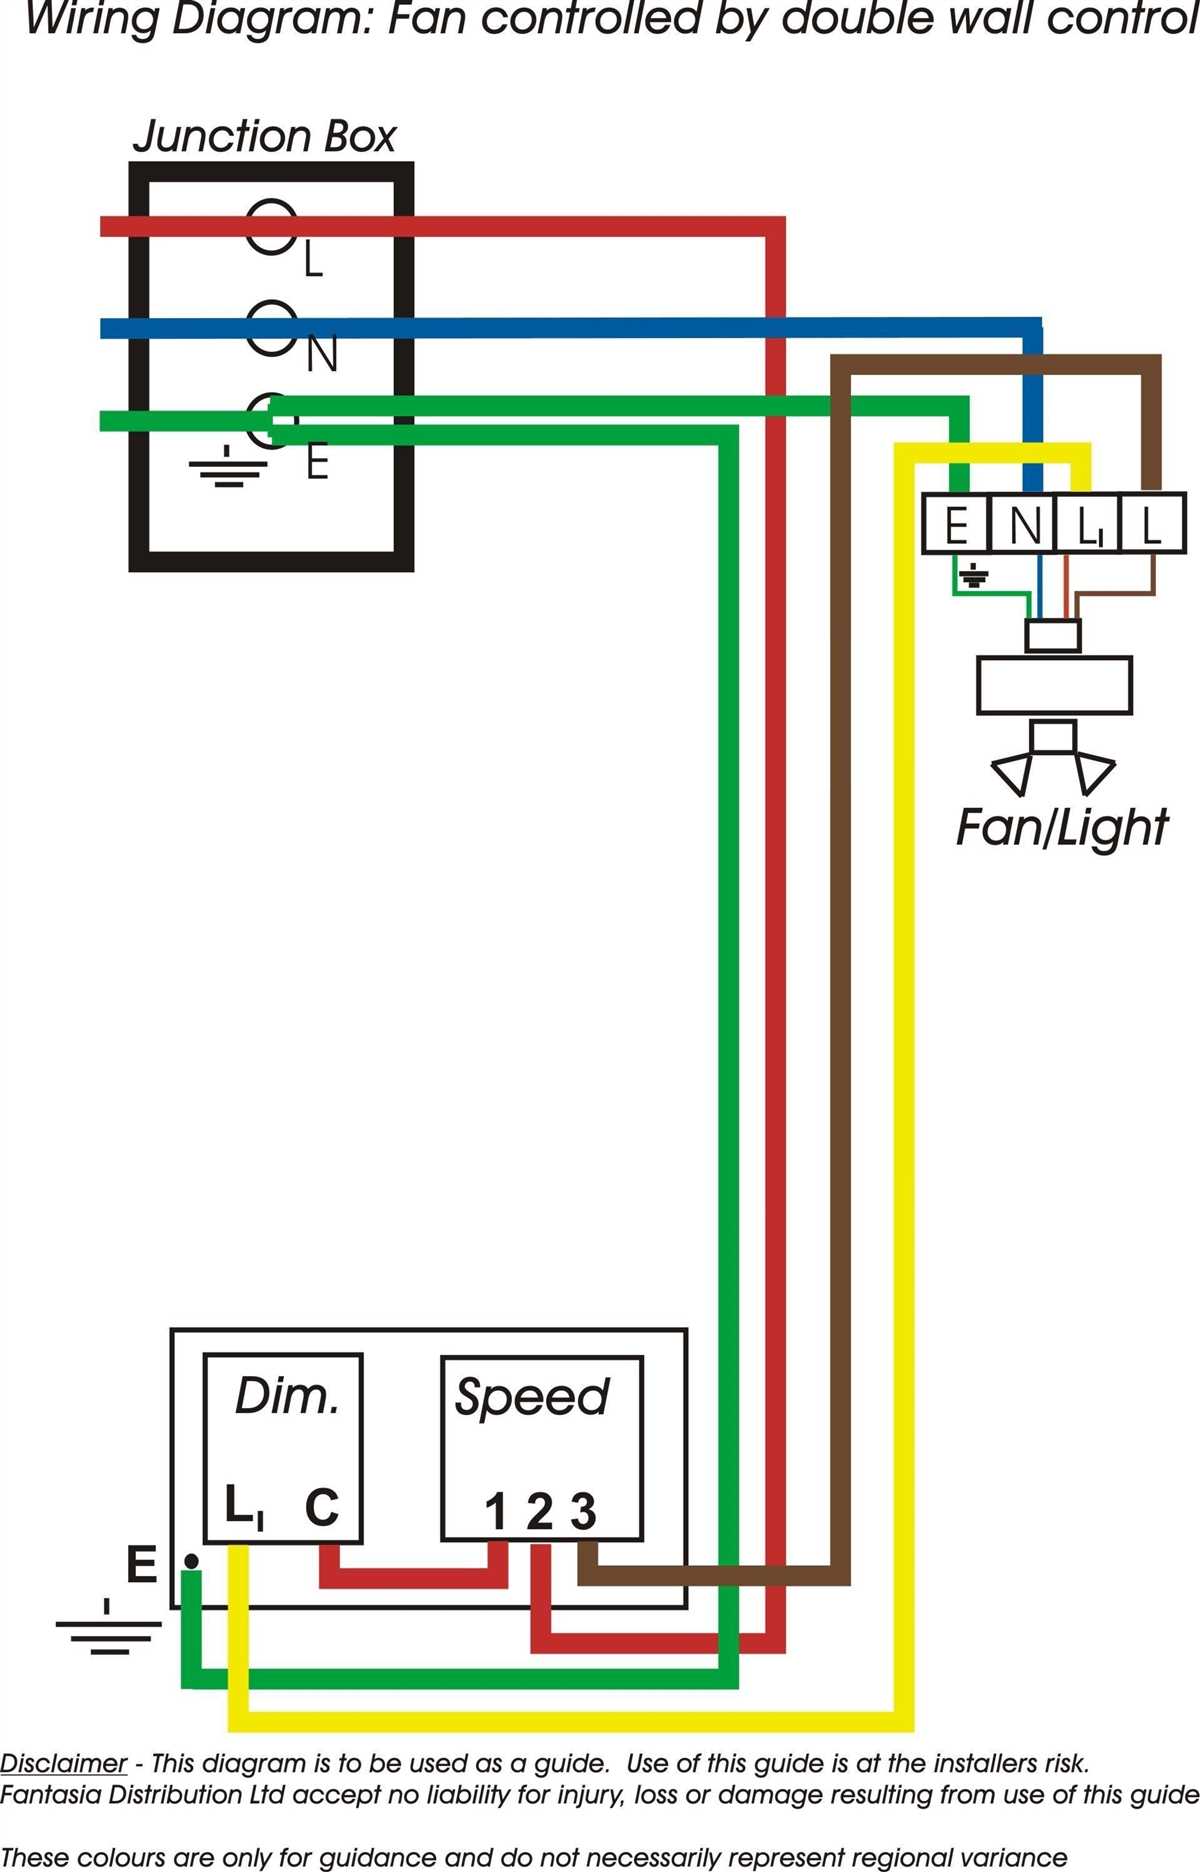
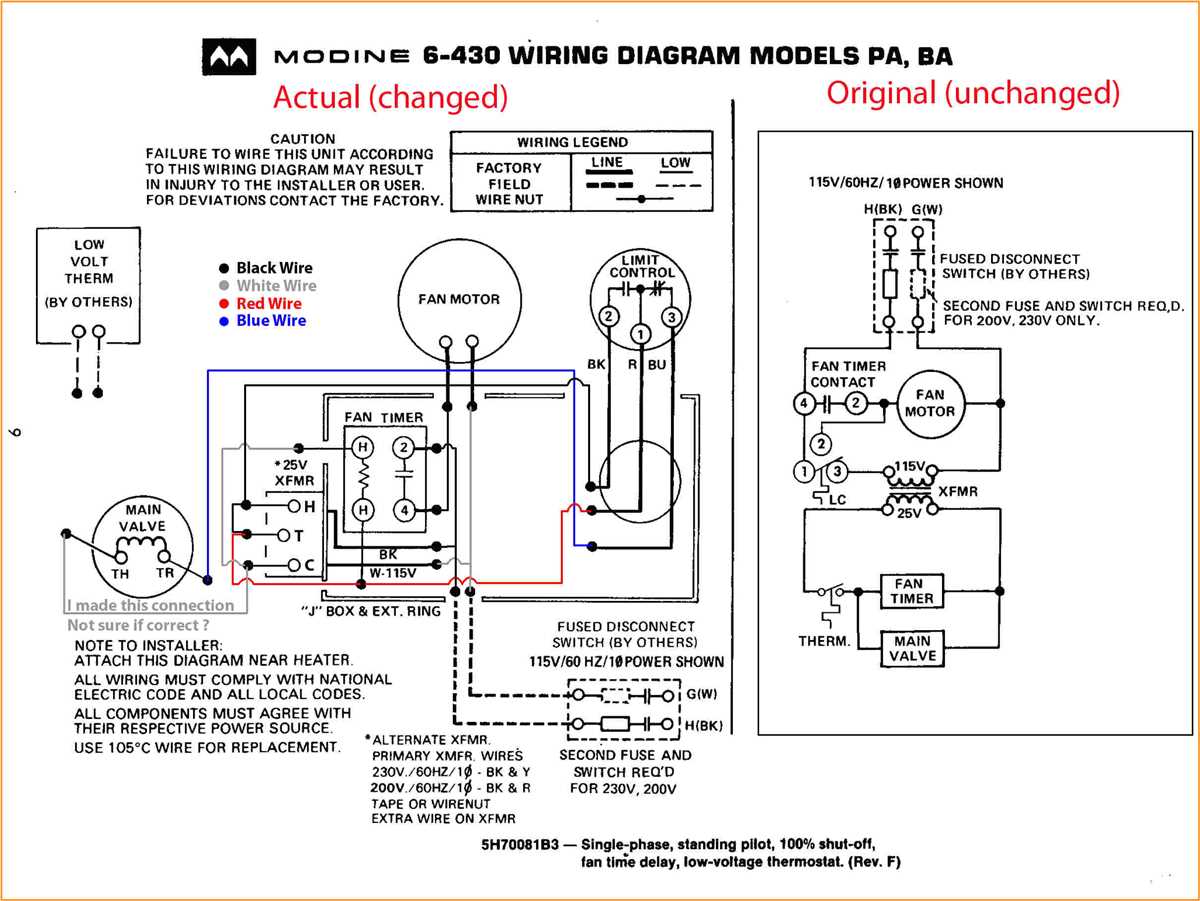
The wiring diagram for a timer fan typically includes several key elements. These include the timer switch, the fan unit, and the power supply. The timer switch is used to control the operation of the fan, allowing you to set specific time intervals for the fan to run. The fan unit consists of the motor, blades, and housing, responsible for extracting air from the room. The power supply provides the electrical energy needed to operate the fan.
When wiring a timer fan, it is important to follow the manufacturer’s instructions and local electrical codes. The first step is to turn off the power supply to the designated area where the fan will be installed. This ensures your safety while working with electrical connections. Then, you will need to mount the timer switch on the wall and route the necessary wiring from the switch to the fan unit.
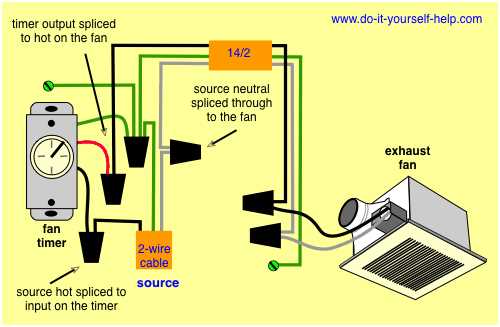
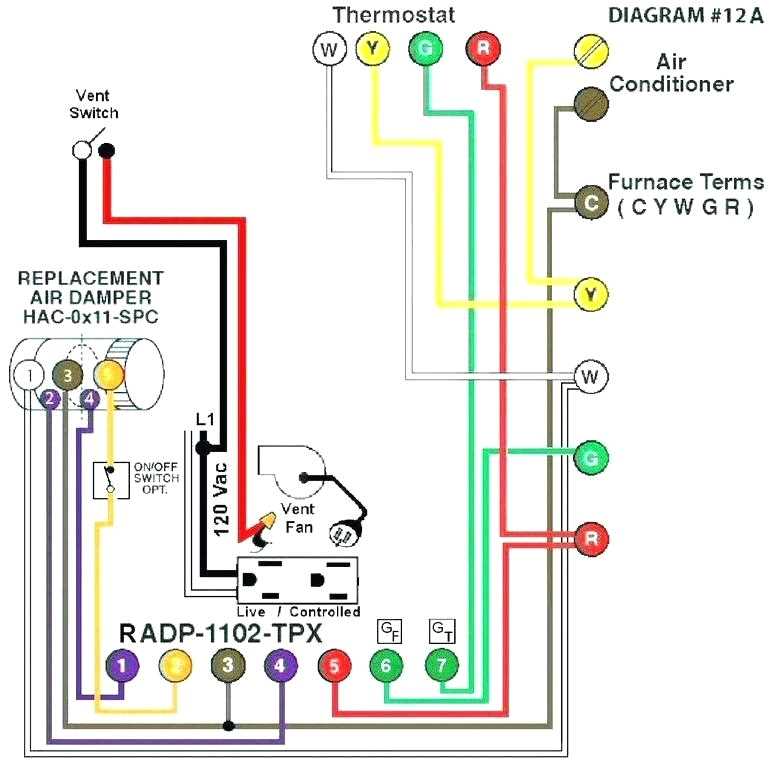
The wiring connections will vary depending on the specific model and type of timer fan you are installing. However, in general, you will need to connect the live wire from the power supply to the common terminal of the timer switch. Then, you will connect one end of the wire from the fan unit to the switched live terminal of the timer switch. Finally, you will connect the neutral wire from the power supply to the neutral terminal of both the fan unit and the timer switch.
Overall, understanding the wiring diagram for a timer fan is crucial for a successful installation. It ensures that the fan functions properly and provides the necessary ventilation for the designated space. If you are not confident in your electrical wiring skills, it is recommended to consult a professional electrician to handle the installation process. By following the appropriate wiring procedures, you can enjoy the benefits of a timer fan and maintain a healthy indoor environment.
Timer Fan Wiring Diagram: A Step-by-Step Guide
If you’re looking to install a timer for your fan and need guidance on the wiring process, this step-by-step guide is here to help. A timer can provide added convenience and energy efficiency by automatically turning off your fan after a set period of time. Follow these instructions to ensure a proper installation.
Materials Needed:
- Timer switch
- Wiring connectors
- Screwdriver
- Wire cutter/stripper
- Electrical tape
Step 1: Turn Off the Power
Before starting any electrical work, make sure to turn off the power to the fan circuit at the circuit breaker. This will ensure your safety during the installation process.
Step 2: Remove the Existing Fan Switch
Next, remove the existing fan switch from the wall. Use a screwdriver to unscrew the switch plate and carefully disconnect the wires from the switch. Take note of the wiring configuration before disconnection.
Step 3: Prepare the Timer Switch
Prepare the timer switch by reading the instructions provided with the device. Typically, timer switches have specific wiring instructions based on their model and brand. Make sure to follow these instructions to ensure correct installation.
Step 4: Connect the Wires
Using wire connectors, connect the wires from the timer switch to the corresponding wires in the fan circuit. Typically, the timer switch will have labeled terminals (such as “load,” “line,” and “ground”) that match with specific wires in the circuit. Use wire cutters/strippers to remove the insulation from the wires before making the connections.
Step 5: Secure the Connections
Once the wires are connected, make sure to secure the connections with wire nuts and wrap them with electrical tape. This will ensure a safe and reliable connection.
Step 6: Mount the Timer Switch
Mount the timer switch back into the wall, following the manufacturer’s instructions. Use the provided screws to secure the switch in place.
Step 7: Test the Timer
After the installation is complete, turn on the power at the circuit breaker and test the timer switch. Set the desired time duration for the fan to run and make sure it automatically turns off after that period. Adjust the settings as needed.
By following these steps, you can successfully install a timer for your fan and enjoy the added convenience and energy efficiency it provides. Remember to always prioritize safety and consult a professional if you’re unsure about any part of the process.
Understanding the Components of a Timer Fan
Timer fans are commonly used in bathrooms and other areas where ventilation is needed. These fans have the advantage of automatically turning on and off at set intervals, providing efficient ventilation and preventing mold and moisture buildup. To understand how a timer fan works, it is important to familiarize yourself with its components and their functions.
The main components of a timer fan include the motor, timer switch, fan blades, and wiring. The motor is responsible for powering the fan and generating the airflow. It is typically connected to the electrical supply and the timer switch.
- The timer switch is a crucial part of the timer fan as it controls the on and off timings. It allows you to set the desired duration for the fan to run before turning off automatically.
- The fan blades are designed to create a flow of air by rotating when the fan is turned on. They are strategically positioned to maximize air circulation and remove stale air, odors, and excess moisture from the room.
- The wiring of a timer fan comprises various connections that enable the transfer of electrical current. These connections include power supply lines, switch wires, and motor connections. It is essential to ensure proper wiring to ensure the fan works safely and efficiently.
Understanding the components of a timer fan can help when it comes to installation, troubleshooting, and maintenance. Following the wiring diagram for your specific timer fan model is crucial to ensure a successful installation and avoid any electrical hazards. Additionally, regular maintenance, such as cleaning the fan blades and checking the wiring connections, can keep your timer fan functioning optimally and prolong its lifespan.
Gathering the Necessary Tools and Materials
Before you begin wiring your timer fan, it is important to gather all the necessary tools and materials to ensure a smooth installation process. Having everything you need at hand will save you time and prevent any delays or interruptions. Here are the essential items you should have:
1. Timer Fan Kit:
Make sure you have purchased a timer fan kit that includes all the necessary components, such as the timer switch, fan unit, and wiring accessories. Check the package contents to ensure that everything is included.
2. Screwdriver:
A screwdriver is a basic tool that you will need to loosen screws, secure wires, and assemble the fan unit. It is recommended to have both a Phillips-head and a flat-head screwdriver to handle different types of screws.
3. Wire Strippers:
Wire strippers are essential for removing the outer insulation of wires without damaging the inner conductors. They come in different sizes, so make sure you have one that is suitable for the wire gauge you are working with.
4. Electrical Tape:
Electrical tape serves as insulation for exposed wires and helps to secure connections. It is important to use high-quality electrical tape that is designed for electrical wiring to ensure safety and longevity.
5. Wire Connectors:
Wire connectors, also known as wire nuts, are used to join two or more wires together. They provide a secure and insulated connection and come in different sizes to match the wire gauge. Having a variety of wire connectors on hand will ensure that you can make proper connections.
6. Wire Caps:
Wire caps, also known as twist-on wire connectors, are another type of connector used to join wires. They are typically used for smaller gauge wires and provide a quick and easy way to make solid connections. Make sure you have wire caps of appropriate sizes for the wires you are working with.
7. Wire Fish Tape:
If you need to route wires through walls or ceilings, a wire fish tape will be handy. It allows you to guide wires through tight spaces and makes the installation process easier and more efficient. Make sure you have a wire fish tape long enough for the distance you need to cover.
In addition to these tools and materials, you should also have a ladder or step stool if you need to access high ceilings or walls, a safety mask and goggles to protect yourself from dust and debris, and a voltage tester to ensure that the power is completely turned off before working on the wiring. By gathering all these necessary tools and materials beforehand, you can approach the timer fan wiring project with confidence and ensure a successful installation.
Assessing the Existing Electrical Setup
Before installing a timer fan in your electrical system, it is important to assess the existing setup to ensure compatibility and safety. This assessment will help determine the necessary modifications and wiring connections required for the installation.
1. Identify the power source: Begin by locating the power source for the fan. This can be a circuit breaker, fuse box, or an existing electrical outlet. Note the voltage and amperage requirements of the fan to ensure that the power source can accommodate it.
2. Determine the wiring configuration: Examine the existing wiring configuration in your home. Check if there is already a dedicated circuit for the fan or if it shares a circuit with other appliances or lights. It is ideal to have a separate circuit to avoid overloading and ensure proper functioning.
3. Evaluate the switch setup: Assess the existing switch setup to determine if it can accommodate the timer function. Timer fans require a specific type of switch that allows for programming and control. If the current switch does not have this capability, it may need to be replaced with a compatible timer switch.
4. Check for necessary wiring modifications: Depending on the existing setup, you may need to make some modifications to the wiring. This could include installing new wiring lines, connecting the fan to a separate circuit, or adding a junction box for proper connections.
5. Consider professional assistance: If you are uncertain about any aspect of the electrical setup or lack experience in electrical work, it is advisable to seek professional assistance. Electricians are trained to assess and modify electrical systems safely and can ensure that the installation is performed correctly and complies with local regulations.
Step-by-Step Wiring Process
When it comes to wiring a timer fan, it’s important to follow a step-by-step process to ensure everything is connected correctly. Here is a guide to help you in the wiring process:
- Gather the necessary materials: Before you begin, make sure you have all the required materials, including a timer fan, electrical wires, wire connectors, and a screwdriver.
- Turn off the power: Safety should always come first. Turn off the power to the circuit you’ll be working on by switching off the appropriate circuit breaker.
- Remove the cover: Once the power is off, remove the cover from the ceiling or wall to access the existing electrical box.
- Disconnect the old fan: If there is an existing fan in place, disconnect it by unscrewing the wire connectors and separating the wires.
- Mount the timer fan: Position the timer fan in the desired location and secure it using the provided screws. Make sure it is securely fastened to the ceiling or wall.
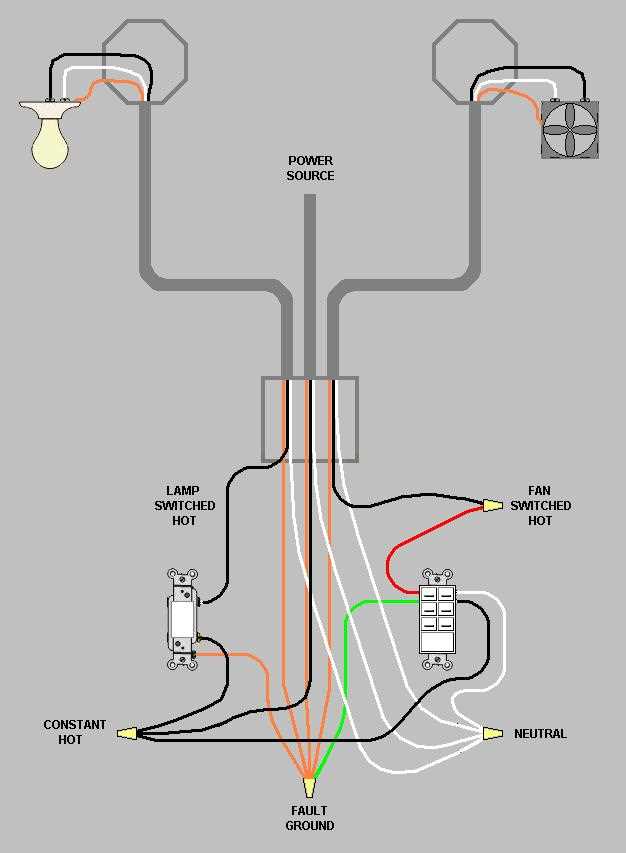
- Connect the wires: Take the electrical wires from the timer fan and strip off the insulation from the ends, exposing about half an inch of bare wire. Connect the corresponding wires from the fan to the electrical wires in the ceiling or wall using wire connectors. Make sure to match the colors correctly (black to black, white to white, and green or bare copper to the grounding wire).
- Secure the wire connectors: Once the wires are connected, twist the wire connectors onto the connected wires clockwise until they are secure. This helps ensure a tight and proper connection.
- Test the connection: Before replacing the cover and turning the power back on, double-check all the connections and make sure they are secure. Use a voltage tester to confirm that there is no power present in the wires.
- Replace the cover: Once you are confident in the wiring, replace the cover on the electrical box and secure it in place using the provided screws.
- Turn on the power: Finally, turn on the power to the circuit by switching the circuit breaker back on. Test the timer fan to ensure it is functioning properly.
Following this step-by-step wiring process will help you successfully install and wire a timer fan, providing you with a functional and efficient cooling solution.
Troubleshooting Timer Fan Wiring Issues
If you are experiencing issues with the wiring of your timer fan, it is important to troubleshoot the problem in order to ensure the proper functioning of the fan. Here are some common issues and solutions to help you resolve any wiring problems.
1. No power to the fan:
If your timer fan does not have power, check if the circuit breaker has tripped. Reset the breaker and test the fan again. If it still does not have power, there may be a problem with the wiring connections. Make sure the wires are properly connected to the power source and check for any loose or damaged wires. If necessary, replace the damaged wires or seek professional assistance.
2. Fan not turning on or off at the designated times:
If the timer fan is not operating according to the predetermined schedule, there could be an issue with the timer settings. Ensure that the timer is properly set and programmed according to your desired schedule. If the fan is still not turning on or off at the designated times, check the wiring connections to the timer. Make sure all the wires are securely connected and there are no loose or damaged connections. Replace any faulty wiring if needed.
3. Fan running continuously:
If the fan is running continuously and does not switch off, there may be a problem with the timer switch. Test the switch by turning it on and off manually. If the fan still does not turn off, the timer switch may need to be replaced. Additionally, check the wiring connections for any loose or damaged wires that could be causing the continuous operation. Repair or replace any faulty wiring as necessary.
Remember, if you are not experienced with electrical work, it is always recommended to seek professional assistance when dealing with wiring issues to ensure your safety and the proper functioning of your timer fan.
Safety Precautions and Final Tips
When working with electrical wiring, it is important to prioritize safety to prevent accidents and ensure the longevity of the timer fan. Here are a few safety precautions and final tips to keep in mind:
1. Turn off Power:
Before starting any wiring work, make sure to turn off the power to the fan circuit at the circuit breaker or fuse box. This will eliminate the risk of electric shock while working with the wiring.
2. Gather Information:
Prior to installation, gather all the necessary information about the timer fan and its wiring requirements. Read the instruction manual carefully to have a clear understanding of the wiring diagram and wiring process. This will help prevent any mistakes during the installation.
3. Use Proper Tools:
Ensure you have the necessary tools for the job, including wire cutters, wire strippers, electrical tape, and a voltage tester. Using the right tools will make the process easier and safer.
4. Double-Check Connections:
Once the wiring is complete, double-check all the connections to ensure they are secure and correct. Loose or incorrect connections can result in malfunctioning or safety hazards.
5. Test Before Closing Up:
Before closing up the wiring box or securing the fan in place, test the timer fan to ensure it is functioning correctly. This will save you from the hassle of having to take it apart again if any issues are discovered.
6. Seek Professional Help if Unsure:
If you are unsure about any aspect of the timer fan wiring or feel uncomfortable working with electrical components, it is always best to seek professional help. Hiring a licensed electrician can ensure a safe and proper installation.
By following these safety precautions and tips, you can successfully wire a timer fan while minimizing risks and ensuring optimal performance. Remember to always prioritize safety and consult professionals when in doubt.
Q&A:
What are some safety precautions to keep in mind?
Some safety precautions to keep in mind include wearing personal protective equipment, following proper safety protocols, being aware of your surroundings, and reporting any safety hazards.
Why is it important to follow safety precautions?
It is important to follow safety precautions to protect yourself and others from potential accidents or injuries. Safety precautions help create a safe and healthy working environment.
What are some final tips for staying safe?
Some final tips for staying safe include staying focused on the task at hand, asking for help when needed, taking breaks to rest and recharge, and keeping work areas clean and organized.
How can I report safety hazards?
You can report safety hazards by notifying your supervisor or manager, following the proper reporting procedures established by your workplace, and documenting any incidents or near misses that occur.