
In order to properly maintain and troubleshoot electrical issues in your Toyota pickup truck, it is essential to have a clear understanding of the fuse box and its functions. The fuse box is a crucial component that houses the fuses for various electrical systems in the vehicle.
A fuse is a safety device designed to protect the electrical circuits from excessive current flow and prevent damage to the sensitive components. If a circuit becomes overloaded or short-circuited, the fuse will blow, cutting off the power supply to that particular circuit.
The Toyota pickup truck is equipped with a fuse box located in the engine compartment, as well as a fuse box under the dashboard. Each fuse box contains various fuses that are assigned to different electrical components and systems, such as the headlights, tail lights, power windows, air conditioning, and more.
To troubleshoot electrical issues, it is important to refer to the Toyota pickup fuse box diagram. This diagram displays the location and function of each fuse, allowing you to quickly identify and replace the faulty fuse. It is crucial to use the correct amperage fuse when replacing a blown fuse to prevent further electrical problems and potential damage to the vehicle.
Toyota Pickup Fuse Box Diagram
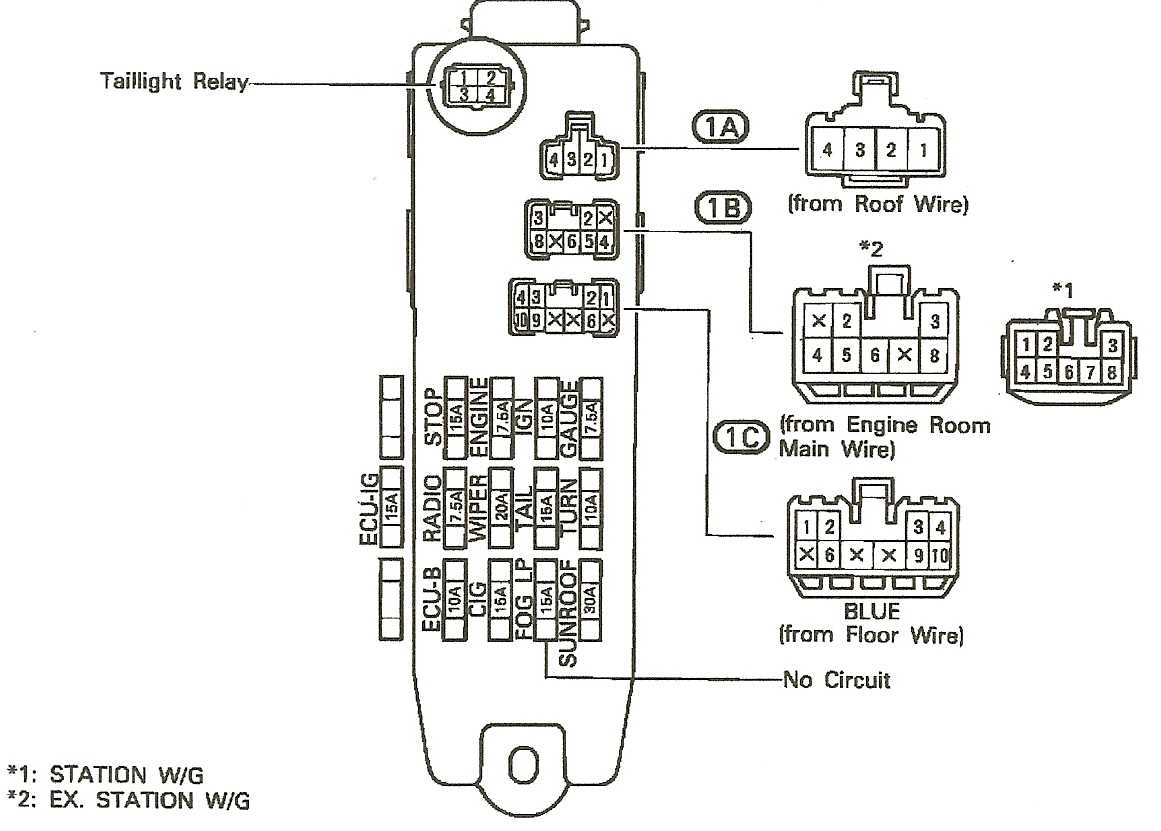
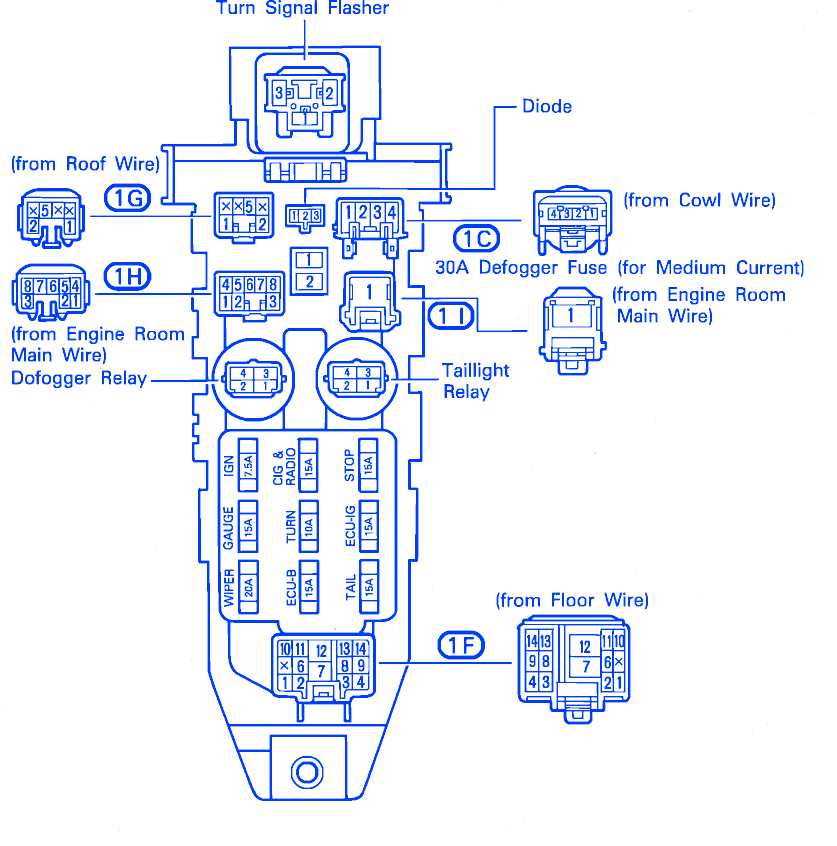
The fuse box diagram is an essential piece of information for Toyota Pickup owners. The fuse box is located under the dashboard on the driver’s side, and it contains various fuses that protect different electrical components of the vehicle. It is important to know the location and function of each fuse to troubleshoot and repair any electrical issues.
The Toyota Pickup fuse box diagram provides a detailed map of the fuses, including their location and the electrical components they protect. This information is crucial when trying to locate and replace a blown fuse. The diagram also specifies the amperage rating of each fuse, so it is important to replace a blown fuse with one of the correct rating to avoid electrical damage.
The fuse box diagram is typically printed on the inside cover of the fuse box or in the owner’s manual. If the diagram is missing or illegible, it is possible to find a replacement diagram online or request one from a Toyota dealership. Some Toyota Pickup models may have different fuse box configurations, so it is important to consult the specific diagram for the model and year of the vehicle.
Common Fuse Box Diagrams
- Main Fuse Box Diagram: This diagram shows the location of the main fuse box and includes fuses for critical components such as the ignition system, headlights, and other key electrical systems.
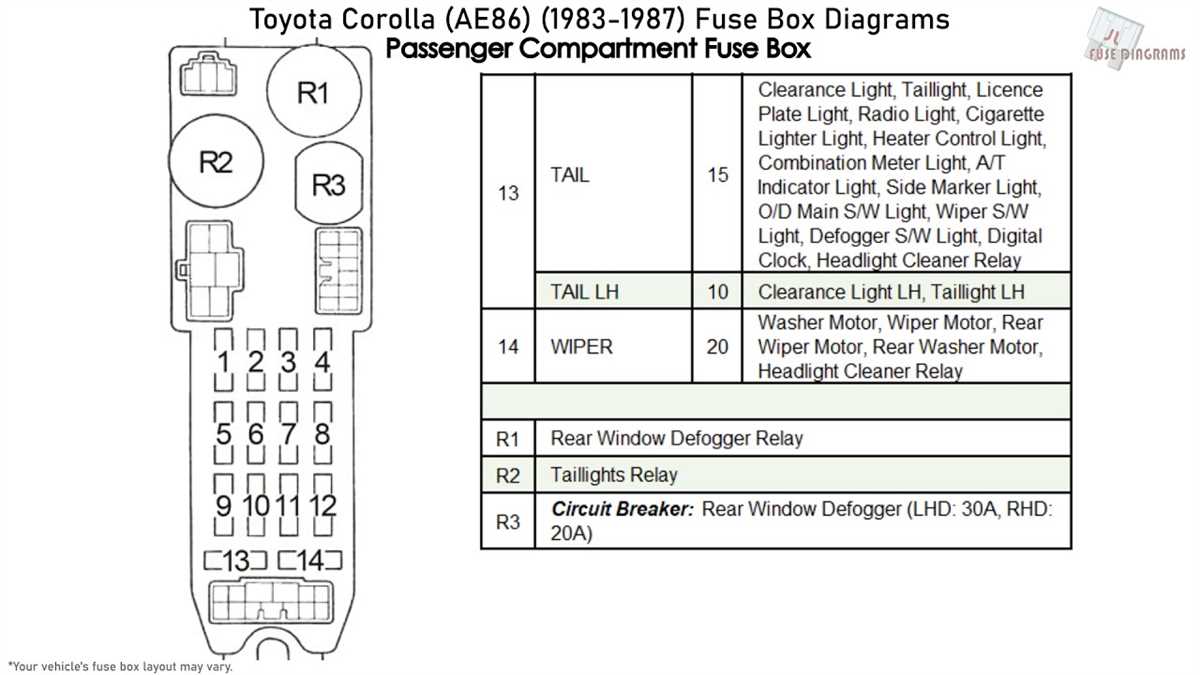
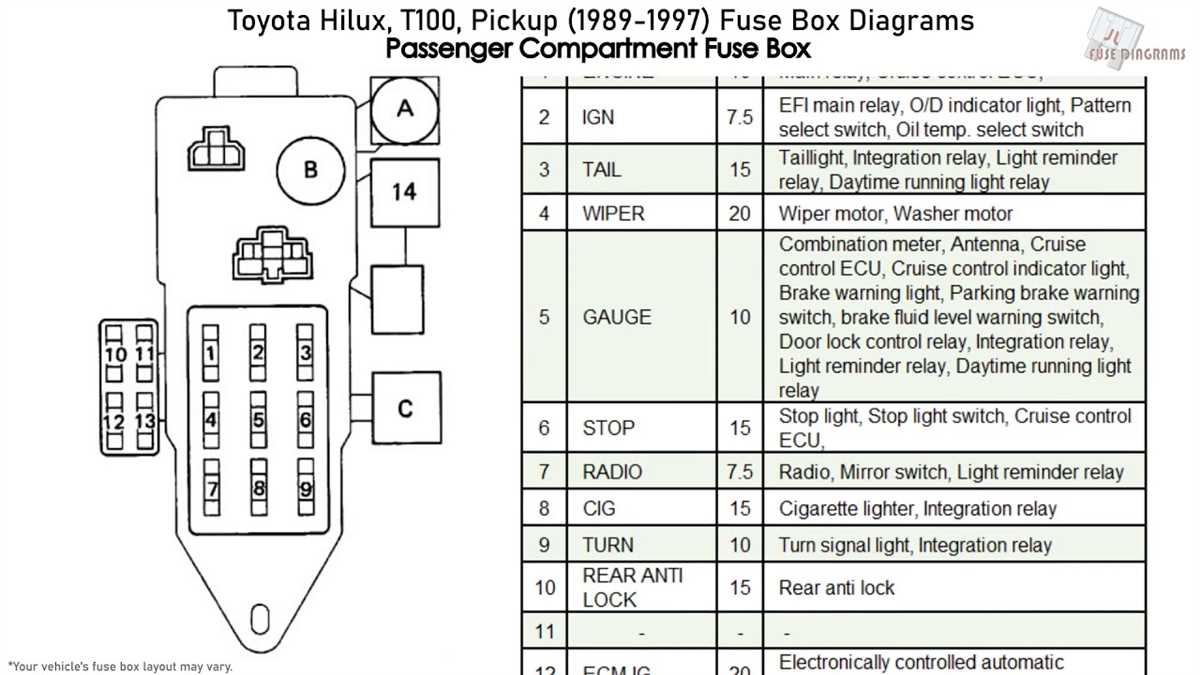
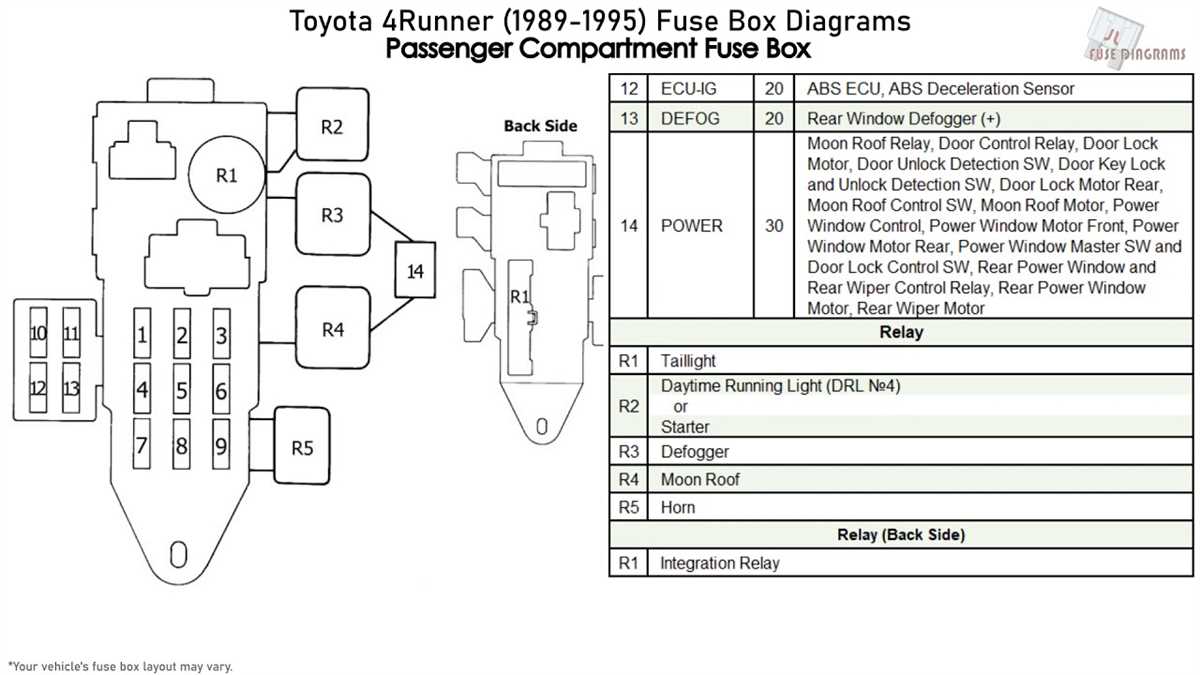
- Instrument Panel Fuse Box Diagram: This diagram identifies the fuses that protect the instrument panel and its components, such as the gauges, radio, and climate control system.
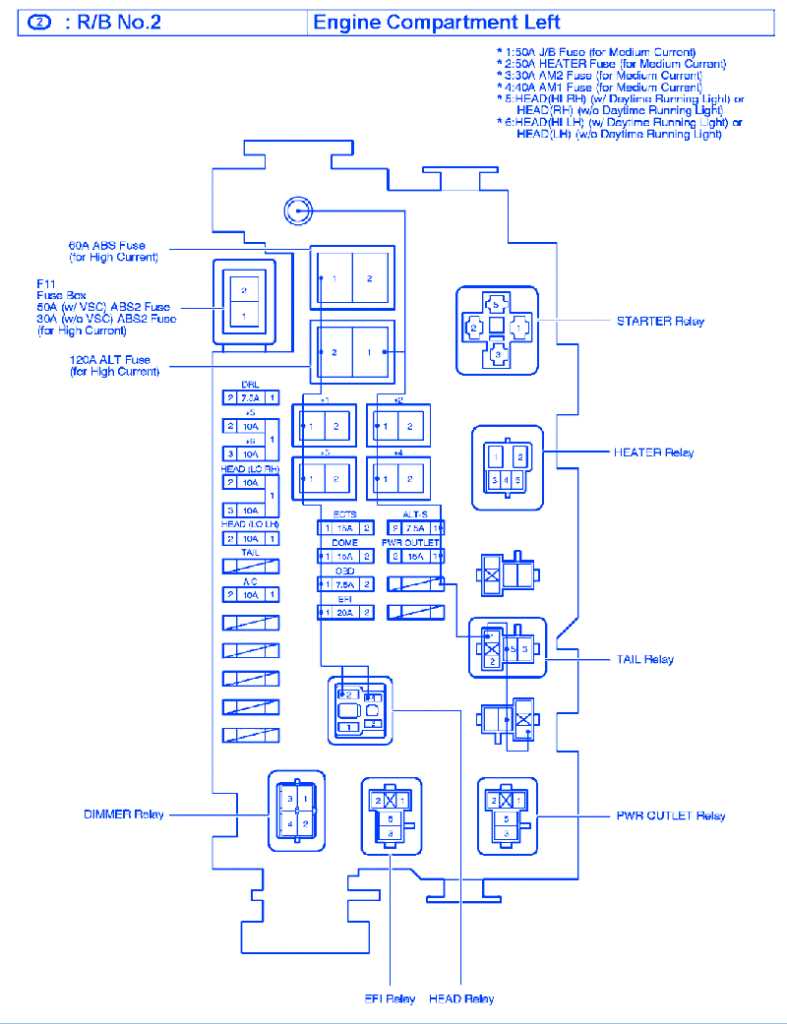
- Engine Compartment Fuse Box Diagram: This diagram shows the fuses that protect the engine compartment and its components, such as the fuel pump, starter motor, and cooling fan.
- Accessory Fuse Box Diagram: This diagram displays the fuses that protect accessories, such as the power windows, power locks, and power seats.
By referring to the Toyota Pickup fuse box diagram, owners can easily locate and replace blown fuses, ensuring that their vehicle’s electrical systems are functioning properly. It is important to follow the diagram and use the correct fuses to avoid further damage and maintain the safety and reliability of the vehicle.
Identifying the Fuse Box Locations
If you are looking for the fuse box diagram for your Toyota pickup, it is important to first identify the locations of the fuse boxes. The fuse box is where all the electrical fuses for different components of your vehicle are housed. It is essential to know the location of the fuse boxes in order to properly diagnose and troubleshoot any electrical issues you may encounter.
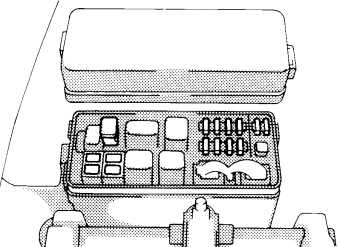
Main Fuse Box: The main fuse box in a Toyota pickup is typically located in the engine compartment. It is usually a rectangular box with a removable cover. Inside the main fuse box, you will find a diagram that indicates the purpose of each fuse and its corresponding amperage rating. It is important to refer to this diagram when replacing fuses to ensure you are using the correct amperage.
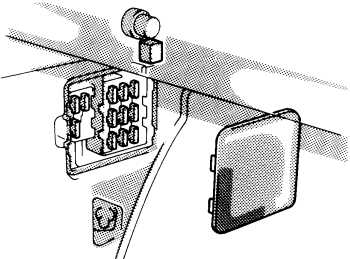
Interior Fuse Box: In addition to the main fuse box, some Toyota pickups may have an interior fuse box as well. This fuse box is usually located inside the vehicle, often underneath the dashboard or near the driver’s side kick panel. The interior fuse box contains fuses for various interior components such as the radio, power windows, and air conditioning.
Other Fuse Boxes: Depending on the specific model and trim level of your Toyota pickup, there may be additional fuse boxes located in different areas of the vehicle. These fuse boxes could be dedicated to specific systems such as the ABS (anti-lock braking system), SRS (supplemental restraint system), or trailer wiring. It is important to consult your vehicle’s owner’s manual or a reliable fuse box diagram for the exact locations and purposes of these additional fuse boxes.
In conclusion, to identify the fuse box locations in your Toyota pickup, first, locate the main fuse box in the engine compartment. Then, check for an interior fuse box inside the vehicle, and finally, investigate if there are any additional fuse boxes for specific systems. Having a clear understanding of the fuse box locations will help you effectively troubleshoot and resolve any electrical issues in your Toyota pickup.
Understanding the Fuse Box Diagram
The fuse box diagram is an essential component of your Toyota pickup’s electrical system. It provides a visual representation of the different fuses and their corresponding circuits, allowing you to easily identify and troubleshoot electrical issues.
The diagram is typically located on the inside cover of the fuse box, making it easily accessible. It displays a grid-like layout, with each fuse represented by a number or symbol, indicating its function and amp rating. By referring to the diagram, you can quickly identify which fuse corresponds to a particular electrical component, such as the headlights, radio, or power windows.
When troubleshooting electrical problems in your Toyota pickup, the fuse box diagram can be incredibly useful. If a specific component is not functioning properly, you can check the corresponding fuse to see if it has blown. A blown fuse will have a broken metal strip visible through the clear plastic casing. By replacing the blown fuse with a new one of the same amp rating, you can often restore normal functionality to the affected component.
It is important to note that the fuse box diagram may vary slightly depending on the model year and trim level of your Toyota pickup. Therefore, it is always recommended to consult the owner’s manual for the most accurate and up-to-date information.
Key Components:
- Fuse: A small device that protects an electrical circuit from overcurrent. When the current flowing through a circuit exceeds the fuse’s amp rating, it will blow, breaking the circuit and preventing damage to other components.
- Fuse Box: A designated space or compartment in your Toyota pickup where all the fuses are housed. It provides a centralized location for easy access and maintenance.
- Fuse Box Diagram: A visual representation of the fuse box layout and the different fuses, helping you identify the correct fuse for a specific electrical function.
- Amp Rating: The amount of current a fuse can handle without blowing. The amp rating is typically indicated on the fuse itself and in the fuse box diagram.
By understanding the fuse box diagram and its components, you can confidently identify and resolve electrical issues in your Toyota pickup. Remember to always use the correct amp rating when replacing a blown fuse, and consult the owner’s manual for specific instructions and precautions.
Commonly Found Fuses and What They Control
When inspecting the fuse box of a Toyota pickup, it’s essential to know which fuses control specific systems or functions in the vehicle. Here are some commonly found fuses and what they control:
Main Fuse
The main fuse is a crucial component that protects the entire electrical system of the vehicle. It is usually a high-amperage fuse, often 100 amps or more. If this fuse blows, it can result in a complete loss of power to the vehicle.
Ignition Fuse
The ignition fuse is responsible for supplying power to the ignition switch and related components. If this fuse blows, the vehicle may not start or experience intermittent starting problems.
Headlight Fuse
The headlight fuse controls the electrical circuit for the headlights and may also control the taillights and parking lights. If this fuse blows, the vehicle may lose all or some of its lighting functions, impacting visibility and safety.
Radio Fuse
The radio fuse supplies power to the vehicle’s radio system. If this fuse blows, the radio may stop functioning, and other related components like the audio speakers or the CD player may also be affected.
Power Window Fuse
The power window fuse controls the electrical circuit for the power windows in the vehicle. If this fuse blows, the power windows may become inoperable, making it difficult to open or close them.
Blower Motor Fuse
The blower motor fuse is responsible for supplying power to the vehicle’s blower motor, which controls the air conditioning and heating system. If this fuse blows, the blower motor may cease to function, resulting in a loss of temperature control inside the vehicle.
Horn Fuse
The horn fuse controls the electrical circuit for the vehicle’s horn. If this fuse blows, the horn will not work, which may pose a safety issue in certain situations where the horn is necessary, such as warnings or emergencies.
Brake Light Fuse
The brake light fuse controls the electrical circuit for the brake lights. If this fuse blows, the brake lights will not illuminate when the brakes are applied, potentially increasing the risk of rear-end collisions as other drivers may not be aware that the vehicle is braking.
Accessory Fuse
The accessory fuse is responsible for supplying power to various accessories in the vehicle, such as the power outlets or cigarette lighter. If this fuse blows, the accessories may not receive power, affecting their functionality.
Conclusion

Understanding the function of commonly found fuses in a Toyota pickup’s fuse box can help troubleshoot and resolve electrical issues in the vehicle. It is essential to refer to the vehicle’s owner’s manual or a fuse box diagram for accurate information on fuse locations and their functions.
Troubleshooting Fuse Box Issues
If you own a Toyota pickup and are experiencing electrical issues, it is important to understand how to troubleshoot problems that may arise with the fuse box. The fuse box is a critical component of the electrical system and is responsible for protecting the various circuits in your vehicle. When a circuit becomes overloaded or shorted, the fuse will blow, which prevents further damage to the electrical system.
Identifying blown fuses: One of the first steps in troubleshooting fuse box issues is to locate and identify any blown fuses. Start by consulting the fuse box diagram, which provides a visual representation of the fuses and their assigned function. Using a fuse puller or a pair of needle-nose pliers, carefully remove the suspected blown fuse. Inspect the fuse element for any signs of damage or discoloration. If the fuse element appears broken or burnt, it is likely that the fuse is blown and will need to be replaced.
Testing fuses: If you are unsure whether a fuse is blown or not, you can use a multimeter to test for continuity. Set the multimeter to the appropriate continuity setting and touch the probes to the metal tabs on each end of the fuse. If the multimeter beeps or shows a low resistance reading, this indicates that the fuse is intact. If there is no continuity, it means that the fuse is blown and should be replaced.
Replacing fuses: Once you have identified a blown fuse, it is important to replace it with a new fuse of the correct amperage rating. Using a fuse with the wrong rating can lead to further electrical issues or even damage the circuit it is meant to protect. Always refer to the vehicle’s manual or the fuse box diagram to determine the correct amperage rating for each fuse. Carefully insert the new fuse into the appropriate slot, making sure it is securely seated.
Further troubleshooting: If you have replaced a blown fuse and are still experiencing electrical issues, there may be an underlying problem that requires further troubleshooting. In such cases, it is recommended to consult a professional automotive technician who has the knowledge and diagnostic tools to identify and resolve complex electrical problems.
In conclusion, troubleshooting fuse box issues in a Toyota pickup involves identifying blown fuses, testing them for continuity, and replacing them with the correct amperage rating. If further issues persist, seeking professional assistance is advised to ensure the proper functioning of the vehicle’s electrical system.
Replacing Fuses in a Toyota Pickup
When it comes to maintaining your Toyota pickup, it’s important to know how to properly replace fuses. Fuses play a vital role in protecting your vehicle’s electrical system from damage caused by electrical faults or overloads. In this guide, we’ll walk you through the steps to safely and effectively replace fuses in your Toyota pickup.
Step 1: Locate the Fuse Box
Begin by locating the fuse box in your Toyota pickup. The fuse box is typically located in the engine compartment or under the dashboard. Consult your owner’s manual or the fuse box diagram for the exact location. Once you’ve located the fuse box, make sure to turn off the engine and remove the key from the ignition to avoid any accidents or electrical shock.
Step 2: Identify the Blown Fuse
Next, identify the fuse that needs to be replaced. Examine the fuse box diagram to find the corresponding fuse for the specific electrical component that is not working. Fuses are labeled with numbers or symbols that indicate their amperage rating and the circuit they control. Make sure to choose a replacement fuse with the correct amperage rating to prevent electrical damage.
Step 3: Remove the Blown Fuse
Using a fuse puller or a pair of needle-nose pliers, grip and gently pull out the blown fuse. Be careful not to damage the surrounding fuse box or any other components while removing the fuse. Inspect the blown fuse for any signs of damage, such as a broken filament or blackening, which indicate a faulty fuse.
Step 4: Install the Replacement Fuse
Take a new fuse with the same amperage rating and carefully insert it into the empty fuse slot. Make sure the fuse is securely seated and there are no loose connections. Do not force the fuse into the slot as it may cause damage or create a poor electrical connection. Once the replacement fuse is properly installed, you can move on to the next step.
Step 5: Test the Electrical Component
Before closing the fuse box, test the electrical component that was not working to ensure the fuse replacement resolved the issue. Turn on the ignition and activate the component. If it functions properly, then you have successfully replaced the fuse. If the component still does not work, there may be an underlying issue that requires further diagnostic testing.
Step 6: Close the Fuse Box
Once you have confirmed that the replaced fuse is working correctly, close the fuse box securely. Make sure there are no loose wires or connections that could cause a short circuit. Double-check that all components are working as intended before driving your Toyota pickup.
Remember, if you are unsure about replacing fuses or if the issue persists after replacing the fuse, it is recommended to consult a professional mechanic or your Toyota dealership for further assistance.
By following these steps, you can confidently replace fuses in your Toyota pickup and ensure the proper functioning of your vehicle’s electrical system.