
If you are a proud owner of a trailer, you know how important it is to have a reliable and functional wiring kit with lights. Trailers are often used for transporting various items, whether it’s for work or recreation. Having proper lighting on your trailer is essential for safety on the road. A trailer wiring kit with lights is designed to provide you with all the necessary equipment to ensure your trailer is visible to other drivers and meets legal requirements.
A trailer wiring kit typically includes a set of lights, connectors, and wires that are needed to install and connect the lights to your trailer. The lights included in the kit usually consist of tail lights, brake lights, and turn signal lights. These lights are essential for indicating your intentions to other drivers on the road, whether you are slowing down, making a turn, or coming to a complete stop.
Installing a trailer wiring kit with lights is relatively easy, even for those who are not particularly skilled in automotive wiring. The kit usually comes with detailed instructions on how to properly connect the wires and install the lights on your trailer. Additionally, most kits are designed to be compatible with a wide range of trailer types and models, making it easy to find a kit that fits your specific trailer.
What is a Trailer Wiring Kit with Lights?
A trailer wiring kit with lights is a set of electrical components that allows you to connect the lighting system of your trailer to the towing vehicle. It includes everything you need to ensure that your trailer lights function properly, including wiring harnesses, connectors, and various types of lights.
Wiring Harnesses: The wiring harnesses included in a trailer wiring kit are specifically designed to provide a secure and reliable connection between the towing vehicle and trailer. They are made of high-quality materials that are resistant to moisture, corrosion, and other hazards that can affect the performance of the lights.
Connectors: The connectors in a trailer wiring kit allow you to easily connect the wiring harnesses to the towing vehicle and trailer. They come in different types, such as four-pin, six-pin, and seven-pin connectors, depending on the specific requirements of your trailer.
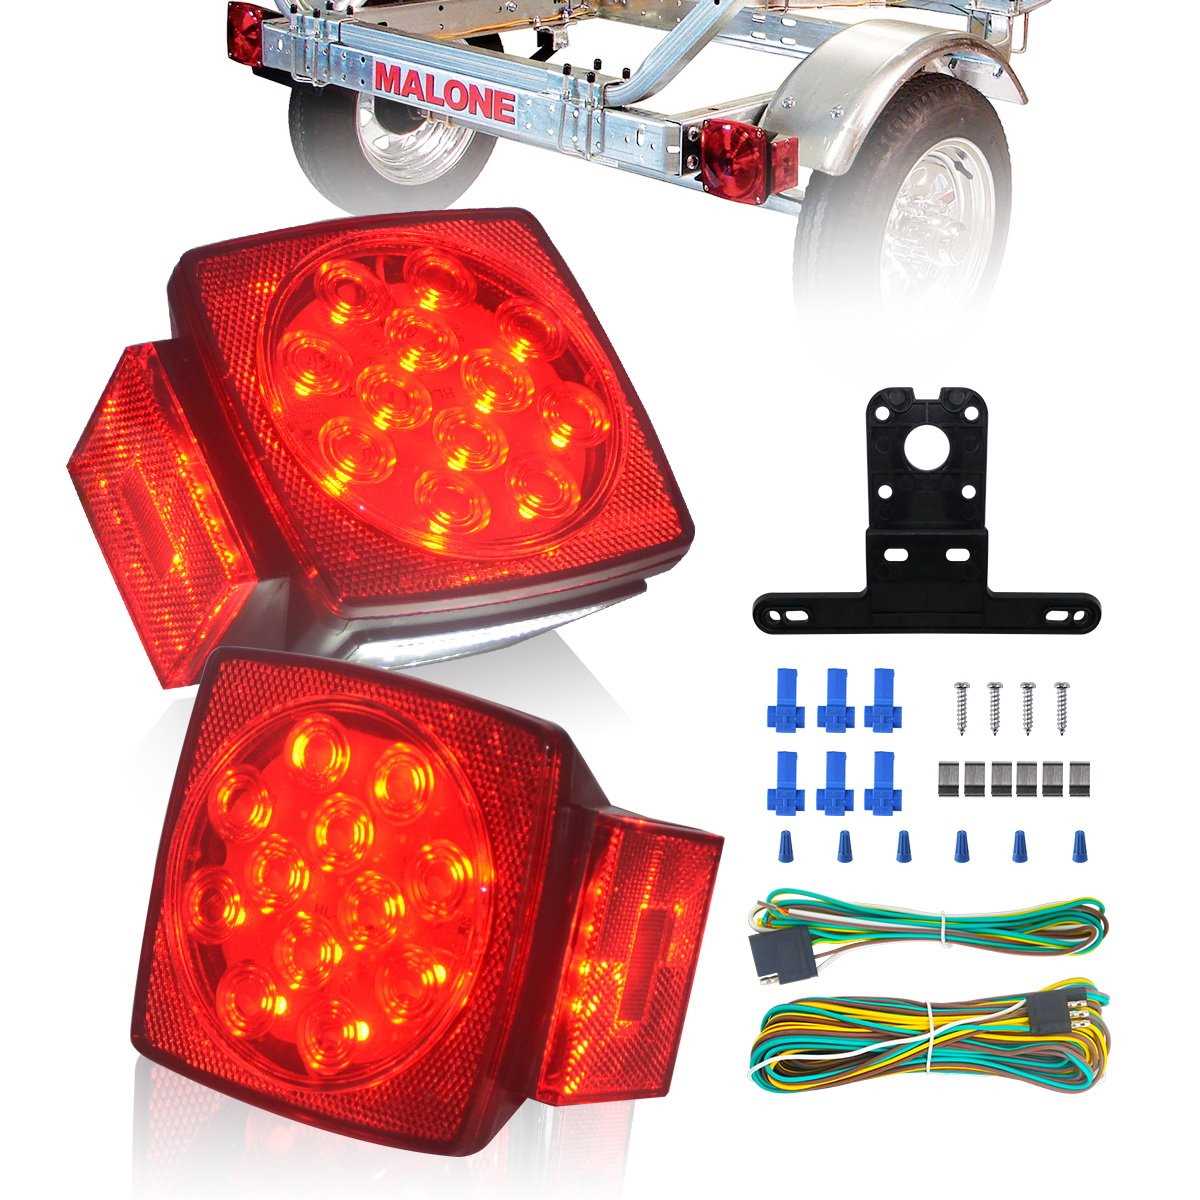
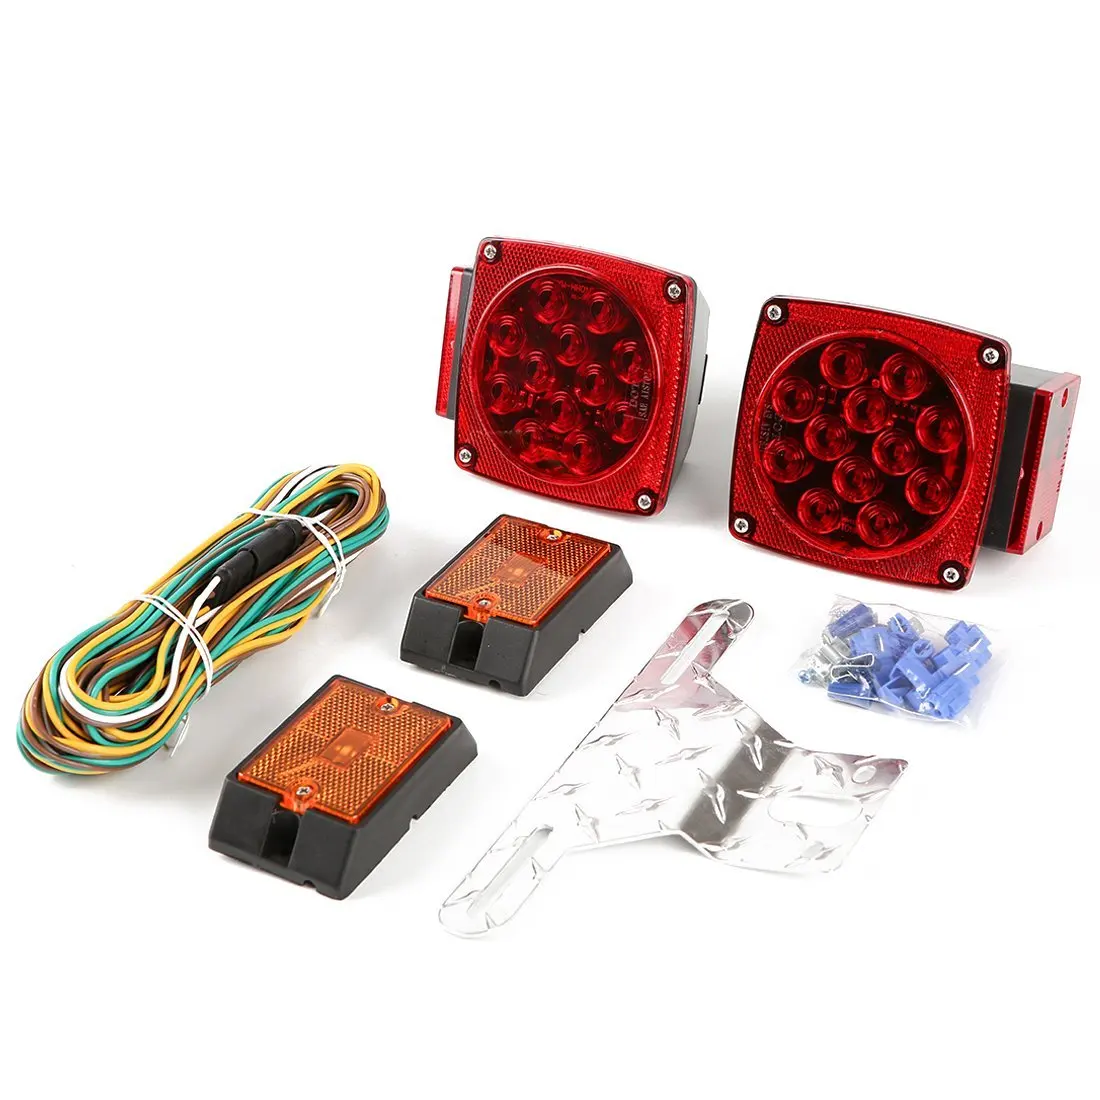
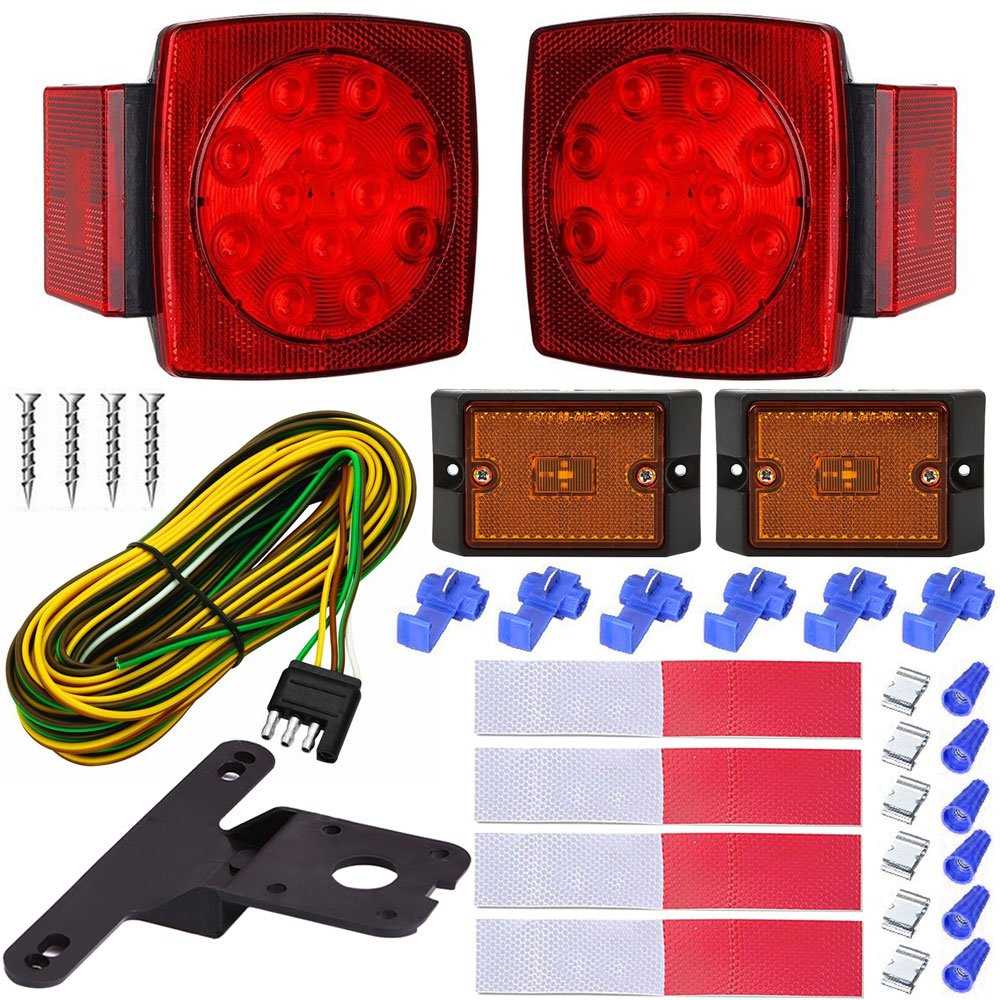
Lights: The lights in a trailer wiring kit are an essential part of the system. They include various types of lights, such as tail lights, brake lights, turn signals, and license plate lights. These lights ensure that your trailer is visible to other drivers and complies with all road safety regulations.
Installation: Installing a trailer wiring kit with lights typically requires basic electrical knowledge and some tools. The kit usually comes with detailed instructions that guide you through the installation process step-by-step. However, if you’re not confident in your abilities, it’s always recommended to seek professional assistance to ensure proper installation and functionality.
In conclusion, a trailer wiring kit with lights is an essential component for safely towing a trailer. It provides a reliable electrical connection between the towing vehicle and trailer, ensuring that the lights work properly and comply with road safety regulations.
Understanding the Basics
The Trailer Wiring Kit with Lights
The trailer wiring kit with lights is an essential accessory for towing trailers and other vehicles. It allows for the safe and efficient operation of the trailer’s electrical systems, including the lights, brakes, and turn signals. Without a proper wiring kit, the trailer may not function correctly, making it difficult and potentially dangerous to operate on the road. Understanding the basics of a trailer wiring kit with lights is crucial for anyone who tows trailers regularly.
Components of a Trailer Wiring Kit
A typical trailer wiring kit with lights consists of several components, each with its own specific function. These components include:
- Wiring Harness: The wiring harness is the main component of the trailer wiring kit, which connects the trailer’s electrical system to the towing vehicle. It consists of a series of wires and connectors designed to carry electrical signals between the two.
- Power Converter: The power converter is responsible for converting the electrical signals from the towing vehicle to the appropriate voltage and current required by the trailer’s lights and other electrical systems.
- Lights: The lights are an integral part of the trailer wiring kit, including the tail lights, brake lights, turn signals, and license plate lights. These lights ensure that the trailer is visible to other drivers on the road and allows for safe maneuvering.
- Connectors: Connectors are used to connect the wiring harness to the towing vehicle and the trailer. There are various types of connectors available, including the popular 4-pin and 7-pin connectors, each with its own configuration for different electrical systems.
Installation and Usage
Installing a trailer wiring kit with lights typically involves connecting the wiring harness to the towing vehicle’s electrical system and the trailer’s electrical system. This may require some basic wiring knowledge and tools, so it is advisable to consult the product’s installation instructions or seek professional help if needed. Once installed, the trailer wiring kit should be tested to ensure proper functioning before hitting the road.
When using a trailer wiring kit with lights, it is essential to follow proper usage guidelines. This includes regularly inspecting the wiring and connectors for any damage or wear, ensuring proper connection to the towing vehicle and the trailer, and using the appropriate electrical connectors and adapters when necessary. Additionally, it is crucial to understand the legal requirements and safety regulations regarding trailer lights and wiring in the specific region or country.
By understanding the basics of a trailer wiring kit with lights, individuals can ensure their trailers are safely and properly equipped for towing, promoting a smooth and secure towing experience.
Benefits of Using a Trailer Wiring Kit with Lights
When it comes to towing a trailer, having proper lighting is crucial for safety on the road. One of the best ways to ensure that your trailer lights are properly connected and functioning is by using a trailer wiring kit with lights. This kit provides several benefits that make it a must-have for anyone who frequently tows a trailer.
1. Easy installation: A trailer wiring kit with lights is designed to be easy to install, even for those who may not have much experience with electrical wiring. The kit usually includes clear instructions and all the necessary components, such as connectors and wires, for a hassle-free installation process.
2. Reliable connections: With a trailer wiring kit, you can have peace of mind knowing that your trailer lights are securely and reliably connected to your vehicle’s electrical system. This ensures that all of your trailer lights, including brake lights, turn signals, and tail lights, will function properly, increasing visibility and reducing the risk of accidents.
3. Enhanced safety: Properly functioning trailer lights not only make your trailer more visible to other drivers on the road but also allow you to communicate your intentions effectively. This means that drivers around you can easily see when you’re braking, turning, or changing lanes, helping to prevent dangerous situations and accidents.
4. Compliance with regulations: Many jurisdictions have specific regulations and requirements regarding trailer lighting. By using a trailer wiring kit with lights, you can ensure that your trailer is compliant with these regulations, reducing the risk of fines or legal issues.
In conclusion, a trailer wiring kit with lights offers easy installation, reliable connections, enhanced safety, and compliance with regulations. Investing in a high-quality kit can make a significant difference in your overall towing experience and provide peace of mind knowing that your trailer lights are properly connected and functional.
Choosing the Right Trailer Wiring Kit with Lights
When it comes to installing lights on your trailer, it is important to choose the right wiring kit with lights. A trailer wiring kit with lights is designed to provide you with all the necessary components to safely and properly wire your trailer’s lights, ensuring visibility and compliance with road safety regulations.
One of the first things to consider when choosing a trailer wiring kit with lights is the type of lights you will be using. There are various types of trailer lights available, including incandescent, LED, and fluorescent lights. Each type of light requires a specific wiring kit to ensure proper connectivity and functionality. It is important to choose a wiring kit that is compatible with the type of lights you plan to install on your trailer.
Another important factor to consider is the size and capacity of your trailer. Wiring kits with lights come in different sizes and configurations to accommodate trailers of various sizes and weight capacities. It is important to choose a wiring kit that can handle the electrical demands of your trailer, ensuring that the lights will function properly and provide adequate visibility.
Additionally, it is crucial to consider the specific wiring needs of your trailer. Some trailers may require additional wiring components, such as brake lights, turn signals, or reverse lights. Make sure to choose a wiring kit that includes all the necessary components to meet your trailer’s wiring requirements, allowing you to customize the lighting setup according to your specific needs.
In conclusion, choosing the right trailer wiring kit with lights is essential for ensuring proper and safe installation of lights on your trailer. Consider factors such as the type of lights, the size and capacity of your trailer, and the specific wiring needs of your trailer when selecting a wiring kit. By choosing the right kit, you can ensure that your trailer lights will function properly and provide optimal visibility on the road.
How to Install a Trailer Wiring Kit with Lights
Installing a trailer wiring kit with lights is an essential step in ensuring the safety and functionality of your trailer. Whether you are hauling a boat, RV, or any other type of trailer, having properly functioning lights is crucial for visibility and obeying traffic laws.
Here are the steps to install a trailer wiring kit with lights:
Step 1: Gather the necessary tools and materials
Before you begin the installation process, make sure you have all the tools and materials you will need. This includes a trailer wiring kit, which typically includes the wiring harness, connectors, and mounting hardware. You will also need a wire stripper, electrical tape, and a set of pliers.
Step 2: Disconnect the trailer’s battery
Prior to starting any electrical work, it is essential to disconnect the trailer’s battery to prevent any accidental shock or damage. Locate the battery and disconnect the negative terminal by loosening the clamp with a wrench.
Step 3: Identify the trailer’s existing wiring
Take a close look at the existing wiring on the trailer to determine where the connections need to be made. This may include the taillights, brake lights, turn signals, and ground connections. Refer to the wiring diagram included in the trailer wiring kit to ensure proper installation.
Step 4: Install the wiring harness
Begin by connecting the wiring harness to the trailer’s existing wiring. Use a wire stripper to remove a small portion of the insulation from each wire, and then connect the corresponding wires from the harness to the trailer’s wiring using connectors or electrical tape. Make sure the connections are secure and insulated.
Step 5: Mount the lights
Once the wiring harness is installed, mount the lights onto the trailer using the provided hardware. Position the lights in the appropriate locations, such as on the sides or rear of the trailer, and secure them tightly using a screwdriver or wrench.
Step 6: Test the lights
After the wiring and lights are installed, it is important to test them to ensure they are functioning properly. Reconnect the trailer’s battery and turn on the vehicle’s headlights to test the taillights, brake lights, and turn signals. Make sure all lights are working correctly and adjust any connections if necessary.
By following these steps, you can successfully install a trailer wiring kit with lights, providing you with safe and reliable trailer lighting for all your hauling needs.
Troubleshooting Common Issues
When it comes to using a trailer wiring kit with lights, it’s not uncommon to encounter some issues along the way. Fortunately, many of these problems can be easily resolved with a bit of troubleshooting. Here are some common issues you may come across and how to solve them:
Lights not working
If the lights on your trailer are not working at all, the first thing to check is the connection between the trailer and your vehicle. Make sure that the wiring harness is securely plugged in and that there are no loose or damaged wires. If everything seems to be fine with the connection, check the fuse for the trailer lights in your vehicle’s fuse box. If the fuse is blown, replace it with a new one of the same rating. If the lights still don’t work, there may be an issue with the wiring kit itself and you may need to seek professional help.
Dim or flickering lights
If your trailer lights are dim or flickering, it could be due to a poor ground connection. Check the ground wire from your trailer’s wiring harness and make sure it is securely attached to a clean metal surface on your vehicle. If there is any rust or corrosion, clean it off using sandpaper or a wire brush. If the ground connection is fine, the issue may be with the bulbs themselves. Check the bulbs for any signs of damage or corrosion and replace them if necessary. Additionally, check the voltage on your vehicle’s electrical system to ensure it is within the recommended range.
Non-functioning brake or turn signals
If your trailer’s brake or turn signals are not working, the first thing to check is the wiring harness. Make sure that the correct wires are connected to the corresponding lights on your trailer. If all the connections seem to be correct, the issue may be with the wiring itself. Check for any loose or damaged wires and repair or replace them as needed. If the wiring appears to be fine, the problem may be with the vehicle’s electrical system. In this case, it is recommended to consult a professional for further assistance.
By troubleshooting these common issues, you can ensure that your trailer wiring kit with lights is functioning properly. Remember to always follow the manufacturer’s instructions and safety guidelines when working with electrical connections. If you are unsure about any aspect of the installation or troubleshooting process, it is always best to seek professional help to avoid any potential hazards or further damage.
Tips for Maintaining Your Trailer Wiring Kit with Lights
Proper maintenance of your trailer wiring kit with lights is crucial for ensuring they function properly and for preventing potential issues from arising. Here are some tips to help you maintain your trailer wiring kit:
Regularly inspect the wiring and connections:
Make it a habit to visually inspect the wiring and connections of your trailer wiring kit regularly. Look for any signs of damage, such as frayed wires or loose connections. If you notice any issues, it is important to address them promptly to avoid further damage.
- Check the lights regularly: Test all the lights on your trailer, including the brake lights, turn signals, and taillights. If any lights are not functioning properly, it may be an issue with the wiring or the bulbs. Replace any faulty bulbs or repair any damaged wiring as necessary.
- Keep the wiring protected: Ensure that the wiring is properly protected from the elements and other potential hazards. Use wire loom or protective covering to shield the wires from moisture, dirt, and debris. Additionally, secure the wiring to prevent it from rubbing against sharp edges or getting caught on moving parts.
- Use electrical tape or connectors: To ensure a secure and reliable connection, use electrical tape or connectors to secure the wiring together. This will help prevent any loose connections that could lead to faulty lights.
- Regularly clean the lights and connectors: Dirt, grime, and corrosion can affect the performance of your trailer lights and connectors. Clean them regularly using a mild detergent and water solution, and gently scrub away any debris. Inspect the connectors for any signs of corrosion, and clean them with a wire brush or electrical contact cleaner.
- Ensure proper grounding: Proper grounding is essential for the effective functioning of your trailer lights. Make sure that the ground wire is securely connected to a clean and corrosion-free metal surface on your trailer. Clean the surface if necessary to ensure a good connection.
By following these maintenance tips, you can help ensure that your trailer wiring kit with lights remains in good working condition and provides reliable performance for all your towing needs.
Q&A:
How often should I inspect my trailer wiring kit?
It is recommended to inspect your trailer wiring kit at least once a year, or more frequently if you frequently use your trailer. Regular inspections will help identify any potential issues and allow for timely repairs or replacements.
What should I look for during the inspection of the trailer wiring kit?
During the inspection of the trailer wiring kit, you should look for any frayed or damaged wires, loose connections, corrosion on the connectors, or any signs of wear and tear. Additionally, ensure that all the lights are functioning properly.
How can I prevent the trailer wiring kit from getting damaged?
To prevent the trailer wiring kit from getting damaged, you can take a few precautions. Firstly, avoid dragging or snagging the wires on the ground or other objects. Secondly, use wire loom or conduit to protect the wires from exposure to the elements and potential abrasion. Lastly, make sure the wires are properly secured away from moving parts to prevent any damage.
What should I do if there is a faulty connection in my trailer wiring kit?
If you have a faulty connection in your trailer wiring kit, the first step is to identify the specific connection that is causing the issue. Once identified, check for loose or corroded connections and clean or tighten them if necessary. If the issue persists, you may need to replace the connector or consult a professional for further assistance.
Are there any additional maintenance steps for trailer wiring kits with LED lights?
Trailer wiring kits with LED lights require similar maintenance steps as regular trailer wiring kits. However, it is important to check the LED lights for any signs of dimming or failure, as this may indicate a problem with the wiring or the LED lights themselves. If any issues are found, it is advisable to consult the manufacturer or a professional for guidance on repair or replacement.