
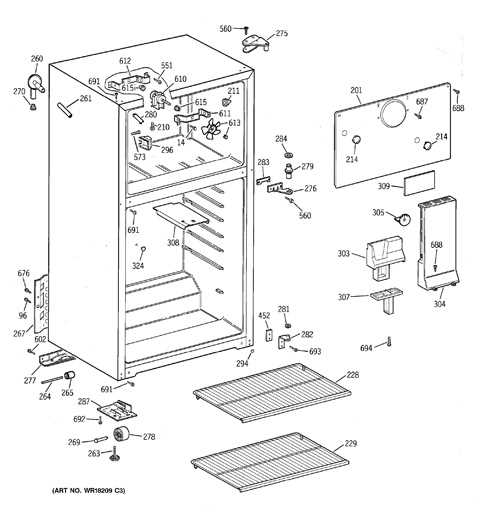
When it comes to keeping your freezer in working order, it’s important to have a good understanding of its various components and how they function. This knowledge can help you troubleshoot any issues that may arise and ensure that your freezer runs efficiently. One way to gain this understanding is by referring to a parts diagram, which provides a visual representation of all the different parts and their locations within the freezer.
A true freezer parts diagram is a valuable tool for both DIY enthusiasts and professional repair technicians. It allows you to identify specific parts, such as the compressor, condenser, evaporator fan, and defrost heater, and understand their role in the freezing process. By familiarizing yourself with these components, you’ll be better equipped to diagnose problems and replace faulty parts.
In addition to helping with repairs, a parts diagram can also be useful when ordering replacement parts for your freezer. By referring to the diagram, you can ensure that you’re purchasing the correct part and avoid any compatibility issues. This can save you time and money in the long run, as you won’t have to deal with the hassle of returning incorrect items.
Overall, a true freezer parts diagram is an essential resource for anyone who wants to maintain their freezer or troubleshoot any issues. Whether you’re a DIY enthusiast or a professional technician, having a visual representation of the various components can help you keep your freezer running smoothly and efficiently.
What is a True Freezer Parts Diagram?
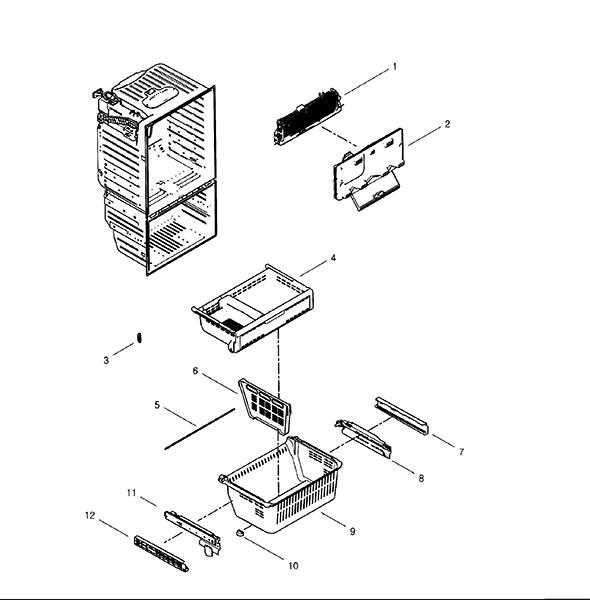
A True freezer parts diagram is a visual representation of the various components and parts that make up a True freezer. True Manufacturing is a leading manufacturer of commercial refrigeration equipment, including freezers, and their products are known for their durability and reliability. Understanding the different parts of a True freezer can be helpful for troubleshooting and maintenance purposes, as well as for ordering replacement parts.
Components and Parts:
The parts diagram typically includes labels and numbers for the different components of the freezer, such as the compressor, condenser, evaporator, defrost heater, fan motor, and temperature control. It may also include smaller parts like gaskets, hinges, and door handles. Each part serves a specific function in the freezing process and contributes to the overall operation and performance of the freezer.
Troubleshooting and Maintenance:
Having a parts diagram can be incredibly useful when troubleshooting issues or performing maintenance on a True freezer. If a specific component is not functioning properly, the diagram can help identify the part that needs to be repaired or replaced. It can also aid in understanding the relationships between different parts and how they interact with each other.
Ordering Replacement Parts:
If a part of the True freezer needs to be replaced, having a parts diagram makes the process of ordering a replacement much easier. By referring to the diagram and identifying the specific part number, it ensures that the correct component is ordered and installed. This saves time and reduces the risk of ordering the wrong part. Additionally, having a visual representation of the part can aid in the installation process.
Overall, a True freezer parts diagram is a valuable tool for anyone working with or maintaining a True freezer. It provides a clear and organized representation of the freezer’s components, enabling efficient troubleshooting, maintenance, and replacement of parts.
Understanding the Components of a True Freezer
When it comes to understanding how a True freezer works, it’s important to familiarize yourself with its different components. By knowing how each part contributes to the overall functionality of the freezer, you can better troubleshoot and maintain it.
1. Compressor: The compressor is the heart of the True freezer and is responsible for circulating the refrigerant. It compresses the low-pressure refrigerant gas into high-pressure gas, which increases its temperature.
2. Condenser: The condenser is a heat exchanger located near the compressor. Its main function is to remove heat from the high-pressure refrigerant gas and turn it into a high-pressure liquid. This liquid is then sent to the expansion valve.
3. Expansion Valve: The expansion valve is a small device located between the condenser and the evaporator. It regulates the flow of the high-pressure liquid refrigerant into the evaporator. As the liquid passes through the expansion valve, it expands and experiences a pressure drop, allowing it to evaporate.
4. Evaporator: The evaporator is located inside the freezer and is responsible for absorbing heat from the surroundings. As the low-pressure liquid refrigerant enters the evaporator, it absorbs heat, which causes it to evaporate and turn into low-pressure gas.
5. Fan Motor: The fan motor is responsible for circulating air within the freezer. It draws air from the freezer’s interior and blows it over the evaporator coils, helping to cool down the stored items.
6. Temperature Control: The temperature control is an important component that allows you to set and maintain the desired temperature inside the freezer. It regulates the compressor’s operation, ensuring that it turns on and off as needed to maintain the set temperature.
By understanding these different components, you can have a better grasp of how your True freezer operates and be better prepared to troubleshoot any potential issues that may arise. Regular maintenance and proper care of these components are essential for keeping your freezer running efficiently.
How to Read a True Freezer Parts Diagram
If you are trying to repair or troubleshoot a True freezer, it is essential to understand how to read a parts diagram. A parts diagram is a visual representation of the various components that make up a True freezer, including the compressor, evaporator, condenser, and other essential parts. By understanding how to read and interpret a parts diagram, you can quickly identify and locate the specific parts you need for your repair or troubleshooting task.
1. Identify the different parts: Most parts diagrams will have a labeled key that explains the different parts and their specific names or numbers. Take some time to familiarize yourself with the labeling and identify each component on the diagram.
2. Understand the connections: Pay attention to the lines and arrows on the diagram, as they indicate the connections between different parts. For example, an arrow pointing from the compressor to the condenser indicates the flow of refrigerant. Understanding these connections will help you visualize how the different parts work together.
3. Note the part numbers: Each part on the diagram will typically have a corresponding part number. These part numbers are crucial when ordering replacement parts or referring to specific components in troubleshooting guides. Make sure to write down or remember the part numbers for any parts you may need.
4. Look for exploded views: Some parts diagrams may include exploded views, which provide a more detailed look at how the various parts fit together. These views can be especially helpful when disassembling and reassembling the freezer.
5. Use the diagram as a reference: Once you have familiarized yourself with the parts diagram, you can use it as a reference when troubleshooting or repairing your True freezer. If you encounter an issue, you can refer to the diagram to identify the specific part or connection that may be causing the problem.
Overall, learning how to read a True freezer parts diagram is an essential skill for anyone working with these appliances. By understanding the various components, connections, and part numbers, you can efficiently navigate the diagram and successfully repair or troubleshoot your True freezer.
Common Parts in a True Freezer Parts Diagram
Evaporator Coil: The evaporator coil is an essential part of a True freezer. It is responsible for absorbing heat from the freezer’s interior and cooling the air inside. The evaporator coil is typically located on the inside of the freezer, and it is made up of tubes that allow refrigerant to flow through them.
Compressor: The compressor is another crucial component in a True freezer. It is responsible for compressing the refrigerant gas and increasing its pressure. This high-pressure, high-temperature gas eventually travels to the condenser where it releases heat and condenses back into a liquid form.
Condenser Coil: The condenser coil is located on the outside of the True freezer and works in conjunction with the compressor. Its primary function is to release heat absorbed from the interior of the freezer into the surrounding environment. This allows the refrigerant to condense back into a liquid form and complete the cooling cycle.
Thermostat: The thermostat is an important control device in a True freezer. It is responsible for maintaining the desired temperature inside the freezer by turning the compressor on and off as needed. When the temperature rises above the setpoint, the thermostat signals the compressor to start, and when the temperature falls below the setpoint, it signals the compressor to shut off.
Expansion Valve: The expansion valve is a device that regulates the flow of refrigerant from the condenser to the evaporator coil. It restricts the flow of refrigerant, causing it to expand and lower its pressure. This allows the refrigerant to absorb heat from the freezer’s interior and complete the cooling cycle.
- Defrost Timer: The defrost timer is responsible for initiating the defrost cycle in a True freezer. It controls when the freezer switches from the cooling mode to the defrost mode to prevent the buildup of ice on the evaporator coil.
- Fan Motor: The fan motor circulates air inside the freezer, helping to distribute cold air evenly and maintain a consistent temperature. It is usually located near the evaporator coil and is controlled by the thermostat.
- Door Gasket: The door gasket seals the freezer door and prevents cold air from escaping while also preventing warm air from entering. It is made of a flexible material and is attached to the door frame.
In conclusion, a True freezer parts diagram typically includes components such as the evaporator coil, compressor, condenser coil, thermostat, expansion valve, defrost timer, fan motor, and door gasket. These parts work together to maintain the desired temperature inside the freezer and ensure optimal cooling performance.
Replacing Parts in a True Freezer
When it comes to maintaining and repairing your True freezer, knowing how to replace parts is essential. Whether you need to replace a broken door gasket or a faulty thermostat, having a basic understanding of the process can save you time and money.
1. Identify the problem: Before you can replace any parts, it’s important to identify the issue with your True freezer. Is it not cooling properly? Is the door not sealing? By identifying the problem, you can determine which part needs to be replaced.
2. Order the correct part: Once you’ve identified the faulty component, you’ll need to order a replacement. Make sure to have the model number and serial number of your True freezer on hand, as this will help you find the exact part you need. You can usually find this information on the back or side of the appliance.
3. Disconnect the power and empty the freezer: For safety reasons, always disconnect the power to your True freezer before attempting any repairs. Additionally, make sure to remove all items from the freezer to prevent any damage or contamination during the replacement process.
4. Remove the old part: Depending on the part you’re replacing, you may need to unscrew or unclip it from the freezer. Consult the True freezer parts diagram or the manufacturer’s instructions for specific guidance on how to remove the old part. Take note of any wiring connections and make sure to disconnect them properly.
5. Install the new part: Once the old part is removed, carefully install the new part in its place. Follow the instructions provided with the replacement part, and make sure to reconnect any wiring connections if necessary. Take care to ensure a tight and secure fit to prevent any issues in the future.
6. Test the freezer: After installing the new part, reconnect the power and test the freezer to make sure it’s functioning properly. Monitor the temperature and check for any leaks or unusual noises. If everything looks and sounds good, you’re ready to restock your freezer with your favorite frozen goods!
By following these steps and having the necessary tools and replacement parts, you can easily replace faulty components in your True freezer and keep it running smoothly for years to come.
Troubleshooting Issues with a True Freezer Parts Diagram
Having issues with your True freezer? No need to worry! With the help of a True freezer parts diagram, you can easily troubleshoot and identify any problems that may arise.
One common issue that can occur with a freezer is a lack of cooling. If you notice that your freezer is not keeping your items frozen as it should, there are a few components you can check using the parts diagram. Start by inspecting the thermostat. This is responsible for regulating the temperature inside the freezer. Make sure it is set to the correct temperature and functioning properly. If the thermostat seems fine, move on to the condenser fan motor. This fan helps circulate cold air throughout the freezer. If it is not running, the freezer may not be cooling properly. Check for any obstructions or signs of damage to the fan motor.
Another common issue with a True freezer is excessive frost buildup. If you find frost accumulating inside the freezer, it could be a sign of a faulty defrost timer or heater. Using the parts diagram, locate these components and inspect them for any signs of damage or malfunction. The defrost timer controls when the freezer goes into the defrost cycle, while the defrost heater helps melt any frost buildup. If either of these components is not working properly, it can result in excessive frost accumulation. Replacing the faulty parts should resolve the issue.
In addition to these common issues, a True freezer parts diagram can also assist with troubleshooting other problems such as a malfunctioning door seal, a faulty compressor, or a broken fan motor. By using the diagram to identify and understand the various components of your freezer, you can quickly diagnose and resolve any issues that may arise, saving you time and money on professional repairs.
Where to Find True Freezer Parts Diagrams
When it comes to finding True freezer parts diagrams, there are a few options available to you. Whether you are a repair technician or a homeowner looking to fix your freezer, having access to the right diagram can make the process much easier.
One of the best places to find True freezer parts diagrams is directly from the manufacturer. True Manufacturing has a comprehensive website where you can find an extensive library of manuals, diagrams, and other resources. Simply visit their website and navigate to the support or parts section to access the diagrams you need.
Another option is to visit online appliance parts retailers. Many of these retailers have diagrams available for different appliance models, including True freezer models. You can often search for your specific model number and find the diagrams you need. These retailers may also have customer reviews and ratings, which can be helpful in determining the reliability and quality of the parts.
If you prefer a more traditional approach, you can visit local appliance repair shops. These shops often have access to parts diagrams and can assist you in finding the right one for your True freezer. They may also be able to order the parts for you if they do not have them in stock.
Ultimately, the best place to find True freezer parts diagrams depends on your specific needs and preferences. Whether you choose to go directly to the manufacturer, shop online, or visit a local repair shop, having access to the right diagram is essential for a successful repair.