
If you’ve ever studied set theory or taken a mathematics or logic course, chances are you’ve come across Venn diagrams. These visual representations of sets and their relationships are an invaluable tool for understanding complex mathematical concepts and solving problems. And with the advent of technology, Venn diagram calculators have made it even easier to create and analyze these diagrams.
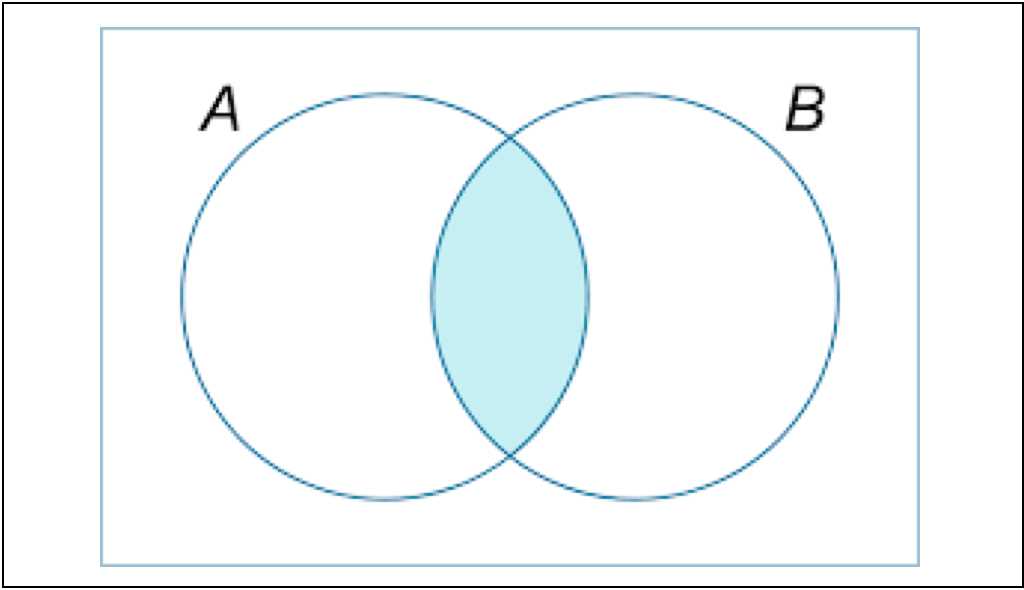
A Venn diagram calculator shading helps you determine the overlapping areas between sets by allowing you to input the elements in each set and shade the regions accordingly. This shading is crucial for visualizing the intersections and unions of sets, which can provide valuable insights in fields such as statistics, data analysis, and even biology.
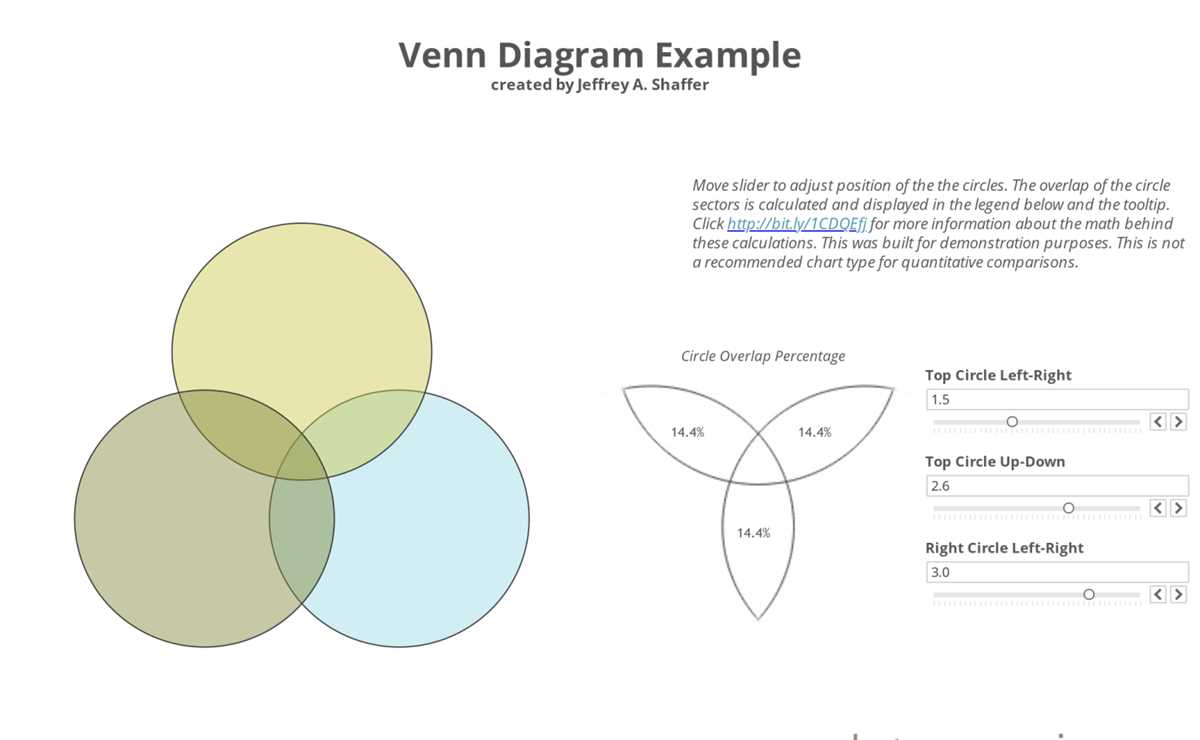
With a Venn diagram calculator shading tool, you can explore various scenarios by adding and removing elements from sets, adjusting the shading, and observing how it affects the diagram. This interactive approach allows for a deeper understanding of set relationships and can assist in problem-solving tasks such as finding the probability of certain events or understanding the logical consequences of different assumptions.
Whether you’re a student studying mathematics or a professional in a field where set theory is applicable, a Venn diagram calculator shading can be an invaluable companion. By visualizing complex relationships in a clear and concise manner, these tools help enhance understanding and facilitate decision-making processes. So why not give it a try and discover the power of Venn diagram calculator shading for yourself?
What is a Venn Diagram Calculator and How to Use It
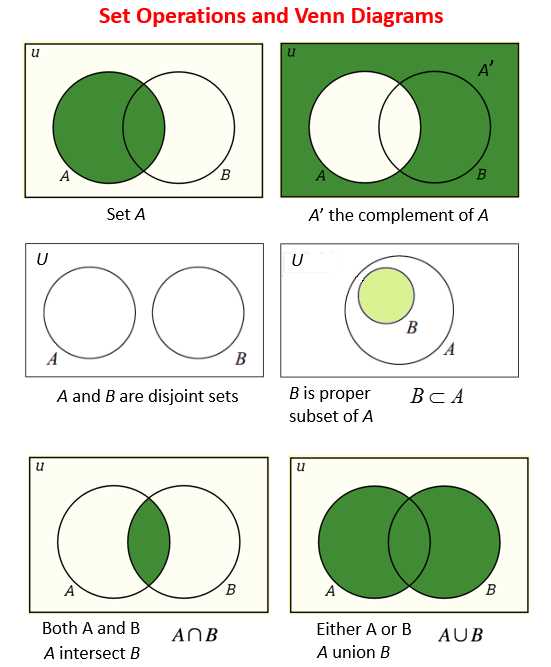
A Venn Diagram Calculator is a tool that allows you to create and visualize Venn diagrams, which are visual representations of sets and their relationships. Venn diagrams use overlapping circles or other shapes to show the commonalities and differences between different sets of objects or elements. These diagrams are commonly used in mathematics, logic, statistics, and computer science.
To use a Venn Diagram Calculator, you typically start by entering the number of sets you want to work with. Then, you can enter the elements or objects that belong to each set. The calculator will then generate the Venn diagram, with each set represented by an individual circle or shape, and the overlapping areas representing the intersections between the sets.
You can also use the Venn Diagram Calculator to shade or color the different regions of the diagram based on specific criteria or conditions. For example, if you want to shade the region that represents the elements that belong to both set A and set B, you can specify this condition in the calculator and it will automatically update the diagram accordingly.
The Venn Diagram Calculator can be a useful tool for visually organizing and analyzing complex sets of data or information. It can help you identify commonalities, differences, and relationships between different sets, and can assist in making logical conclusions or decisions based on the information represented in the diagram.
Benefits of Using a Venn Diagram Calculator
Venn diagram calculators are powerful tools that can help you visualize and analyze data in a clear and organized way. By using a Venn diagram calculator, you can easily identify patterns, overlaps, and relationships between different sets of data. This can be particularly useful in various fields such as mathematics, statistics, and data analysis.
One of the main benefits of using a Venn diagram calculator is its ability to simplify complex data sets. Instead of having to manually draw and shade Venn diagrams, the calculator can automatically generate accurate diagrams with just a few clicks. This not only saves time but also ensures accuracy, as human errors can be eliminated.
Another advantage of using a Venn diagram calculator is its flexibility. These calculators often come with customizable features, allowing you to adjust the size, shape, and color of the diagram to suit your specific needs. This can be helpful in presentations and reports, as you can create visually appealing diagrams that effectively convey your message.
Additionally, Venn diagram calculators are beneficial for collaborative work. They provide an easy way to share and collaborate on data analysis projects. Multiple users can simultaneously work on the same diagram, making it easier to compare and analyze different data sets. This can enhance teamwork and improve overall efficiency.
In conclusion, using a Venn diagram calculator offers numerous benefits, including simplifying complex data sets, saving time and ensuring accuracy, providing flexibility in customization, and facilitating collaboration. Whether you are a student, a researcher, or a professional, a Venn diagram calculator can be a valuable tool for analyzing and visualizing data effectively.
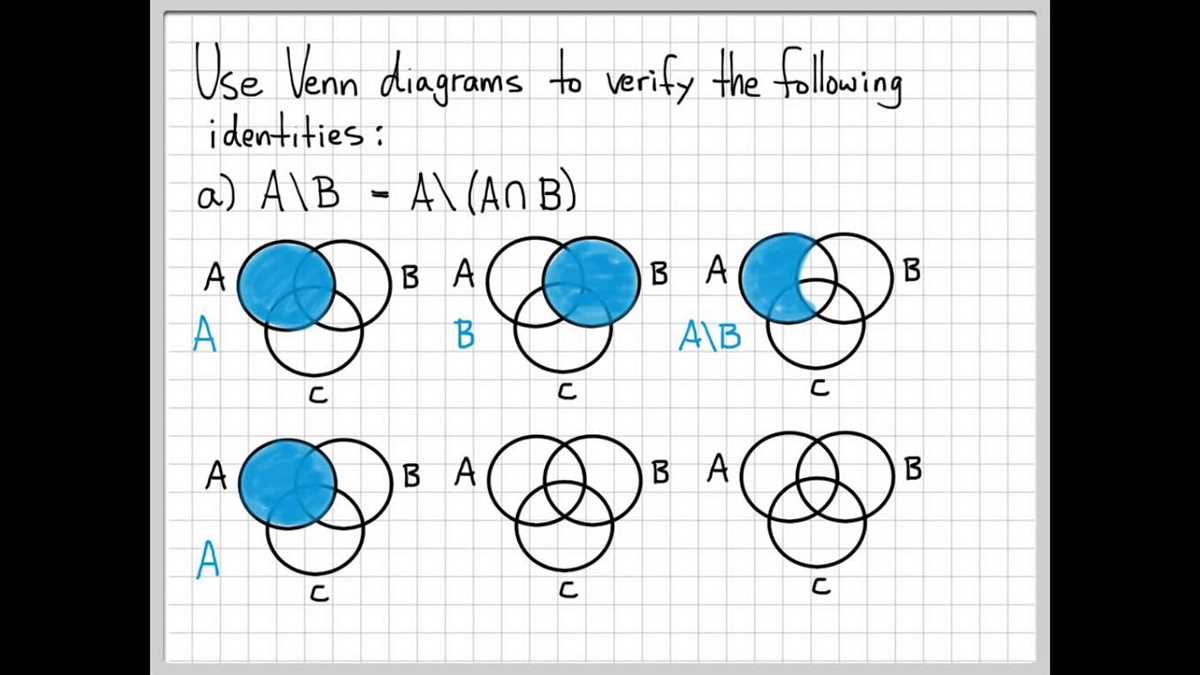
Step-by-Step Guide on Shading a Venn Diagram
A Venn diagram is a visual representation of the relationships between different sets. It consists of overlapping circles or ellipses, with each circle representing a different set and the overlapping region representing the intersection of the sets. Shading the Venn diagram helps to visually differentiate the different regions and understand the relationships between the sets.
To shade a Venn diagram, follow these steps:
- Identify the sets: Start by identifying the sets you want to represent in the Venn diagram. For example, if you are working with a Venn diagram representing different types of fruits, you might have sets for apples, oranges, and bananas.
- Draw the circles: Draw circles or ellipses to represent each set. Make sure the circles overlap to show the intersection between the sets.
- Label the sets: Label each circle with the name of the set it represents. For example, label one circle as “Apples”, another as “Oranges”, and so on.
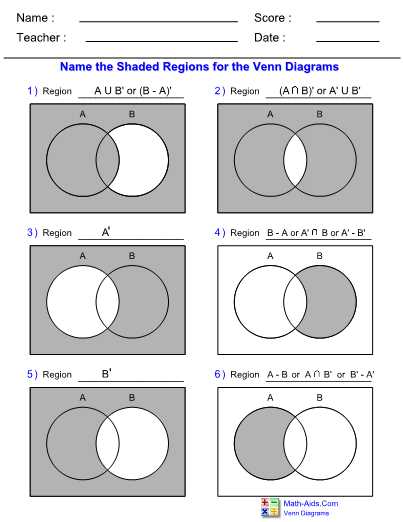
- Shade the regions: Determine the regions that need to be shaded based on the given information or conditions. Use a shading pencil or marker to shade these regions.
- Add additional information: If there are any additional conditions or information that need to be represented in the Venn diagram, add labels or symbols to indicate them.
By following these steps, you can effectively shade a Venn diagram and visualize the relationships between different sets. It is a useful tool for organizing and analyzing data, solving problems, and understanding complex relationships.
Common Mistakes to Avoid when Using a Venn Diagram Calculator
A Venn diagram calculator can be a handy tool for organizing and analyzing sets of data. However, it’s important to use it correctly to get accurate results. Here are some common mistakes to avoid when using a Venn diagram calculator:
1. Not defining the sets clearly
One of the most common mistakes is not clearly defining the sets you want to analyze. Each set should represent a distinct category or group, and the elements within each set should be related to that category. If the sets are not clearly defined, the results may be confusing or inaccurate.
2. Overlapping sets incorrectly
When using a Venn diagram calculator, it’s important to correctly overlap the sets to show the relationships between them. Overlapping sets incorrectly can lead to misinterpretation of the data. Make sure to adjust the overlap based on the actual intersection of the sets.
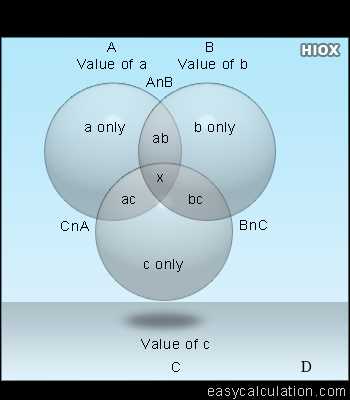
3. Forgetting to label the regions
In a Venn diagram, it’s crucial to label each region to indicate which elements belong to which sets. Forgetting to label the regions can make it difficult to understand the data and can lead to confusion. Double-check that all regions are clearly labeled.
4. Using incorrect data input format
A Venn diagram calculator usually requires specific data input formats, such as lists or sets. Using incorrect formats can result in errors or incorrect calculations. Make sure to carefully follow the instructions provided by the calculator and input the data correctly.
5. Relying solely on the calculator
While a Venn diagram calculator can be a useful tool, it’s important not to rely solely on it. It’s still essential to have a good understanding of Venn diagrams and the underlying concepts. Double-check the results provided by the calculator and verify its accuracy using manual calculations if needed.
Avoiding these common mistakes will help ensure that you use a Venn diagram calculator effectively and accurately. By taking the time to properly define sets, overlap them correctly, label regions, use the correct data input format, and double-check results, you can confidently analyze and interpret data using a Venn diagram calculator.
Tips and Tricks for Advanced Venn Diagram Shading
When it comes to shading complex Venn diagrams, there are a few tips and tricks that can help make the process easier and more efficient. Whether you’re working on a math problem or creating a visual representation for a presentation, these strategies will come in handy.
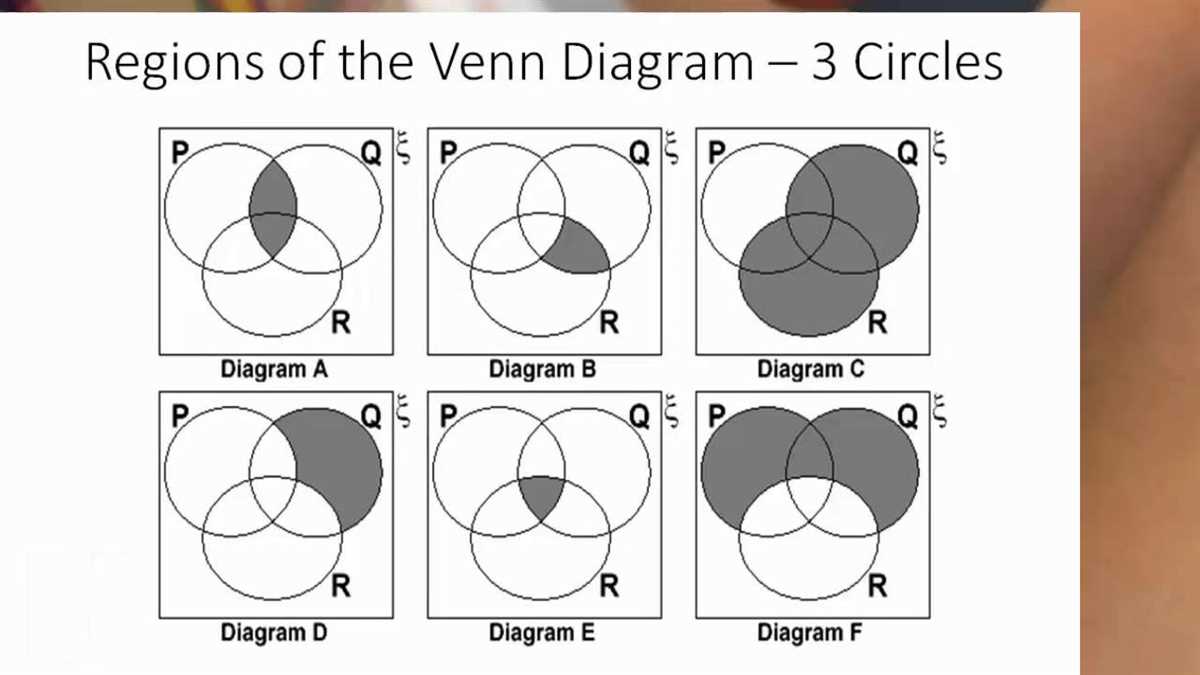
1. Break it down
Start by breaking down the Venn diagram into smaller sections. Identify the overlapping areas and focus on shading one section at a time. This will help you manage the complexity of the diagram and ensure that you don’t miss any areas.
2. Use colors strategically
Using different colors for each section can make it easier to distinguish between overlapping and non-overlapping regions. Consider using a color key or legend to indicate the meaning of each color, especially if you’re working on a complex diagram with multiple sections.
3. Simplify the problem
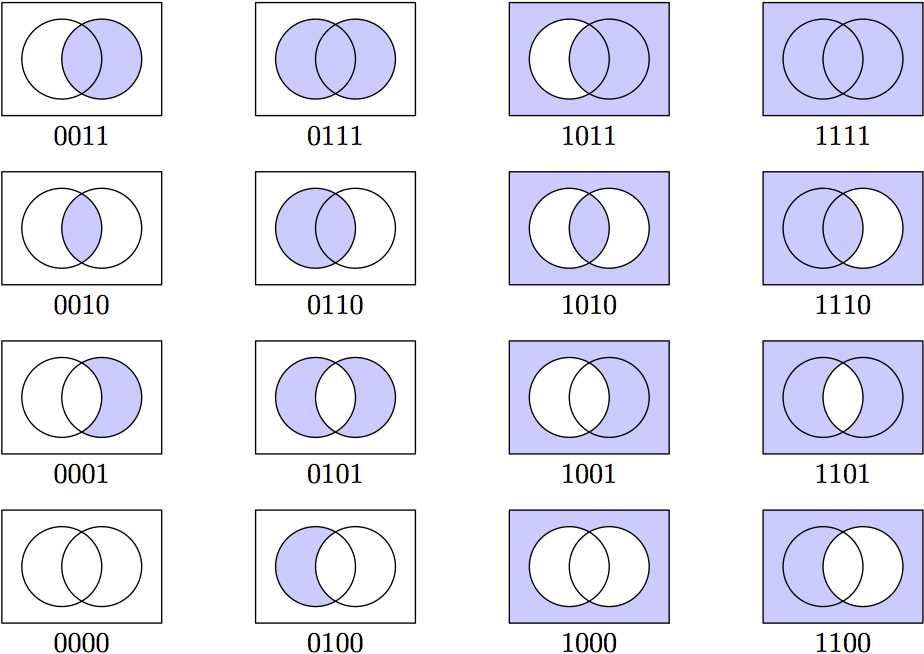
If you’re dealing with a particularly complex Venn diagram, try simplifying the problem before shading. For example, you can start by shading the non-overlapping areas first, then gradually add the overlapping regions. This approach can help prevent errors and make the shading process more manageable.
4. Use shading techniques
Experiment with different shading techniques, such as cross-hatching or stippling, to add depth and dimension to your Venn diagram. These techniques can make the diagram more visually appealing and help convey the relationships between different sets.
5. Double-check your work
Before finalizing your shaded Venn diagram, double-check your work to make sure all the sections are correctly shaded. Check for any missed areas or errors in shading. It’s also a good idea to review the problem or question you’re working on to ensure that your shading accurately represents the relationships between the sets.
By following these tips and tricks, you’ll be able to shade even the most complex Venn diagrams with ease and accuracy. Remember to take your time, stay organized, and practice regularly to improve your shading skills. Happy diagram shading!