
Occupancy sensor switches are becoming increasingly popular for their convenience and energy-saving capabilities. These switches automatically turn on the lights when someone enters a room and turn them off when no movement is detected. Wiring an occupancy sensor switch may seem like a daunting task, but with the right knowledge and tools, it can be done easily and safely.
Before diving into the wiring process, it is essential to understand the basic components of an occupancy sensor switch. These switches typically consist of a motion sensor, a relay, and a control circuit. The motion sensor detects movement in a room, while the relay controls the electrical current flowing to the lights. The control circuit is responsible for managing the switch’s settings and adjusting its sensitivity.
When wiring an occupancy sensor switch, it is crucial to follow the manufacturer’s instructions for your specific switch model. However, there are some general steps that can be followed for most switches. Firstly, turn off the power to the room at the circuit breaker box to ensure safety. Next, remove the existing light switch from the wall and disconnect the wires. It is essential to take note of the wire colors and their corresponding terminals.
How to Wire an Occupancy Sensor Switch
Wiring an occupancy sensor switch is a relatively simple process that can greatly improve the efficiency and convenience of your lighting system. An occupancy sensor switch automatically turns the lights on when someone enters a room and turns them off when the room is empty. This not only saves energy but also eliminates the need for manual light control.
To wire an occupancy sensor switch, you will need a few basic tools, including a screwdriver, wire strippers, and wire nuts. Start by turning off the power to the circuit you will be working on. This can be done by flipping the corresponding circuit breaker in your electrical panel.
Step 1: Remove the Existing Switch
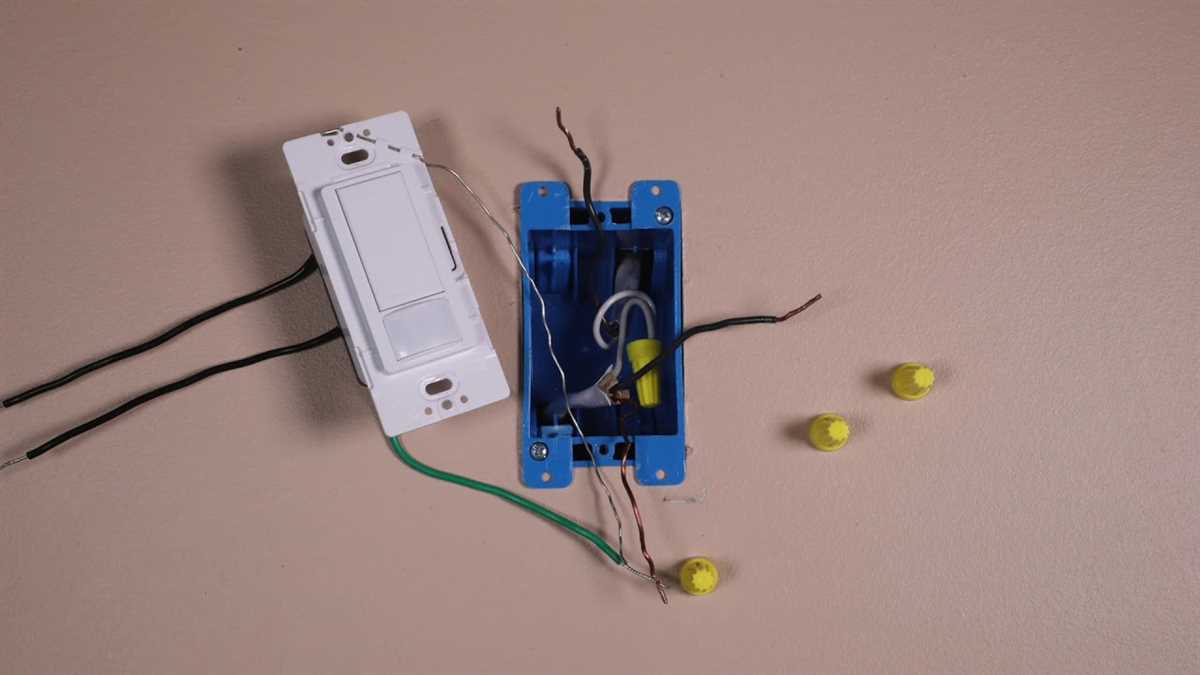
Begin by removing the existing switch from the electrical box. To do this, remove the screws securing the switch cover plate and then unscrew the switch from the box. Carefully pull the switch out, being mindful of any wires attached to it.
Step 2: Examine the Wiring
Before you begin connecting the occupancy sensor switch, take a moment to examine the wiring in the electrical box. Identify the wires that are hot (usually black), neutral (usually white), and ground (usually green or bare copper). Make sure the power is off before touching any wires.
Step 3: Connect the Wires
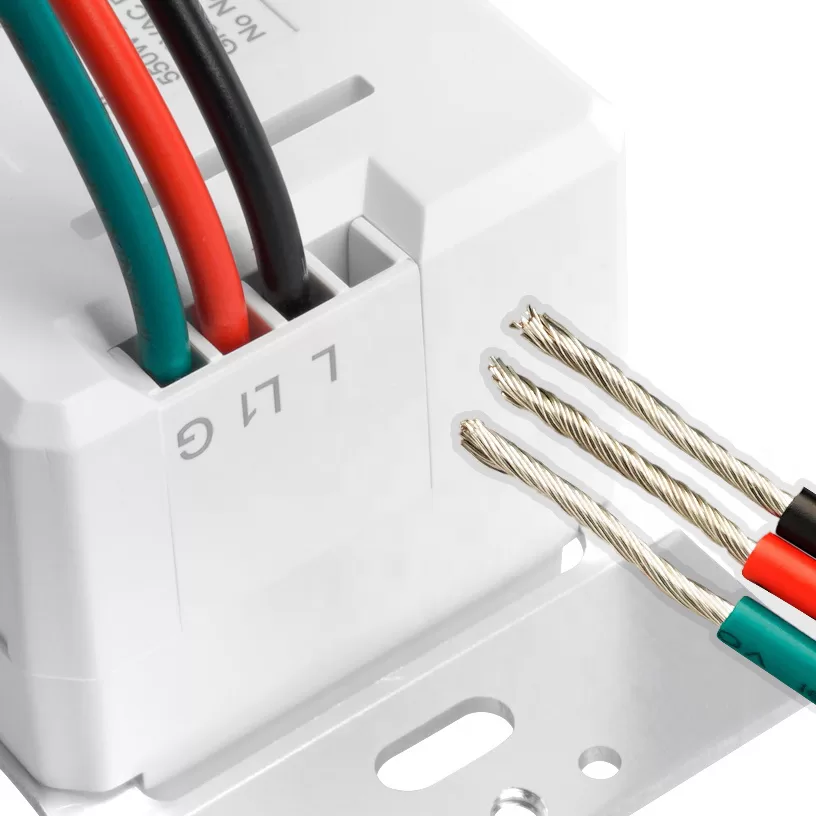
Using your wire strippers, strip a small length of insulation from the ends of the hot, neutral, and ground wires. Connect the hot wire from the electrical box to the black wire of the occupancy sensor switch using a wire nut. Connect the neutral wire from the box to the white wire of the sensor switch, and connect the ground wire to the green or bare copper wire on the switch.
Step 4: Secure the Switch
Once the wires are securely connected, carefully tuck them back into the electrical box. Align the occupancy sensor switch with the screw holes in the box and use screws to secure it in place. Finally, replace the switch cover plate.
Now that the occupancy sensor switch is wired and installed, you can turn the power back on at the circuit breaker. Test the switch by entering the room and verifying that the lights turn on automatically. You can adjust the sensor’s settings if necessary, such as the sensitivity or the duration of the lights staying on after the room is empty.
Wiring an occupancy sensor switch is a simple and effective way to improve the energy efficiency of your lighting system. By following these steps and taking the necessary safety precautions, you can easily install an occupancy sensor switch in any room of your home or office.
Prepare the necessary tools and materials
Before starting the installation of an occupancy sensor switch, it is important to gather all the necessary tools and materials. This will ensure that you have everything you need to complete the wiring process efficiently and properly. Here are some of the essential items you will need:
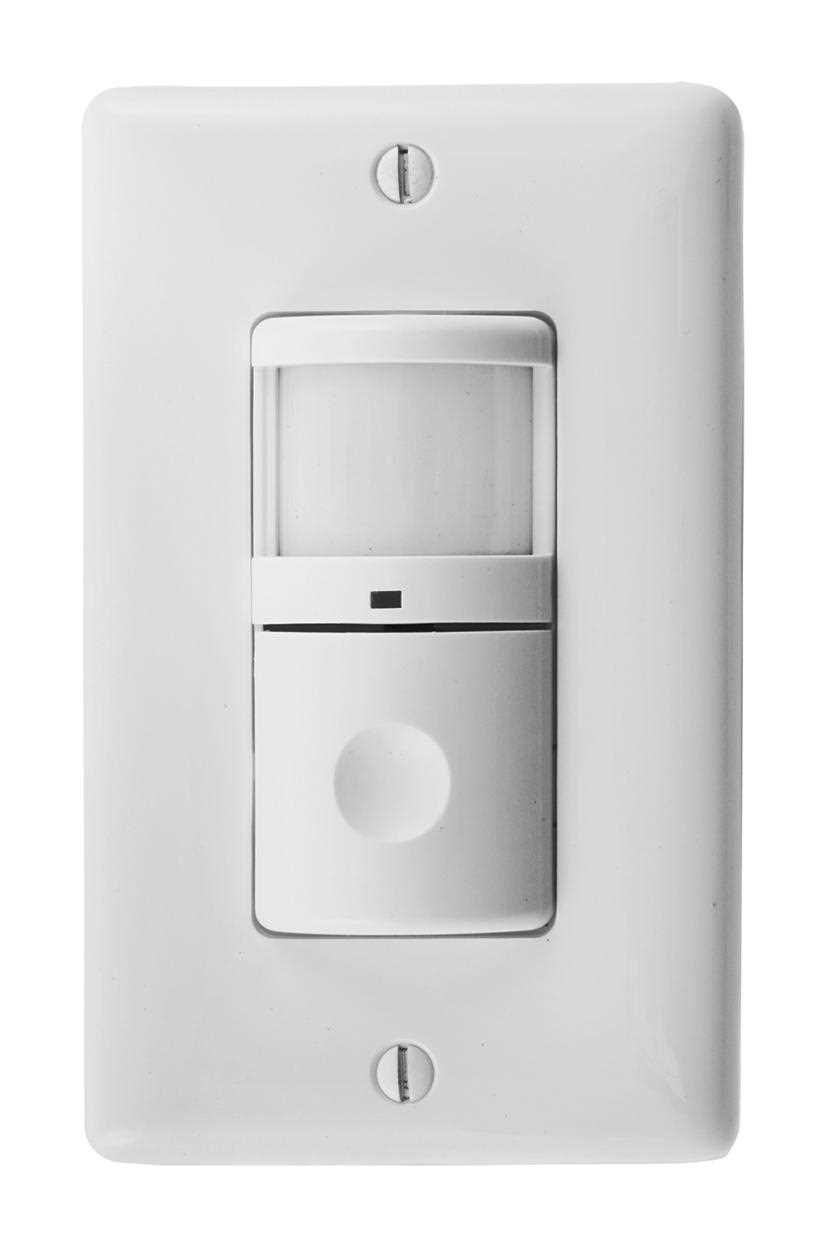
- Occupancy sensor switch: Choose a switch that suits your needs and preferences. Some common options include motion sensors, infrared sensors, and sound sensors.
- Screwdriver: A screwdriver will be needed to remove the existing switch and install the new occupancy sensor switch.
- Wire strippers: The wire strippers are used to remove the insulation from the electrical wires to expose the bare copper wire.
- Electrical tape: Electrical tape is used to insulate and secure the connections once the wires are joined together.
- Wire connectors: Wire connectors are used to join together the electrical wires securely.
- Voltage tester: A voltage tester is used to ensure that there is no electrical current in the circuit before starting the installation.
- Wire nuts: Wire nuts are used to connect the wires together and provide a secure and safe connection.
- Electrical box: Depending on where you plan to install the occupancy sensor switch, you may need an electrical box to mount the switch.
- Pliers: Pliers are useful for bending and shaping the wires as needed.
Having these tools and materials on hand will make the installation process go smoothly and ensure that you have everything you need to successfully wire the occupancy sensor switch.
Turn off the power
Turn off the power
Before starting any work on the occupancy sensor switch, it is essential to turn off the power to the circuit. This will ensure your safety and prevent any potential electrical accidents.
To turn off the power, locate the circuit breaker or fuse that controls the circuit where the sensor switch is installed. Use a circuit tester to double-check that the power is indeed turned off before proceeding with any work. This step is crucial to avoid the risk of electric shock or damage to the switch.
Step-by-step guide to turning off the power:
- Locate the electrical panel in your home or building.
- Open the electrical panel door.
- Identify the circuit breaker or fuse that controls the circuit where the occupancy sensor switch is installed.
- Flip the switch on the circuit breaker to the “off” position or remove the fuse accordingly.
- Use a circuit tester to verify that the power to the circuit has been successfully turned off.
- Once you have confirmed that the power is off, you can proceed with installing or working on the occupancy sensor switch.
Remember, safety should always be the top priority when working with electrical systems. Taking the time to turn off the power before starting any work will help protect you from potential hazards and ensure a successful installation or repair of the occupancy sensor switch.
Remove the existing switch
The first step in wiring an occupancy sensor switch is to remove the existing switch. This is necessary in order to access the wiring and make the necessary connections for the sensor switch. Before beginning, make sure to turn off the power supply to the switch in the circuit breaker or fuse box.
To remove the existing switch, start by unscrewing the switch plate cover. Use a flathead screwdriver or a small pry tool to gently pry the cover away from the wall. Once the cover is removed, you will see the switch itself and the wires connected to it.
Next, unscrew the mounting screws that hold the switch in place. Use a Phillips screwdriver to turn the screws counterclockwise until they are loose enough to remove. Once the screws are removed, carefully pull the switch away from the wall, exposing the wiring behind it.
Take note of how the existing switch is wired before disconnecting the wires. This will be helpful when wiring the new occupancy sensor switch. Identify the hot wire (usually black or red) and the neutral wire (usually white) connected to the switch. Use a wire stripper to remove the insulation from the ends of the wires, if necessary.
Once the wires are exposed and ready to be disconnected, carefully remove the wire nuts or screws that secure the wires to the switch terminals. Slowly pull the wires away from the switch and set the old switch aside. The existing switch has now been successfully removed and you are ready to proceed with wiring the occupancy sensor switch.
Connect the occupancy sensor switch
Connecting an occupancy sensor switch is a relatively simple process that involves a few basic steps. To ensure safety, always turn off the power to the circuit before beginning any electrical work.
1. Start by removing the existing switch plate cover and switch from the electrical box. Use a voltage tester to confirm that the electricity is turned off. Once confirmed, disconnect the wires from the old switch, making note of which wires are connected to which terminals.
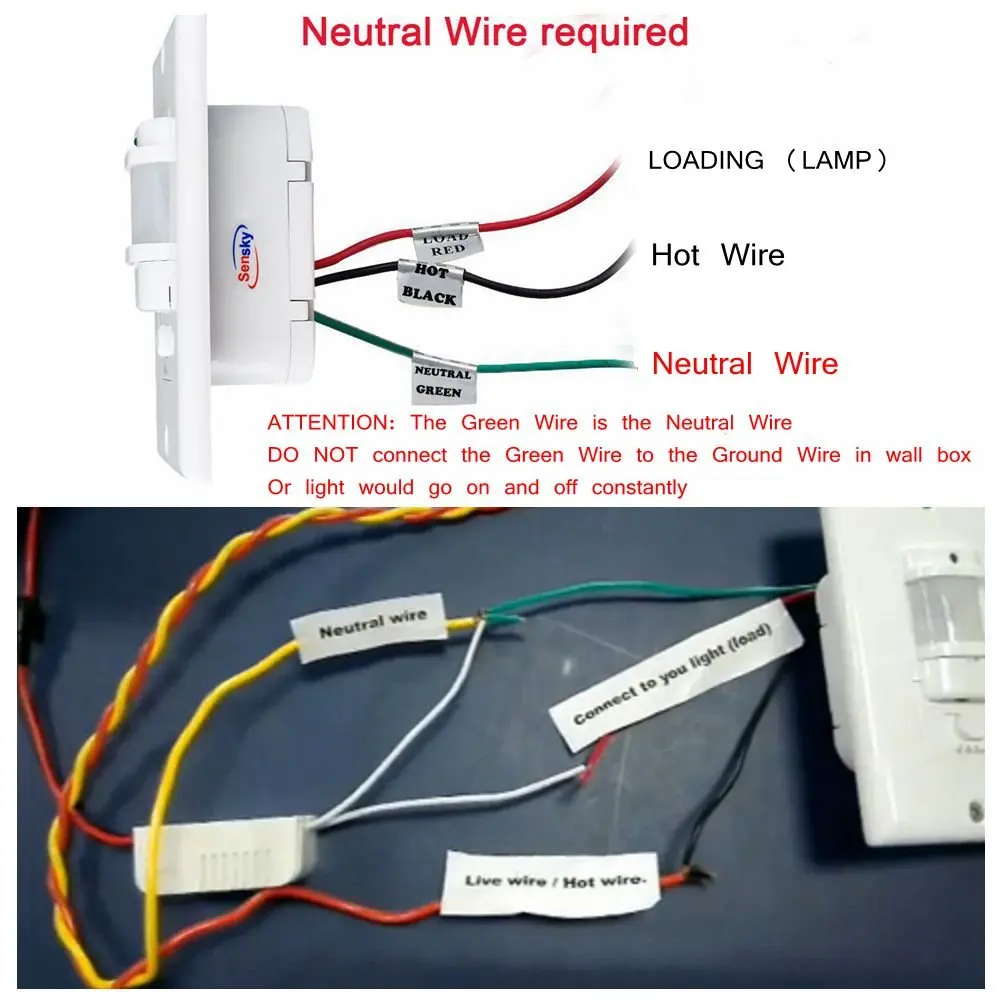
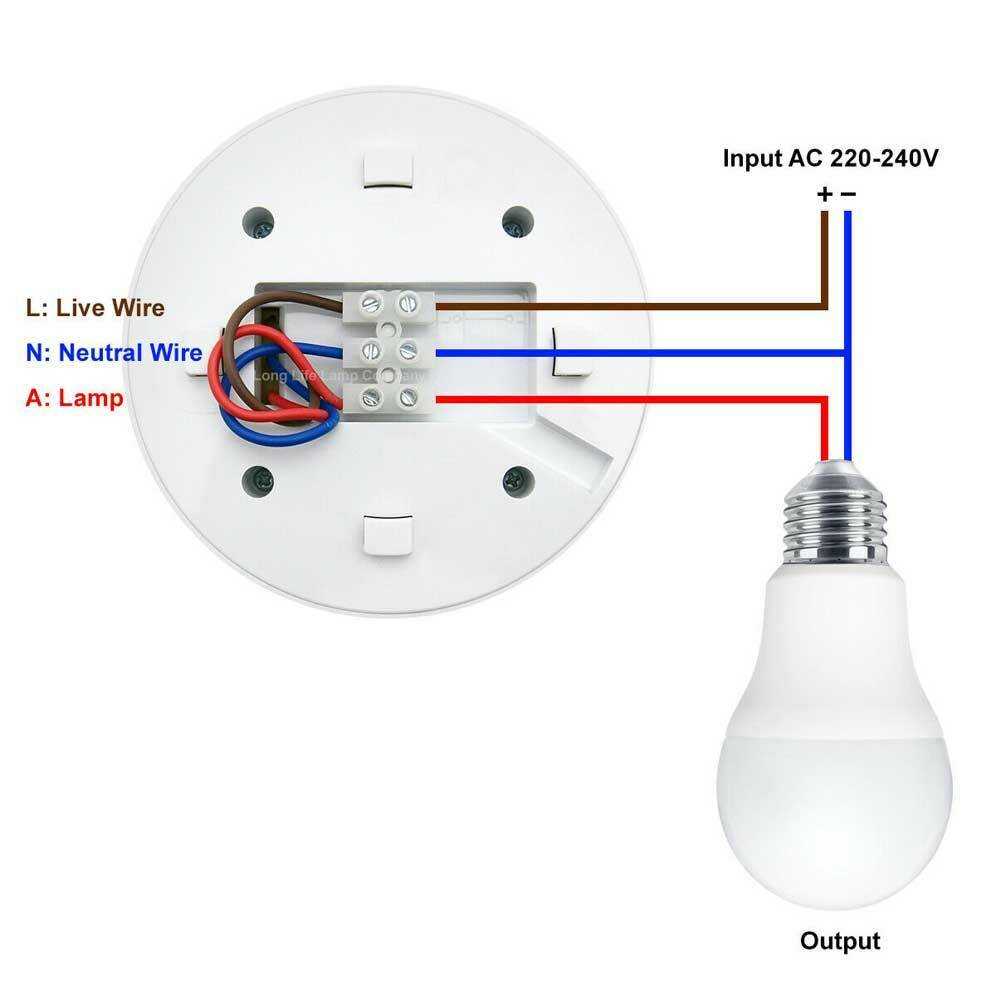
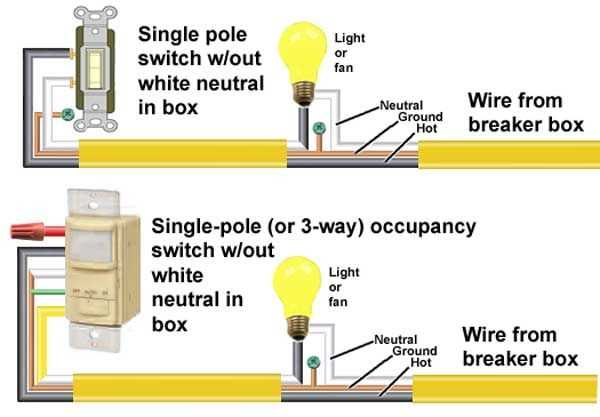
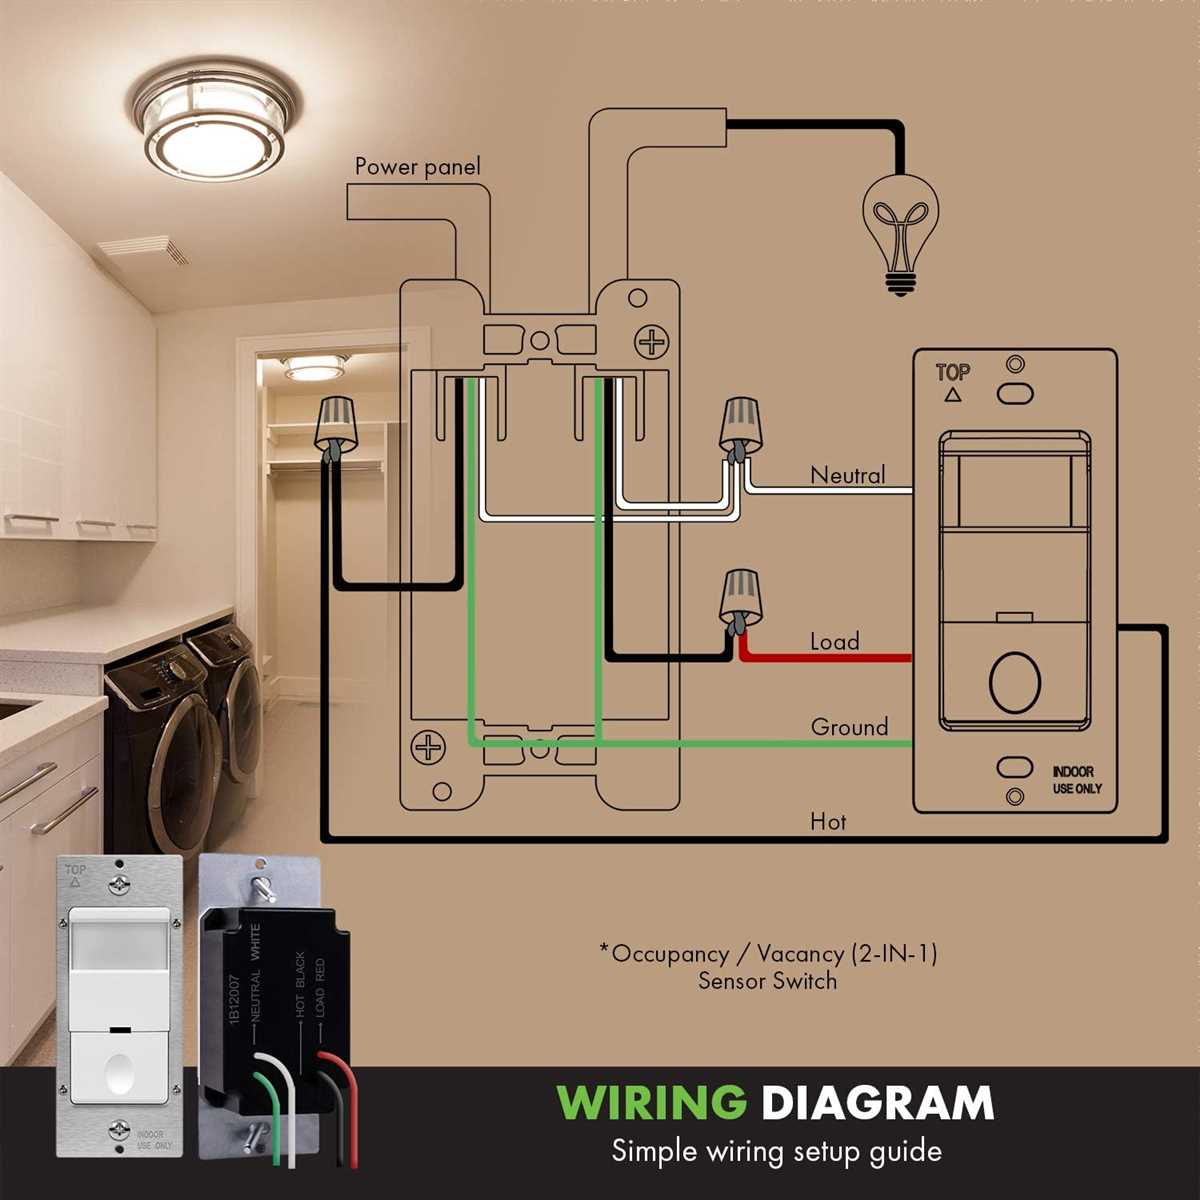
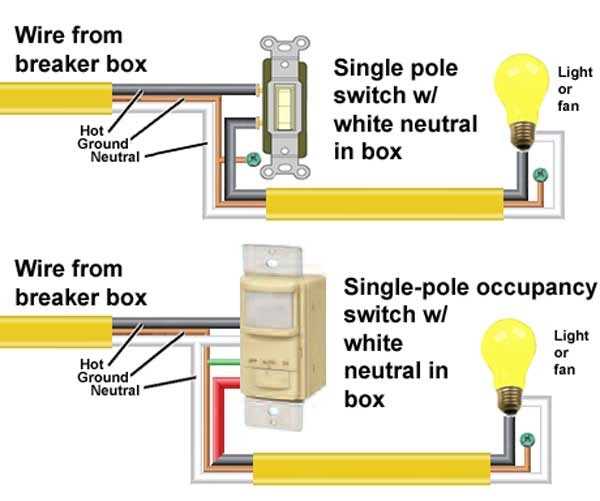
2. Next, connect the wires from the new occupancy sensor switch. The specific wiring diagram will vary depending on the model and manufacturer, so it’s important to refer to the installation instructions provided with the switch. Generally, there will be three wires: a black “hot” wire, a white neutral wire, and a green or bare copper ground wire.
3. Connect the black “hot” wire from the switch to the black (or sometimes red) wire from the electrical box. This connection provides power to the switch.
4. Connect the white neutral wire from the switch to the white wire from the electrical box. This wire completes the circuit for the switch.
5. Connect the green or bare copper ground wire from the switch to the green or bare copper ground wire from the electrical box. This provides a safe path for electrical currents in case of a fault.
6. Once all the wires are securely connected, carefully tuck them back into the electrical box, making sure they are not crimped or pinched. Attach the occupancy sensor switch to the electrical box using the mounting screws provided.
7. Finally, attach the switch plate cover and restore power to the circuit. Test the occupancy sensor switch to ensure it is working correctly.
By following these steps and carefully referring to the manufacturer’s instructions, you can safely and effectively connect an occupancy sensor switch to enhance energy efficiency and convenience in your home or workspace.
Install and mount the sensor
Before installing the occupancy sensor switch, make sure to turn off the power supply to the circuit you will be working on. This will help prevent any electrical accidents or injuries during the installation process.
Once the power is turned off, locate the electrical box where the sensor switch will be mounted. Remove the existing switch or cover plate from the box, using a screwdriver if necessary. Make sure to keep any screws or small pieces in a safe place for later use.
1. Connect the wires:
- Identify the black (hot) wire and the white (neutral) wire in the electrical box.
- Connect the black wire from the sensor switch to the black wire in the box, using a wire nut to secure the connection.
- Connect the white wire from the sensor switch to the white wire in the box, again using a wire nut.
- If there is a ground wire in the box, connect it to the green or bare copper wire on the sensor switch.
2. Mount the sensor switch:
- Position the sensor switch in the electrical box, making sure the wires are neatly tucked away.
- Align the screw holes on the switch with the holes on the electrical box.
- Insert screws through the holes and tighten them securely to mount the switch in place.
After mounting the sensor switch, double-check all connections to ensure they are secure. Reattach the cover plate to the electrical box, using the screws that were previously removed. Finally, restore the power supply to the circuit and test the sensor switch to ensure it is functioning correctly.
Test the occupancy sensor switch
After wiring the occupancy sensor switch, it is important to test its functionality to ensure proper installation and operation. Here are the steps to test the occupancy sensor switch:
- Turn on the power: Make sure the power to the circuit connected to the occupancy sensor switch is turned on.
- Adjust the settings: Depending on the specific occupancy sensor switch, there may be various settings that can be adjusted, such as sensitivity and timeout. Refer to the manufacturer’s instructions to set these parameters accordingly.
- Enter the detection zone: Walk into the area covered by the occupancy sensor switch to trigger its activation. The sensor should detect your presence and turn on the connected lights or devices.
- Test the range: Walk around the area covered by the occupancy sensor switch to ensure that it detects movement across its entire range. If there are dead spots or areas where the sensor fails to detect movement, adjust its position or sensitivity settings accordingly.
- Observe the timeout: After triggering the occupancy sensor switch, observe how long it takes for the connected lights or devices to turn off after leaving the detection zone. This is determined by the timeout setting, which can be adjusted if necessary.
It is recommended to test the occupancy sensor switch in different scenarios and conditions to ensure its reliability. If any issues or inconsistencies are observed, refer to the manufacturer’s instructions for troubleshooting steps or consider seeking professional assistance.
Overall, testing the occupancy sensor switch is crucial to verify its proper installation and functionality. It ensures that the switch accurately detects occupancy and operates the lights or devices accordingly, providing convenience, energy efficiency, and enhanced safety in various settings.