
If you own a 2000 Chevy S10, it’s important to understand the various components and systems that make up your vehicle. One such system is the vacuum system, which plays a crucial role in the operation and performance of your S10. The vacuum system helps regulate and control various functions such as the air intake, emissions, and power brake booster. Having a clear understanding of the vacuum hose diagram is vital to properly maintain and troubleshoot any issues that may arise.
The vacuum hose diagram for a 2000 Chevy S10 provides a visual representation of the various vacuum hoses and their corresponding connections. This diagram helps you identify the different hoses, valves, and connectors that make up the vacuum system. By referring to the diagram, you can ensure that each hose is properly connected and in good condition. It also allows you to identify and replace any worn or damaged hoses, which is essential for optimal performance.
In addition to understanding the vacuum hose diagram, it’s important to be aware of common issues that can occur with the vacuum system in a 2000 Chevy S10. Common problems may include leaks in the hoses, clogged or malfunctioning valves, or issues with the vacuum pump. If any of these problems arise, it can result in poor engine performance, decreased fuel efficiency, and potential damage to other components.
Regular maintenance and inspection of the vacuum system is key to preventing and resolving any issues. By referring to the 2000 Chevy S10 vacuum hose diagram, you can easily locate and inspect each component, ensuring that everything is functioning as it should. Additionally, it’s important to use high-quality hoses and connectors when replacing any worn or damaged components to ensure a proper seal and long-lasting performance.
In conclusion, understanding the vacuum system and referring to the 2000 Chevy S10 vacuum hose diagram is crucial for maintaining and troubleshooting your vehicle. By having a clear understanding of how the vacuum system works and being aware of common issues, you can ensure optimal performance and prevent potential damage. Regular maintenance and inspection, along with the use of high-quality replacement parts, will help keep your 2000 Chevy S10 running smoothly for years to come.
Understanding Your 2000 Chevy S10 Vacuum Hose Diagram
The vacuum hose diagram is an important tool for understanding the intricate workings of your 2000 Chevy S10’s vacuum system. This diagram provides a visual representation of the various vacuum hoses and connectors that make up the system, helping you to understand how they are all interconnected and work together to ensure the smooth operation of your vehicle.
The diagram typically features a series of lines or arrows that represent the different vacuum hoses, with labels indicating their specific functions and connections. By referring to the diagram, you can easily identify which hoses are responsible for delivering vacuum pressure to specific components, such as the brake booster, transmission, or HVAC system.
Brake Booster: One of the key elements in the vacuum system is the brake booster, which utilizes vacuum pressure to assist with braking. The diagram will show you the hose that connects the engine intake manifold to the brake booster, allowing for the transfer of vacuum pressure.
Transmission: Another important component that relies on vacuum pressure is the transmission. The vacuum hose diagram will outline the route of the hose that connects the engine intake manifold to the transmission, ensuring proper shifting and smooth operation.
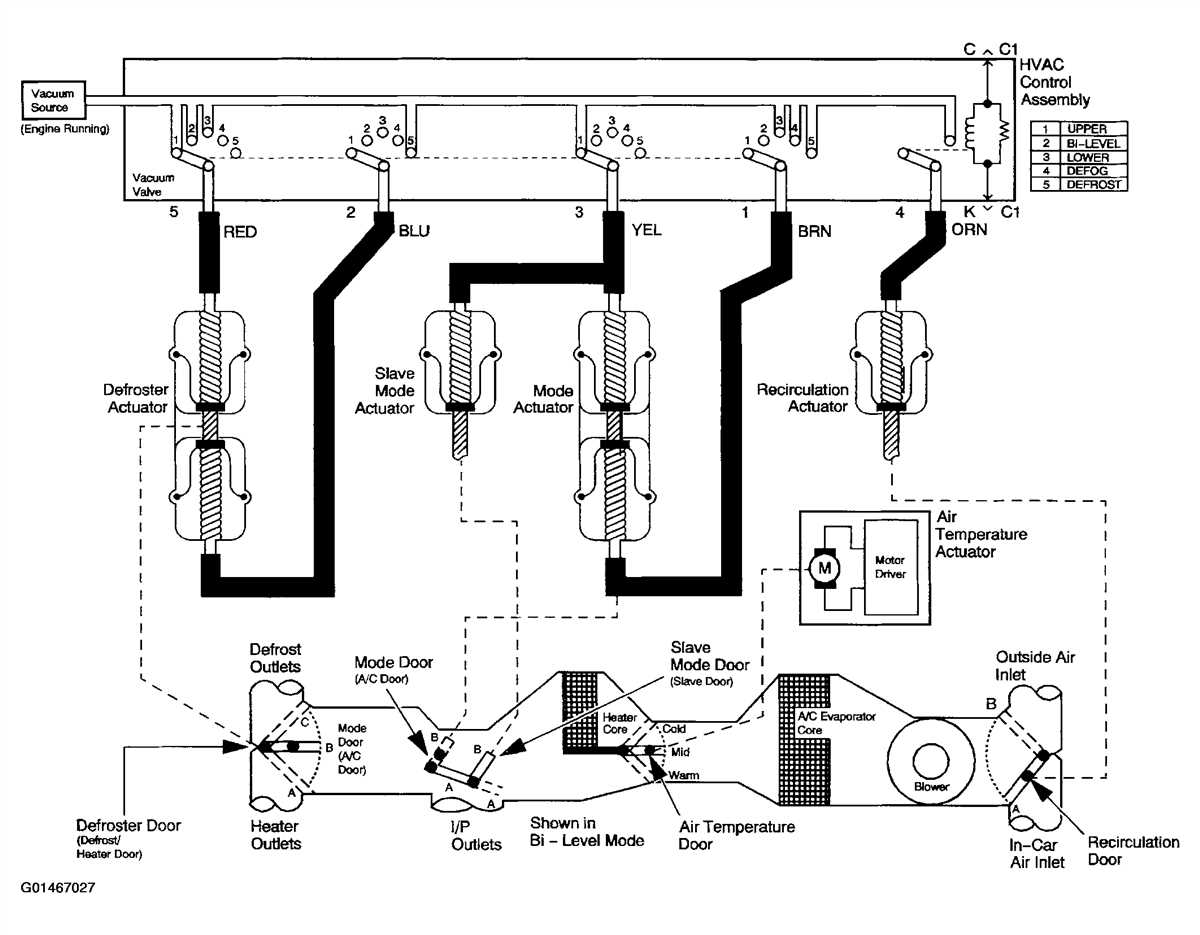
HVAC System: The HVAC (Heating, Ventilation, and Air Conditioning) system in your Chevy S10 also relies on vacuum pressure for certain functions. The diagram will indicate the hoses that connect the engine intake manifold to the various HVAC components, such as the climate control system and the vacuum-driven actuators for the blend doors.
By refering to the vacuum hose diagram, you can easily troubleshoot and diagnose any issues with your Chevy S10’s vacuum system. If you notice a loss of vacuum pressure or a malfunctioning component, the diagram will help you pinpoint the problem area and make the necessary repairs or replacements. Additionally, it can be a useful reference when performing any maintenance or upgrades to the vacuum system.
What is a Vacuum Hose Diagram?
A vacuum hose diagram is a visual representation of the vacuum system in a vehicle. It shows the routing of the vacuum hoses and the connections between various components. Vacuum hoses play a crucial role in the proper functioning of the vehicle’s engine and emission control systems. They carry vacuum from the intake manifold to different components such as the brake booster, HVAC controls, and emissions components.
A vacuum hose diagram is especially useful when it comes to troubleshooting or repairing issues with the vacuum system. It helps technicians and DIY enthusiasts identify the correct routing of the vacuum hoses, ensuring that they are connected correctly and not damaged or blocked.
The diagram typically features different colored lines representing different sizes or types of hoses, along with labels to indicate the components they connect to. It may also include arrows to show the direction of airflow or vacuum flow. Additionally, the diagram may include a legend or key that explains the symbols used.
In the case of a 2000 Chevy S10, a vacuum hose diagram would be beneficial for owners or mechanics who need to locate or replace specific vacuum hoses in the vehicle. By referring to the diagram, they can identify the appropriate hose and its connection points, making the repair process more efficient and accurate.
Identifying the Components of a Vacuum Hose Diagram
In order to properly diagnose and repair issues with the vacuum system in your 2000 Chevy S10, it’s important to understand the components of the vacuum hose diagram. The vacuum system in a vehicle is responsible for various functions, such as controlling the operation of the heating and cooling systems, emission controls, and assisting in the operation of certain engine components.
The vacuum hose diagram for a 2000 Chevy S10 typically includes several components, such as the vacuum reservoir, vacuum lines, check valves, and vacuum actuators. The vacuum reservoir is a storage tank that holds a supply of vacuum pressure for the system. It helps maintain consistent vacuum pressure even when the engine is not producing enough vacuum. The vacuum lines are hoses that connect these components together and allow for the transfer of vacuum pressure.
- The check valves are one-way valves that prevent the backflow of vacuum pressure and help maintain proper operation of the system.
- The vacuum actuators are devices that use vacuum pressure to control the operation of various engine components, such as the EGR valve, HVAC system, and emission controls.
Identifying these components on the vacuum hose diagram can be helpful when troubleshooting and repairing vacuum system issues. By understanding how these components work together and the path of vacuum pressure, you can better pinpoint the source of any problems and make the necessary repairs.
It’s important to note that the vacuum hose diagram for a 2000 Chevy S10 may vary depending on the specific engine and emission control system. Therefore, it’s always recommended to consult a vehicle-specific repair manual or seek professional assistance when dealing with vacuum system issues.
Common Issues with Vacuum Hoses
Vacuum hoses play a crucial role in the functioning of an automobile’s engine and overall performance. However, over time, these hoses can develop issues that affect the vehicle’s performance and efficiency. Here are some common issues that can arise with vacuum hoses:
- Vacuum Leaks: One of the most common issues with vacuum hoses is the development of leaks. These leaks can occur due to wear and tear, age, or improper installation. When a vacuum hose develops a leak, it can disrupt the airflow and compromise the engine’s ability to function properly.
- Hose Cracks or Breaks: Another issue that can arise with vacuum hoses is cracking or breaking. This can occur due to exposure to extreme temperatures, chemicals, or physical damage. When a vacuum hose cracks or breaks, it can cause a loss of vacuum pressure, leading to poor engine performance.
- Hose Blockages: Vacuum hoses can also become blocked or clogged over time. This can happen due to the accumulation of dirt, debris, or even engine oil. When a vacuum hose is blocked, it can disrupt the flow of air, affecting the engine’s performance and fuel efficiency.
- Misrouting: Sometimes, vacuum hoses can be misrouted during repairs or maintenance. This can lead to improper airflow and performance issues. It is important to ensure that vacuum hoses are correctly routed and connected to the appropriate components.
- Worn or Damaged Connectors: Vacuum hoses are connected to various components in the engine, and the connectors can become worn or damaged over time. When connectors are worn or damaged, they can cause air leaks or disconnections, affecting the vacuum system’s performance.
In order to maintain optimal engine performance, it is important to regularly inspect and replace any damaged or worn vacuum hoses. Additionally, it is essential to ensure proper installation and routing to prevent potential issues. Regular maintenance and inspections can help identify and resolve vacuum hose problems to keep the engine running smoothly.
How to Read a Vacuum Hose Diagram
Understanding a vacuum hose diagram is crucial for maintaining and troubleshooting the vacuum system in your vehicle. The diagram provides a visual representation of the routing and connections of the vacuum hoses, which are responsible for controlling various functions such as the EGR valve, brake booster, and HVAC system.
1. Study the Legend: The legend or key on the diagram explains the symbols and abbreviations used to represent different components and connections. Familiarize yourself with these symbols to accurately follow the diagram.
2. Start at the Intake Manifold: The intake manifold is typically where most vacuum hoses originate. Locate the intake manifold in the diagram and identify the main vacuum hose connected to it.
3. Follow the Lines: The diagram will have lines connecting various components. Follow these lines to understand how the vacuum hoses are routed and connected. Pay attention to any branches or junctions in the lines, as they indicate connections to different components.
4. Check the Component Labels: The diagram may have labels or numbers next to the components, which correspond to specific parts in the engine bay. Use these labels to identify the components connected by the vacuum hoses.
5. Trace Individual Hoses: To troubleshoot or replace a specific vacuum hose, trace it from the component it connects to back to the intake manifold. This will help you identify any possible leaks or blockages in that particular hose.
6. Refer to Service Manuals: If you’re having trouble understanding the vacuum hose diagram, consult the vehicle’s service manual. These manuals often include detailed explanations and diagrams specific to your vehicle’s make and model.
By familiarizing yourself with the vacuum hose diagram and understanding how the vacuum system works in your vehicle, you’ll be better equipped to diagnose and address any issues that may arise.
Replacing and Repairing Vacuum Hoses
The vacuum hoses in a 2000 Chevy S10 are an important component of the vehicle’s overall performance and efficiency. These hoses help to regulate the flow of air and fuel through the engine, and when they become damaged or worn out, it can lead to a variety of problems including decreased engine power, poor fuel efficiency, and even engine misfires.
When it comes to replacing or repairing vacuum hoses in a Chevy S10, it is important to first identify the specific hoses that need attention. This can be done by referring to a vacuum hose diagram, which outlines the routing and connections of each hose in the engine compartment. The diagram can usually be found in the vehicle’s owner’s manual or obtained from a reputable automotive repair manual.
Once the damaged hoses have been identified, they can be replaced with new ones. It is important to choose high-quality hoses that are compatible with the specific make and model of the S10. The new hoses should be carefully routed and connected to ensure proper airflow and fuel delivery. It is also recommended to use hose clamps to secure the connections and prevent any leaks.
If only a small section of a hose is damaged, it may be possible to repair it instead of replacing the entire hose. This can be done by cutting out the damaged section and using a hose repair kit to connect the remaining sections. However, this should only be done as a temporary solution, as repaired hoses may not provide the same level of performance and reliability as new hoses.
In conclusion, replacing and repairing vacuum hoses in a 2000 Chevy S10 is an important maintenance task that can help to ensure the vehicle’s optimal performance. By properly identifying the damaged hoses, choosing high-quality replacements, and carefully routing and connecting them, drivers can help to maintain the efficiency and reliability of their Chevy S10.
Proper Maintenance of Vacuum Hoses
Vacuum hoses play a crucial role in the proper functioning of your vehicle’s engine and other important systems. Regular maintenance and inspection of these hoses is essential to ensure optimal performance and prevent potential problems. Here are some key steps to follow for proper maintenance of vacuum hoses:
1. Visual Inspection
Regularly check the condition of the vacuum hoses for any signs of wear, cracks, or leaks. Inspect the entire length of each hose, paying close attention to connection points and bends. If you notice any damage, it is important to replace the hose as soon as possible to prevent further issues.
2. Tighten Connections
Ensure that all vacuum hose connections are securely tightened. Over time, these connections may become loose, leading to air leaks and reduced performance. Tighten any loose connections using the appropriate tools, such as pliers or a wrench, taking care not to overtighten and cause damage.
3. Clean the Hoses
Periodically clean the vacuum hoses to remove any debris or buildup that can obstruct airflow. A simple method is to use compressed air or a soft brush to remove any dirt or dust. Be careful not to damage the hoses during the cleaning process.
4. Replace According to Schedule

Follow the manufacturer’s recommended maintenance schedule for replacing vacuum hoses. These schedules are based on the typical lifespan of the hoses and can vary depending on the make and model of your vehicle. Regularly replacing worn or damaged hoses will help to prevent potential issues and ensure optimal performance.
5. Use High-Quality Hoses
When replacing vacuum hoses, use high-quality hoses that are designed to withstand the demands of your vehicle’s systems. Cheap or low-quality hoses may not provide the necessary durability and may lead to premature failure. Opting for reputable brands and quality materials will save you money in the long run.
Proper maintenance of vacuum hoses is essential for the overall health and performance of your vehicle. By following these steps, you can ensure that your hoses are in optimal condition, preventing potential problems and prolonging the lifespan of your vehicle’s systems.
Q&A:
How often should vacuum hoses be inspected?
Vacuum hoses should be inspected regularly, ideally once a month, to ensure they are in good condition and free from any cracks or leaks.
What are some signs of a damaged vacuum hose?
Signs of a damaged vacuum hose may include visible cracks or splits, hissing or whistling sounds coming from the hose, or a loss of suction power.
How can vacuum hoses be cleaned?
Vacuum hoses can be cleaned by using a damp cloth to wipe away any debris or dust. If the hose has a clog, it can be removed and cleaned separately.
How long do vacuum hoses typically last?
The lifespan of a vacuum hose can vary depending on the usage and the quality of the hose. On average, a vacuum hose can last anywhere from 2 to 5 years.
What should be done if a vacuum hose is damaged?
If a vacuum hose is damaged, it should be replaced as soon as possible to prevent any further damage to the vacuum cleaner. Many manufacturers sell replacement hoses that are compatible with their vacuum models.
How often should vacuum hoses be inspected?
Vacuum hoses should be inspected at least once a year to check for any signs of wear or damage.