
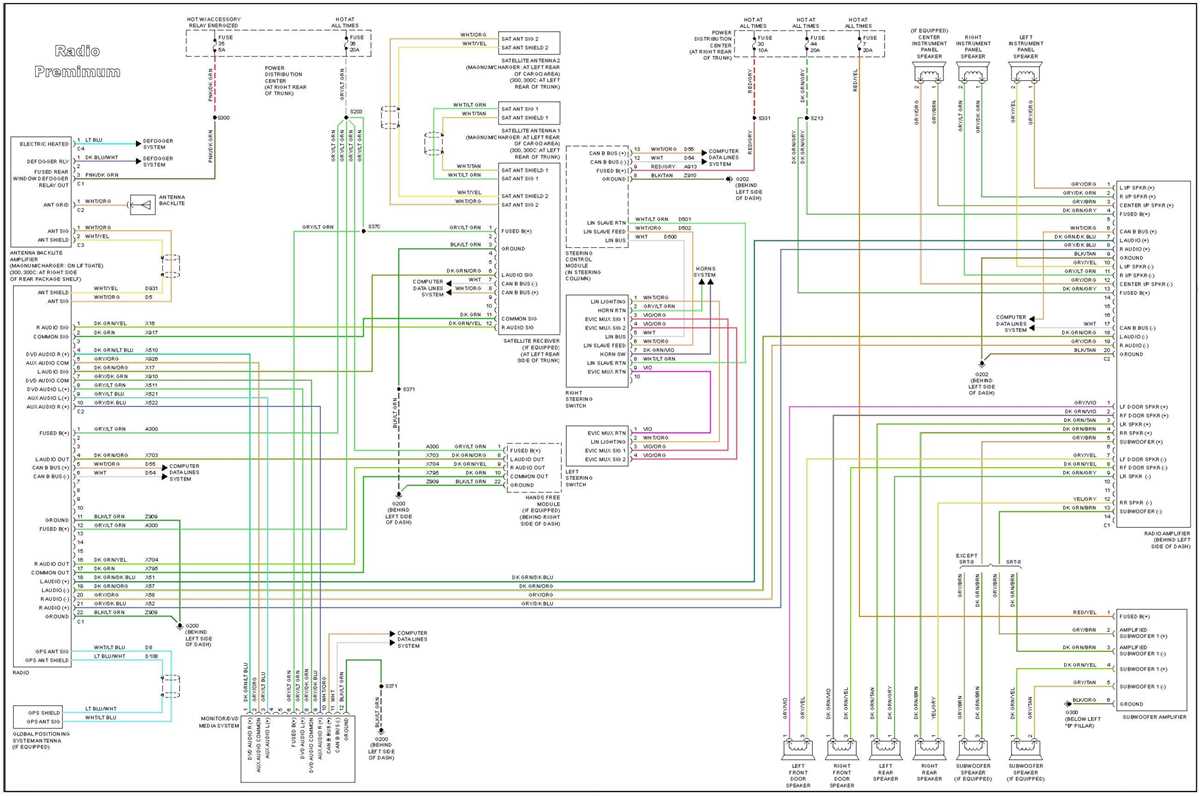
If you’re looking for a wiring diagram for the radio in your 2010 Chrysler 300, you’ve come to the right place. Having a complete wiring diagram can be invaluable when it comes to troubleshooting and installing aftermarket radio equipment. In this article, we’ll provide you with a detailed wiring diagram that covers all the necessary connections for the radio in your 2010 Chrysler 300.
The wiring diagram will include information on the color codes for the various wires, as well as the connections for power, ground, speakers, and any other accessories that may be connected to the radio. It will also indicate which wires are connected to the steering wheel controls, if applicable. This diagram will make it much easier to install a new radio or troubleshoot any issues you may be experiencing with your current radio.
By understanding the wiring diagram, you’ll be able to identify and connect the correct wires for your specific radio setup. This will ensure that everything functions properly and that you won’t encounter any issues down the line. Whether you’re a seasoned car audio enthusiast or a beginner looking to upgrade your radio, having a wiring diagram is essential.
Overview of the Chrysler 300 Radio System
The Chrysler 300 radio system is an integral part of the vehicle’s entertainment and communication features. It offers a wide range of options for listening to music, staying connected, and enjoying a personalized driving experience. The radio system in the 2010 Chrysler 300 is equipped with advanced technology and user-friendly controls, making it easy for drivers and passengers to operate.
The radio system in the Chrysler 300 includes a variety of components that work together to deliver high-quality audio and connectivity. These components include a head unit, speakers, amplifiers, and antenna. The head unit serves as the central control panel for the radio system, allowing users to select radio stations, adjust sound settings, and connect external devices.
Key Features and Functions:

- AM/FM Radio: The Chrysler 300 radio system offers both AM and FM radio capabilities, allowing users to tune in to their favorite radio stations and enjoy a wide range of music and talk shows.
- CD Player: The radio system also includes a built-in CD player, which allows users to listen to their favorite CDs while on the road.
- Auxiliary Input: The Chrysler 300 radio system features an auxiliary input, which enables users to connect external devices such as smartphones, MP3 players, and iPods. This allows for seamless integration of personal music libraries and streaming services.
- Bluetooth Connectivity: The radio system is equipped with Bluetooth technology, allowing users to connect their mobile devices wirelessly for hands-free calling and audio streaming.
- Navigation System: Some models of the Chrysler 300 come with a built-in navigation system, providing users with turn-by-turn directions and real-time traffic updates.
- Satellite Radio: The radio system is compatible with SiriusXM satellite radio, giving users access to hundreds of channels of commercial-free music, sports, news, and entertainment.
Overall, the Chrysler 300 radio system offers a comprehensive range of features and functions that enhance the driving experience for both the driver and passengers. Whether it’s enjoying music, staying connected, or finding your way, the radio system in the Chrysler 300 delivers convenience and entertainment at your fingertips.
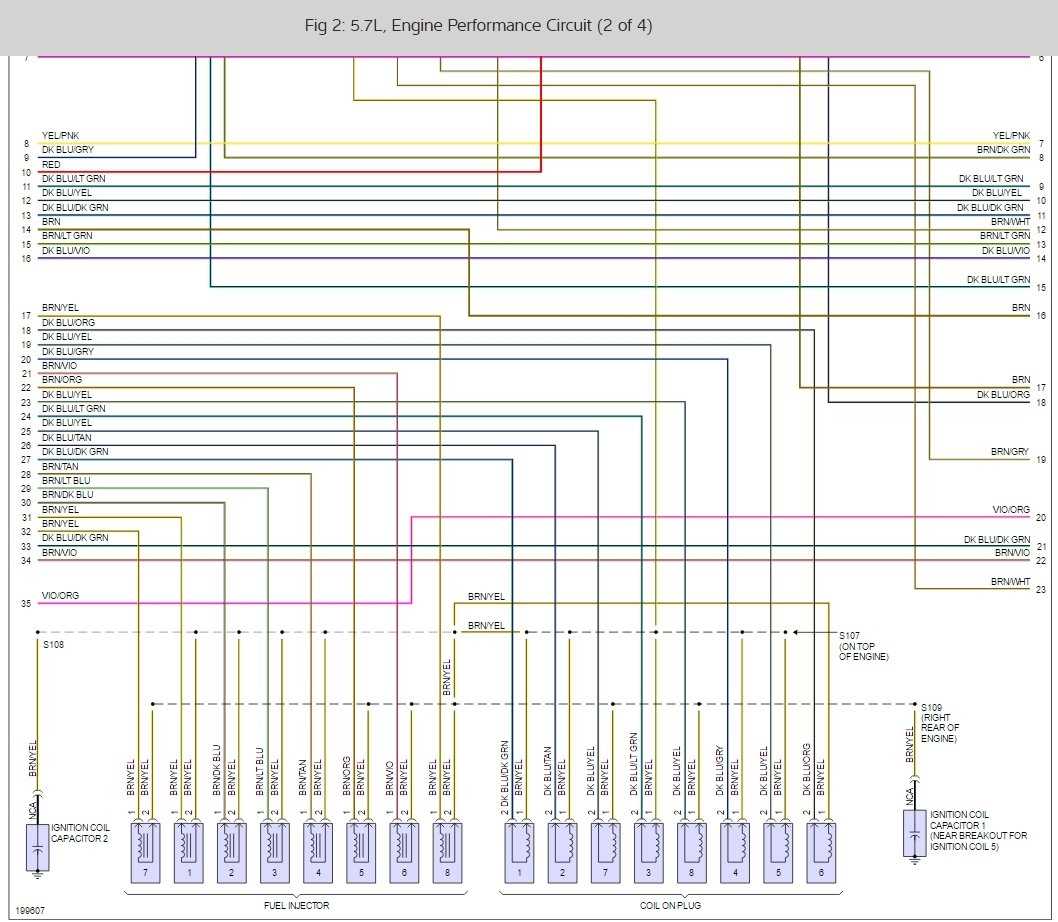
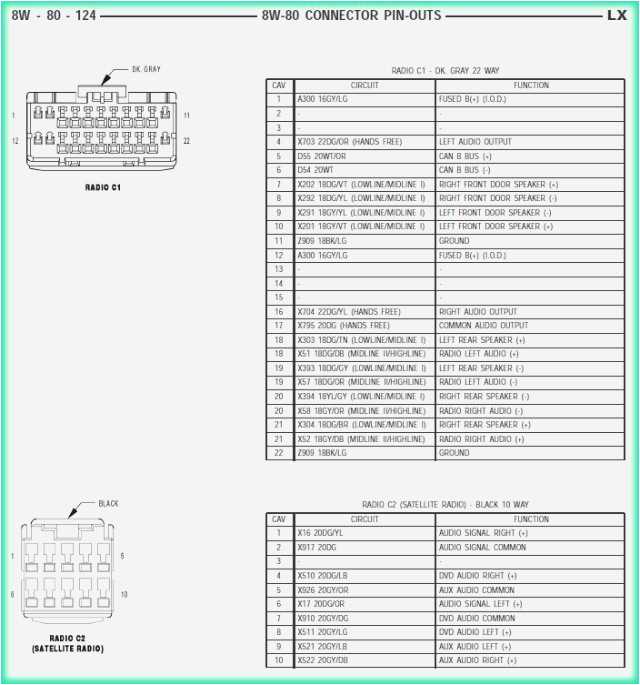
Identifying the Wiring Diagram Components
When it comes to understanding the wiring diagram of a 2010 Chrysler 300 radio, it is important to familiarize yourself with the various components that make up the diagram. By identifying these components, you can easily navigate through the diagram and understand how the wiring is connected and functions within the system.
Here are some key components to look out for:
- Power Source: This component represents the source of power for the radio system. It could be a battery or a fuse connected to the vehicle’s electrical system.
- Radio Unit: The radio unit is the main component of the system. It includes the receiver, amplifier, and controls for tuning and controlling audio output.
- Speakers: These components are responsible for producing sound. The wiring diagram will show how the speakers are connected to the radio unit.
- Antenna: The antenna receives radio signals and sends them to the radio unit for processing. The diagram will indicate the location and connection points for the antenna.
- Wires and Connectors: These components are used to connect various parts of the system. They include cables, harnesses, and connectors that facilitate the flow of electrical signals.
By understanding these key components, you can better interpret the wiring diagram and troubleshoot any issues that may arise with the radio system in your 2010 Chrysler 300.
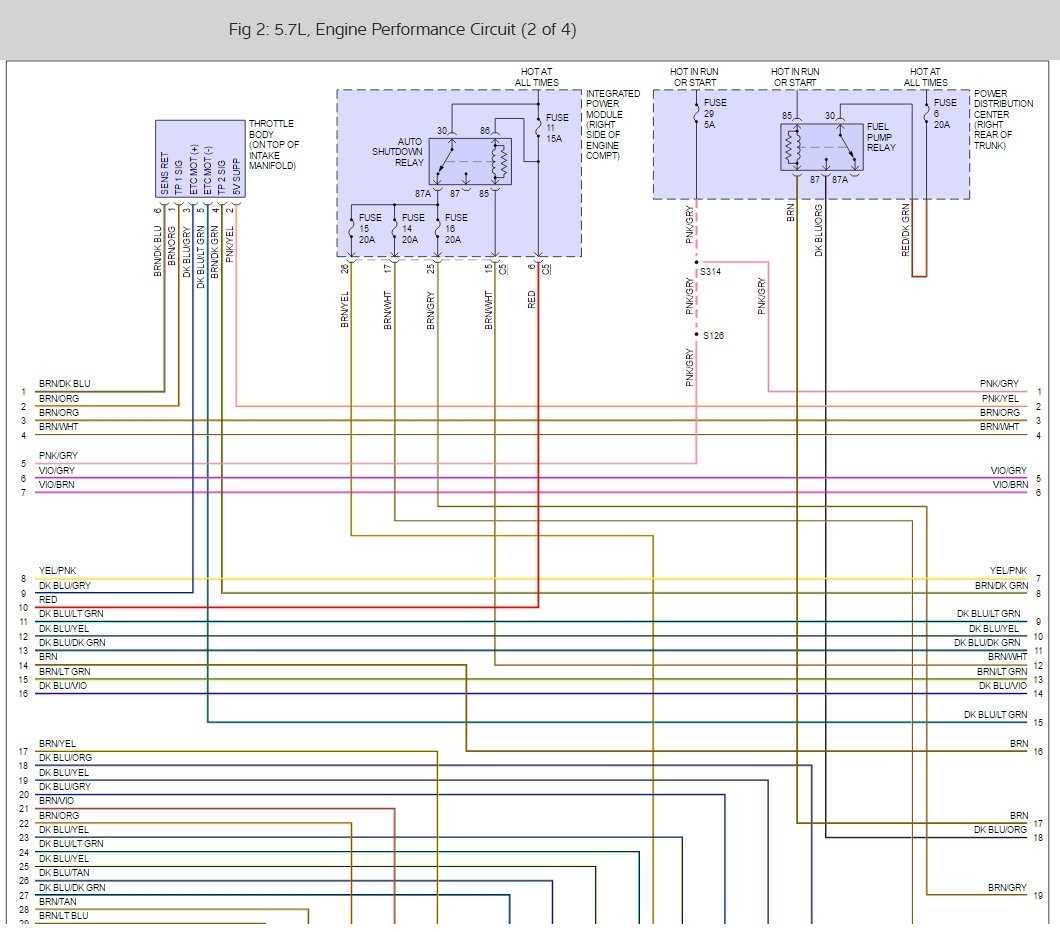
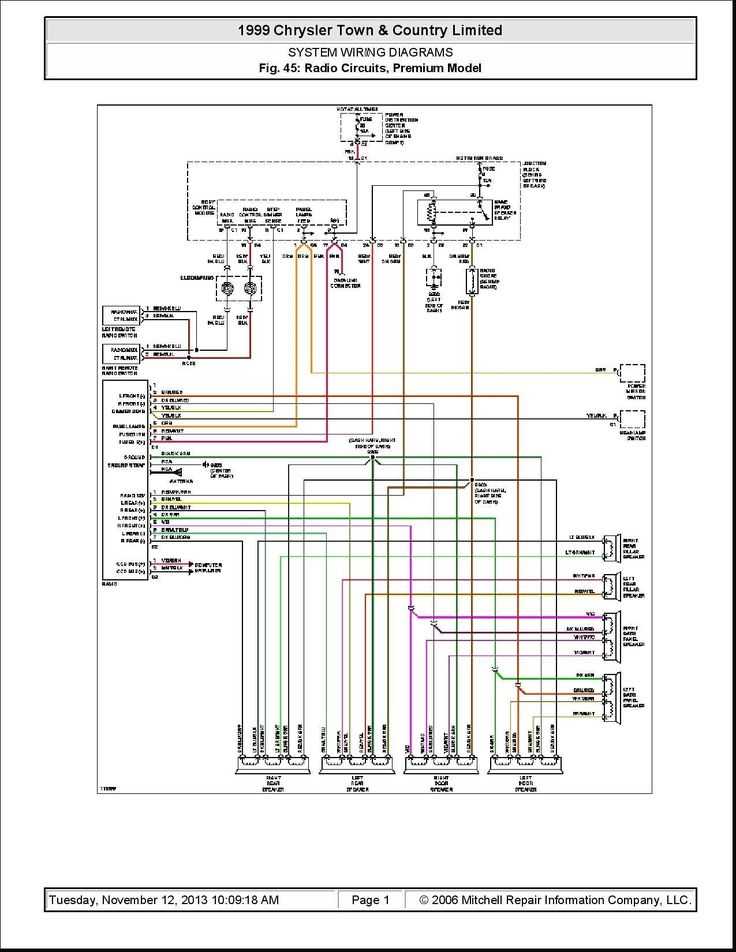
Understanding the Wire Color Codes
When it comes to wiring diagrams for car radios, understanding the wire color codes is essential. These color codes indicate the function of each wire and help you identify which wires are used for power, ground, speaker connections, and more.
Power wires: In most car radio wiring diagrams, the power wires are typically red and yellow. The red wire is for constant power, which ensures that the radio memory is preserved even when the car is turned off. The yellow wire is for accessory power, which is used to power the radio when the ignition key is turned on.
Ground wires: The ground wire is typically black and is used to complete the electrical circuit and ensure proper functioning of the radio. It is important to connect the ground wire securely to a metal part of the car’s chassis to avoid electrical interference.
Speaker wires: The speaker wires in car radio wiring diagrams are usually color-coded pairs, with one wire in each pair being positive (+) and the other negative (-). These wires are used to connect the radio to the speakers and deliver audio output.
Other wires: Car radios may also have additional wires for specific functions such as antenna power, illumination, steering wheel controls, and more. These wires are often color-coded and can be identified using the wiring diagram.
It is important to refer to the specific wiring diagram for your car radio model to ensure proper installation and connection of the wires. Incorrect wiring can result in malfunctioning of the radio or even damage to the car’s electrical system. Always use reliable sources and consult a professional if needed.
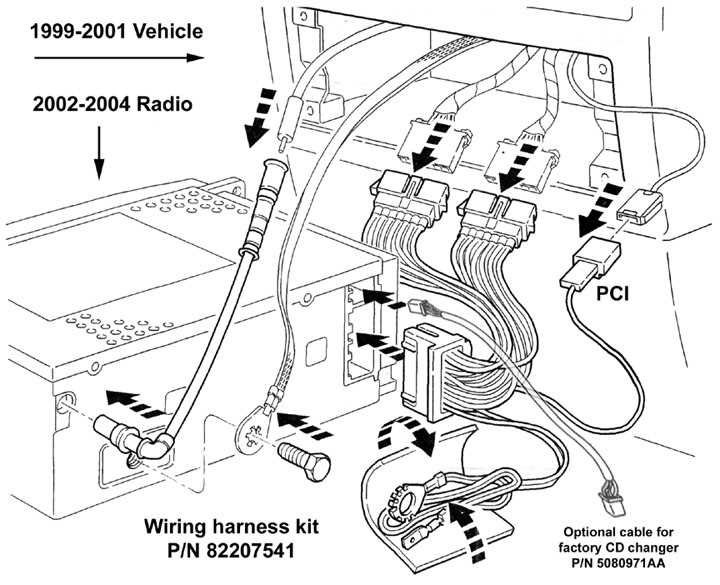
Step-by-Step Guide on How to Install a New Radio
Installing a new radio in your vehicle can enhance your driving experience by providing access to better audio quality, additional features, and connectivity options. Here is a step-by-step guide on how to install a new radio in your vehicle:
Gather the necessary equipment:
- New radio unit
- Dash kit and wiring harness compatible with your vehicle
- Wire strippers
- Electrical tape
- Panel removal tools
- Screwdriver set
Prepare the vehicle:
- Disconnect the negative terminal of the vehicle’s battery to prevent any electrical mishaps.
- Use panel removal tools to carefully remove any trim panels or bezels surrounding the existing radio.
- Unscrew and remove the bolts or screws securing the old radio in place.
- Gently pull out the old radio unit and carefully unplug all the wiring connectors from the back.
- Remove any antenna cable attached to the old radio.
Install the new radio:

- Connect the wiring harness of the new radio to the vehicle’s wiring harness. Ensure that the color-coded wires match and use wire strippers to remove a small portion of insulation from each wire.
- Securely connect the antenna cable to the new radio.
- Slide the new radio into the dash kit or mounting sleeve provided with the new radio unit.
- Secure the new radio in place using the screws or bolts removed earlier.
Test and finalize the installation:
- Reconnect the negative terminal of the vehicle’s battery to restore power.
- Turn on the new radio and test all its functions, including audio playback, Bluetooth connectivity, and any other features.
- If everything is working properly, carefully reattach any trim panels or bezels that were removed earlier.
- Clean up and organize any loose wires using electrical tape or cable ties.
Following these step-by-step instructions will help you install a new radio in your vehicle and enjoy a better audio experience while driving. Remember to refer to the specific instructions provided with your new radio and dash kit for any additional guidance or requirements.
Troubleshooting Common Radio Wiring Issues
Installing or troubleshooting a radio wiring system can sometimes be a challenging task. However, by understanding some of the most common issues that can arise, you can save time and avoid unnecessary frustrations. Below are a few troubleshooting tips to help you resolve common radio wiring problems:
No Power to the Radio
If your radio is not receiving any power, there may be a problem with the power connection. Check the fuse for the radio circuit and replace it if necessary. Also, ensure that the wiring connections have been properly made and that there are no loose or detached wires.
Intermittent or Poor Sound Quality
If you are experiencing issues with the sound quality, there are a few things you can check. Ensure that all wiring connections are secure and that there are no loose or frayed wires. Additionally, verify that the speakers are properly connected and functioning correctly. If necessary, replace any faulty speakers or wires.
Another potential cause of poor sound quality is interference from other electronic devices. Check for any nearby devices, such as cell phones or Wi-Fi routers, that may be causing interference and move them away from the radio.
Limited or No Radio Reception
If you are having trouble receiving radio signals, there could be a problem with the antenna or its connection. Inspect the antenna for any damage or loose connections. If necessary, replace the antenna or tighten any loose connections.
You may also want to check the antenna cable for any signs of damage, such as cuts or frays. If the cable is damaged, it will need to be replaced.
Incorrect Wiring Connections
If you suspect that the wiring connections are incorrect, consult the radio’s wiring diagram or the vehicle’s wiring diagram to ensure that the wires have been properly connected. Double-check the color codes and match them with the appropriate wires.
It is also a good idea to use a multimeter to test the voltage and continuity of the wires. This will help you identify any faulty or incorrectly connected wires.
Conclusion
Troubleshooting radio wiring issues can be a complex process, but by following these tips, you can quickly identify and resolve common problems. Remember to always double-check the wiring connections, inspect for any damage, and consult the appropriate wiring diagrams if needed. With a little patience and attention to detail, you’ll have your radio system up and running smoothly in no time.