
When it comes to electrical installation, understanding how to properly wire a 240v breaker is crucial. Whether you’re a DIY enthusiast or a professional electrician, having a clear understanding of the wiring diagram can ensure safety and efficient electrical operation. In this article, we will provide a comprehensive guide on the 240v breaker wiring diagram and explain its significance in various electrical installations.
A 240v breaker is commonly used in larger residential and commercial applications, providing a higher voltage for powering heavy-duty appliances and equipment. However, connecting a 240v breaker requires precise knowledge of the electrical system and adherence to electrical codes and safety guidelines. A wiring diagram serves as a visual representation of the circuit, allowing you to understand the flow of electricity and establish all the necessary connections.
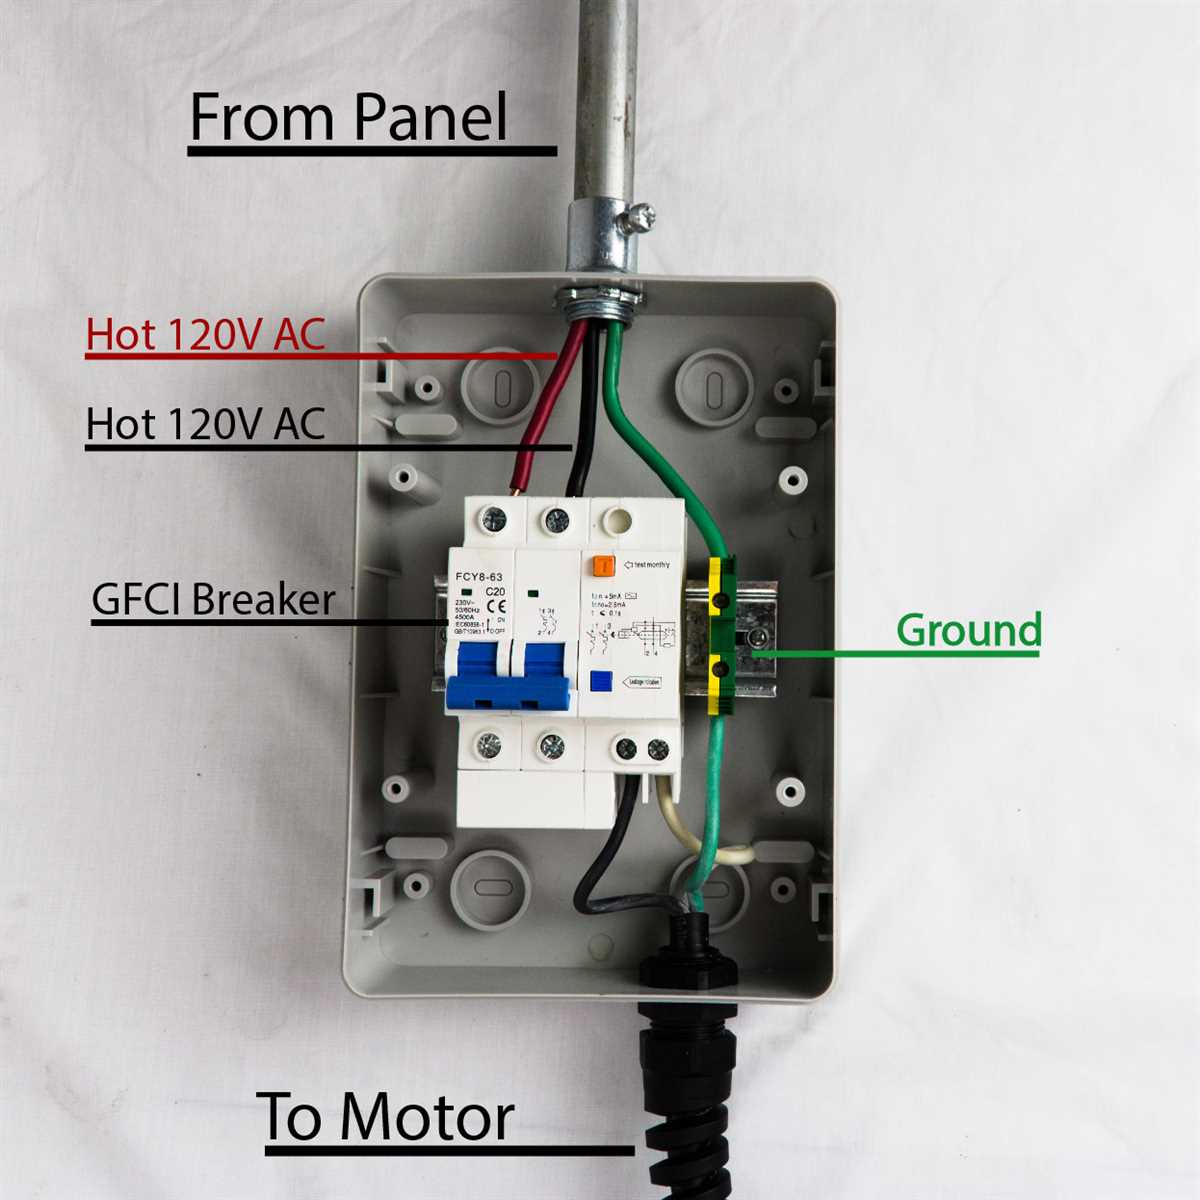
Understanding a 240v breaker wiring diagram involves several key components, including the breaker panel, wires, outlets, and electrical appliances. The diagram typically shows how the hot wires (black and red) connect to the breaker, while the neutral wire (white) and ground wire (green or bare copper) are connected to their respective terminals. It also provides information on how to properly connect the wires, ensure proper grounding, and prevent overloading or short circuits.
By following the 240v breaker wiring diagram, you can ensure a safe and efficient electrical installation. It is essential to consult local electrical codes and regulations before attempting any wiring work, as they may vary depending on your location. Always remember to turn off the power supply before making any connections, and seek professional help if you’re unsure about any aspect of the installation process. With the right knowledge and careful execution, you can confidently wire a 240v breaker and enjoy a reliable electrical system.
What Is a 240v Breaker Wiring Diagram?
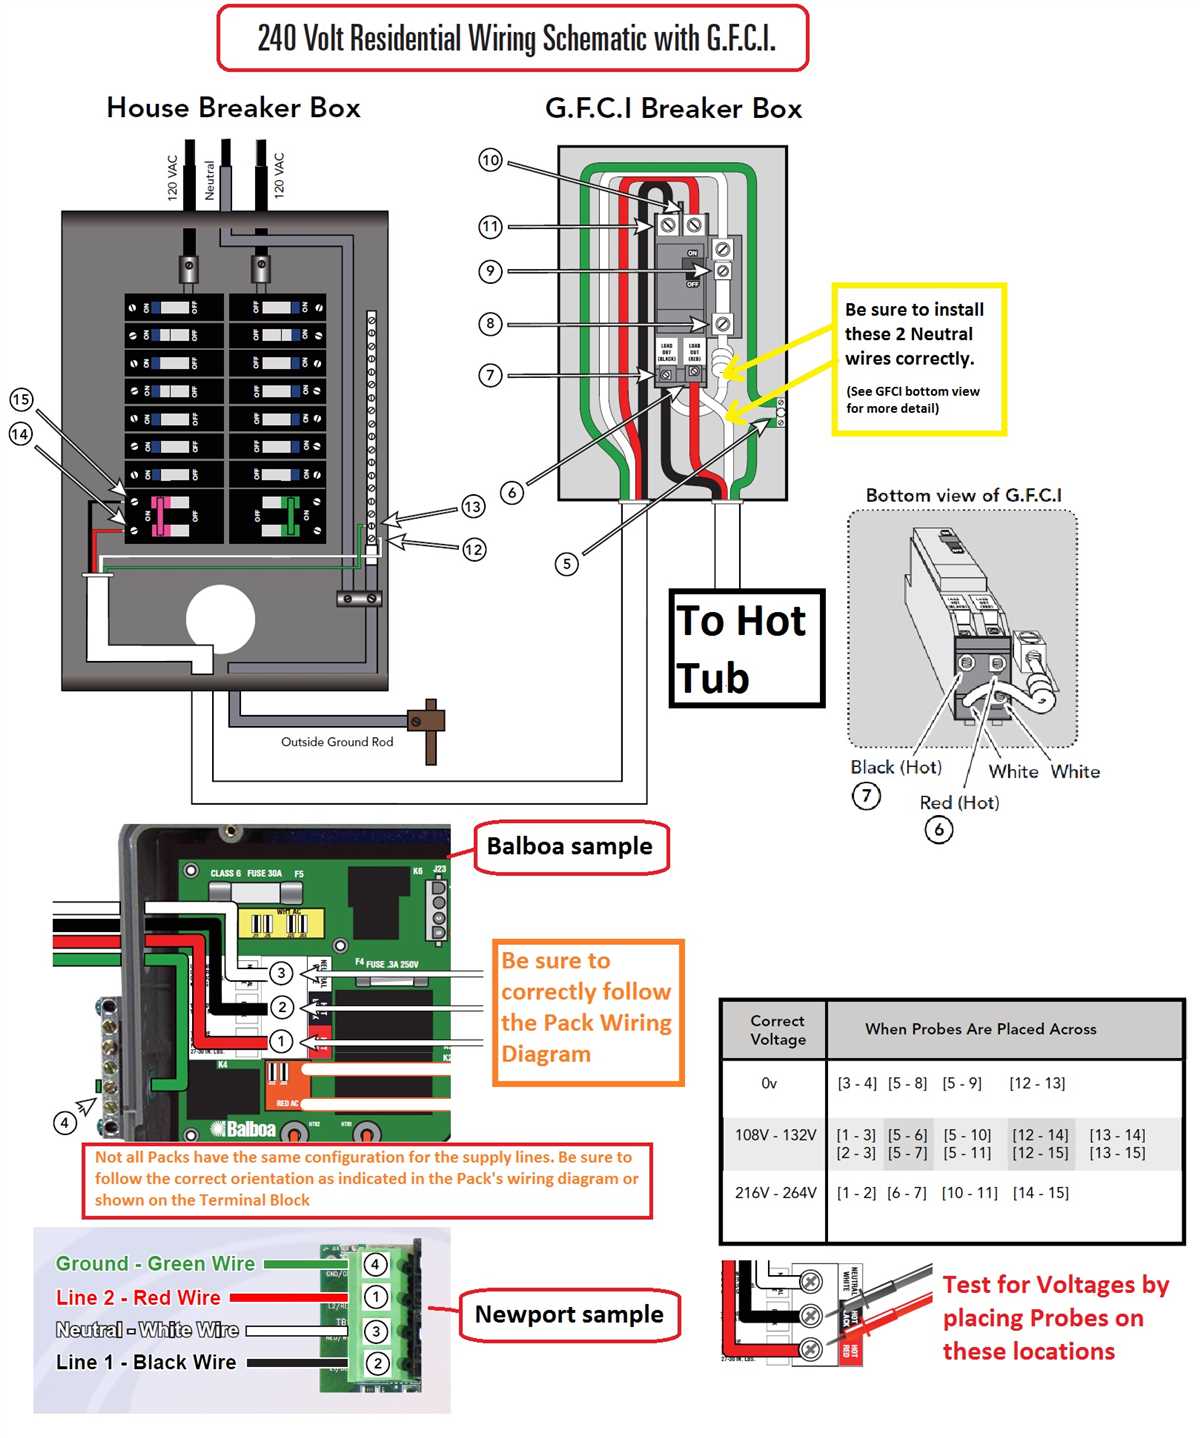
A 240v breaker wiring diagram is a visual representation of the electrical circuitry involved in connecting a 240-volt electrical appliance or system to the electrical panel. It shows the specific connections, cable sizes, and breakers required to safely supply power to the appliance or system.
The diagram typically includes information such as the main electrical service panel, the circuit breakers, the wiring connections, and any additional components or devices that may be necessary for the circuit to function properly. It serves as a guide for electricians and other professionals to ensure the safe and efficient installation of a 240-volt electrical system.
A 240v breaker diagram may also include information on the grounding requirements for the circuit, as well as any special considerations or precautions that need to be taken. It is an essential tool for understanding the electrical flow and connections involved in a 240-volt circuit, helping to prevent electrical accidents and ensure compliance with electrical codes and regulations.
The Importance of Understanding 240v Breaker Wiring Diagrams
When it comes to electrical systems in our homes or workplaces, safety is of utmost importance. One crucial aspect of electrical safety is understanding and correctly interpreting wiring diagrams for 240v breakers. These diagrams provide a visual representation of how the breaker is wired and help ensure a safe and efficient electrical system.
One reason why understanding these diagrams is so crucial is that they show the correct connections for the breaker. A wiring diagram will specify which wires should be connected to the breaker terminals, ensuring that the correct voltage is distributed throughout the electrical system. Incorrect connections can lead to electrical shorts, fires, or damage to appliances and equipment.
Additionally, wiring diagrams for 240v breakers provide information about the amperage rating and overload protection of the breaker. This is essential to prevent overloading the electrical circuit and causing damage. By understanding the diagram, one can make informed decisions about which appliances or equipment can be safely connected to the circuit without exceeding the breaker’s capacity.
Furthermore, understanding these diagrams enables homeowners and electricians to troubleshoot electrical issues more effectively. By following the circuit diagram, one can identify potential problems such as loose connections, faulty wiring, or overloaded circuits. This knowledge can help prevent electrical hazards and ensure the proper functioning of the electrical system.
In conclusion, comprehending 240v breaker wiring diagrams is essential for maintaining a safe and efficient electrical system. These diagrams provide valuable information about correct connections, amperage rating, and overload protection. By understanding and following these diagrams, individuals can prevent electrical hazards, avoid damage to appliances, and ensure the smooth operation of their electrical systems.
Basics of a 240v Breaker Wiring Diagram
In residential and commercial electrical systems, a 240v breaker wiring diagram is used to show the arrangement and connections of the various components involved in supplying power to appliances and devices that require 240 volts. Understanding the basics of this wiring diagram is essential for electricians and homeowners alike to ensure safe and efficient operation of electrical systems.
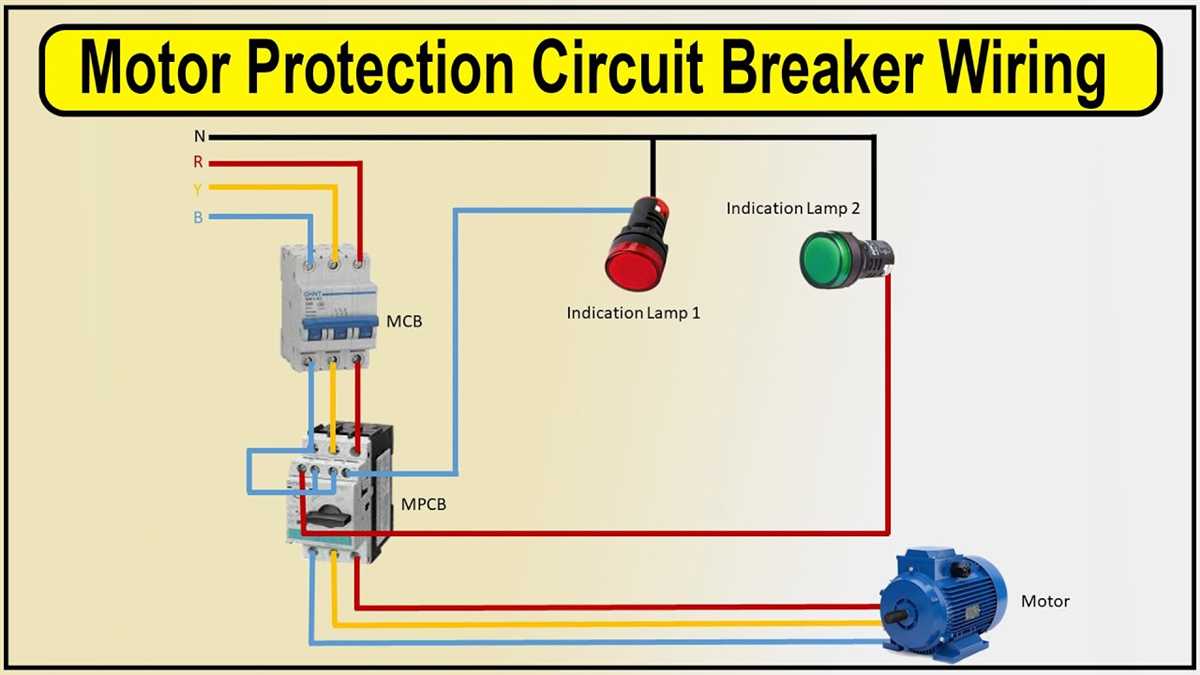
A 240v breaker wiring diagram typically includes key components such as the service panel, subpanel, main breaker, branch circuit breakers, and various electrical outlets or loads. The diagram illustrates how these components are interconnected and how the electrical current flows through the system.
To properly read and interpret a 240v breaker wiring diagram, one should understand the color coding of wires and the purpose of different types of breakers. In the diagram, different colors are used to represent different types of wires, such as black for hot wires, white for neutral wires, and green or bare copper for grounding wires.
Breakers are safety devices that automatically interrupt the flow of electricity when a fault or overload occurs. A 240v breaker is designed to handle the higher voltage and current load associated with 240-volt circuits. The wiring diagram indicates the size and type of breakers used in the system, as well as their location in the panel.
By following a 240v breaker wiring diagram, electricians can ensure that the electrical connections are made correctly, minimizing the risk of electrical hazards and potential damage to appliances or equipment. It is important to consult the appropriate electrical codes and regulations when working with high voltage circuits and to have any electrical work inspected by a qualified professional.
Components of a 240v Breaker Wiring Diagram
A 240v breaker wiring diagram is a visual representation of the electrical circuit for a 240-volt breaker used to supply power to appliances and devices. It shows how the components of the wiring system are connected and how the electricity flows through the circuit. Understanding the different components of a 240v breaker wiring diagram is essential for ensuring the safe and proper installation of the electrical system.
1. Main Breaker:
The main breaker is a large switch that controls the flow of electricity from the utility into the circuit panel. It is the first point of connection for the incoming electrical supply and protects the entire electrical system by shutting off the power in case of an overload or fault.
2. Branch Circuit Breakers:
Branch circuit breakers are smaller switches that protect individual circuits in the electrical system. They control the flow of electricity to specific appliances or devices, such as lights, outlets, or appliances. Each branch circuit breaker typically has a specific amp rating that determines the maximum amount of electrical current it can handle.
3. Neutral Bar:
The neutral bar is a metal strip or bus bar located within the circuit panel. It provides a common connection point for the current flowing back from the electrical devices to the utility’s neutral wire. The neutral bar is typically connected to the ground through the grounding system to ensure the safe and proper operation of the electrical system.
4. Ground Bar:
The ground bar is another metal strip or bus bar located within the circuit panel. It provides a connection point for the ground wires, which are connected to the grounding system. The grounding system helps to protect against electrical shock by providing a path for electrical current to travel safely to the earth in the event of a fault or electrical surge.
5. Wiring Connections:
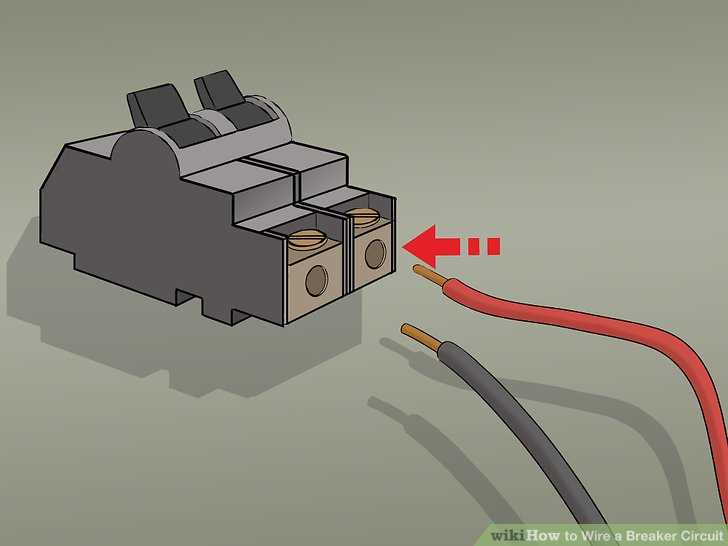
The wiring connections in a 240v breaker wiring diagram show how the various components are interconnected. They include the incoming power supply wires, which are typically labeled as hot, neutral, and ground. These wires are connected to the appropriate terminals on the main breaker and branch circuit breakers to complete the electrical circuit.
Overall, a 240v breaker wiring diagram provides a detailed illustration of the electrical circuit for a 240-volt breaker system. It helps electricians and homeowners understand the layout and connections of the different components and ensure a safe and efficient electrical installation.
Step-by-Step Guide to Reading a 240v Breaker Wiring Diagram
When working with electrical systems, it is crucial to understand how to read a 240v breaker wiring diagram. This diagram provides a visual representation of how the electrical circuit is connected and what each component does. By following this step-by-step guide, you will be able to effectively decipher a 240v breaker wiring diagram and ensure proper installation and troubleshooting.
1. Identify the Breaker Panel
The first step in reading a 240v breaker wiring diagram is to identify the breaker panel. This is where all the electrical circuits in your home or building originate. The breaker panel will have a main breaker and several individual breakers, each of which controls a specific circuit. Locate the breaker panel and familiarize yourself with its layout.
2. Understand Circuit Breaker Symbols
Next, you need to understand the symbols used in the wiring diagram for circuit breakers. These symbols represent different components and actions within the electrical circuit. Common symbols include lines indicating wires, squares or rectangles representing breaker switches, and dots representing connections between wires and components. Take some time to familiarize yourself with these symbols to better understand the wiring diagram.
3. Trace the Circuit Path
Once you have identified the breaker panel and understand the symbols, start tracing the circuit path in the wiring diagram. Follow the lines that connect various components, such as outlets, switches, and lights. Note how the wires are connected and which breaker controls each part of the circuit. This step will help you understand the flow of electricity in the circuit and how it is distributed throughout the system.
4. Check for Proper Wiring Connections
As you trace the circuit path, pay close attention to the wiring connections in the diagram. Ensure that all connections are properly made and that there are no loose or damaged wires. Check for any potential hazards, such as crossed wires or overloaded circuits. If you notice any issues or discrepancies, consult a professional electrician for further guidance.
5. Verify the Voltage and Amperage Ratings
Lastly, verify the voltage and amperage ratings in the wiring diagram. The 240v breaker wiring diagram should indicate the proper voltage and amperage for the circuit. Ensure that the breaker you are using matches these specifications. Using the wrong breaker can lead to electrical hazards and potentially damage your electrical system.
By following this step-by-step guide, you can confidently read and interpret a 240v breaker wiring diagram. Remember to prioritize safety and consult a professional electrician if you have any doubts or concerns about your electrical system.
Common Mistakes to Avoid When Wiring a 240v Breaker
Wiring a 240v breaker can be a challenging task, especially for those who are not familiar with electrical systems. It is essential to avoid common mistakes that can lead to safety hazards or damage to the breaker system. Here are some key mistakes to avoid when wiring a 240v breaker:
1. Incorrect Wire Sizing:
One of the most common mistakes is using the wrong wire size when connecting the breaker. It is crucial to select the appropriate wire gauge to ensure it can handle the voltage and current load without overheating or causing a short circuit. Always refer to the manufacturer’s instructions or consult a professional electrician to determine the correct wire size for your specific breaker.
2. Poor Connection Quality:
Another mistake to avoid is creating poor or loose connections. It is crucial to ensure that the wire connections are secure and tight, as loose connections can lead to overheating, voltage drops, and potential electrical fires. Use proper techniques, such as twisting wires together and using wire nuts or terminal blocks, to create reliable and long-lasting connections.
3. Lack of Proper Grounding:
Proper grounding is essential for electrical safety. Failing to establish proper grounding for a 240v breaker can result in a higher risk of electric shock or damage to electrical equipment. Always follow the manufacturer’s instructions and local electrical codes to ensure the breaker is grounded correctly.
4. Overloading the Circuit:
Overloading the circuit is a common mistake that can lead to circuit breaker tripping or damage to the electrical system. It is essential to understand the current rating of the breaker and not exceed the recommended load. If you need to power multiple devices or appliances, consider installing additional circuits or upgrading to a higher ampacity breaker.
5. Lack of Safety Precautions:
Safety should always be a priority when working with electrical systems. Failing to take proper safety precautions can lead to serious injuries or accidents. Always turn off the power supply before working on the breaker, wear appropriate personal protective equipment, and use insulated tools to minimize the risk of electric shock.
Overall, wiring a 240v breaker requires careful attention to detail and adherence to safety guidelines. By avoiding these common mistakes and consulting with professionals when needed, you can ensure a safe and efficient electrical installation.
Troubleshooting and Problem Solving with a 240v Breaker Wiring Diagram
When working with a 240v breaker wiring diagram, it is important to be aware of potential issues that may arise. Troubleshooting and problem-solving skills are crucial to ensure the safe and efficient operation of your electrical system. Here are some common problems you may encounter and some tips for troubleshooting:
1. Tripped Breaker
If the circuit breaker trips frequently, it may indicate an overloaded circuit. Check if you have added new appliances or devices that are drawing too much power. You may need to redistribute the load across different circuits or consider upgrading your electrical system.
2. No Power in the Circuit
If there is no power in a circuit connected to a 240v breaker, check if the breaker is turned off or tripped. Reset the breaker if necessary. If the breaker trips immediately after resetting, there may be a short circuit or a ground fault in the circuit. Inspect the wiring for any signs of damage or loose connections.
3. Inconsistent Power Supply
If you experience fluctuating or inconsistent power supply, it may indicate a loose connection or a faulty breaker. Inspect the wiring connections for any signs of looseness or corrosion. If necessary, tighten any loose connections or replace the breaker.
4. Burning Smell or Sparks
If you notice a burning smell or see sparks coming from the breaker panel, immediately turn off the power to the affected circuit and contact a licensed electrician. This could indicate a dangerous electrical fault that requires professional intervention.
Overall, a 240v breaker wiring diagram is a valuable tool for understanding and troubleshooting electrical circuits. It is important to exercise caution when working with electricity and consult a professional if you encounter any issues that you are not comfortable addressing yourself.