
If you own a Ford 2n tractor and are struggling with its wiring, you have come to the right place. The wiring diagram is an essential tool for understanding and troubleshooting the electrical system of your tractor. Whether you are a novice or an experienced tractor enthusiast, having a comprehensive wiring diagram can save you time and frustration.
The Ford 2n tractor wiring diagram provides a detailed illustration of the electrical connections and components of the tractor. It shows the various wires, switches, and relays that make up the system, as well as their respective locations and functions. With this diagram, you can easily trace the electrical pathways and identify any issues or faults in the wiring.
Understanding the wiring diagram is crucial for performing any electrical repairs or modifications on your Ford 2n tractor. It allows you to properly connect new components, troubleshoot existing problems, and ensure that the electrical system is functioning correctly. Whether you are replacing a faulty switch, adding new lights, or upgrading the entire system, the wiring diagram will be your go-to resource.
In conclusion, the 2n Ford tractor wiring diagram is an invaluable tool for any owner or enthusiast. It provides a detailed and visual representation of the tractor’s electrical system, allowing for easy troubleshooting and repairs. Whether you are a beginner or an experienced DIYer, having access to a comprehensive wiring diagram can make all the difference in successfully maintaining and improving your Ford 2n tractor.
Understanding the Basics of 2N Ford Tractor Wiring Diagram
The 2N Ford tractor is a classic machine that has been used in farms and agricultural settings for decades. Understanding the wiring diagram of this tractor is essential for proper maintenance and troubleshooting. The wiring diagram is a visual representation of the electrical system and components of the tractor, allowing users to identify and understand the connections and functions of each part.
Key Components
The 2N Ford tractor wiring diagram includes several key components that are crucial for the electrical system’s proper functioning. These components include the battery, generator or alternator, ignition switch, starter, solenoid, distributor, coil, and various switches and connectors. Each component has its specific wiring and connections, and understanding these connections is necessary to ensure the tractor operates efficiently.
Wiring and Connections
The wiring diagram provides a detailed illustration of the wiring and connections between the various electrical components of the 2N Ford tractor. It shows how the battery supplies power to the electrical system, how the starter is connected to the battery and ignition switch, and how the generator or alternator charges the battery. It also indicates the connections between the ignition switch and other components such as the distributor and coil.
Troubleshooting and Maintenance
The 2N Ford tractor wiring diagram is an essential tool for troubleshooting electrical issues and performing proper maintenance tasks. By referring to the diagram, users can identify and fix wiring problems, locate faulty components, and ensure that all connections are secure and in good condition. Regular maintenance, such as checking for loose or corroded connections and replacing worn-out components, can prevent electrical problems and ensure the tractor’s reliable operation.
Conclusion
Understanding the basics of the 2N Ford tractor wiring diagram is essential for proper maintenance and troubleshooting. By familiarizing yourself with the key components and their connections, you can ensure that the electrical system operates efficiently and troubleshoot any issues that may arise. Regularly referring to the wiring diagram and performing necessary maintenance tasks can prolong the lifespan of the tractor and keep it running smoothly for years to come.
The Importance of a Wiring Diagram for 2N Ford Tractors
In order to properly maintain and repair a 2N Ford tractor, it is crucial to have access to a wiring diagram. This diagram provides a visual representation of the electrical system in the tractor, including the connections between various components. Without a wiring diagram, troubleshooting electrical issues can become a time-consuming and frustrating task.
A wiring diagram acts as a roadmap for diagnosing and fixing electrical problems in a 2N Ford tractor. It allows the user to see the specific wiring connections, the color codes, and the overall layout of the electrical system. This information is essential when trying to locate a faulty wire, a loose connection, or a malfunctioning component.
By having a wiring diagram readily available, owners and mechanics can save valuable time and effort in the repair process. Instead of blindly checking each wire and connection, they can refer to the diagram and quickly identify the problem area. This not only speeds up the troubleshooting process but also reduces the chances of making mistakes or causing further damage.
Furthermore, a wiring diagram for a 2N Ford tractor can be a valuable resource for restoring or modifying the electrical system. Whether you are upgrading to a more powerful alternator or adding new accessories, having a clear understanding of the original wiring layout is crucial. It ensures that the modifications are done correctly and safely, without risking any damage to the tractor or its electrical system.
In conclusion, a wiring diagram for 2N Ford tractors is an invaluable tool for maintaining, repairing, and modifying the electrical system. It allows for efficient troubleshooting, reduces the likelihood of mistakes, and provides a clear roadmap for any modifications or upgrades. Whether you are a tractor owner or a professional mechanic, having access to a wiring diagram is essential for ensuring the proper functioning of the electrical system in a 2N Ford tractor.
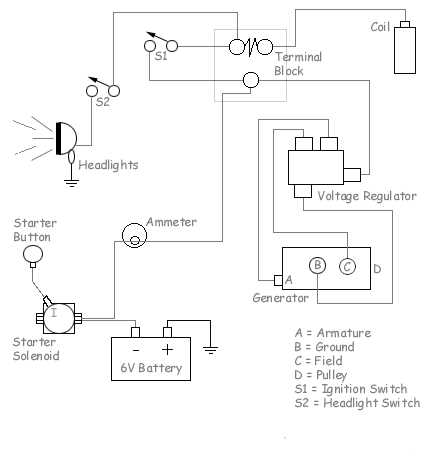
Identifying the Components in a 2N Ford Tractor Wiring Diagram
When working with a 2N Ford tractor, it is important to understand the components involved in its wiring diagram. By familiarizing yourself with these components, you can better understand how the electrical system of the tractor functions and troubleshoot any potential issues that may arise.
The Battery: The battery is a crucial component in the electrical system of the 2N Ford tractor. It provides the necessary power to start the engine and powers the various electrical components of the tractor.
The Starter Solenoid: The starter solenoid is responsible for engaging the starter motor when the ignition switch is turned. It receives power from the battery and directs it to the starter motor, which in turn cranks the engine to start it.
The Ignition Switch: The ignition switch is used to start and stop the engine of the tractor. It is typically a key-operated switch that controls the flow of power from the battery to the ignition system, allowing the engine to start or stop.
The Generator or Alternator: The generator or alternator is responsible for generating electrical power to charge the battery and provide power to the electrical components of the tractor when the engine is running. It converts mechanical energy from the engine into electrical energy.
The Voltage Regulator: The voltage regulator regulates the output voltage of the generator or alternator to ensure that it remains within a specified range. It prevents overcharging of the battery and protects the electrical components of the tractor from excessive voltage.
The Ammeter: The ammeter is a gauge that measures the flow of current in the electrical system of the tractor. It provides a visual indication of the battery charging or discharging and helps monitor the overall electrical health of the system.
The Lighting Switch: The lighting switch controls the various lights on the tractor, such as the headlights, taillights, and indicators. It allows the operator to turn the lights on or off as required.
The Fuse Box: The fuse box contains fuses that protect the electrical system from overloading or short circuits. If a fuse blows, it indicates that there is a fault in the system that needs to be resolved before replacing the fuse.
Understanding the components in a 2N Ford tractor wiring diagram is essential for maintaining and troubleshooting the electrical system of the tractor. By familiarizing yourself with these components, you can ensure proper functioning of the electrical system and identify and resolve any issues that may arise.
Step-by-Step Guide to Reading a 2N Ford Tractor Wiring Diagram
When it comes to working on a 2N Ford tractor, it’s important to have a good understanding of the wiring system. A wiring diagram is a valuable tool that can help you troubleshoot electrical issues and make necessary repairs. In this step-by-step guide, we will walk you through the process of reading a 2N Ford tractor wiring diagram.
1. Start by obtaining a copy of the 2N Ford tractor wiring diagram. You can find these diagrams in the tractor’s service manual, which can be purchased online or at a local tractor parts store. Make sure to choose a diagram that corresponds to the year and model of your tractor.
2. Familiarize yourself with the components on the wiring diagram. Look for symbols and labels that represent various electrical parts, such as switches, lights, and wires. Take note of the colors assigned to different wires, as this will be important later on.
3. Identify the power source. The wiring diagram will show you where the power comes from and how it is distributed throughout the tractor. This is typically represented by a battery symbol, with arrows indicating the flow of electricity.
4. Follow the path of the wiring. Trace each wire on the diagram, starting from the power source and moving to the different electrical components. Pay attention to any junctions or connections along the way. This will help you understand the overall wiring layout and how all the components are connected.
5. Check for color-coded wires. The wiring diagram may indicate the color of each wire, which can be helpful for troubleshooting. If a wire is damaged or disconnected, you can use the diagram to identify the wire’s location and its corresponding color.
6. Refer to the wiring diagram for troubleshooting. If you’re experiencing an electrical issue with your tractor, consult the wiring diagram to identify potential problem areas. You can use a multimeter to test the continuity of wires and check for any faults.
By following this step-by-step guide, you’ll be able to effectively read and interpret a 2N Ford tractor wiring diagram. This knowledge will help you diagnose electrical problems and make necessary repairs, ensuring that your tractor continues to run smoothly and efficiently.
Common Issues and Troubleshooting Tips for 2N Ford Tractor Wiring
Electrical issues can be a common problem with the wiring in a 2N Ford tractor. Understanding the common issues and knowing how to troubleshoot them can help you quickly resolve any problems and get your tractor back in working order. Here are some common issues and troubleshooting tips for 2N Ford tractor wiring:
1. No Power to Electrical Components
If you find that there is no power reaching the electrical components, such as the lights or ignition system, there may be a problem with the wiring or the connections. Start by checking the battery to ensure it is fully charged and securely connected. If the battery checks out, inspect the wiring for any signs of damage or loose connections. Repair or replace any damaged wires, and tighten any loose connections to restore power to the electrical components.
2. Blown Fuses

Blown fuses can also cause electrical issues in a 2N Ford tractor. If you notice that certain electrical components are not working, such as the wipers or horn, check the fuses. Use a multimeter to test the fuses for continuity. If a fuse is blown, replace it with a new one of the same amperage rating. Be sure to identify and address the underlying cause of the blown fuse to prevent it from happening again.
3. Faulty Ignition Switch
A faulty ignition switch can prevent the tractor from starting or cause intermittent power loss to the electrical components. If you are experiencing starting issues or sporadic power loss, the ignition switch may be the culprit. Test the ignition switch with a multimeter to determine if it is functioning properly. If it is faulty, replace it with a new one to restore proper ignition and power to the electrical system.
4. Wiring Harness Issues
Over time, the wiring harness in a 2N Ford tractor can deteriorate or become damaged, causing electrical problems. Inspect the wiring harness for any signs of wear, fraying, or exposed wires. If you find any issues, replace the wiring harness with a new one. It is also important to ensure that the wiring harness is properly routed and secured to prevent any chafing or damage.
5. Grounding Problems
Improper grounding can cause various electrical issues in a 2N Ford tractor. Check the ground connections to ensure they are clean and securely attached to the tractor’s frame. If you notice any corrosion or loose connections, clean the terminals and tighten the connections. Proper grounding is essential for the electrical system to function effectively.
By addressing these common issues and following the troubleshooting tips, you can resolve many wiring problems in your 2N Ford tractor. If you are unsure or are unable to fix the issue yourself, it is recommended to consult a professional mechanic or electrician for assistance. Ensuring a well-maintained wiring system will help keep your tractor running smoothly for years to come.
Upgrading the Wiring System of a 2N Ford Tractor
Upgrading the wiring system of a 2N Ford Tractor can significantly improve its overall performance and reliability. The original wiring harness in these tractors is often outdated and prone to damage, which can lead to various electrical issues. By upgrading the wiring system, owners can ensure a more efficient and trouble-free operation of their tractors.
When upgrading the wiring system of a 2N Ford Tractor, it is important to consider the following steps:
- Assess the current wiring system: Before starting the upgrade, it is crucial to thoroughly inspect the existing wiring system. Check for any frayed or damaged wires, loose connections, or signs of wear and tear. This assessment will help determine the extent of the upgrade required.
- Purchase a wiring harness kit: Look for a quality wiring harness kit specifically designed for 2N Ford Tractors. These kits usually come with all the necessary wires, connectors, and instructions for installation. It is recommended to choose a kit that matches the tractor’s specifications and includes modern wiring components for better durability.
- Remove the old wiring: Carefully remove the old wiring harness, taking note of the routing and connections. Label each wire or take pictures for reference during the installation of the new harness. Ensure that all electrical components are disconnected before proceeding.
- Install the new wiring harness: Follow the instructions provided with the wiring harness kit to install the new wiring system. Pay close attention to the correct routing of wires and proper connections. It is advisable to do the installation one section at a time to avoid confusion.
- Test the new wiring system: Once the installation is complete, it is essential to test the new wiring system. Verify that all electrical components are functioning correctly, including lights, gauges, and the ignition system. Address any issues that may arise during the testing phase.
Overall, upgrading the wiring system of a 2N Ford Tractor can greatly enhance its reliability and performance. The new wiring harness will provide a more robust and efficient electrical connection, reducing the risk of electrical problems and ensuring smooth operation. By following the proper steps and using a quality wiring harness kit, tractor owners can enjoy a more dependable and enjoyable farming experience.
Q&A:
Why should I upgrade the wiring system of my 2N Ford Tractor?
Upgrading the wiring system of your 2N Ford Tractor can improve its electrical performance and reliability. The factory wiring system may be outdated and prone to issues, so upgrading it can prevent electrical problems and ensure smooth operation of the tractor.
What are the common signs that indicate a need for upgrading the wiring system?
Common signs that indicate a need for upgrading the wiring system of a 2N Ford Tractor include frequent electrical malfunctions, dim or flickering lights, blown fuses, and difficulty starting the tractor. If you experience any of these issues, it may be a good idea to upgrade the wiring system.
What are the benefits of upgrading the wiring system?
Upgrading the wiring system of a 2N Ford Tractor can provide several benefits, including improved electrical performance, enhanced reliability, reduced risk of electrical fires, and easier troubleshooting of electrical problems. It can also allow for the installation of additional electrical accessories, such as lights or radios.
Can I upgrade the wiring system myself?
While it is possible to upgrade the wiring system of a 2N Ford Tractor yourself, it is recommended to seek professional assistance, especially if you are not familiar with electrical work. A professional can ensure that the upgrade is done correctly and safely, minimizing the risk of electrical issues or damage to the tractor.
What are some key considerations when upgrading the wiring system?
When upgrading the wiring system of a 2N Ford Tractor, it is important to use high-quality wiring components that are compatible with the tractor’s electrical system. It is also crucial to follow the appropriate wiring diagrams and guidelines provided by the manufacturer or a professional. Additionally, make sure to disconnect the tractor’s battery before starting any electrical work and take necessary safety precautions.