
If you are looking for a wiring diagram for a 6 wire ceiling fan switch, you have come to the right place. Ceiling fans are a popular choice for many homeowners as they can help to cool down a room and provide a gentle breeze in the summer months. However, when it comes to installing or repairing a ceiling fan, understanding the wiring connections can be a challenge. In this article, we will provide you with a detailed wiring diagram for a 6 wire ceiling fan switch, so you can easily understand how to connect the wires and get your ceiling fan up and running again.
A 6 wire ceiling fan switch controls the various functions of a ceiling fan, such as the fan speed, lighting, and direction. The six wires in the switch are usually labeled as L, 1, 2, 3, 4, and 5. Each wire has a specific function and needs to be connected accordingly for the ceiling fan to work correctly.
In the wiring diagram, you will see that the L wire is connected to the black wire of the ceiling fan, which is the hot wire. The 1 wire is connected to the motor, the 2 wire is connected to the lights, and the 3, 4, and 5 wires are connected to the various fan speeds. By following this diagram and connecting the wires correctly, you can ensure that your ceiling fan operates smoothly and efficiently.
If you are unsure about any of the wiring connections or are not confident in your electrical skills, it is always best to consult a professional electrician. They will be able to help you with the installation or repair of your ceiling fan, ensuring that it is done safely and correctly. Remember, working with electrical wiring can be dangerous if not done properly, so it is always better to be safe than sorry.
How to Wire a 6-Wire Ceiling Fan Switch: A Step-by-Step Guide
Wiring a 6-wire ceiling fan switch can seem intimidating at first, but with a step-by-step guide, it can be a straightforward process. Whether you are replacing an old switch or installing a new ceiling fan, this guide will help you wire the switch correctly.
Step 1: Turn off the Power
Before beginning any electrical work, it is essential to turn off the power to the fan at the breaker box. This will ensure your safety throughout the installation process.
Step 2: Remove the Old Switch
Using a screwdriver, carefully remove the screws holding the switch cover plate in place. Then, unscrew the switch from the electrical box and disconnect the wires attached to it.
Step 3: Identify the Wires
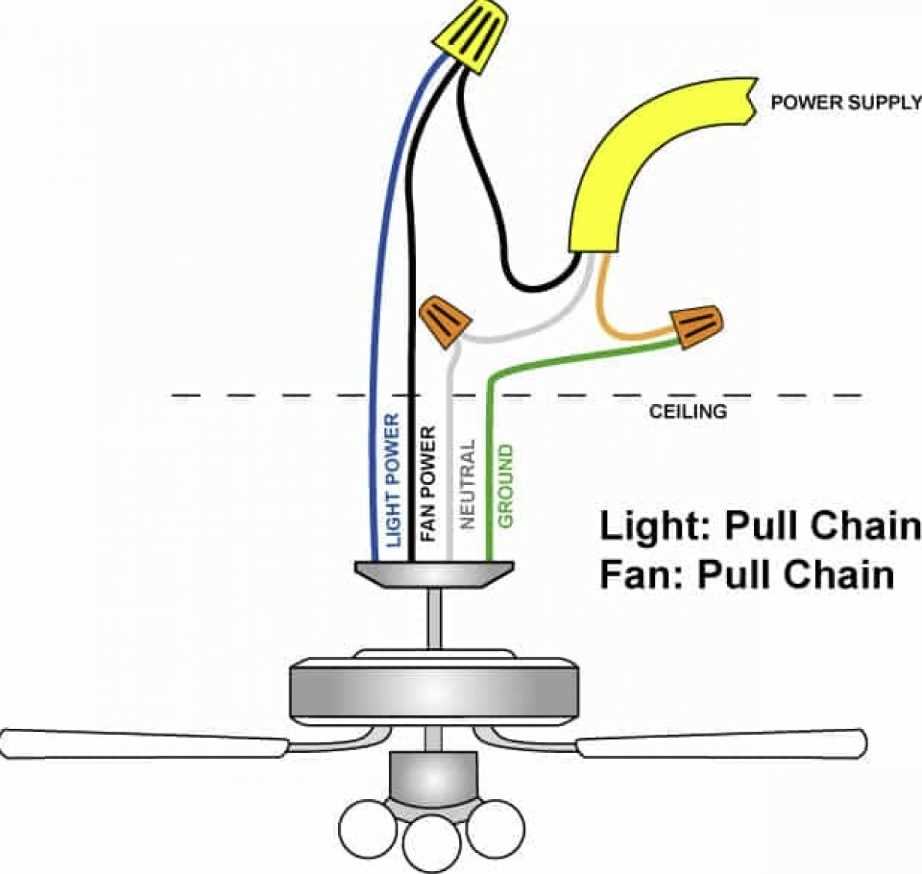
Take a moment to familiarize yourself with the different wire colors and their corresponding functions. In most cases, the wires will be labeled: white (neutral), black (hot), green or bare copper (ground), and three additional wires for the fan motor and lighting functions.
Step 4: Connect the Wires
Using wire nuts, connect the corresponding wires from the switch to the wires from the ceiling. Match the wire colors and functions as closely as possible. For example, connect the black wire from the switch to the black wire from the ceiling.
Step 5: Secure the Wires
Once the connections are made, carefully tuck the wires back into the electrical box. Secure the switch to the box using the screws provided. Make sure all connections are tight and ensure there are no loose wires.
Step 6: Test the Switch
Turn the power back on at the breaker box and test the functionality of the switch. Make sure the fan motor and lighting functions operate correctly when the switch is turned on and off.
Following these steps will enable you to wire a 6-wire ceiling fan switch correctly. However, it is essential to consult the manufacturer’s instructions or seek professional help if you are unsure about any step of the process. Remember, safety is always a priority when working with electricity.
Understanding the Basics of a 6-Wire Ceiling Fan Switch
A 6-wire ceiling fan switch is a crucial component that allows you to control the speed and direction of your ceiling fan. While it may seem intimidating at first, understanding the basic wiring diagram of this switch can help you troubleshoot and replace it if necessary.
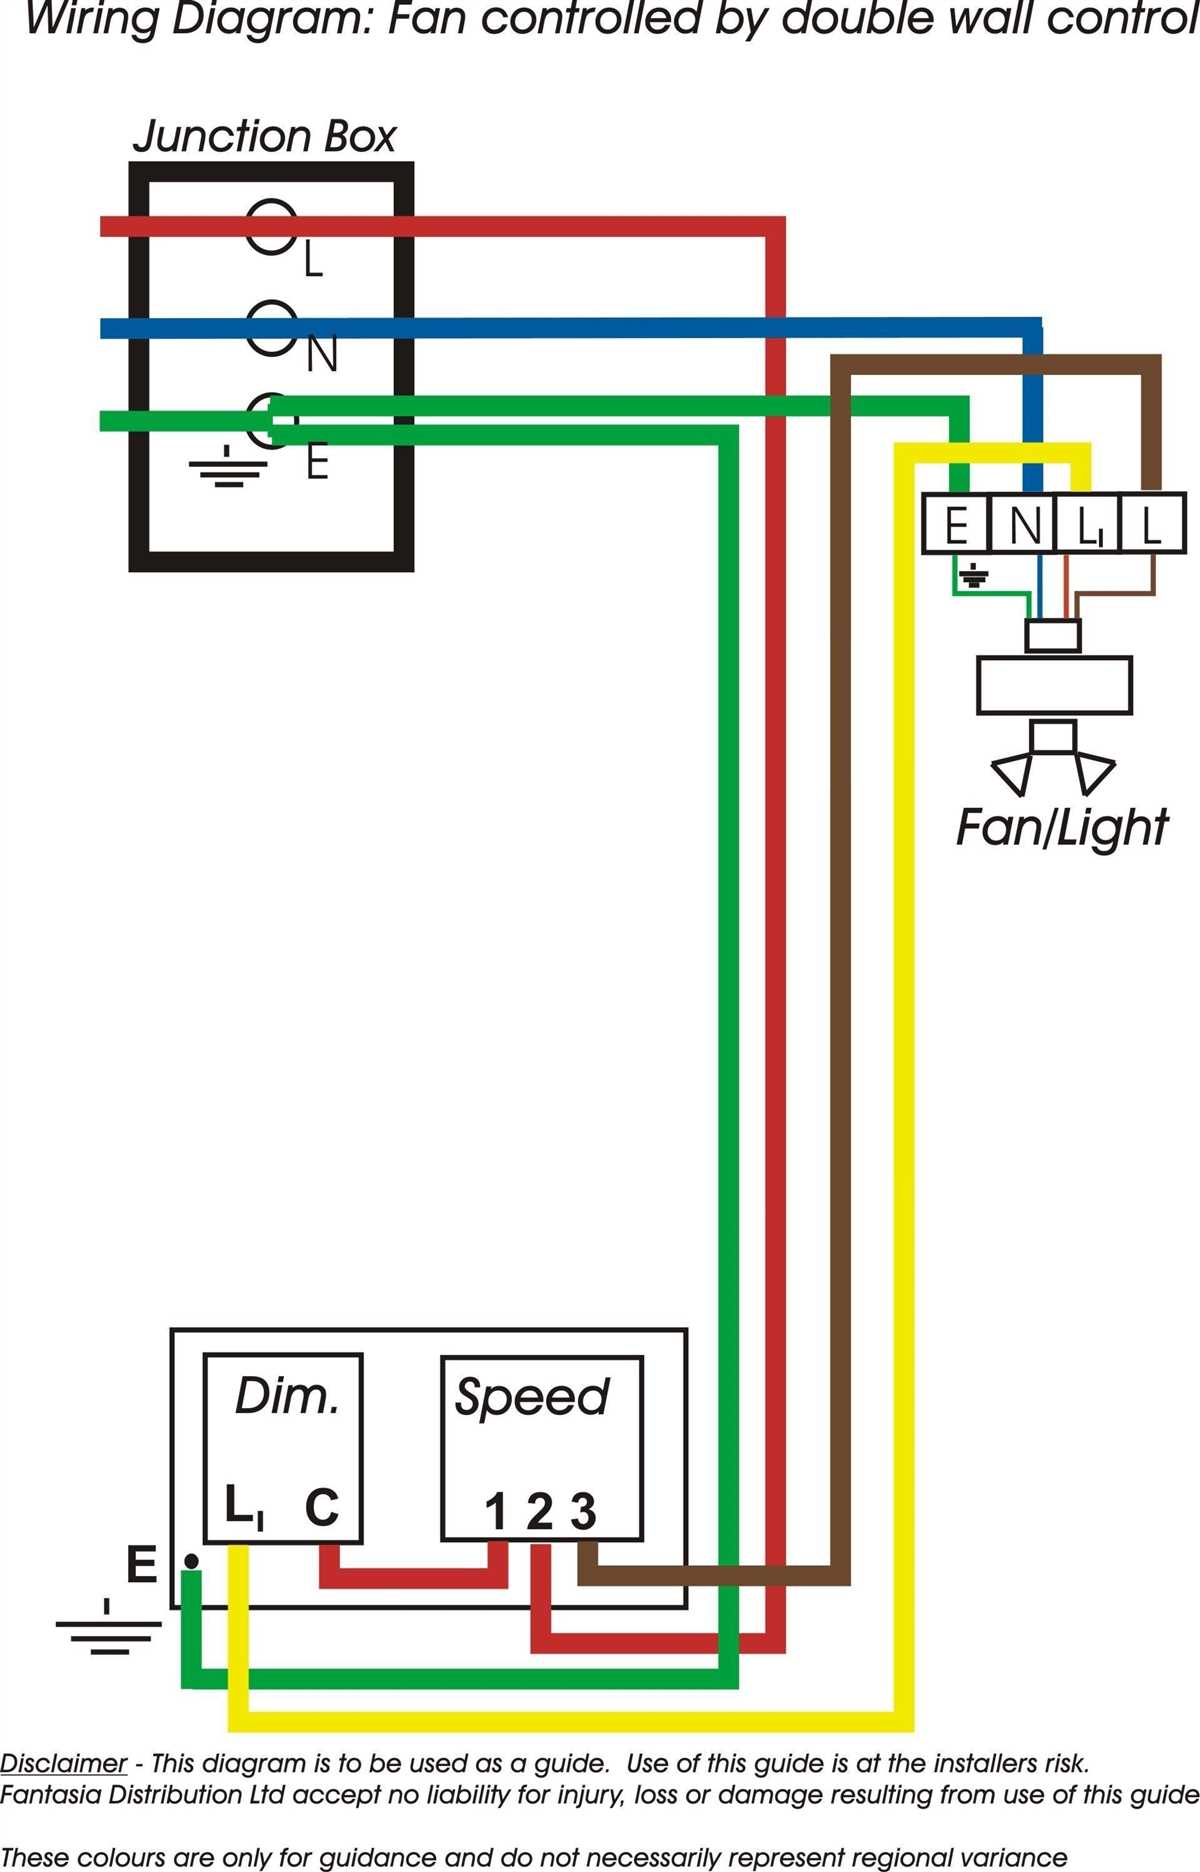
The 6 wires in the switch are typically color-coded and labeled for easy identification. These wires include the line wires, which bring power to the fan, and the switch wires, which control the speed and direction. It’s important to note that the wire colors may vary depending on the manufacturer, so always refer to the provided diagram or instructions.
The first step in wiring a 6-wire ceiling fan switch is to turn off the power to the fan at the circuit breaker. Once you have confirmed it is safe to work, remove the switch cover and locate the wires. The switch will typically have three main speed settings (high, medium, and low) and two additional settings for reversing the fan direction.
Using a combination of the provided wiring diagram and your understanding of the wire colors, carefully connect each wire to its designated terminal. It’s crucial to double-check your connections to ensure they are secure and tight. Once all the wires are connected, replace the switch cover and restore power to the fan.
In conclusion, understanding the basics of a 6-wire ceiling fan switch is essential for proper installation and troubleshooting. Always refer to the provided wiring diagram and follow safety precautions when working with electricity. With the right knowledge and careful attention to detail, you can successfully wire and control your ceiling fan to create a comfortable and enjoyable environment in any room.
Gathering the Necessary Tools and Materials
Before you begin wiring your 6 wire ceiling fan switch, it is important to gather all the necessary tools and materials to ensure a smooth and successful installation. Here is a list of the items you will need:
- Ceiling fan switch: Make sure you have a 6 wire ceiling fan switch that is compatible with your fan model. It is important to choose a high-quality switch to ensure proper functioning.
- Wire strippers: These tools will be used to remove the insulation from the wires, allowing you to make connections.
- Wire connectors: You will need wire connectors to join the various wires together. Make sure you have connectors of the appropriate size for the wires you are working with.
- Electrical tape: Electrical tape is used to insulate the connections and ensure they are secure and safe.
- Wire nuts: Wire nuts are used to twist and secure wires together. Make sure you have an assortment of sizes to accommodate different wire gauges.
- Voltage tester: A voltage tester is essential for ensuring there is no electricity present in the wires before you begin working on them.
- Screwdriver: Depending on the type of screws used in your fan, you may need a screwdriver to remove and install the switch.
By gathering these tools and materials beforehand, you can save time and ensure that you have everything you need to complete the wiring process without any interruptions.
Identifying the Wires: The Key to Successful Installation
When it comes to wiring a ceiling fan switch, one of the most important steps is identifying the wires. A ceiling fan can have multiple wires, and knowing which wire is which will ensure a successful installation. It’s crucial to understand the purpose of each wire and how they should be connected to ensure the ceiling fan operates correctly and safely.
Before starting the installation, it’s important to turn off the power to the circuit that the ceiling fan is connected to. This will prevent any accidents or electrical shocks during the wiring process. Once the power is turned off, you can begin identifying the wires.
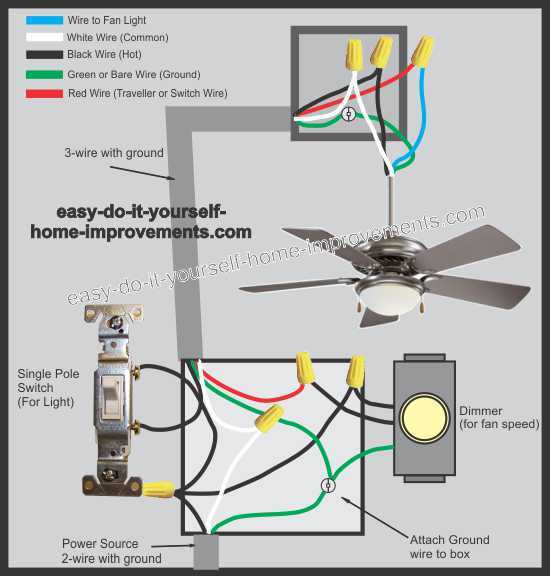
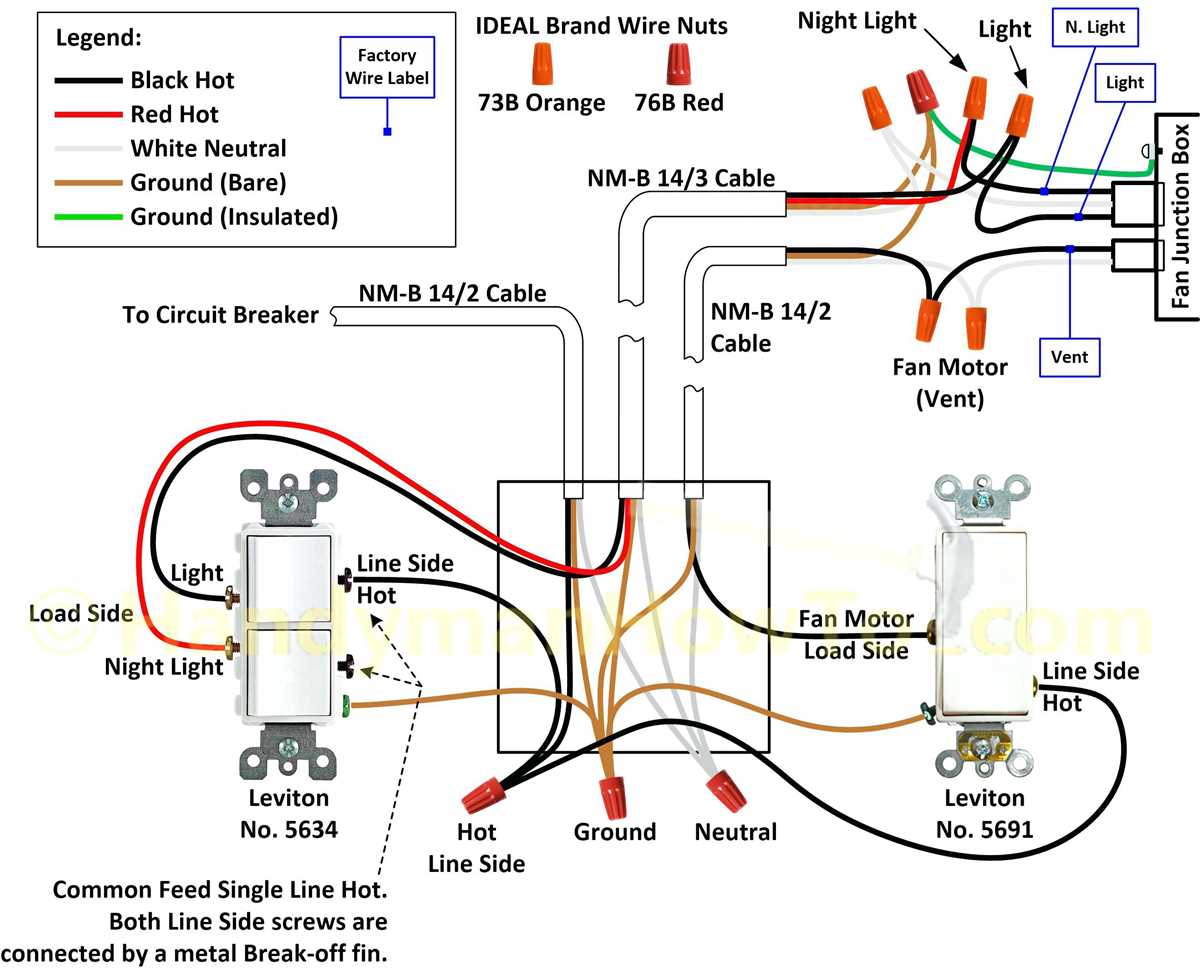
The most common wires found in a ceiling fan switch are the live wire, neutral wire, ground wire, and the wires for the fan and light functions. The live wire is typically colored black or red and carries the power from the electrical panel to the fan. The neutral wire is usually white and provides the return path for the electrical current. The ground wire, which is typically green or bare copper, connects the fan to the grounding system for safety.
Additionally, there may be wires specifically for the fan and light functions. These wires can vary depending on the specific wiring diagram for the ceiling fan switch. It’s important to carefully follow the instructions provided by the manufacturer to correctly identify and connect these wires.
Once you have identified the wires, you can begin connecting them according to the wiring diagram. This typically involves connecting the live wire to the corresponding terminal, connecting the neutral wire to its designated terminal, and connecting the ground wire to the grounding screw. The wires for the fan and light functions will also need to be connected to their respective terminals as specified in the wiring diagram.
By properly identifying the wires and following the wiring diagram, you can ensure a successful installation of your ceiling fan switch. It’s important to take your time and double-check your connections before turning the power back on. If you’re unsure about any aspect of the wiring process, it’s recommended to consult a professional electrician for assistance.
Step-by-Step Wiring Instructions for a 6-Wire Ceiling Fan Switch
Wiring a 6-wire ceiling fan switch may seem daunting at first, but with the right guidance, it can be a straightforward task. Here are step-by-step instructions to help you successfully wire your ceiling fan switch:
1. Turn off the power
Before starting any electrical work, it is crucial to turn off the power to the circuit you will be working on. This ensures your safety and prevents any accidents. Locate the circuit breaker that controls the power to the ceiling fan and switch it off.
2. Remove the old switch
Using a screwdriver, remove the screws that secure the switch plate to the wall. Carefully pull the switch out from the wall box, exposing the wiring connections.
3. Identify the wires
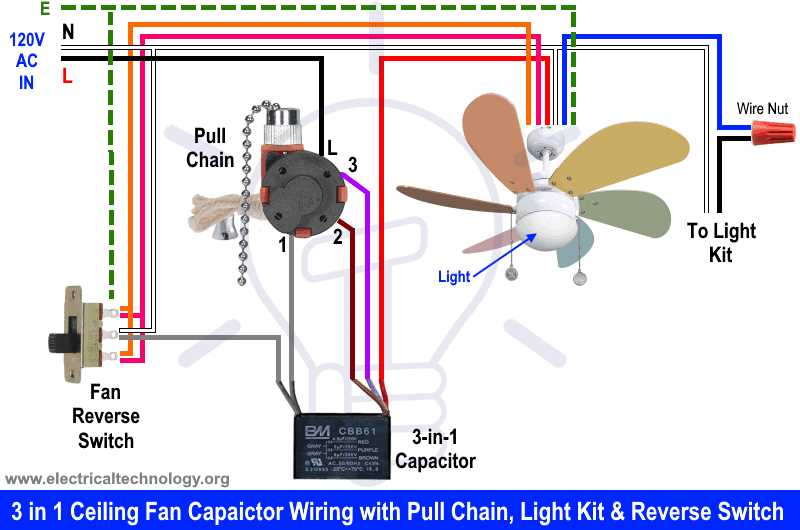
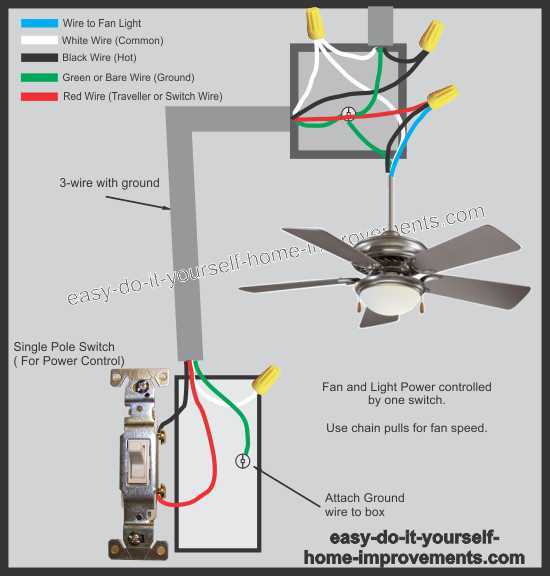
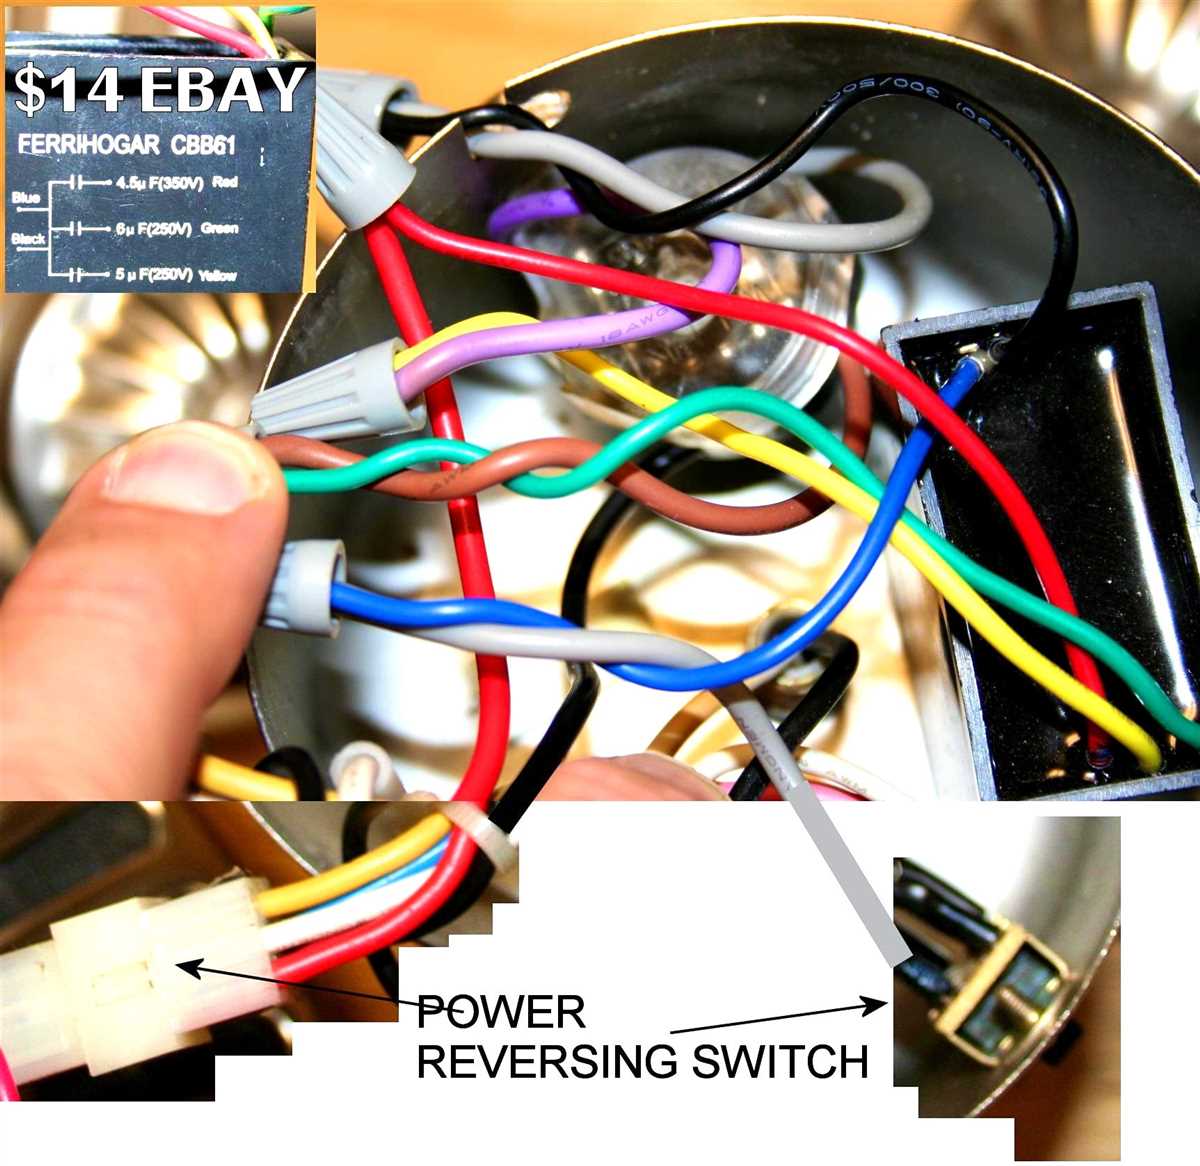
Identifying the wires correctly is essential for proper wiring. The 6 wires you will typically find in a ceiling fan switch are: black (power supply), white (neutral), green or copper (ground), red (fan motor), blue (light kit), and yellow or orange (reverse switch). Use a voltage tester to verify the presence of power in the black wire.
4. Connect the wires
Using wire nuts, connect the black wire from the switch to the black wire from the power supply. Connect the white wire from the switch to the white wire from the power supply and the fan motor. Connect the green or copper wire from the switch to the ground wires. Connect the red wire from the switch to the fan motor, the blue wire to the light kit, and the yellow or orange wire to the reverse switch.
5. Secure the switch
Once all the wires are properly connected, carefully push the switch back into the wall box. Secure it in place using the screws that were previously removed.
6. Test the switch
After completing the wiring, turn on the power at the circuit breaker. Test the switch to ensure it is functioning correctly. Turn on the fan and light separately and check if the reverse switch operates as intended.
Following these step-by-step instructions will help you wire a 6-wire ceiling fan switch with ease. However, if you are unsure about any step or encounter any issues, it is always best to consult a licensed electrician for assistance.
Testing and Troubleshooting: Ensuring Proper Functionality
Testing and troubleshooting are essential steps in ensuring the proper functionality of a 6 wire ceiling fan switch. By following a systematic approach, it becomes easier to identify any issues and resolve them effectively. Here are some key steps to perform during the testing and troubleshooting process:
1. Check the power supply: Start by checking if the power supply to the ceiling fan switch is intact. Ensure that the circuit breaker or fuse is not blown and that electricity is reaching the switch. Use a voltage tester to verify the presence of electrical current.
2. Inspect the wiring connections: Examine the connections between the ceiling fan switch and the fan itself. Look for any loose or damaged wires, and ensure that all connections are tight and secure. Pay special attention to the six wires connected to the switch and make sure they are properly connected according to the wiring diagram.
3. Test the switch: Use a multimeter or continuity tester to check the functionality of the ceiling fan switch. This involves testing each individual switch position to ensure that it is functioning as intended. Compare the readings to the wiring diagram to verify that the switch is working correctly.
4. Verify motor operation: Once the switch is confirmed to be working properly, test the motor operation of the ceiling fan. Activate each switch position and observe if the motor responds accordingly. Pay attention to any unusual noises or vibrations, which could indicate a problem with the motor or its bearings.
5. Troubleshoot any issues: If any issues are encountered during the testing process, troubleshoot them one by one. Check if there are any loose connections, damaged wires, or faulty components. Consult the wiring diagram and any available troubleshooting guides to identify and resolve the specific issue.
By following these testing and troubleshooting steps, you can ensure that your 6 wire ceiling fan switch is functioning properly. Regular maintenance and periodic checks are recommended to maintain the longevity and efficiency of your ceiling fan.
Additional Tips and Safety Precautions
When working with electrical wiring, it’s essential to follow certain safety precautions to ensure your well-being and the proper functioning of your ceiling fan. Here are some additional tips to keep in mind:
- Turn off the power: Before you start any electrical work, make sure to turn off the power at the circuit breaker or fuse box. This will prevent any accidental electrical shocks.
- Use proper tools and equipment: Always use insulated tools and equipment when working with electrical wiring. This includes insulated screwdrivers, pliers, and wire strippers. Using non-insulated tools can increase the risk of electrical shock.
- Double-check your connections: Before turning the power back on, double-check all your connections to ensure they are secure. Loose or faulty connections can lead to electrical malfunctions or even fires.
- Consult a professional if unsure: If you are unsure about any part of the wiring process or if you encounter any difficulties, it’s best to consult a professional electrician. They have the knowledge and experience to ensure a safe and proper installation.
Remember, working with electrical wiring can be dangerous if not done correctly. Always prioritize safety and take the necessary precautions to protect yourself and others. Following these tips will help ensure a successful and safe installation of your ceiling fan’s 6 wire switch.