
An intercom system is a communication device that allows two or more people to talk and listen to each other from different areas or rooms of a building. It is commonly used in residential, commercial, and industrial settings for security, convenience, and efficient communication.
The 2-wire intercom system is a popular choice due to its simplicity and cost-effectiveness. It consists of two wires, which are used for both power and communication. One wire carries the audio signal, while the other wire carries the power for the system. This makes the installation process relatively easy, as there is no need for additional wires for power supply.
To understand the wiring diagram of a 2-wire intercom system, it is important to know the different components involved. The main components include the master station, substation, and power supply. The master station is the central unit that controls the communication between different substations. It usually has a speaker and a microphone for audio transmission and a button for call initiation.
What Is a 2 Wire Intercom?
A 2 wire intercom is a communication system that uses only two wires to transmit audio signals between different locations. It is commonly used for residential and commercial purposes, allowing individuals to communicate with each other without the need for complicated wiring systems.
The basic setup of a 2 wire intercom consists of a master station and one or more sub-stations. The master station is the main control unit, while the sub-stations are the individual units installed in different rooms or areas. The two wires are used to carry both the audio signal and power to the sub-stations, simplifying the installation process.
One of the key advantages of a 2 wire intercom is its simplicity and cost-effectiveness. Compared to other intercom systems that require more wiring and complex setups, a 2 wire intercom is easier to install and maintain. It also allows for flexibility in terms of the number of sub-stations that can be connected to the system.
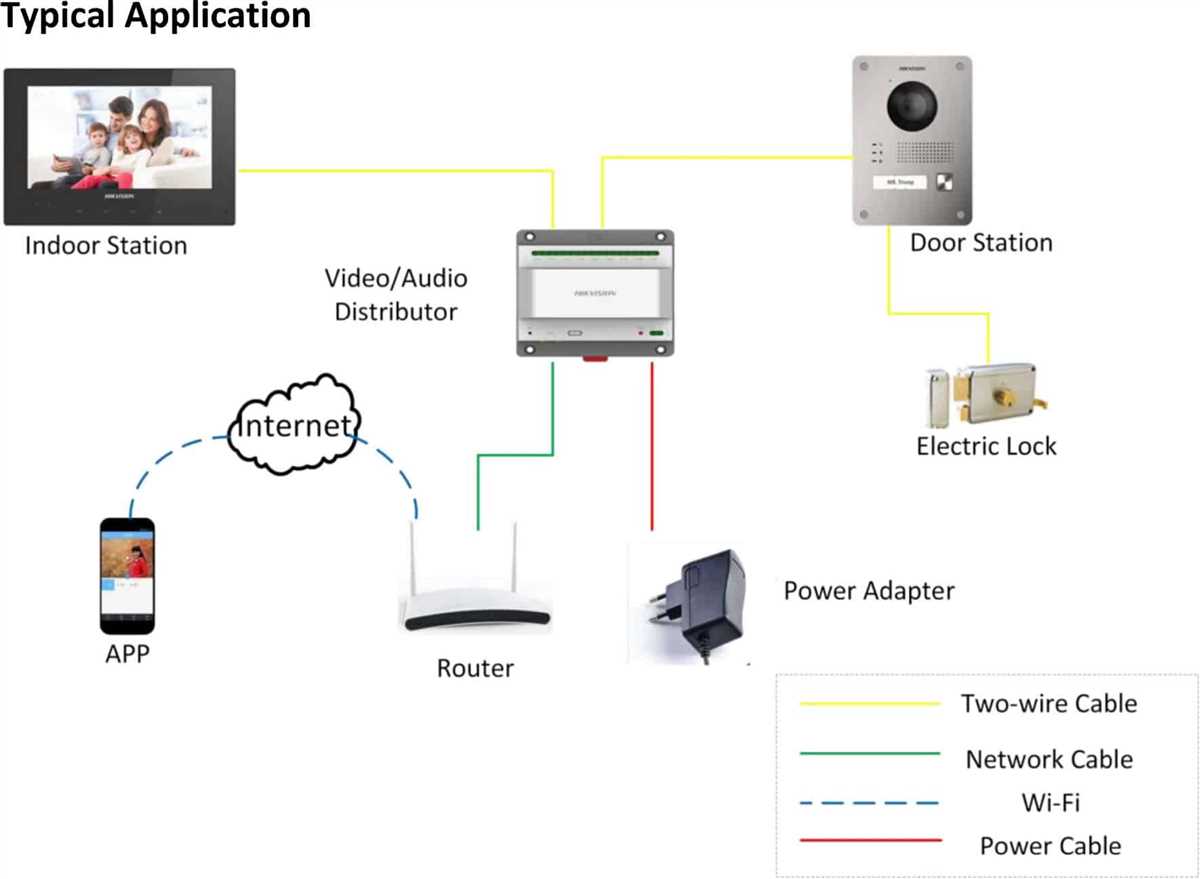
Another important aspect of a 2 wire intercom is its compatibility with different types of devices. It can be integrated with doorbells, video cameras, and other security systems, providing a comprehensive solution for communication and security needs.
In conclusion, a 2 wire intercom is a practical and efficient communication system that uses only two wires to transmit audio signals between different locations. It offers simplicity, cost-effectiveness, and compatibility with various devices, making it an ideal choice for residential and commercial applications.
The Importance of a Wiring Diagram for a 2 Wire Intercom
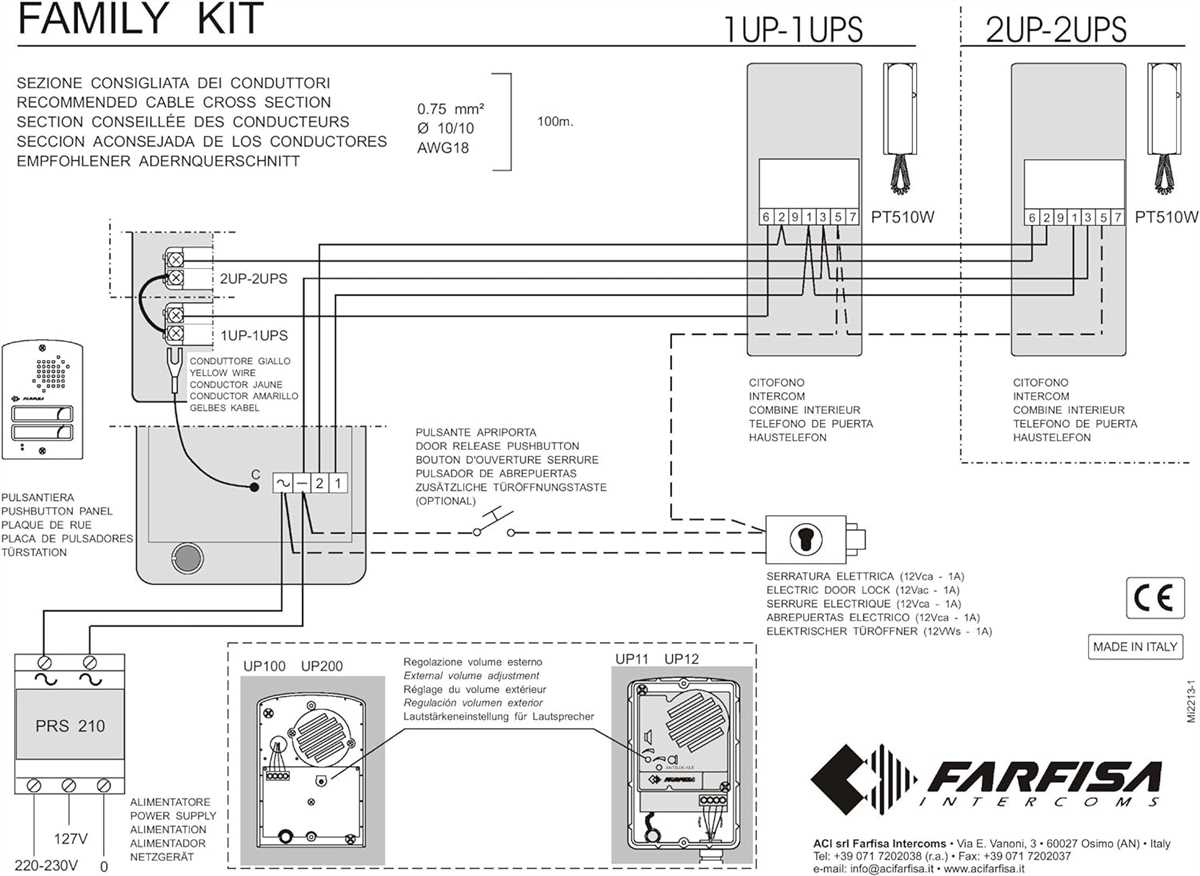
When it comes to installing a 2 wire intercom system, having a wiring diagram is essential. A wiring diagram is a visual representation of the electrical connections and components in a system. It provides a roadmap for how the system should be wired, ensuring that everything is connected correctly and functions as intended. Without a wiring diagram, it can be easy to make mistakes or overlook important connections, leading to unreliable or non-functional intercom system.
One of the key benefits of a wiring diagram for a 2 wire intercom is that it helps ensure proper installation. The diagram shows the specific wiring connections for each component, including the master station, substations, and power supply. This allows installers to follow a step-by-step process and make accurate connections, minimizing the risk of errors. With a clear understanding of how the system should be wired, installers can save time and effort, making the installation process smoother and more efficient.
In addition to installation, a wiring diagram is also crucial for troubleshooting and maintenance purposes. If any issues arise with the intercom system, having a wiring diagram makes it much easier to identify the problem and locate the faulty components or connections. This can significantly reduce the time and effort required for troubleshooting, as technicians can refer to the diagram to quickly pinpoint the issue.
Overall, a wiring diagram is an invaluable tool for anyone working with a 2 wire intercom system. It provides a clear and concise visual representation of the system’s wiring, ensuring proper installation and facilitating troubleshooting. By following the wiring diagram, installers and technicians can ensure that the intercom system functions efficiently and reliably, providing seamless communication for users.
Understanding the Basic Components of a 2 Wire Intercom System

In a 2 wire intercom system, there are several key components that work together to provide communication between different areas or rooms. These components include the master station, the substation, and the power supply.
The master station is the central control unit of the intercom system. This is where the main controls and interface are located. Typically, the master station is installed in a central location, such as a front desk or main office. It allows the operator to make or receive calls, control the volume, and interact with the other stations.
A substation is a device that is usually installed in individual rooms or areas. It acts as a remote station that can make or receive calls from the master station. Substations are often equipped with a speaker and microphone, allowing for two-way communication. They are connected to the master station through a 2-wire cable, which carries both audio and power signals.
To provide power to the intercom system, a power supply unit is required. This unit is responsible for converting the AC power from the main electrical system into low voltage DC power that is used by the intercom system. The power supply is typically located near the master station and provides power to both the master station and the substations through the 2-wire cable.
In addition to these main components, there may be additional accessories or features depending on the specific intercom system. These can include door release buttons, video camera integration, or integration with other security systems. However, the basic components of a 2-wire intercom system are the master station, the substations, and the power supply.
How to Install a 2 Wire Intercom System
If you are looking to install a 2 wire intercom system in your home or office, there are a few steps you will need to follow. Intercom systems are a great way to communicate with others within your property, and can provide added security and convenience. Here’s a guide on how to install a 2 wire intercom system.
1. Plan and prepare
The first step in installing a 2 wire intercom system is to plan and prepare. Determine the locations where you want to install the intercom stations and ensure they are within reach of the two wires you will be using. Measure the distances between the stations and calculate the length of wire you will need.
Make sure you have all the necessary tools and equipment, such as wire cutters, screwdrivers, and connectors. You may also need to purchase additional wire if the distance between stations is too long for the provided wire.
2. Install the master station

Start by installing the master station, which is the central control unit for the intercom system. Choose a suitable location near the main entrance or in a central area of your property. Mount the master station securely to the wall using screws or brackets, following the manufacturer’s instructions.
Connect one end of the two-wire cable to the designated terminals on the master station. Make sure to match the positive and negative terminals correctly. Use wire connectors to secure the connection and prevent any loose wires.
3. Install the sub-stations
Once the master station is in place, move on to installing the sub-stations. These are the additional intercom units located in different rooms or areas of your property. Mount each sub-station securely to the wall, ensuring they are easily accessible for communication.
Connect the other end of the two-wire cable to the designated terminals on each sub-station. Again, make sure the positive and negative terminals are correctly matched and use wire connectors to secure the connection.
4. Test and adjust
After all the intercom stations are installed, it’s important to test the system to ensure it is functioning properly. Check if you can hear and communicate clearly between the master station and each sub-station. If there are any issues, double-check the connections and make any necessary adjustments.
Once you are satisfied with the performance of your 2 wire intercom system, tidy up the wiring and secure it in place. This will help prevent any accidental damage or disconnection in the future.
By following these steps, you can successfully install a 2 wire intercom system in your home or office. Enjoy the convenience and added security it provides!
Common Issues and Troubleshooting Tips for a 2 Wire Intercom System
2 wire intercom systems are a popular choice for residential and commercial buildings due to their simplicity and cost-effectiveness. However, like any other electronic system, they can encounter issues that require troubleshooting. Here are some common problems you may encounter with a 2 wire intercom system and some tips on how to resolve them.
1. No Sound or Poor Sound Quality
If you are experiencing no sound or poor sound quality in your 2 wire intercom system, there are a few things you can check. First, ensure that the volume levels on both the master station and the substation are properly adjusted. Consult the user manual for instructions on how to do this.
Next, check the wiring connections. Make sure that all wires are securely connected and that there are no loose or damaged connections. If you find any damaged wires, it may be necessary to replace them.
If the sound issue persists, it could be due to a faulty speaker or microphone. Try swapping the components with known working ones to determine if the issue is with the specific component. If necessary, contact the manufacturer for further assistance or consider replacing the faulty component.
2. Interference or Feedback
Interference or feedback can occur in a 2 wire intercom system, causing distorted sound or unwanted noise. To troubleshoot this issue, first, check for any nearby devices that could be causing interference, such as radios, cell phones, or other wireless devices. Try moving these devices away from the intercom system to see if the interference resolves.
Next, check the grounding of the intercom system. Improper grounding can lead to interference issues. Ensure that the ground wire is securely connected to a proper grounding point.
If the interference or feedback issue persists, it may be necessary to consult a professional technician who can further diagnose and resolve the problem.
3. Inability to Transmit or Receive Calls
If you are unable to transmit or receive calls on your 2 wire intercom system, there are a few potential causes to consider. First, check the power supply to ensure that the system has sufficient power. Check if the power adapter is securely connected and functioning properly.
Next, check the wiring connections, particularly at the master station and substation. Ensure that all wires are securely connected and that there are no loose or damaged connections. If any damaged wires are found, replace them as necessary.
If the issue persists, it could be due to a malfunctioning component such as the microphone or speaker. Consult the user manual for instructions on how to troubleshoot and test these components. If needed, contact the manufacturer for further assistance or consider replacing the faulty component.
By following these troubleshooting tips, you can effectively diagnose and resolve common issues that may arise with a 2 wire intercom system. However, if the problem persists or if you are unsure how to proceed, it is always advisable to seek professional assistance.
Benefits of Using a 2 Wire Intercom System
Two wire intercom systems offer several benefits over other types of intercom systems.
- Cost-effective: A 2 wire intercom system requires fewer cables and components, resulting in lower installation and maintenance costs.
- Easy installation: With only two wires needed for the entire system, installation is quick and straightforward. This makes it an ideal choice for both new constructions and retrofits.
- Flexibility: 2 wire intercom systems can be easily expanded or modified to accommodate additional devices or users. This provides flexibility for future expansion or changes to the system.
- Improved communication: With a 2 wire intercom system, users can communicate with each other without the need for dialing or waiting for a connection. This improves efficiency and productivity in various settings, such as offices, residential buildings, and warehouses.
- Clear audio quality: 2 wire intercom systems typically offer high-quality audio transmission, ensuring clear communication between users even in noisy environments.
- Integration with other systems: Many 2 wire intercom systems can be integrated with other security or communication systems, such as access control or CCTV systems, providing a comprehensive solution for building management and security.
Overall, a 2 wire intercom system combines cost-effectiveness, ease of installation, flexibility, improved communication, and integration capabilities, making it a reliable choice for various applications.