
Have you been experiencing problems with the electrical system in your 2000 GMC Sierra? The wiring diagram can be a helpful tool in diagnosing and resolving these issues. Whether you are a seasoned mechanic or a do-it-yourselfer, this diagram provides a detailed map of the electrical connections in your vehicle.
With the wiring diagram, you can easily identify the various circuits and components in your 2000 GMC Sierra. From the headlights to the taillights, from the power windows to the radio, this diagram shows how all the parts interact and where they are located. By understanding the wiring, you can trace electrical problems back to their source and make necessary repairs.
Whether you need to replace a faulty wire, troubleshoot a malfunctioning component, or install an aftermarket accessory, the 2000 GMC Sierra wiring diagram is an invaluable resource. This diagram provides a clear and concise illustration of the electrical system, making it easier for anyone to work on their Sierra. So, before you start any electrical work on your truck, be sure to consult the wiring diagram for guidance.
Understanding the Basics of a 2000 GMC Sierra Wiring Diagram
A wiring diagram is a visual representation of the electrical connections and components found in a vehicle. In the case of a 2000 GMC Sierra, a wiring diagram provides a detailed overview of the electrical system, allowing owners and technicians to troubleshoot and repair any electrical issues that may arise.
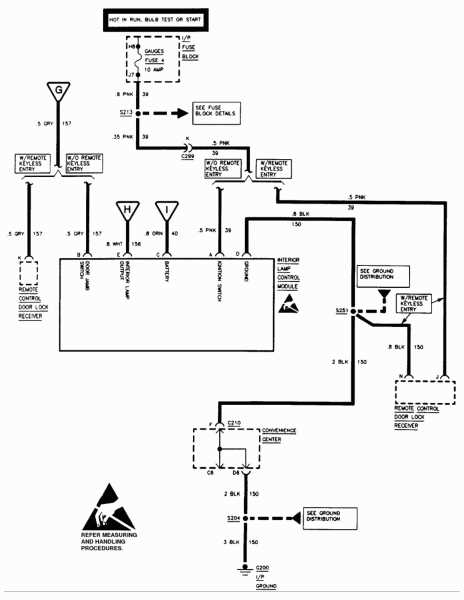
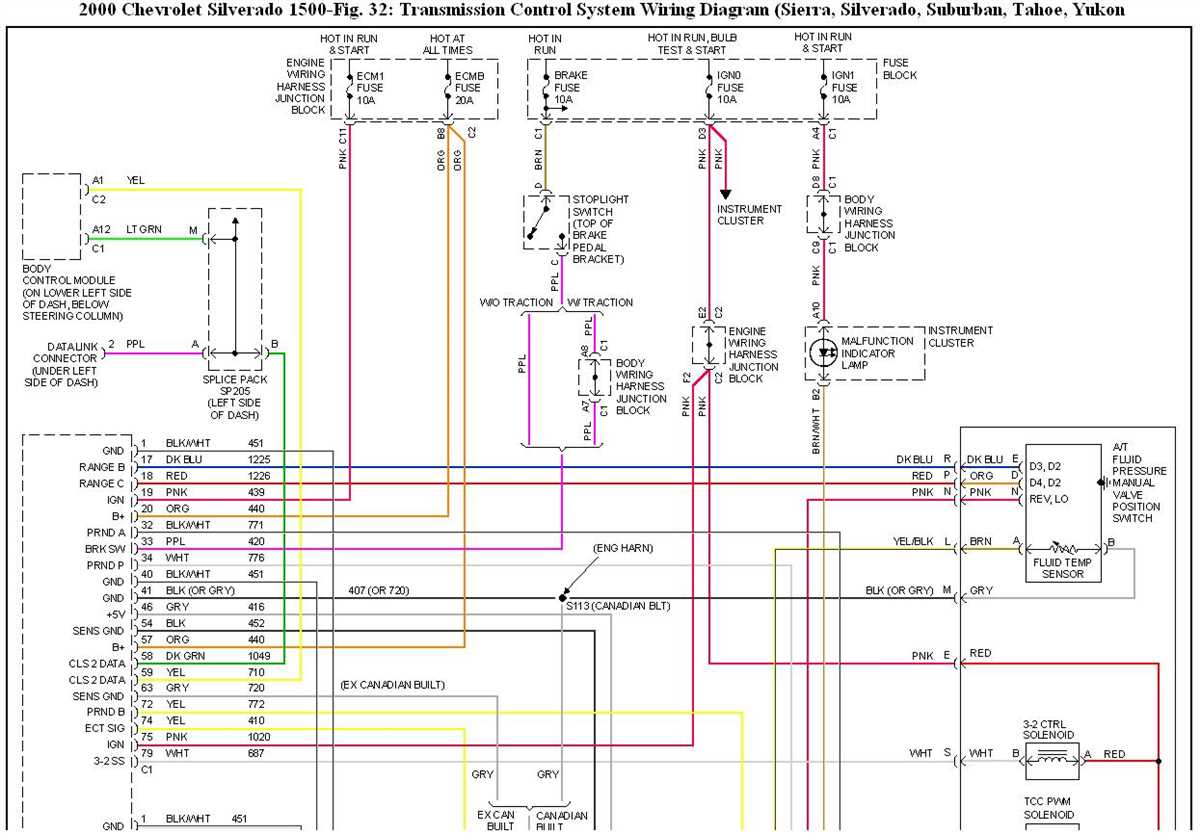
The 2000 GMC Sierra wiring diagram is divided into various sections, each representing a different aspect of the vehicle’s electrical system. These sections include the power distribution, grounding, starting, charging, lighting, and accessory circuits. Each circuit is labeled and color-coded to make troubleshooting easier.
Power Distribution Circuit
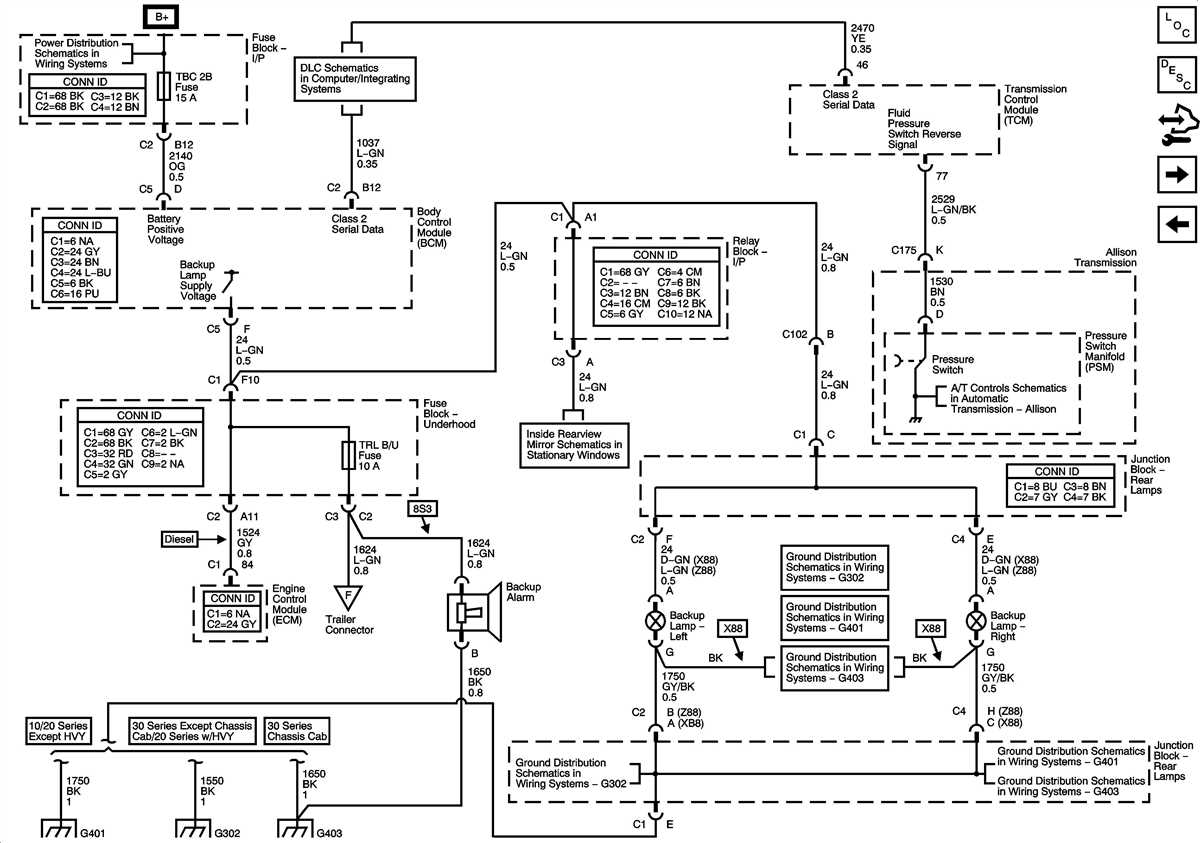
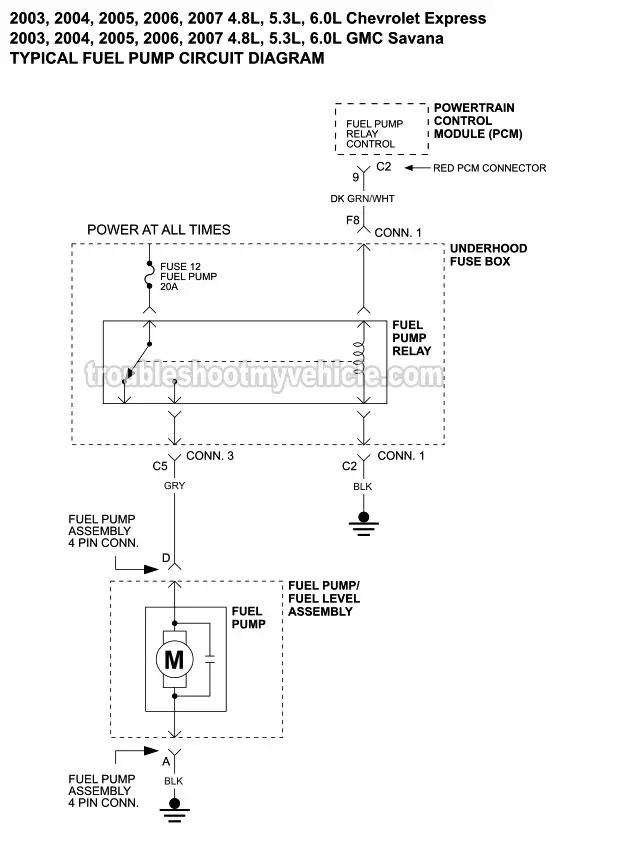
The power distribution circuit of the 2000 GMC Sierra wiring diagram illustrates how power is supplied to different components and systems in the vehicle. This section includes the battery, alternator, starter, and main power distribution points. It also shows the fuses and relays responsible for protecting the electrical system from overloads and short circuits.
The wiring diagram provides information on the wire colors and size, as well as the connections and terminals used in the power distribution circuit. This information is crucial when testing or replacing components in the system, as it ensures proper electrical connections and prevents damage to the vehicle.
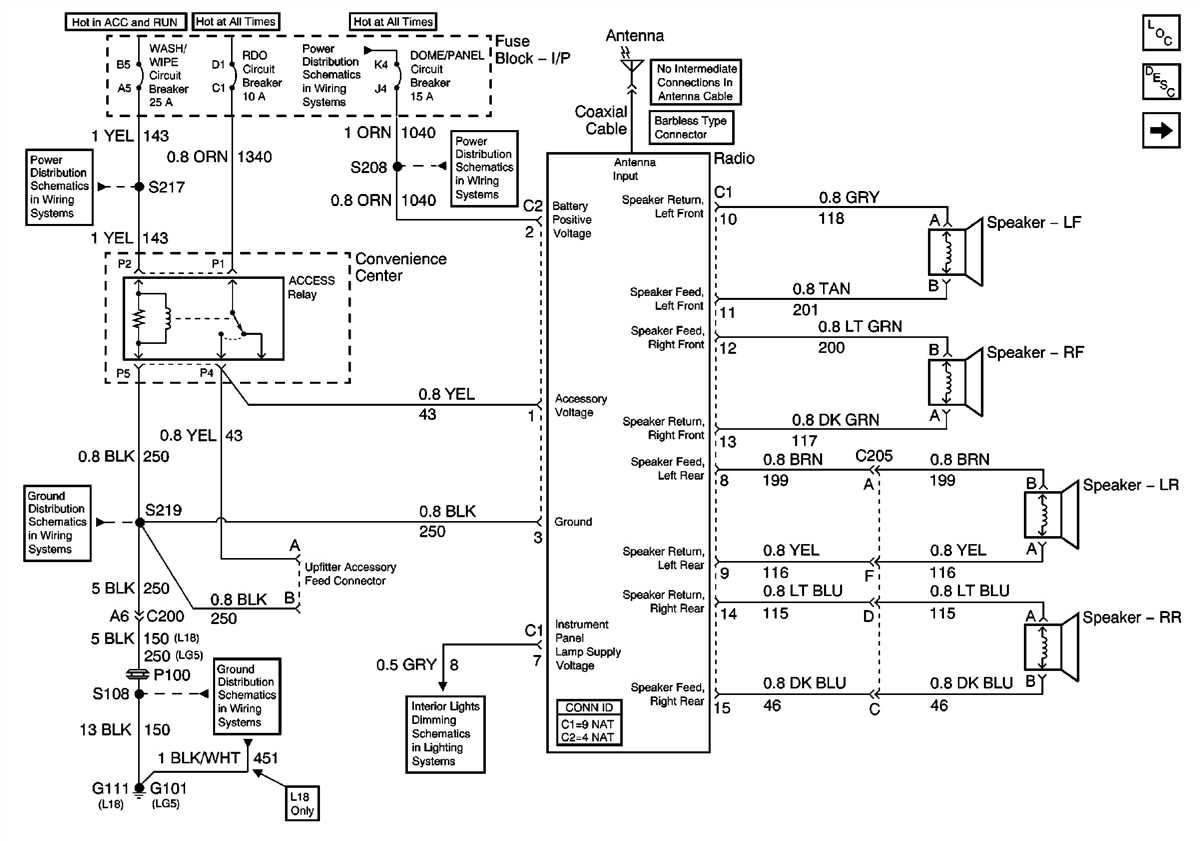
Lighting Circuit

The lighting circuit of the 2000 GMC Sierra wiring diagram is responsible for the headlights, taillights, turn signals, and other lighting components. This section provides details on the wiring connections, switches, and relays involved in the lighting system. It also includes information on the wire colors and sizes, allowing for proper troubleshooting and repair.
Understanding the basics of a 2000 GMC Sierra wiring diagram is essential for anyone working on the electrical system of the vehicle. It provides a comprehensive overview of the system, allowing for effective troubleshooting and repair. By referring to the diagram, owners and technicians can ensure that the electrical connections and components are functioning properly, leading to a safer and more reliable vehicle.
What is a Wiring Diagram?
A wiring diagram is a visual representation of the electrical system of a vehicle, showing how various components are connected and what wires are used to transmit electrical signals. It is a detailed schematic that provides a clear and concise overview of the wiring and electrical connections in a specific vehicle model. Wiring diagrams are essential tools for automotive technicians and enthusiasts when diagnosing and repairing electrical issues or installing aftermarket accessories.
In a wiring diagram, each component is represented by a symbol or abbreviation, and its connection to other components is illustrated by lines or arcs. The diagram also includes labels and color codes to indicate the types of wires used, such as power, ground, or signal wires. By studying the wiring diagram, technicians can understand the routing of wires, identify potential problem areas, and trace electrical faults.
Wiring diagrams come in various formats, including printed manuals, digital files, or online resources. They are typically organized by vehicle systems or subsystems, such as the engine, transmission, lighting, or audio system. Some wiring diagrams may also include additional information, such as fuse box locations, relay assignments, or wire gauge specifications.
Overall, a wiring diagram is an essential tool for understanding and troubleshooting the electrical system of a vehicle. It provides a comprehensive and visual representation of the wiring connections, helping technicians and enthusiasts to effectively diagnose and repair electrical issues.
Components of a Wiring Diagram
A wiring diagram is a visual representation of the electrical connections and components within a system. It provides detailed information about the wirings, the various components, and their interconnections. The diagram serves as a roadmap for understanding the electrical system and troubleshooting any issues that may arise. Here are the key components you’ll typically find in a wiring diagram:
1. Symbols:
Wiring diagrams use standardized symbols to represent different electrical components such as switches, relays, lights, motors, and connectors. These symbols help in quickly identifying and understanding the components and their functions.
2. Lines and Colors:
The lines in a wiring diagram represent the electrical connections between the components. The colors and patterns of the lines indicate the type of connection – for example, solid lines may represent wires that are directly connected, while dashed lines may represent wires that are connected but not directly. Different colors also help in distinguishing between different circuits and systems within the overall diagram.
3. Wiring Connections:
The wiring connections in a diagram show how the various components are connected to each other and to the power source. This includes information on the type of wire used, its color, and the specific terminal or pin to which it is connected.
4. Component Descriptions:
Wiring diagrams often provide descriptions or labels for each component, helping to identify their specific purpose or function within the system. This information can be crucial when troubleshooting or replacing components.
5. Power Sources:
A wiring diagram will typically indicate the power sources for the components, such as batteries or electrical panels. It will also show the connection points where power is distributed throughout the system.
Overall, a wiring diagram is a valuable tool for understanding the electrical system of a vehicle or any other complex system. It allows technicians and DIY enthusiasts to comprehend the connections and identify potential issues. By following the diagram, one can confidently navigate the wiring of a system and ensure its proper functioning.
Interpreting a 2000 GMC Sierra Wiring Diagram
A wiring diagram is a visual representation of the electrical system in a vehicle. It shows the various components and their connections, allowing technicians to diagnose and repair electrical issues. When interpreting a 2000 GMC Sierra wiring diagram, it is important to understand the symbols and color codes used.
The diagram typically includes symbols for components such as the battery, alternator, starter, ignition switch, fuse box, and various sensors. Each symbol represents a specific electrical component and its function within the system. By referring to the diagram, technicians can identify the location and connections of these components.
Color codes are used to differentiate between different wires and their functions. For example, red wires are often associated with power and can be connected to the battery or a fuse box. Black wires usually indicate a ground connection, while green or blue wires may be used for communication or data transmission.
Components and connections
Understanding the components and connections in a 2000 GMC Sierra wiring diagram is crucial for diagnosing and repairing electrical issues. For example, if the diagram shows a problem with the starter circuit, technicians can trace the wiring from the ignition switch to the starter solenoid to identify any possible faults.
The diagram may also include information about the size of the wire and the type of connector used. This can help technicians select the appropriate replacement parts and ensure compatibility with the existing wiring system.
Overall, a 2000 GMC Sierra wiring diagram is a valuable tool for technicians and mechanics. It provides a visual representation of the vehicle’s electrical system and allows for efficient troubleshooting and repairs. By understanding the symbols and color codes used, technicians can interpret the diagram accurately and effectively work on the vehicle’s electrical system.
Troubleshooting Common Electrical Issues
Electrical issues can be frustrating and inconvenient, but they are a common problem that many GMC Sierra owners encounter. Fortunately, there are some common troubleshooting steps you can take to diagnose and resolve these issues. Here are some tips for troubleshooting common electrical problems in your 2000 GMC Sierra:
1. Check the Fuses
Start by checking the fuses in your GMC Sierra. A blown fuse can cause various electrical issues, such as a malfunctioning radio or power windows. Refer to the owner’s manual or the fuse box diagram for the location of the fuses and check each one to see if it is blown. Replace any blown fuses with ones of the same amperage.
2. Inspect the Battery
A weak or dead battery can cause several electrical issues in your GMC Sierra. Check the battery terminals for corrosion and ensure they are securely connected. Use a multimeter to test the battery voltage, which should be around 12 volts. If the voltage is low, recharge or replace the battery as needed.
3. Check the Wiring
Inspect the wiring in your GMC Sierra for any signs of damage, such as frayed wires, loose connections, or burned insulation. Focus on the wiring related to the specific electrical issue you are experiencing. Use a wiring diagram to help you trace the wires and identify any potential issues. Repair or replace any damaged wiring as necessary.
4. Test the Electrical Components
If you are experiencing issues with a specific electrical component, such as the headlights or power windows, test the component itself. Use a multimeter to check for continuity and proper voltage. If the component is not functioning correctly, it may need to be repaired or replaced.
5. Check the Ground Connections
Poor ground connections can cause electrical issues in your GMC Sierra. Check the ground connections for the specific electrical system you are troubleshooting. Clean any corrosion and ensure the connections are tight. Consider adding additional ground connections if needed.
6. Consult a Professional
If you have tried troubleshooting the electrical issues in your GMC Sierra but are still unable to resolve them, it may be time to consult a professional. A qualified mechanic or electrician will have the knowledge and equipment to diagnose and repair complex electrical problems.
By following these troubleshooting steps and utilizing the appropriate resources, you can effectively diagnose and resolve common electrical issues in your 2000 GMC Sierra. Remember to exercise caution when working with electrical systems and consult a professional if needed. With proper maintenance and care, you can keep your GMC Sierra’s electrical system running smoothly.