
When it comes to troubleshooting and repairing your Honda 400ex carburetor, having a diagram can be invaluable. Understanding how all the components work together and interact with each other is essential for ensuring optimal performance and preventing issues down the road.
In this comprehensive guide, we will provide you with a detailed Honda 400ex carb diagram and go through each component step by step. Whether you are a seasoned mechanic or a DIY enthusiast, this guide will help you identify and resolve any carburetor-related issues you may encounter.
From the fuel supply system to the throttle and pilot jets, every part of the carburetor has a specific function that contributes to the overall performance of your Honda 400ex ATV. By understanding how each component works and their relationship with one another, you can easily diagnose and fix any problems that may arise.
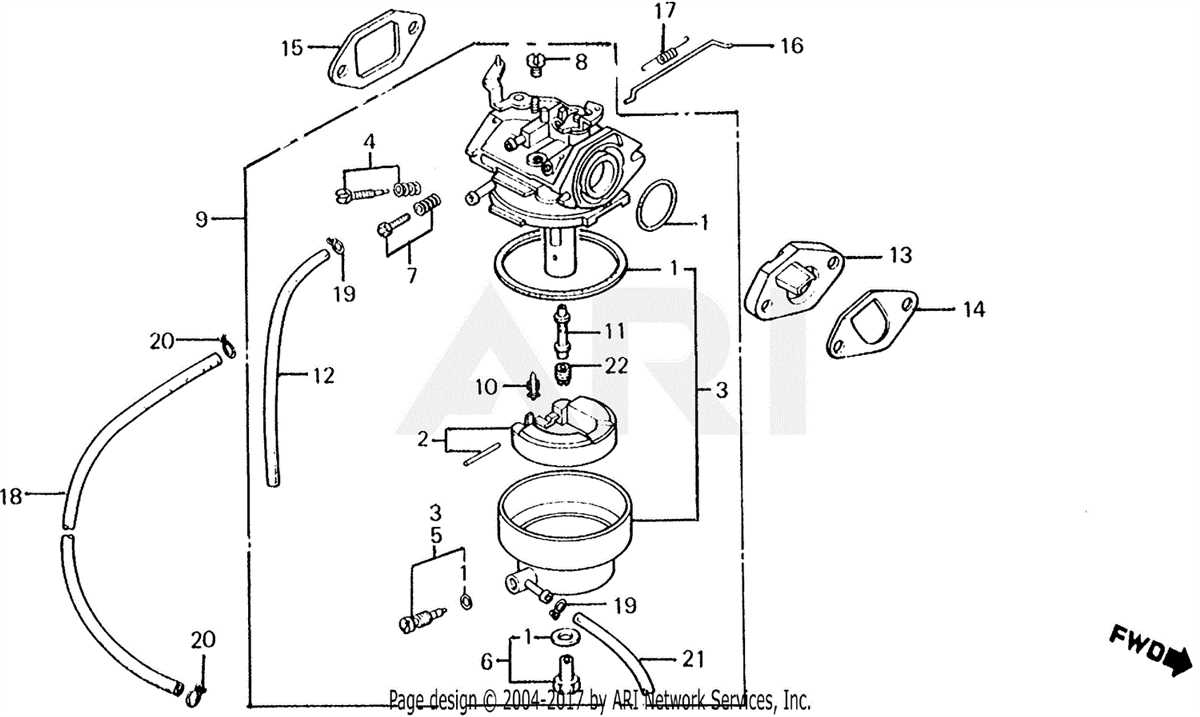
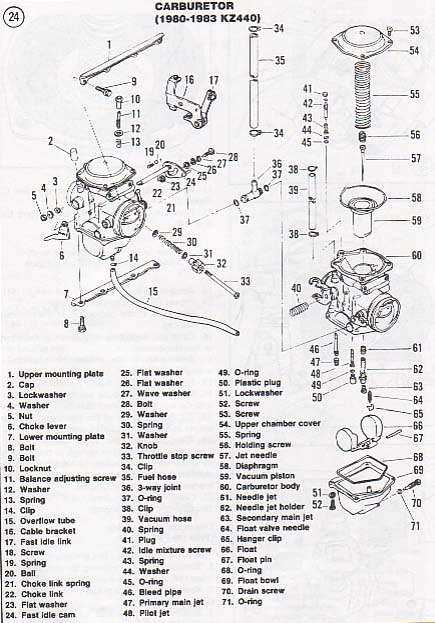
Honda 400ex Carb Diagram
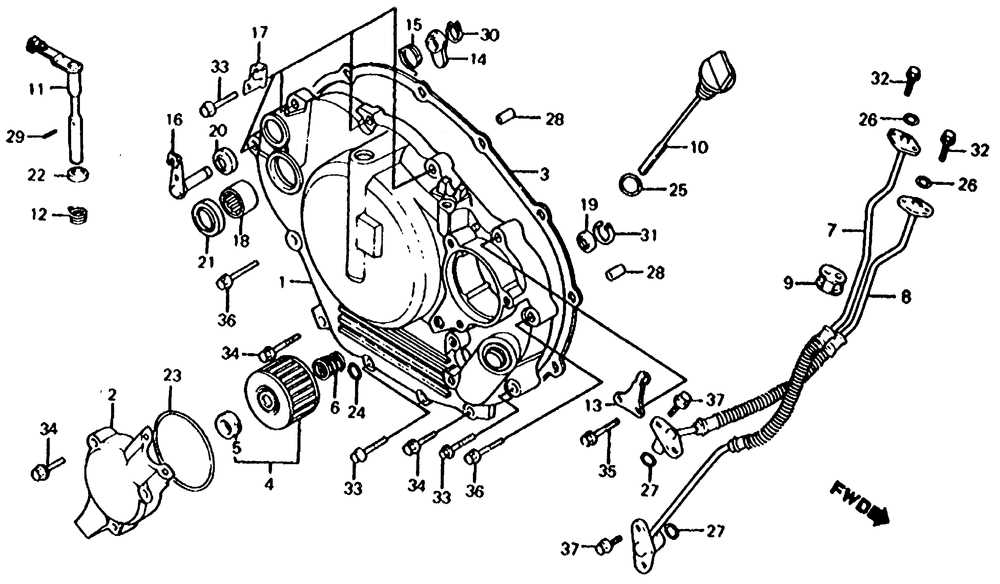
The Honda 400ex carburetor diagram is a useful visual representation of the various components and connections involved in the carburetor system of the Honda 400ex ATV. Understanding this diagram can help owners and mechanics diagnose and troubleshoot issues with the carburetor, as well as perform maintenance and repairs.
Basic Components: The Honda 400ex carburetor consists of several main components, including the throttle slide, needle and seat, float bowl, jets, and fuel mix screw. The throttle slide controls the amount of air entering the engine, while the needle and seat regulate the flow of fuel. The float bowl holds fuel, and the jets control the mixture of air and fuel. The fuel mix screw allows for fine-tuning of the air-fuel mixture.
Connections: The carburetor diagram shows how these components are connected to each other and to other parts of the engine. For example, the fuel line connects to the fuel inlet on the carburetor, while the air filter attaches to the air intake on the carburetor. The diagram also indicates the direction of flow for fuel and air, helping to ensure proper installation and operation.
Troubleshooting and Maintenance: By referring to the Honda 400ex carburetor diagram, owners and mechanics can easily identify and inspect specific components that may be causing issues. For example, if the ATV is running rich or lean, the diagram can help determine which jets or needles may need adjustment or replacement. Regular maintenance, such as cleaning and rebuilding the carburetor, can also be performed more effectively with the help of the diagram.
Conclusion: The Honda 400ex carburetor diagram is a valuable tool for understanding the inner workings of the carburetor system and diagnosing and resolving issues. By familiarizing themselves with this diagram, owners and mechanics can confidently maintain and repair the carburetor, ensuring optimal performance of the Honda 400ex ATV.
Components of Honda 400ex Carburetor
The carburetor is an essential component of the Honda 400ex motorcycle, responsible for mixing air and fuel to create a combustible mixture that powers the engine. Understanding the various parts of the carburetor can help in troubleshooting and maintaining the overall performance of the vehicle.
Here are some key components of the Honda 400ex carburetor:
- Main Body: The main body of the carburetor houses various passages and channels that allow the flow of air and fuel. It is typically made of aluminum and provides a solid structure for the other components.
- Throttle Plate: The throttle plate controls the air intake by opening or closing the carburetor’s throat. It is connected to the throttle cable and can be adjusted to control the engine’s speed.
- Float Bowl: The float bowl is a reservoir that holds fuel for the carburetor. It regulates the fuel level using a float, which opens and closes a needle valve to control the flow.
- Jetting: The carburetor’s jetting system consists of various jets and needles that control the fuel flow at different engine speeds and throttle positions. These components can be adjusted to optimize performance based on the bike’s specific requirements and riding conditions.
- Venturi: The venturi is a tapered section in the carburetor that accelerates the airflow, creating a low-pressure area to enhance fuel atomization and improve engine performance.
- Idle Adjustment: The idle adjustment screw allows fine-tuning of the engine’s idle speed. By turning the screw, the amount of fuel entering the idle circuit can be adjusted.
- Choke: The choke is used to enrich the air-fuel mixture during cold starts. It restricts the airflow to create a richer mixture that aids easier ignition.
Proper maintenance and understanding of these components are crucial for optimal performance and reliable operation of the Honda 400ex carburetor. Regular cleaning, inspection, and adjustment can ensure that the carburetor functions efficiently, providing a smooth and responsive riding experience.
Understanding the Function of Each Carburetor Component
The carburetor plays a crucial role in the fuel system of a Honda 400ex. It is responsible for mixing air and fuel in the right proportions to ensure efficient combustion and optimal engine performance. To understand how it works, it is important to have a clear understanding of the function of each carburetor component.
Main Body and Throttle Valve:
The main body of the carburetor houses several components, including the throttle valve. This valve controls the amount of air entering the engine by opening and closing in response to the throttle lever’s movement. As the valve opens wider, more air is allowed to enter, resulting in increased engine speed. Conversely, closing the valve restricts airflow, reducing the engine speed.
Main Nozzle and Jet:
Located in the main body of the carburetor is the main nozzle and jet. The main nozzle is a small opening through which fuel is drawn from the float bowl into the carburetor throat. The jet, on the other hand, determines the amount of fuel that is mixed with the incoming air. Adjusting the jet size can help fine-tune the air-fuel mixture to achieve optimal performance in different conditions.
Float Bowl and Float:
The float bowl is a chamber located at the bottom of the carburetor that holds a certain amount of fuel. The float, connected to a needle valve, regulates the fuel level in the float bowl. When the fuel level drops, the float drops and opens the needle valve to allow more fuel to enter. Once the fuel level rises, the float rises and closes the needle valve to stop the flow of fuel.
Pilot Jet and Air Screw:

The pilot jet and air screw are responsible for controlling the air-fuel mixture at low engine speeds. The pilot jet meters the fuel flow, while the air screw adjusts the amount of air entering at idle. Fine-tuning these components can help improve idle performance and throttle response.
Understanding the function of each carburetor component is essential for troubleshooting and tuning the fuel system of your Honda 400ex. By knowing how each part works together, you can make the necessary adjustments to optimize engine performance and ensure a smooth riding experience.
How to Clean and Maintain the Honda 400ex Carburetor
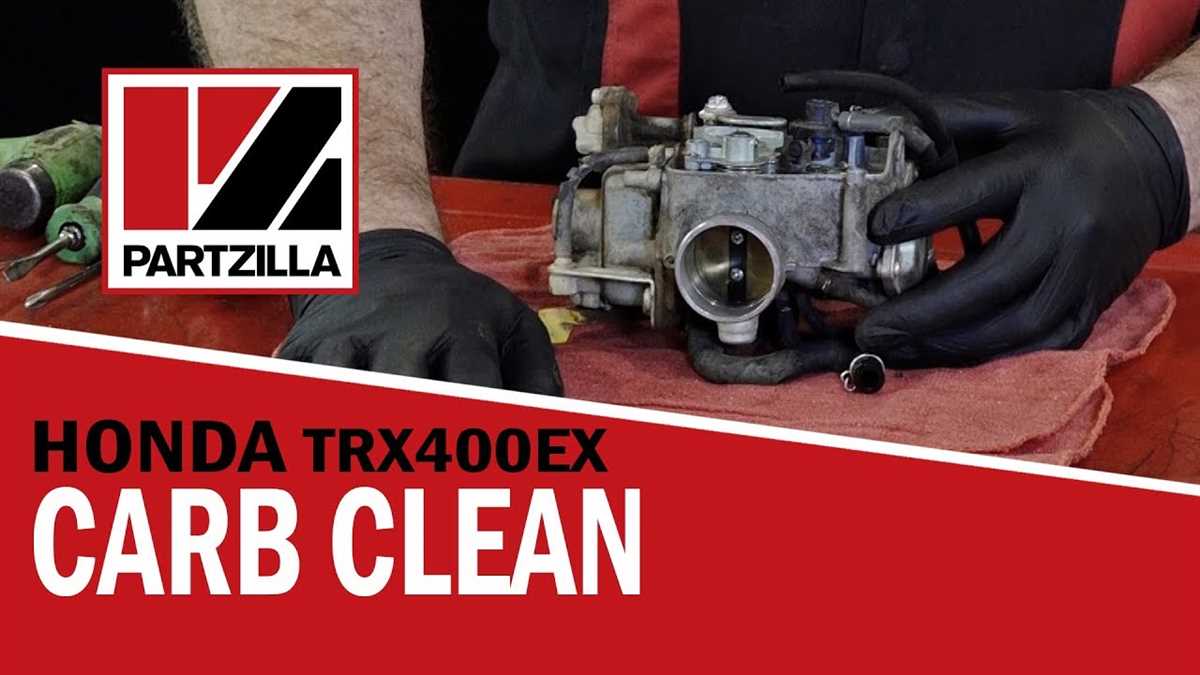
Keeping the carburetor clean and properly maintained is essential for the optimal performance of your Honda 400ex ATV. A dirty or clogged carburetor can cause issues such as poor fuel efficiency, inconsistent power output, and difficulty starting the engine. Regular cleaning and maintenance of the carburetor can help prevent these problems and ensure smooth and reliable operation.
To start, it’s important to gather the necessary tools and materials for the job. You will need a screwdriver or wrench to remove the carburetor from the ATV, a carburetor cleaner solution, compressed air, a small brush or toothbrush, and clean rags or paper towels. Once you have everything ready, follow these steps to clean and maintain your Honda 400ex carburetor:
- Begin by shutting off the fuel supply to the carburetor and removing it from the ATV. Refer to the Honda 400ex carburetor diagram to locate the different components and screws that need to be removed.
- Use a screwdriver or wrench to carefully remove the screws that hold the float bowl in place. Gently remove the float bowl, being cautious not to damage the gasket.
- Inspect the float bowl for any dirt, debris, or residue. Use the carburetor cleaner solution and a small brush or toothbrush to thoroughly clean the inside of the float bowl. Pay particular attention to the jets and small passages, ensuring they are clear of any obstructions.
- Clean the float and needle valve assembly by spraying carburetor cleaner onto them and wiping away any dirt or residue. Check the float for proper operation, making sure it moves freely and is not damaged.
- Use compressed air to blow out any remaining debris or cleaner from the float bowl and the carburetor body. Be careful not to damage any sensitive parts with excessive airflow.
- Reassemble the carburetor, making sure to tighten all screws securely. Double-check the Honda 400ex carburetor diagram to ensure proper reassembly.
- Before reinstalling the carburetor on the ATV, clean the air filter and replace it if necessary. A dirty air filter can affect the performance of the carburetor and engine.
Regularly cleaning and maintaining the Honda 400ex carburetor will help keep your ATV running smoothly and efficiently. It’s recommended to perform this maintenance task at least once a season or more frequently if you ride in dusty or muddy conditions. Keeping the carburetor clean and in good condition will ensure reliable performance and a longer lifespan for your ATV.
Troubleshooting Common Carburetor Issues
A carburetor is an essential component of an engine that helps in the proper mixing of fuel and air, ensuring smooth and efficient combustion. However, like any other mechanical part, carburetors can develop issues over time. Here, we will discuss some common carburetor problems and their troubleshooting solutions.
Flooding
Flooding occurs when there is an excessive amount of fuel in the carburetor. This can happen due to a variety of reasons, such as a stuck float or a faulty needle valve. Symptoms of flooding include difficulty in starting the engine, black smoke from the exhaust, and poor fuel efficiency.
- Check the float level and ensure it is set to the correct specifications.
- Clean or replace the needle valve if it is not functioning properly.
- Inspect the float for any damage or debris that may be causing it to stick.
- Ensure the fuel pressure is within the recommended range.
Lean Mixture
A lean mixture occurs when there is too much air and not enough fuel in the carburetor. This can lead to a variety of issues, including engine misfires, overheating, and a decrease in power. Common causes of a lean mixture include clogged jets, vacuum leaks, and incorrect carburetor adjustment.
- Inspect and clean the jets to remove any blockages.
- Check for any vacuum leaks and repair them accordingly.
- Adjust the carburetor settings to ensure proper fuel-air mixture.
- Consider installing a larger jet in cases where the engine requires more fuel.
Idle Problems
Idle problems refer to issues that arise when the engine is at idle speed. This can include rough idling, stalling, or erratic idle speed. Common causes of idle problems include a dirty idle circuit, incorrect idle adjustment, or a malfunctioning idle control valve.
- Clean the idle circuit to remove any dirt or debris.
- Adjust the idle screw to the recommended specifications.
- Inspect the idle control valve and replace it if necessary.
- Check for any vacuum leaks that may be affecting the idle speed.
By understanding these common carburetor issues and their troubleshooting solutions, you can effectively diagnose and resolve problems with your Honda 400ex carburetor. Remember to follow safety guidelines and, if needed, seek professional assistance for complex issues.
How to Adjust the Carburetor on a Honda 400ex
If you own a Honda 400ex, it’s important to know how to adjust the carburetor to ensure optimal performance. The carburetor is responsible for mixing air and fuel and delivering it to the engine. If it’s not properly adjusted, you may experience issues such as poor fuel efficiency, sluggish acceleration, or engine misfires. Fortunately, adjusting the carburetor on a Honda 400ex is a relatively straightforward process that can be done by following a few simple steps.
Step 1: Identify the adjustment screws
Before you start adjusting the carburetor, it’s important to know the location of the adjustment screws. On the Honda 400ex, there are typically three screws that can be adjusted: the idle mixture screw, the idle speed screw, and the main jet adjustment screw. These screws are usually located on the side or bottom of the carburetor and can be identified by their markings.
Step 2: Adjust the idle mixture screw
The idle mixture screw controls the amount of fuel that is mixed with the air at idle. To adjust it, start by turning the screw clockwise until it gently seats. Then, turn it counterclockwise 1-1/2 turns. Start the engine and let it warm up for a few minutes. With the engine running, turn the idle mixture screw clockwise until the engine starts to stumble, then turn it counterclockwise until the stumbling stops. This will ensure that the carburetor is properly adjusted for the idling condition.
Step 3: Adjust the idle speed screw
The idle speed screw controls the engine’s idle speed. To adjust it, start by locating the screw and turning it clockwise until the engine rpm increases slightly. Then, turn it counterclockwise until the engine rpm drops slightly. The goal is to find the sweet spot where the engine idles smoothly without racing or stalling.
Step 4: Adjust the main jet adjustment screw
The main jet adjustment screw controls the fuel mixture at high speeds. To adjust it, start by riding the Honda 400ex at a consistent high speed. Gradually turn the screw clockwise until the engine starts to stumble or lose power. Then, turn it counterclockwise until the engine regains its power. This will ensure that the carburetor is properly adjusted for high-speed performance.
Once you have adjusted all the necessary screws, test ride the Honda 400ex to ensure that it’s running smoothly and efficiently. If you notice any issues, you may need to make further adjustments or seek professional assistance. Remember to always refer to the manufacturer’s instructions and specifications when adjusting the carburetor.
Tips for Upgrading the Carburetor on Your Honda 400ex
Upgrading the carburetor on your Honda 400ex can enhance the performance and overall riding experience of your ATV. Whether you are a seasoned rider or a beginner, installing a new carburetor can improve throttle response, increase horsepower, and provide better fuel efficiency. Here are some tips to consider when upgrading the carburetor on your Honda 400ex:
- Research and choose the right carburetor: There are various carburetor options available for the Honda 400ex, so it’s important to do some research and choose one that is compatible with your ATV. Consider factors such as your riding style, terrain, and budget when selecting the right carburetor for your needs.
- Seek professional advice: If you are unsure about which carburetor to choose or how to install it, it’s always a good idea to seek professional advice. Consult with a mechanic or experienced ATV rider who can provide guidance and recommendations based on their expertise.
- Follow the manufacturer’s instructions: When installing the new carburetor, make sure to carefully read and follow the manufacturer’s instructions. This will ensure proper installation and avoid any potential damage to your ATV.
- Tune and adjust the carburetor: After installing the new carburetor, it’s important to tune and adjust it for optimal performance. This may involve adjusting the air-fuel mixture, idle speed, and jetting to achieve the best results. Again, professional assistance may be helpful if you are not familiar with carburetor tuning.
- Regular maintenance: Once you have upgraded the carburetor, it’s essential to perform regular maintenance to keep it in good condition. This includes cleaning the carburetor, inspecting for any leaks or clogs, and replacing any worn-out parts as needed.
By following these tips, you can successfully upgrade the carburetor on your Honda 400ex and enjoy improved performance and responsiveness during your ATV rides. Remember to always prioritize safety and consult with professionals when needed to ensure the best results.