
If you’re in the process of upgrading your car’s sound system, one crucial component you can’t overlook is the amplifier. An amplifier plays a critical role in enhancing the audio quality by providing a clean and powerful signal to your speakers. However, installing an amplifier in your car requires some careful wiring to ensure everything works as it should.
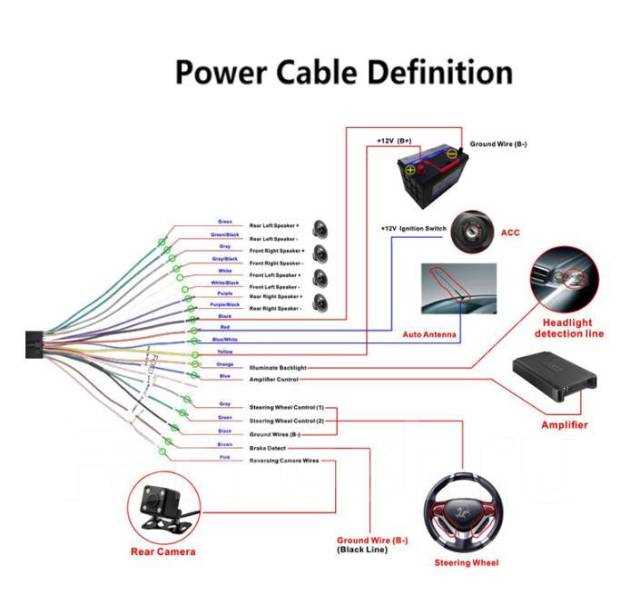
That’s where a power Acoustik amp wiring diagram can come in handy. This diagram provides a visual representation of how to connect your amplifier to your car’s electrical system and speakers. It outlines the proper placement of wires and helps prevent common wiring mistakes that can lead to poor sound quality or even damage to your amplifier.
Whether you’re a seasoned car audio enthusiast or just starting to dive into the world of car modifications, understanding how to properly wire your amplifier is crucial. A power Acoustik amp wiring diagram can serve as your go-to resource, guiding you through the process step-by-step.
Keep in mind that every car and amplifier setup can be different, so it’s essential to consult the specific wiring diagram for your particular amplifier model. It’s also essential to follow safety precautions and ensure that your wiring is done properly to avoid any electrical issues or potential damage to your car.
Power Acoustik Amp Wiring Diagram: A Comprehensive Guide
When it comes to installing a car audio system, having a clear understanding of the wiring diagram is essential. Power Acoustik is a well-known brand in the industry, offering a range of amplifiers for car audio enthusiasts. In this comprehensive guide, we will explore the Power Acoustik amp wiring diagram to help you with the installation process.
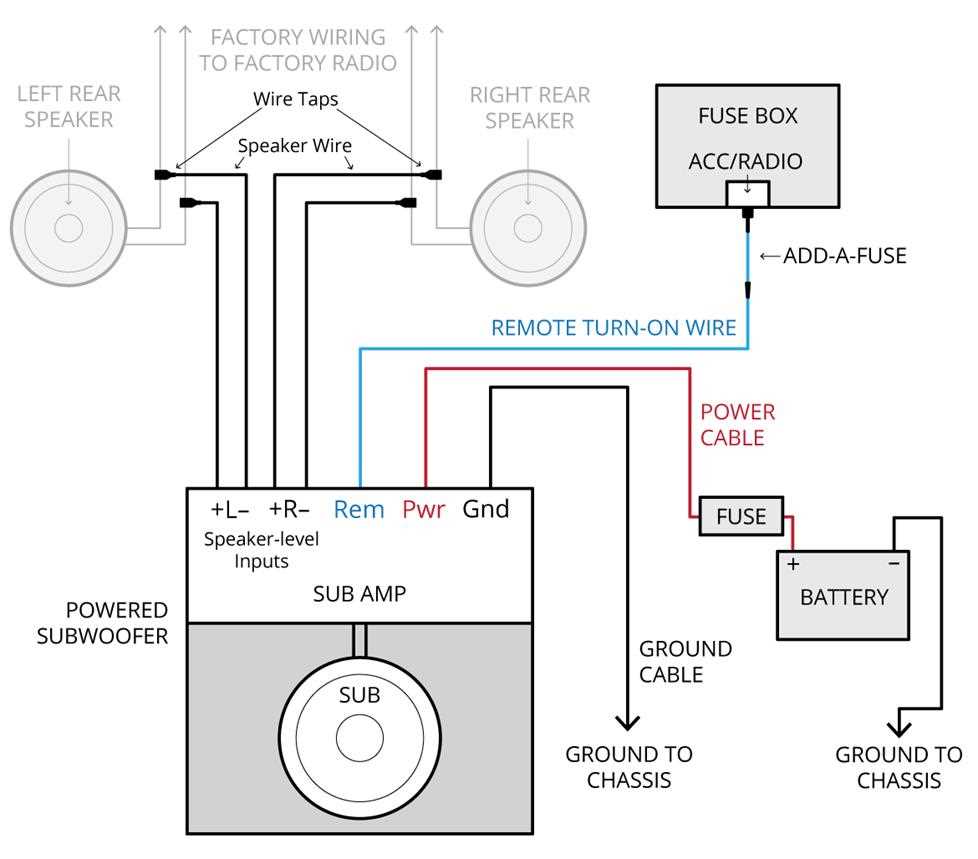
The Power Acoustik amp wiring diagram typically includes information about the different connections and components involved in setting up the amplifier. This includes details on how to connect the power and ground wires, as well as the speaker wires. It may also provide instructions on how to properly connect a remote turn-on wire and input signal cables.
Power and Ground Wires: The power wire is responsible for supplying the necessary electrical current to the amplifier, while the ground wire is used to complete the circuit. The Power Acoustik amp wiring diagram will specify the appropriate gauge and length of wire to use for safe and optimal performance.
Speaker Wires: The speaker wires are used to connect the amplifier to the speakers in your car audio system. The wiring diagram will indicate which wires should be connected to each speaker channel, ensuring proper sound distribution.
It is important to note that the specific wiring diagram for your Power Acoustik amplifier may vary depending on the model and the specific configuration of your car audio system. Therefore, it is always a good idea to refer to the manufacturer’s instructions or consult a professional installer for guidance.
In conclusion, understanding the Power Acoustik amp wiring diagram is crucial for a successful installation of your car audio system. By following the diagram’s instructions, you can ensure that all the connections are made correctly and that your amplifier performs optimally. If you are unsure about any aspect of the installation process, it is recommended to seek professional assistance to avoid any potential damage to your equipment or vehicle.
Understand the Basics
Before diving into the power acoustik amp wiring diagram, it is important to have a basic understanding of the components involved. The amplifier is a crucial part of any car audio system, as it amplifies the audio signal and provides the necessary power to the speakers. The wiring diagram represents the connections between the various components, such as the head unit, amplifier, and speakers.
In order to properly interpret the power acoustik amp wiring diagram, it is essential to familiarize yourself with the different symbols used. These symbols represent the various electrical components and connections, such as wires, ground points, and power sources. Additionally, the diagram may include information about the impedance requirements of the speakers and the amplifier’s power output.
One key aspect to consider when wiring an amplifier is ensuring proper grounding. Grounding refers to creating a secure connection to the car’s chassis, which serves as the ground reference for the electrical system. This is crucial for minimizing noise and interference in the audio system. The power acoustik amp wiring diagram will usually indicate the specific grounding points that need to be used.
Another important factor to understand is the concept of impedance matching. Impedance is the measure of opposition to the flow of alternating current in an electrical circuit. It is important to ensure that the amplifier’s impedance and the speakers’ impedance are compatible in order to avoid damaging the equipment. The power acoustik amp wiring diagram may provide guidance on how to correctly wire the speakers and amplifier to achieve the desired impedance match.
In summary, understanding the basics of amplifier wiring is essential when working with a power acoustik amp wiring diagram. Knowing the different symbols, proper grounding techniques, and impedance matching principles will help ensure a successful installation and optimal performance of the car audio system.
Gather the Necessary Tools and Materials
Before you start wiring your Power Acoustik amp, it’s essential to gather all the necessary tools and materials. Having everything you need on hand will help make the installation process much smoother, allowing you to complete the task efficiently. Here are the items you will need:
- Power Acoustik amp: Make sure you have the correct amp model for your specific needs.
- Wiring kit: Purchase a quality wiring kit that includes power and ground cables, RCA cables, speaker wires, and fuse holders.
- Amplifier mounting brackets: These brackets will secure the amp in place and prevent it from moving during operation.
- Wire strippers: Use wire strippers to remove the insulation from the ends of the cables.
- Crimping tool: A crimping tool is needed to connect terminals to the cables securely.
- Screwdriver: Choose a screwdriver that fits the screws on the amp and any other components you might be using.
- Tape or zip ties: These can be used to secure and organize the cables, preventing them from getting tangled.
- Drill and drill bits: You may need a drill to create holes for mounting brackets or routing cables.
- Multimeter: A multimeter will help you check the voltage and ensure the wiring connections are correct.
By having all the necessary tools and materials at your disposal, you can proceed with confidence and complete the wiring of your Power Acoustik amp efficiently and safely.
Disconnect the Car Battery
Disconnecting the car battery is an essential step when working with car audio systems, including Power Acoustik amps. This procedure ensures safety and prevents any potential damage to the system or the vehicle.
Here are the steps to disconnect the car battery:
- Gather the necessary tools: Before starting, gather the tools required to disconnect the car battery, such as wrenches or pliers.
- Turn off the car: Make sure the car is turned off completely to prevent any electrical mishaps.
- Open the hood: Pop the hood of the car and secure it in place to provide easy access to the car battery.
- Locate the car battery: Identify the car battery’s location under the hood. It is usually located towards the front of the engine bay.
- Identify the battery terminals: The car battery has two terminals – red for positive (+) and black for negative (-). They are typically labeled or marked accordingly.
- Disconnect the negative terminal: Start by using a wrench or pliers to loosen the nut on the negative (-) terminal. Once loose, carefully remove the negative cable from the battery and keep it away from the terminal.
- Disconnect the positive terminal: Repeat the same process for the positive (+) terminal, loosening the nut, removing the cable, and keeping it away from the battery terminal.
- Secure the disconnected cables: To prevent accidental contact or short-circuiting, secure the disconnected battery cables using tape or other means.
Following these steps will safely disconnect the car battery, allowing you to proceed with the installation or maintenance of your Power Acoustik amp or any other car audio components.
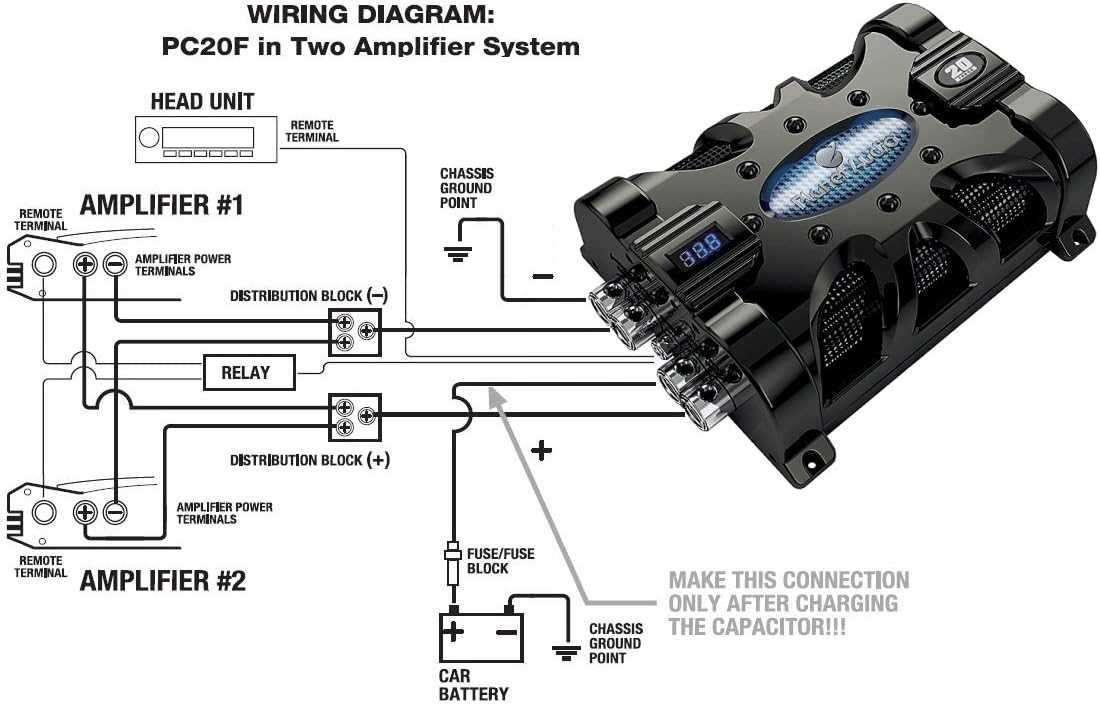
Connect the Wiring
When it comes to connecting the wiring for your Power Acoustik amp, there are a few steps you need to follow to ensure a proper installation. Here is a step-by-step guide on how to connect the wiring:
- Prepare the wires: Start by preparing the power, ground, and remote wires for the amplifier. Make sure they are long enough to reach the desired locations and strip the ends of the wires to expose the bare metal.
- Connect the power wire: Locate the positive terminal on the car battery and connect the power wire to it. It is recommended to use a fuse holder on the power wire close to the battery to protect the amplifier in case of a power surge.
- Ground the amplifier: Find a suitable location near the amplifier to ground the negative wire. It should be a solid metal surface with good conductivity. Remove any paint or corrosion from the surface and securely fasten the ground wire.
- Connect the remote wire: The remote wire is responsible for turning the amplifier on and off. Connect one end of the remote wire to the amplifier’s remote input and the other end to the remote output of the stereo head unit.
- Connect the speaker wires: Determine the appropriate speaker wire gauge based on the power requirements of your speakers. Connect the positive and negative ends of the speaker wires to their respective terminals on the amplifier.
- Double-check the connections: Once all the wiring is in place, double-check all the connections to ensure they are secure and properly insulated. This will help prevent any electrical shorts or damage to the amplifier.
Following these steps will help you properly connect the wiring for your Power Acoustik amp. It’s important to take your time and ensure that everything is done correctly to ensure optimal performance and safety.
Test the Installation
Once you have completed the wiring of your Power Acoustik amp according to the wiring diagram, it is important to test the installation to ensure everything is working correctly. Here are some steps to follow:
1. Power on the system:
Make sure the power switch on the amp is in the “off” position before connecting the power source. Once you have made all the necessary connections, turn on the power source and the amp. You should see the power indicator light on the amp turn on, indicating that it is receiving power.
2. Check the signal input:
Verify that the RCA cables are properly connected to the amp’s input terminals. If you are using a line output converter, make sure it is connected to the correct speaker outputs. Play some audio through the source (such as a CD player or your vehicle’s stereo), and adjust the volume on both the source and the amp to a moderate level.
3. Test the speaker output:
Connect the speakers to the amp’s speaker output terminals. Start with one speaker at a time and gradually increase the volume. You should hear sound coming from the speaker. Repeat the process for each speaker to ensure they are all functioning properly.
- If you do not hear any sound, check the speaker connections and make sure they are securely attached to the amp.
- If you hear distorted sound or no sound at all, double-check the wiring connections and make sure the polarity (+/-) is correct.
- If the sound is still not optimal, check the amp’s settings and make adjustments as needed.
By following these steps, you can test the installation of your Power Acoustik amp to ensure it is working properly. If you encounter any issues, refer to the amp’s user manual or consult a professional for assistance.
Troubleshooting Common Issues
Power acoustik amp wiring diagrams can be very helpful in setting up and troubleshooting audio systems. However, even with a clear diagram, issues can still arise. Here are some common issues that you may encounter and how to troubleshoot them.
No Sound
If you have followed the wiring diagram correctly but there is no sound coming from your speakers, there are a few things you can check:
- Make sure the amp’s power switch is turned on.
- Check that the speaker wires are securely connected to the amp and speakers.
- Ensure that the speakers are functioning properly and not blown.
- Verify that the source unit, such as a head unit or receiver, is sending audio to the amplifier.
If none of these checks solve the issue, there may be a problem with the amplifier itself or with the wiring connections. It might be necessary to consult a professional or refer to the manufacturer’s troubleshooting guide for further assistance.
Distorted Sound
If the sound coming from your speakers is distorted or unclear, there are a few things you can try:
- Check the gain settings on the amplifier. If the gain is set too high, it can cause distortion. Adjust the gain level accordingly.
- Inspect the wiring connections to ensure they are secure and free from any damage or corrosion.
- If you are using RCA cables for the audio input, make sure they are not damaged or loose.
- Check the source unit and audio settings to ensure they are properly configured.
If these steps do not resolve the distortion issue, it may be necessary to consult a professional or contact the manufacturer for further assistance.
Overheating
If your power acoustik amp is overheating, it can lead to poor performance or even damage to the unit. Here are some steps you can take to prevent overheating:
- Ensure proper ventilation for the amplifier by keeping it in a well-ventilated area.
- Check that the amplifier is not being pushed beyond its power limits. Running the amp at high volumes for extended periods can cause overheating.
- Clean any dust or debris that may have accumulated around the amp’s cooling vents. This can obstruct airflow and contribute to overheating.
- If necessary, consider installing additional cooling fans or heat sinks to help dissipate heat more effectively.
If the overheating issue persists despite these measures, it may be necessary to consult a professional or contact the manufacturer for further assistance.
Overall, power acoustik amp wiring diagrams can be valuable tools for setting up and troubleshooting audio systems. By following the proper wiring connections and addressing common issues that may arise, you can ensure optimal performance and enjoyment of your audio system.