
When it comes to understanding the electrical system of your 2010 Honda Civic, one of the most important components to consider is the relay box. This box contains various relays that control different electrical functions in your vehicle, from the headlights to the air conditioning system.
The relay box diagram can be a valuable tool for any Honda Civic owner, as it provides a visual representation of how the relays are arranged and connected to each other. With this diagram, you can easily identify the relays responsible for specific functions and troubleshoot any electrical issues that may arise.
Having a clear understanding of the relay box diagram is especially important when it comes to troubleshooting electrical problems in your Civic. If, for example, your headlights are not working, you can refer to the diagram to locate the relay responsible for controlling the headlights. From there, you can check if the relay is functioning properly or if any connections are loose or damaged.
In summary, the relay box diagram for the 2010 Honda Civic is a useful tool for understanding and troubleshooting the electrical system of your vehicle. By referring to this diagram, you can easily identify the relays responsible for specific functions and ensure that your Civic’s electrical system is functioning properly.
Overview of the 2010 Honda Civic
The 2010 Honda Civic is a compact car that offers a stylish and efficient option for everyday driving. With its sleek design and reliable performance, the Civic has become a popular choice among drivers looking for a practical and affordable vehicle.
The 2010 Civic is available in several different trims, including the DX, LX, EX, and Si models. Each trim offers its own set of features and options, allowing drivers to customize their Civic to meet their specific needs and preferences.
Exterior Features:
- The 2010 Civic features a modern and aerodynamic design, with sleek lines and a distinctive grille.
- Standard exterior features include power side mirrors, a rear window defroster, and 15-inch steel wheels.
- Optional features include alloy wheels, fog lights, and a power moonroof.
Interior Features:
- The Civic offers a comfortable and well-designed interior, with seating for up to five passengers.
- Standard interior features include cloth upholstery, air conditioning, and a tilt-and-telescoping steering wheel.
- Optional features include leather upholstery, heated front seats, and a navigation system.
Engine and Performance:
- The 2010 Civic comes equipped with a 1.8-liter four-cylinder engine, which produces 140 horsepower.
- Transmission options include a five-speed manual or a five-speed automatic.
- The Civic delivers excellent fuel efficiency, with an EPA-estimated 25 mpg in the city and 36 mpg on the highway.
Safety Features:
- The 2010 Civic is designed with safety in mind, featuring anti-lock brakes, stability control, and front side airbags.
- Optional safety features include a rearview camera, forward collision warning, and lane departure warning.
- The Civic received top safety scores in crash tests conducted by the National Highway Traffic Safety Administration (NHTSA) and the Insurance Institute for Highway Safety (IIHS).
In conclusion, the 2010 Honda Civic offers a reliable, efficient, and stylish option for drivers in search of a practical and affordable compact car. With its range of features and options, the Civic can be customized to fit individual needs and preferences, making it a popular choice among car buyers.
Understanding the Relay Box
The relay box in a 2010 Honda Civic is an essential component of the vehicle’s electrical system. It houses a series of relays, which are electromagnetic switches that control the flow of power to various electrical components. The relay box is typically located in the engine compartment, near the battery or fuse box.
Relays:
The relays in the relay box are responsible for activating different electrical systems in the car. These systems can include the headlights, cooling fan, fuel pump, horn, and other accessories. Each relay acts as a switch, allowing or interrupting the electrical current to the corresponding component.
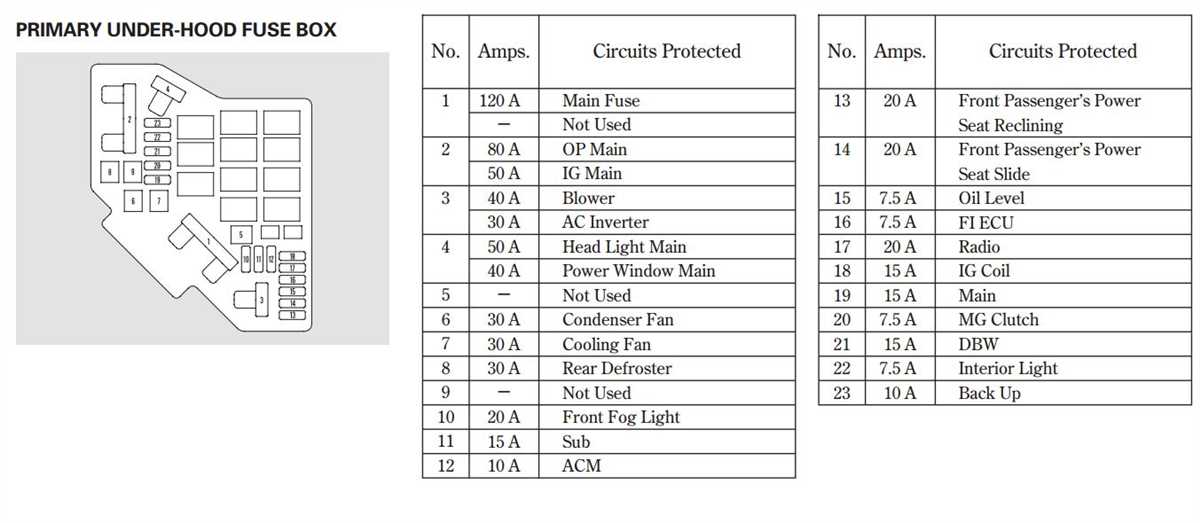
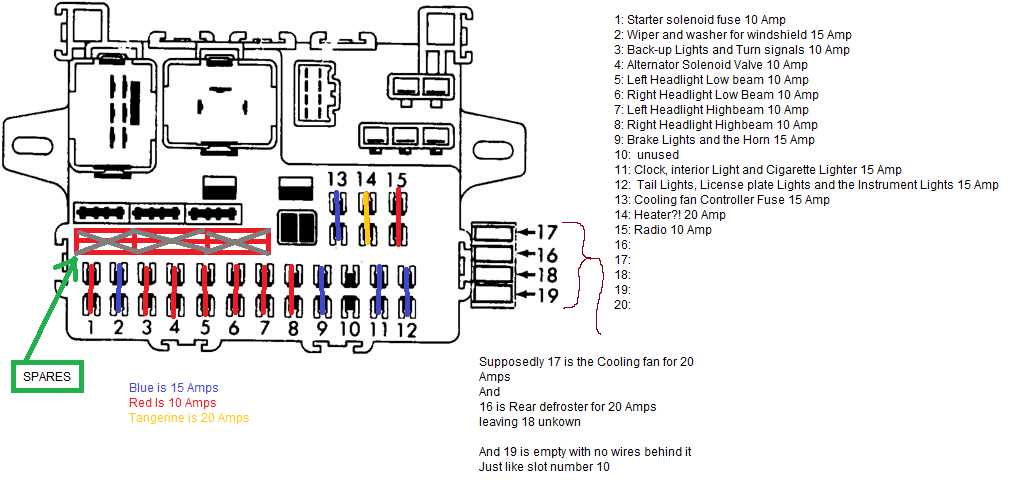
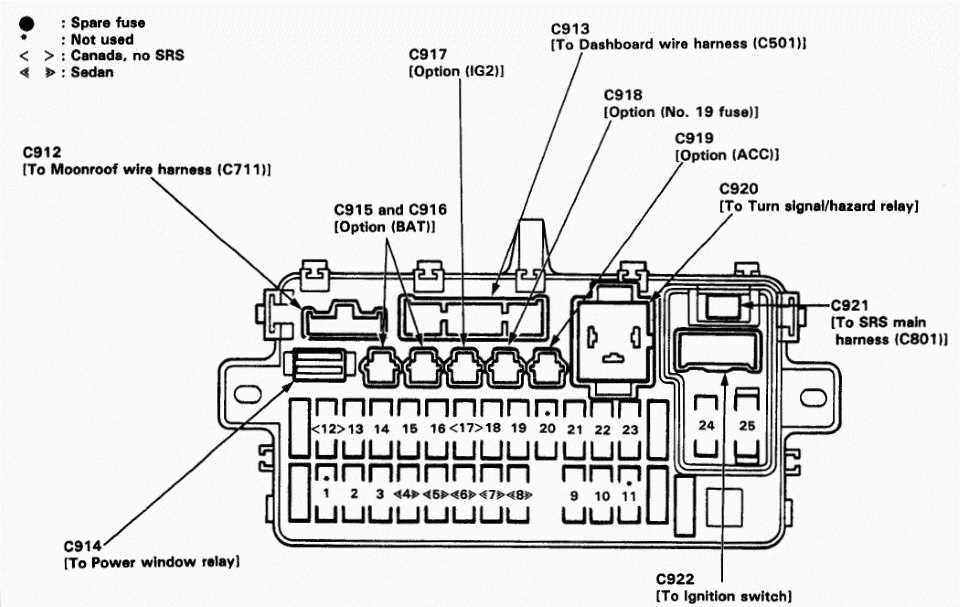
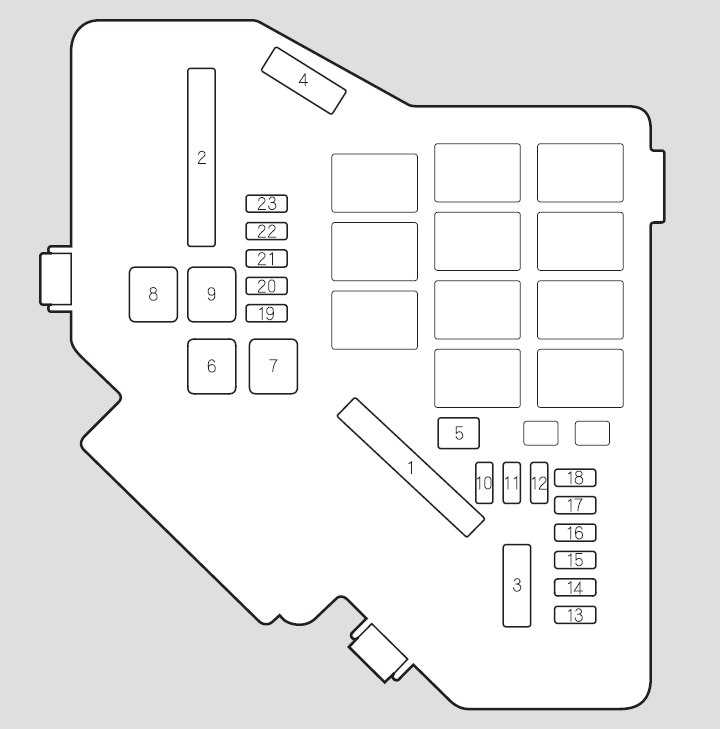
Layout and Diagram:
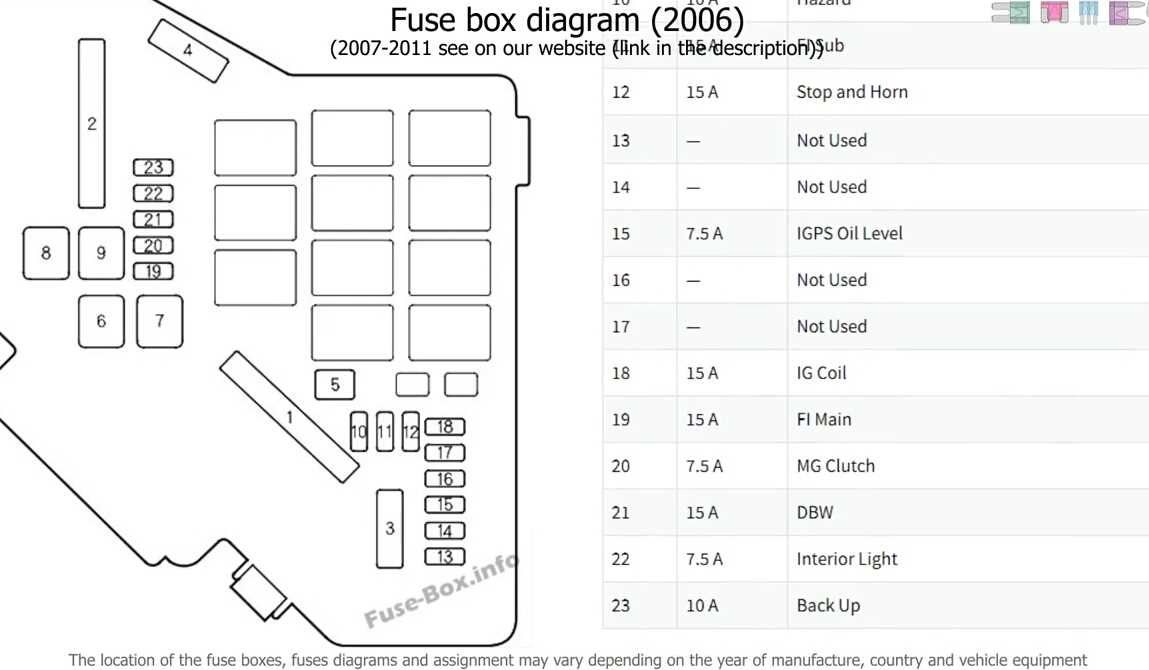
In the 2010 Honda Civic, the relay box is usually labeled with a diagram indicating the specific relays and their corresponding functions. This diagram can be found on the inside of the relay box cover or in the vehicle’s owner’s manual. It is important to understand the layout and diagram of the relay box to properly identify and troubleshoot any electrical issues.
Example Diagram:
| Relay Number | Function |
| 1 | Headlights |
| 2 | Cooling Fan |
| 3 | Fuel Pump |
| 4 | Horn |
Troubleshooting:
If there are any issues with the electrical systems in the car, such as the headlights not working or the cooling fan not turning on, the relay box should be one of the first places to check. By referencing the relay box diagram and using a multimeter, it is possible to test the relays to determine if they are functioning properly. If a relay is found to be faulty, it can be easily replaced to restore the proper operation of the affected electrical system.
Overall, understanding the relay box and its components is crucial for maintaining and troubleshooting the electrical systems in a 2010 Honda Civic. By familiarizing oneself with the layout and diagram, it becomes easier to identify and resolve any electrical issues that may arise.
Location of the Relay Box
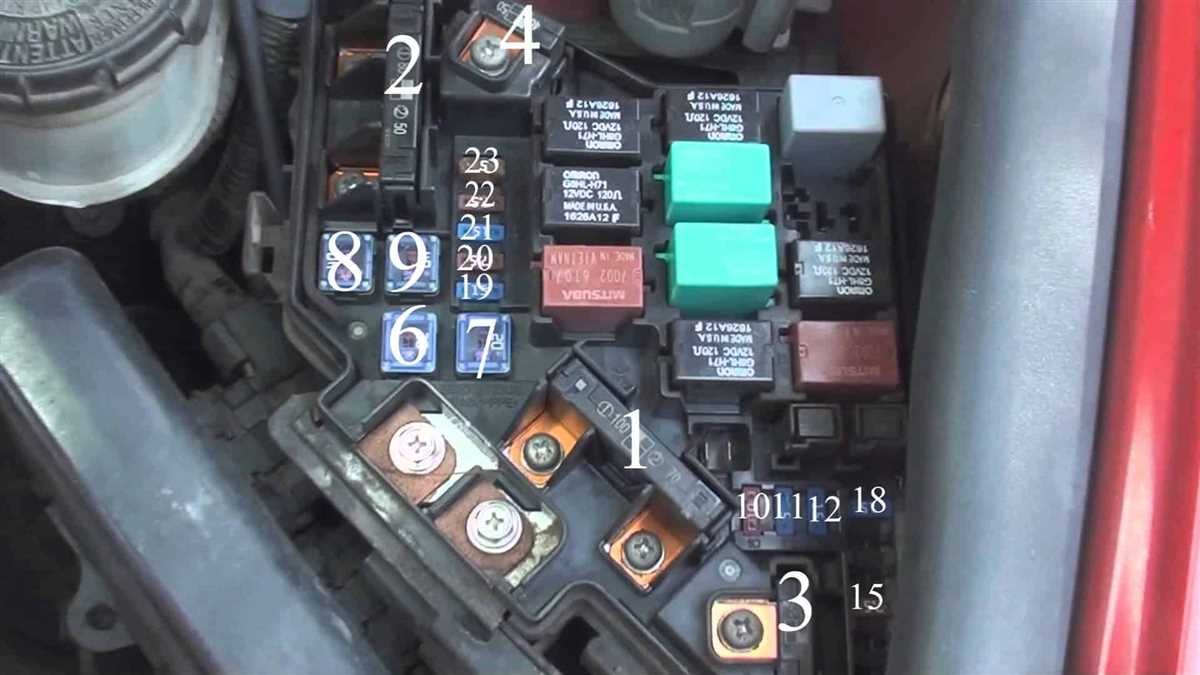
The relay box in the 2010 Honda Civic is an important component of the electrical system, as it houses various relays that control the operation of different electrical functions in the vehicle. The box is typically located in the engine bay, near the battery or the fuse box. It is important to locate and access the relay box in order to troubleshoot and replace faulty relays, if necessary.
To locate the relay box in the 2010 Honda Civic, start by opening the hood of the vehicle. Look for a rectangular or square-shaped box with a removable lid. This box is usually made of plastic and may be labeled as the “relay box” or “power distribution center.” It is often located on the driver’s side or near the front of the engine bay.
Once you have located the relay box, carefully remove the lid by either unlatching or unscrewing it, depending on the design. Inside the box, you will find a series of relays organized in rows or columns. Each relay is typically labeled with a description of the electrical function it controls.
If you are unsure which relay controls a specific electrical function in your Honda Civic, refer to the owner’s manual or a diagram inside the lid of the relay box. These resources should provide you with the necessary information to identify the correct relay.
When troubleshooting electrical issues, it is important to check the relays in the box for any signs of damage or failure. This can include burnt or melted connectors, loose or corroded terminals, or a visibly damaged relay. If you suspect a relay is faulty, it is recommended to replace it with a new one of the same specifications to ensure proper operation of the electrical system.
In conclusion, the relay box in the 2010 Honda Civic is typically located in the engine bay and houses various relays that control the electrical functions of the vehicle. It is important to locate and access the relay box for troubleshooting and maintenance purposes.
Functions of Each Relay in the Box
The relay box in a 2010 Honda Civic contains several relays that are responsible for controlling various electrical components in the vehicle. Each relay serves a specific function, allowing for efficient operation and control of the different systems. Here are the functions of each relay in the box:
- Main Relay: The main relay is responsible for supplying power to the engine control module (ECM) and other primary engine components. It controls the fuel pump, ignition system, and other critical functions necessary for starting and running the engine.
- Blower Motor Relay: The blower motor relay controls the operation of the HVAC blower motor. It activates the motor when the climate control system is turned on and adjusts the speed of the blower motor based on the selected fan speed.
- Radiator Fan Relay: The radiator fan relay controls the operation of the radiator cooling fans. It activates the fan motor when the engine temperature reaches a certain threshold, helping to regulate the engine temperature and prevent overheating.
- Headlight Relay: The headlight relay controls the operation of the headlights. It allows for the switching between low beam and high beam modes and provides power to the headlights when they are turned on.
- Power Window Relay: The power window relay controls the operation of the power windows. It provides power to the window motor when the window switch is activated, allowing for the opening and closing of the windows.
These are just a few examples of the relays in the relay box of a 2010 Honda Civic. The functions of the relays may vary depending on the specific model and trim level of the vehicle. It is important to refer to the vehicle’s owner’s manual or a wiring diagram for accurate information on the functions of each relay.
Troubleshooting Common Relay Issues
Relays are essential components in a vehicle’s electrical system, helping to control various operations such as activating spark plugs or fuel injectors. However, relay issues can occur, leading to malfunctioning systems or even non-starting vehicles. Here are some common relay issues and troubleshooting steps to resolve them.
1. Failed or Inoperative Relay
One of the most common relay issues is a failed or inoperative relay. This can be caused by various factors such as a damaged relay, a loose connection, or a blown fuse. To troubleshoot this issue:
- Check the fuse box for any blown fuses related to the relay system.
- Inspect the relay for any physical damage or signs of corrosion.
- Ensure that the wiring connections to the relay are secure and free from any damage.
- Replace the relay if necessary and test the system.
2. Constantly Clicking Relay
If you hear a relay constantly clicking, it is a sign of an issue. This can be caused by a faulty relay, a loose or damaged wiring connection, or a short circuit in the system. To troubleshoot this issue:
- Inspect the wiring connections related to the relay and ensure they are secured and free from any damage.
- Check for any signs of a short circuit, such as burnt wires or a blown fuse.
- Replace the relay with a new one to see if the clicking stops.
- If the clicking continues, it may indicate a deeper electrical problem, and it is recommended to consult a professional mechanic.
3. Intermittent Operation
If a relay system operates intermittently, it can be frustrating and difficult to diagnose. This issue can be caused by loose wiring connections, a faulty relay, or a problem with the relay control module. To troubleshoot this issue:
- Check all the wiring connections related to the relay and ensure they are tight and secure.
- Test the relay by swapping it with a known working relay of the same type.
- If the problem persists, consider inspecting the relay control module or consult a professional technician for further diagnosis.
Relay issues can be challenging to diagnose and resolve, but by following these troubleshooting steps, you can often identify and fix the problem. If you encounter persistent relay issues or are unsure about the diagnosis, it is always recommended to seek assistance from a knowledgeable mechanic or electrician.
Q&A:
Why is my relay making a buzzing sound?
A buzzing sound from a relay can indicate a few different issues. It could be due to loose or faulty connections, a damaged or worn-out relay, or an excessive load on the relay contacts. Checking and tightening the connections, replacing the relay if necessary, and reducing the load on the contacts can help resolve this issue.
Why is my relay not clicking or working?
If your relay is not clicking or working, it could be caused by various problems. It could be due to a lack of power supply, a faulty wiring connection, a blown fuse, or a malfunctioning relay itself. Checking the power supply, inspecting the wiring connections, replacing the fuse if needed, and testing or replacing the relay can help fix this issue.
Why is my relay getting too hot?
A relay heating up excessively can indicate a problem. It could be caused by an overloaded relay, poor ventilation, or a malfunctioning relay. Ensuring that the relay is only carrying its rated load, providing adequate ventilation to dissipate heat, and replacing the relay if necessary can help prevent overheating.
Why is my relay not turning off?
If your relay is not turning off when it should, it could be due to a few different reasons. It could be caused by a stuck or welded relay contact, a faulty control signal or input, or an incorrect wiring configuration. Checking and cleaning the relay contacts, verifying the control signal or input, and double-checking the wiring setup can help resolve this issue.
Why is my relay not switching properly?
If your relay is not switching properly, it could be due to a few possible issues. It could be caused by a malfunctioning relay coil or coil drive circuit, an incorrect or insufficient control signal or input, or a damaged or worn-out relay contact. Testing the relay coil and coil drive circuit, ensuring the correct control signal or input, and replacing the relay if necessary can help resolve this issue.