
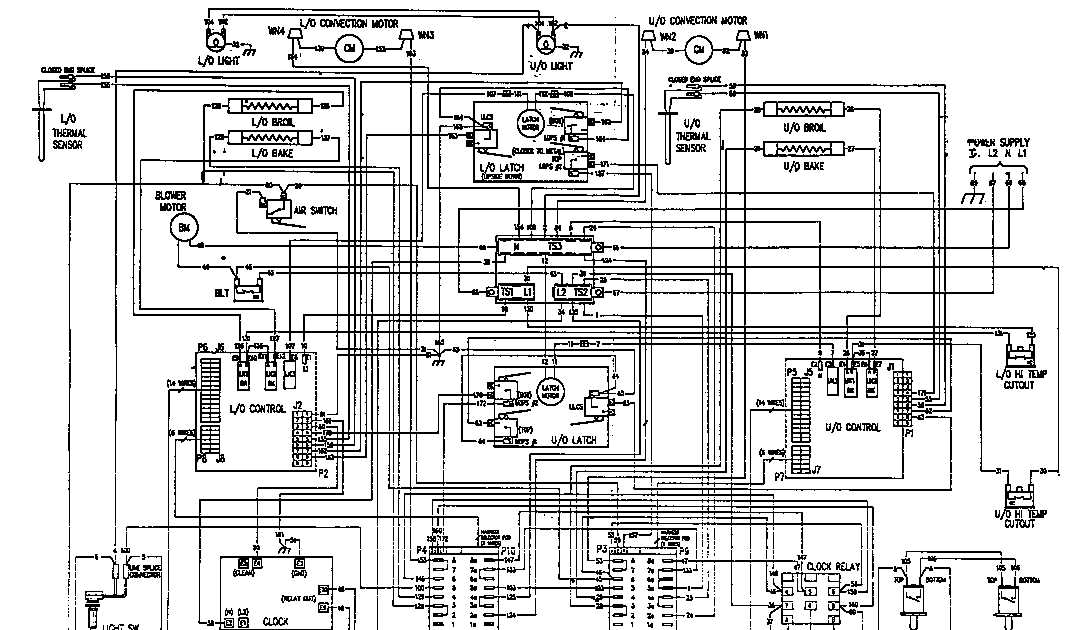
Kenmore dishwashers are known for their reliability and efficiency in cleaning your dishes, but like any other appliance, they may experience occasional issues that require repair. To help simplify the process, Kenmore provides detailed schematics for their dishwashers, making it easier for technicians and DIY enthusiasts to diagnose and fix problems.
These schematics offer a visual representation of the dishwasher’s internal components and their wiring, helping users understand the inner workings of the appliance. By studying these diagrams, homeowners can identify the source of a problem, such as a faulty motor or a broken valve, and take the necessary steps to fix it.
Whether you’re a professional repair technician or a passionate DIYer, having access to Kenmore dishwasher schematics can save you time and money by enabling you to troubleshoot and repair your dishwasher yourself. Instead of blindly guessing what might be wrong, you can rely on the schematics to guide you through the diagnostic process and help you identify the exact part or wiring issue that needs attention.
Kenmore dishwasher schematics are often included in the product’s user manual or are available for download on the manufacturer’s website. They are designed to be easy to read and understand, even for those with limited technical knowledge. With clear labels, symbols, and colors, these diagrams provide a comprehensive overview of the dishwasher’s electrical and mechanical systems, allowing users to quickly locate and address any problems that may arise.
Understanding Kenmore Dishwasher Schematics
Kenmore dishwashers are known for their reliability and efficiency, and understanding the schematics of these appliances can help in troubleshooting and repairing any issues that may arise. The schematics provide a visual representation of the dishwasher’s electrical and mechanical systems, allowing for easier identification of components and their connections.
One key component in Kenmore dishwasher schematics is the control board, which is responsible for managing the dishwasher’s various functions. The control board receives input from the control panel and sends signals to the different parts of the dishwasher, such as the motor, pump, and heating elements. By referring to the schematics, technicians can easily trace the flow of electricity through the control board and identify any faulty connections or components.
The schematics also include information on the dishwasher’s water system, including the inlet valve, water fill level sensor, and drain pump. These components work in harmony to ensure the proper amount of water is filled in the dishwasher and that it is effectively drained after the washing cycle. By understanding the schematics, technicians can pinpoint any issues with these components, such as a clogged drain pump or a faulty water fill level sensor.
Additionally, Kenmore dishwasher schematics provide valuable information on the dishwasher’s motor and pump assembly. These components are responsible for creating the necessary pressure to spray water onto the dishes, as well as to drain the water at the end of the cycle. Being able to follow the schematic allows technicians to identify any issues with the motor or pump, such as a burnt-out motor or a clogged pump.
In conclusion, understanding Kenmore dishwasher schematics is essential for anyone involved in troubleshooting and repairing these appliances. By referring to the schematics, technicians can quickly identify components, trace electrical connections, and diagnose and fix any issues that may arise. Whether it’s a control board problem, water system malfunction, or motor and pump issue, the schematics serve as a valuable tool for effective troubleshooting and repair.
What Are Dishwasher Schematics and Why Are They Important?
Dishwasher schematics are detailed diagrams that illustrate the various components and electrical connections within a dishwasher. These diagrams provide a visual representation of how the dishwasher is designed and how each part should be installed and connected. They are an essential resource for technicians and DIY enthusiasts who need to repair or troubleshoot issues with their dishwasher.
One of the main reasons why dishwasher schematics are important is that they help technicians diagnose and fix problems more efficiently. By following the schematic, technicians can identify which part or electrical connection might be causing the issue and focus their troubleshooting efforts accordingly. This saves time and reduces the likelihood of making mistakes during the repair process.
For example, let’s say a Kenmore dishwasher is not heating the water properly. By referring to the dishwasher schematic, a technician can locate the heating element and check the corresponding electrical connections. If a faulty connection is found, it can be easily repaired or replaced based on the schematic.
In addition to troubleshooting, dishwasher schematics are also invaluable when it comes to installing new parts or upgrading the dishwasher. They provide a clear blueprint of how the different components should be connected, ensuring that everything is installed correctly and functions properly.
Furthermore, dishwasher schematics are particularly useful for DIY enthusiasts who want to take on the challenge of repairing their own dishwasher. By following the schematic, they can gain a better understanding of the dishwasher’s internal workings and make more informed decisions when it comes to troubleshooting and repair.
In conclusion, dishwasher schematics play a crucial role in the repair, troubleshooting, and installation processes of a dishwasher. They provide a visual guide that allows technicians and DIY enthusiasts to understand the dishwasher’s electrical connections and components, ultimately saving time and improving the accuracy of repairs.
How to Read Kenmore Dishwasher Schematics
When it comes to repairing your Kenmore dishwasher, having a clear understanding of the schematics can be incredibly helpful. The schematics provide a detailed visual representation of the various components and electrical connections within the dishwasher. This information can help you identify faulty parts, troubleshoot issues, and make necessary repairs.
1. Identify the main components: The schematics will usually include labels and symbols for the main components of the dishwasher, such as the motor, control panel, heating element, and water inlet valve. Familiarize yourself with these symbols to easily locate and understand each component’s function.
2. Follow the electrical connections: The schematics will show the electrical connections between different parts of the dishwasher. These connections are represented by lines and arrows. By following these lines, you can trace the flow of electricity and identify any potential issues or breaks in the circuit.
3. Pay attention to symbols and labels: In addition to component labels, the schematics may also include symbols and labels that indicate specific features or functions. For example, there may be symbols for buttons, switches, or LED indicators. Understanding these symbols will help you navigate the control panel and troubleshoot any control-related problems.
4. Use a multimeter: Sometimes, simply understanding the schematics may not be enough to diagnose a problem. In such cases, you may need to use a multimeter to measure voltage, resistance, or continuity at various points in the dishwasher. The schematics will often provide reference points or test points where you can make these measurements.
5. Take safety precautions: Before attempting any repairs based on the schematics, make sure to disconnect the dishwasher from its power source and take proper safety precautions. Follow the manufacturer’s instructions and use caution when handling electrical components to avoid the risk of electric shock or other accidents.
Overall, learning how to read Kenmore dishwasher schematics can greatly assist you in troubleshooting and repairing your dishwasher. By understanding the electrical connections, component functions, and symbols used in the schematics, you can effectively diagnose and resolve any issues that may arise.
The Different Components of a Kenmore Dishwasher
In order to understand the inner workings of a Kenmore dishwasher, it is important to familiarize oneself with its various components. Each part plays a crucial role in the overall functionality and efficiency of the machine. From the control panel to the heating element, let’s explore the key components of a Kenmore dishwasher:
1. Control Panel:
The control panel is where the user interacts with the dishwasher. It consists of buttons and indicators that allow the user to select different wash cycles, adjust settings, and monitor the progress of the cleaning process. The control panel is responsible for sending signals to other components, such as the motor and water inlet valve, to initiate specific actions.
2. Motor:

The motor is the powerhouse of the Kenmore dishwasher. It drives the various functions of the machine, including spraying water, circulating detergent, and draining dirty water. The motor is typically located at the bottom of the dishwasher and is responsible for the rotation of the spray arms and the impeller that propels water through the system.
3. Water Inlet Valve:
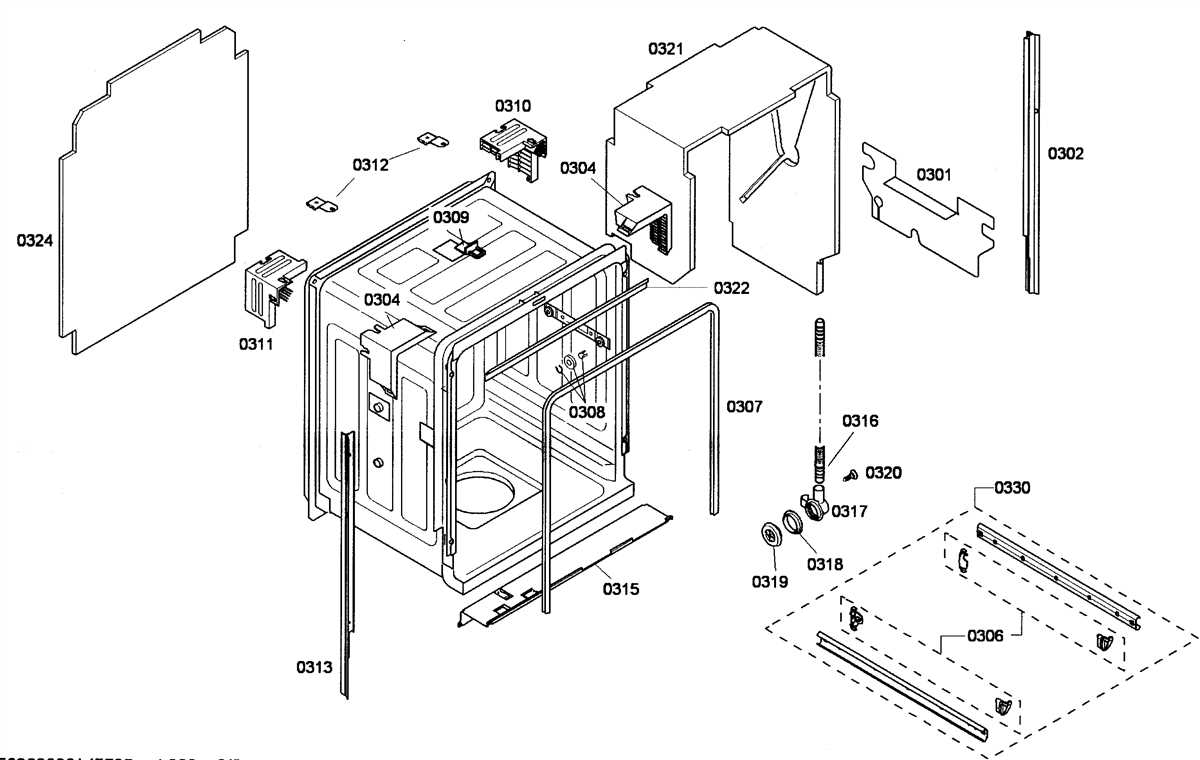
The water inlet valve controls the flow of water into the dishwasher. It is connected to the household water supply and opens or closes to allow water to enter the machine during the appropriate times of the cleaning cycle. The water inlet valve is controlled by signals from the control panel and ensures the right amount of water is dispensed for each wash.
4. Spray Arms:
The spray arms are responsible for distributing water throughout the dishwasher’s interior. They consist of small holes or nozzles that spray water under high pressure, effectively rinsing off food particles and detergent from dishes, glasses, and utensils. The spray arms are connected to the motor and rotate during the cleaning cycle to ensure thorough coverage.
5. Heating Element:
The heating element is used to heat water and aid in the drying process. It is usually located at the bottom of the dishwasher and functions by either heating the water directly or by generating steam. The heating element helps to eliminate bacteria and promote faster drying of dishes after the cleaning cycle.
6. Drain Pump:
The drain pump is responsible for removing dirty water from the dishwasher. It is connected to a drain hose and pumps out the wastewater into the household plumbing system. The drain pump is activated at the end of the cleaning cycle when the dishwasher needs to be emptied. It ensures that the interior of the dishwasher is left clean and ready for the next use.
- Other components that contribute to the overall functionality of a Kenmore dishwasher include the detergent dispenser, racks, filters, and a variety of sensors to monitor water temperature, level, and pressure.
- Understanding the different components of a Kenmore dishwasher can help users troubleshoot common issues and perform basic maintenance to keep the machine running smoothly.
Troubleshooting Common Issues with Kenmore Dishwashers Using Schematics
Kenmore dishwashers are known for their reliability and efficiency, but like any appliance, they can encounter issues from time to time. When troubleshooting common issues with Kenmore dishwashers, having access to schematics can be incredibly helpful in identifying and resolving the problem. Schematics provide a visual representation of the dishwasher’s internal components and electrical connections, allowing you to easily pinpoint where the issue may be occurring.
1. Dishwasher not starting: If your Kenmore dishwasher is not starting at all, the first step is to check the power supply and ensure it is properly connected. Use the schematics to locate the power supply and check if there is any damage or loose connections. You can also use a multimeter to test the voltage at the power supply to ensure it is within the correct range. If the power supply is functioning properly, the issue may lie in the control board, door latch, or motor, which can also be identified using the schematics.
2. Poor cleaning performance: If your dishes are not coming out clean or there is residue left on them after a cycle, there are several components you can inspect using the schematics. Start by checking the spray arm and spray arm support for any clogs or blockages. Use the schematics to locate these components and remove them if necessary. Additionally, check the filters and ensure they are clean and free from debris. The schematics will help you locate the filters and guide you on how to remove and clean them properly.
- 3. Leaking dishwasher: Leaks can occur in various parts of the dishwasher, such as the door seal, tub, or hoses. By referring to the schematics, you can identify the location of these components and inspect them for any signs of damage or wear. If you notice any cracks or tears in the door seal or damaged hoses, they may need to be replaced. The schematics will also show you how to disassemble and reassemble these parts properly to fix the issue.
- 4. Not draining: If your Kenmore dishwasher is not draining properly, there may be a blockage in the drain pump or drain hose. Using the schematics, locate these components and inspect them for any obstructions. Remove any debris or clogs that you find to restore proper drainage. You can also check the drain impeller for any damage or wear, as this can also cause drainage issues.
Overall, having access to schematics can greatly simplify the process of troubleshooting and repairing common issues with Kenmore dishwashers. They provide a clear visual guide to help you identify and resolve any problems you may encounter. Whether it’s an issue with power supply, cleaning performance, leaks, or drainage, following the schematics can save you time and frustration, ensuring your Kenmore dishwasher continues to run smoothly.
How to Use Schematics for Repairs and Replacements
When it comes to repairing or replacing parts of your Kenmore dishwasher, having access to schematics can be extremely helpful. Schematics provide detailed and accurate diagrams of the internal components and wiring of the dishwasher, making it easier to understand how everything is connected and what needs to be done for repairs or replacements.
Identify the problem: Before using the schematics, it is essential to identify the specific issue with your Kenmore dishwasher. Whether it’s a leak, a faulty motor, or something else, pinpointing the problem will help you find the relevant diagram in the schematics.
Locate the schematic: Once you have identified the problem, locate the specific schematic in your Kenmore dishwasher manual or online. The schematic will typically be labeled and organized according to the different components and circuits of the dishwasher.
Study the diagram: Take some time to study the schematic carefully. Familiarize yourself with the different symbols and labels used in the diagram, as they represent the various parts, electrical connections, and circuits within the dishwasher. This will help you understand how everything is interconnected and how to proceed with repairs or replacements.
Follow the lines and symbols: Follow the lines and symbols in the schematic to trace the route of the electrical connections. This will guide you in locating the faulty component or wiring that needs to be repaired or replaced. Additionally, pay attention to any notes or additional information provided in the schematic, as it may contain important details or troubleshooting tips.
Use the schematic as a reference: As you perform the repairs or replacements, keep the schematic nearby for reference. It will serve as a guide to ensure that you reconnect everything correctly and reassemble the dishwasher properly.
Test and troubleshoot: After completing the repairs or replacements, perform tests to ensure that the issue has been resolved. If the problem persists, use the schematic to troubleshoot further and identify any other potential causes or faulty components.
Consult a professional if needed: If you encounter difficulties or if the repairs involve complex electrical or mechanical components, it is advisable to seek the assistance of a professional technician or contact Kenmore customer support for guidance.
By utilizing the schematics provided for your Kenmore dishwasher, you can effectively diagnose and resolve issues with your appliance. Remember to exercise caution while working on the dishwasher and follow the appropriate safety precautions.
Tips for Maintaining Your Kenmore Dishwasher Using Schematics
Proper maintenance is essential for keeping your Kenmore dishwasher running efficiently and preventing costly repairs. By utilizing the schematics provided by the manufacturer, you can easily troubleshoot and maintain your dishwasher. Here are some tips for maintaining your Kenmore dishwasher using schematics:
1. Understand the Schematics
Take the time to familiarize yourself with the schematics provided by Kenmore. These diagrams show the internal components of your dishwasher and their connections. By understanding the schematics, you can identify the various parts and their functions, making it easier to diagnose and fix any issues that arise.
2. Regularly Clean the Filter
The filter in your dishwasher traps food particles and debris, preventing them from clogging the drain and affecting the dishwasher’s performance. Refer to the schematics to locate the filter and remove it for cleaning regularly. Rinse it under running water to remove any debris, and ensure it is thoroughly dry before reinserting it into the dishwasher.
3. Inspect and Clean the Spray Arms
The spray arms are responsible for distributing water throughout the dishwasher to ensure a thorough clean. Over time, these arms can become clogged with food particles or mineral deposits. Follow the schematics to locate the spray arms and remove them for cleaning. Use a toothbrush or small brush to remove any buildup, and rinse them with warm water before reinstalling them.
4. Check the Gaskets and Seals
The gaskets and seals on your Kenmore dishwasher help create a watertight seal, preventing leaks. Inspect these components regularly and refer to the schematics to locate and identify them. Clean any debris or residue from the gaskets and ensure they are in good condition. Replace any worn-out or damaged gaskets to maintain the efficiency of your dishwasher.
5. Follow the Maintenance Schedule
Kenmore provides a recommended maintenance schedule for their dishwashers, which can be found in the user manual or online. This schedule outlines specific tasks that should be performed regularly, such as descaling the dishwasher or checking the water inlet valve. Refer to the schematics to identify the components associated with each task and follow the maintenance schedule to keep your dishwasher in optimal condition.
By utilizing the schematics and following these maintenance tips, you can ensure that your Kenmore dishwasher operates efficiently and lasts for years to come. Regular maintenance not only extends the lifespan of your dishwasher but also helps avoid costly repairs. Take the time to familiarize yourself with the schematics and incorporate these maintenance tasks into your routine to keep your dishwasher in top-notch condition.