
The Honda XR 150 is a popular off-road motorcycle known for its reliability and performance. It is equipped with a complex electrical system that powers various components, such as the lights, ignition, and charging system. Understanding the wiring diagram is essential for troubleshooting electrical issues and making modifications to your bike.
The wiring diagram of the Honda XR 150 provides a visual representation of the electrical system. It shows the connections between different components and the flow of electrical current. By referring to the wiring diagram, you can easily identify the wires and their functions, making it easier to diagnose and fix any electrical problems.
One of the key components of the electrical system is the battery, which stores electrical energy to power the motorcycle. The wiring diagram illustrates the connection between the battery and other components, such as the ignition switch and lights. It also shows the presence of fuses and relays, which protect the electrical system from overload and short circuits.
Whether you are a professional mechanic or a DIY enthusiast, having access to the Honda XR 150 wiring diagram is crucial for maintaining and repairing your motorcycle. It allows you to understand the electrical system, make modifications, and troubleshoot any issues effectively. By familiarizing yourself with the wiring diagram, you can ensure the proper functioning of your Honda XR 150 and enjoy a seamless riding experience.
Honda XR 150 Wiring Diagram
When it comes to the electrical system of a motorcycle, having a wiring diagram can be incredibly helpful. A wiring diagram is a visual representation of the electrical connections and components in a system. For the Honda XR 150, having a wiring diagram can make troubleshooting and repairing electrical issues much easier.
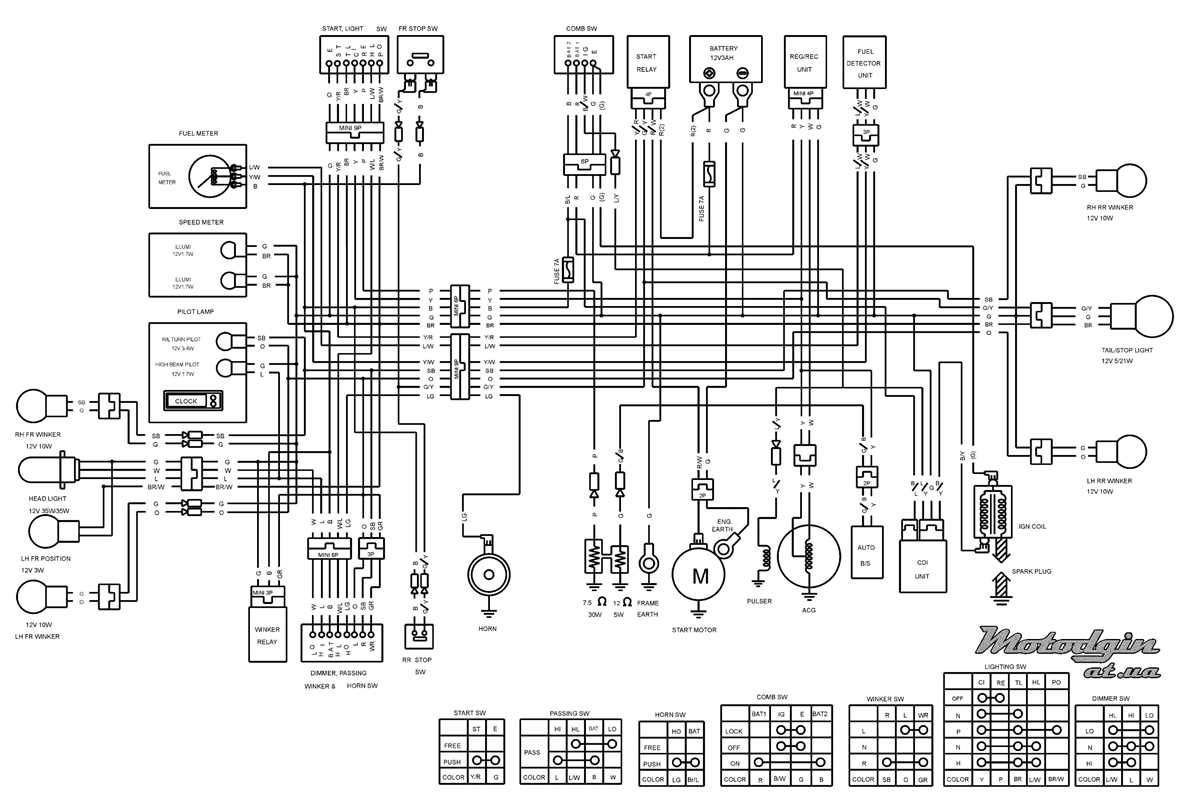
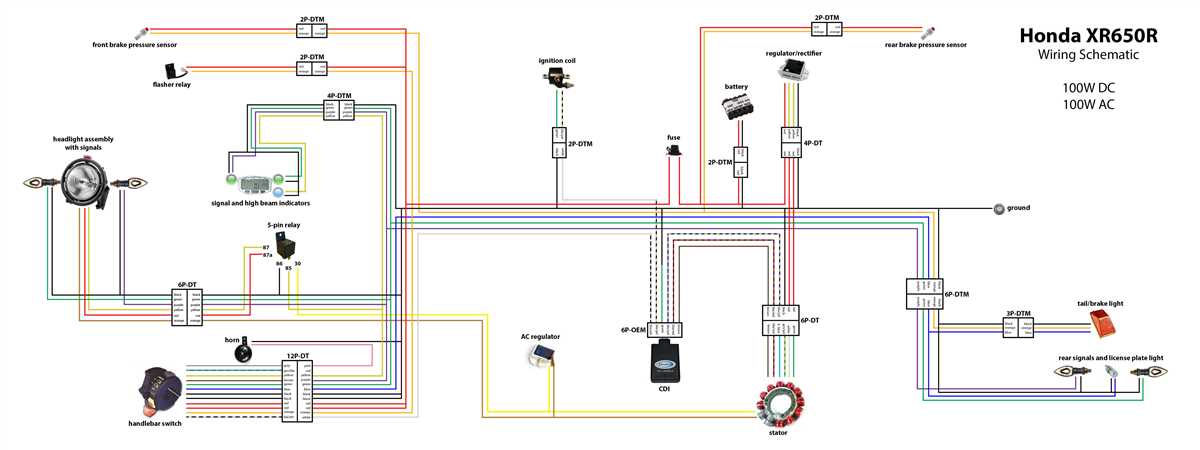
The Honda XR 150 wiring diagram shows the various electrical components and their connections, such as the battery, ignition switch, starter motor, lights, and more. It provides a detailed diagram of the wiring harness, which is the organized system of wires that allows electricity to flow to all the different components on the motorcycle.
With a wiring diagram, you can easily trace the path of electricity and identify any potential issues, such as broken or disconnected wires, faulty connections, or blown fuses. It can also help you understand how the electrical system is designed and how different components work together to power the motorcycle.
It’s important to note that the wiring diagram for the Honda XR 150 may vary depending on the specific model and year. Therefore, it’s crucial to find the correct wiring diagram that corresponds to your motorcycle’s make and model.
In conclusion, having a wiring diagram for the Honda XR 150 can be invaluable when it comes to troubleshooting and repairing electrical issues. It provides a visual representation of the electrical connections and components, making it easier to identify and fix any problems. Whether you’re a motorcycle enthusiast or a professional mechanic, a wiring diagram is a useful tool to have on hand.
Overview
The Honda XR 150 is a popular off-road motorcycle that is known for its reliability and performance. It is often used for various off-road activities such as trail riding, motocross, and enduro racing. The XR 150 features a rugged design and powerful engine, making it suitable for different terrains and conditions.
This wiring diagram is a useful tool for owners and mechanics who need to understand the electrical system of the Honda XR 150. It provides a detailed overview of the wiring connections and components, allowing users to troubleshoot and repair any electrical issues that may arise. The diagram includes information on the battery, ignition system, lighting system, and other electrical components.
The wiring diagram is particularly helpful for individuals who are looking to customize or modify their XR 150. By understanding the electrical system, users can easily add accessories or make changes to the wiring to suit their specific needs. The diagram serves as a guide, ensuring that the modifications are done correctly and safely.
Overall, the Honda XR 150 wiring diagram is an invaluable resource for XR 150 owners and mechanics. It provides a comprehensive overview of the electrical system and enables users to troubleshoot, repair, or customize their motorcycles with confidence.
Electrical System
The electrical system of the Honda XR 150 is a crucial component that powers the various electrical functions of the motorcycle. It consists of several key elements, including the battery, alternator, wiring harness, and various electrical components such as lights and switches.
The battery serves as the main source of power for the electrical system. It stores and supplies electrical energy to the motorcycle’s components when the engine is not running. The alternator, also known as the generator, is responsible for recharging the battery and generating power while the engine is running.
The wiring harness is a network of electrical wires that connects the various electrical components of the motorcycle. It ensures that the electricity flows smoothly and safely throughout the system. The wiring diagram provides a visual representation of the electrical connections and can be used as a guide for troubleshooting and repairing electrical issues.
The electrical components of the Honda XR 150 include headlights, taillights, turn signals, horn, ignition system, and various switches. These components enable the rider to operate the motorcycle safely and efficiently. The wiring diagram helps to understand the connections and functions of these components, making it easier to diagnose and fix any electrical problems.
Proper maintenance and regular inspections of the electrical system are essential for ensuring the reliable operation of the Honda XR 150. It is important to check the battery, inspect the wiring harness for any damage or loose connections, and test the electrical components regularly. If any issues are detected, it is recommended to refer to the wiring diagram and consult a professional mechanic for repairs.
Wiring Diagram
A wiring diagram is a visual representation of the electrical circuits and connections in a vehicle or any other electrical system. It shows how the different components are connected to each other and how electricity flows through the system. Wiring diagrams are essential for troubleshooting electrical problems, modifying or adding new components, and understanding the overall electrical layout.
In the context of the Honda XR 150, a wiring diagram specifically refers to the diagram that illustrates the electrical connections and circuits of this motorcycle model. It provides a detailed map of the wiring system, including color-coded wires and their corresponding connections to various components such as the ignition system, lights, battery, and other electrical devices.
A typical wiring diagram for the Honda XR 150 might include a key or legend that explains the symbols used, such as lines representing wires, dots indicating connection points, and different shapes representing specific components. The diagram may also show the direction of the current flow and any important specifications or ratings for the various components.
By referring to the wiring diagram, technicians and enthusiasts can easily identify and trace electrical issues, such as faulty connections, broken wires, or blown fuses. It allows them to understand how the different electrical components work together and how they are interconnected, enabling them to diagnose and repair electrical problems effectively.
For owners of the Honda XR 150, having access to a wiring diagram can be invaluable for various purposes, such as installing aftermarket accessories, performing maintenance tasks, or troubleshooting electrical issues. It provides a visual guide that ensures correct and safe electrical connections, preventing potential damage to the motorcycle’s electrical system.
Components
In the Honda XR 150 wiring diagram, there are several key components that play an important role in the electrical system of the motorcycle. These components include:
Battery
The battery is the main source of power for the electrical system. It stores and provides the necessary electrical energy to operate the different components of the motorcycle.
Ignition Switch
The ignition switch is used to turn on or off the electrical power to the motorcycle. It controls the flow of electricity from the battery to the different electrical components.
Spark Plug
The spark plug is an essential component in the ignition system. It generates a spark that ignites the fuel-air mixture in the combustion chamber, leading to the engine’s operation.
Stator
The stator is a stationary component within the engine that generates electricity through electromagnetic induction. It provides electrical power to the battery and other electrical components when the engine is running.
Generator
The generator is responsible for producing electrical power for the motorcycle when the engine is running. It converts mechanical energy from the engine into electrical energy to charge the battery and power the electrical components.
Rectifier/Regulator
The rectifier/regulator is a combination component that converts the alternating current (AC) generated by the stator or generator into direct current (DC) and regulates the voltage to ensure a consistent and stable electrical supply to the motorcycle’s electrical system.
Fuses
Fuses are safety devices that protect the electrical system from overloading and short circuits. They melt or blow when there is an excessive current flow, preventing damage to the system and its components.
Wiring Harness
The wiring harness is a collection of wires that connect the different electrical components of the motorcycle. It allows the flow of electricity between the components, ensuring proper functioning and communication.
Switches and Buttons
Switches and buttons are used to control various functions of the motorcycle, such as turning on lights, engaging the starter motor, or activating different electrical systems. They provide an interface between the rider and the electrical components.
Lights and Indicators
Lights and indicators are vital components for visibility and safety. They include headlights, taillights, turn signals, brake lights, and indicators (such as the neutral indicator or fuel gauge), which provide information to the rider.
These are just some of the key components found in the Honda XR 150 wiring diagram. Understanding the purpose and function of each component is essential for proper maintenance and troubleshooting of the motorcycle’s electrical system.
Troubleshooting
When encountering problems with the electrical system of your Honda XR 150, it is important to follow a logical troubleshooting process to identify and resolve the issue. Here are some common problems you may encounter and the steps to troubleshoot them:
No Power
If your Honda XR 150 is not receiving power, follow these steps to troubleshoot the issue:
- Check the battery to ensure it is properly connected and fully charged.
- Inspect the fuse box and replace any blown fuses.
- Examine the wiring connections for any loose or damaged wires and repair or replace as necessary.
- Test the ignition switch to ensure it is functioning correctly.
Intermittent Power
If you are experiencing intermittent power issues, follow these steps to troubleshoot the issue:
- Inspect the battery connections and ensure they are secure.
- Check for any loose or damaged wires and repair or replace as necessary.
- Test the voltage regulator to ensure it is functioning correctly.
- Inspect the ignition switch and handlebar controls for any loose connections or damaged components.
Lights Not Working
If the lights on your Honda XR 150 are not working, follow these steps to troubleshoot the issue:
- Check the bulbs to ensure they are not burnt out and replace if necessary.
- Inspect the wiring connections for any loose or damaged wires and repair or replace as necessary.
- Test the headlight switch and handlebar controls to ensure they are functioning correctly.
- Check the voltage regulator to ensure it is providing the correct power to the lights.
By following these troubleshooting steps, you should be able to identify and resolve most electrical issues with your Honda XR 150. If you are unable to resolve the problem on your own, it is recommended to consult a professional mechanic or refer to the official wiring diagram for further assistance.