
If you’re considering installing a Google Nest Thermostat E in your home, it’s important to understand the wiring diagram. The wiring diagram will show you how to properly connect the thermostat to your HVAC system, ensuring it functions correctly and efficiently. This article will break down the components of the wiring diagram and explain how they all work together.
The Google Nest Thermostat E wiring diagram consists of several key parts. First, there’s the thermostat itself, which is the device you’ll interact with to control your heating and cooling. It has a display screen, buttons, and various sensors to detect temperature and occupancy. Next are the HVAC components, including the heating and cooling systems, and the fan. These components are connected to the thermostat via a series of wires.
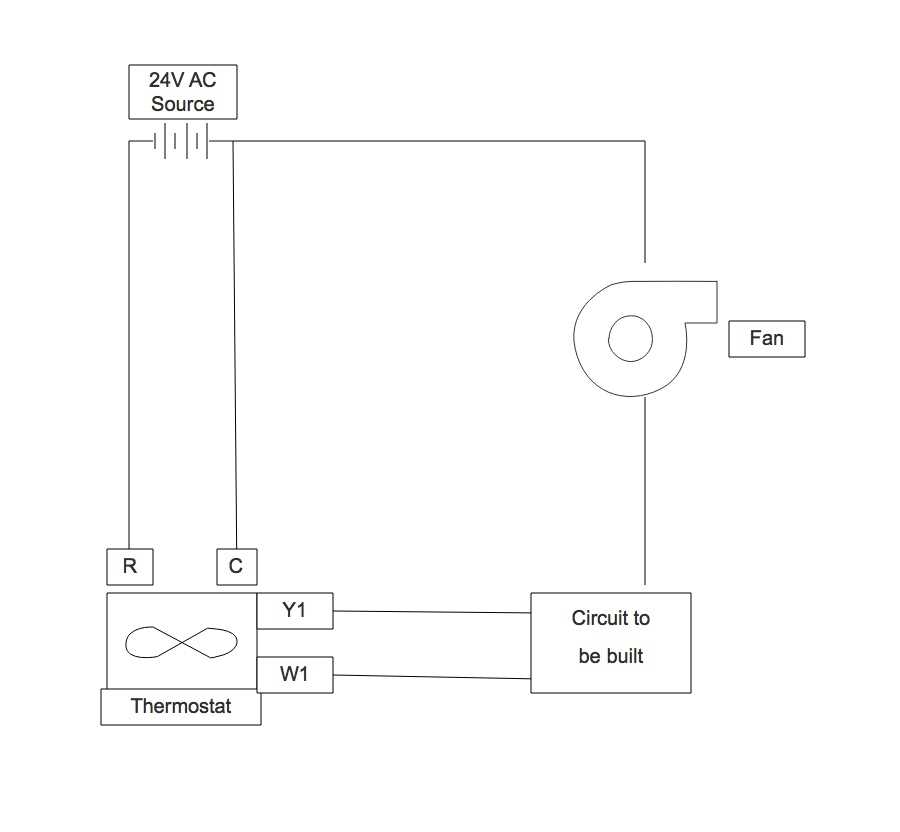
The wiring diagram will show you which wires connect to which terminals on the thermostat. For example, you’ll see terminals labeled “R” for power, “Y” for cooling, “W” for heating, and “G” for the fan. These terminals correspond to the wires coming from your HVAC system. Following the wiring diagram ensures that each wire is correctly connected to the appropriate terminal, allowing the thermostat to communicate with your heating and cooling systems properly.
Understanding the Google Nest Thermostat E wiring diagram is crucial for a successful installation. It ensures that your thermostat is properly connected to your HVAC system, allowing you to control your home’s temperature efficiently. If you’re unsure about any aspect of the wiring diagram, it’s best to consult a professional HVAC technician who can guide you through the installation process.
What is a Google Nest Thermostat E?
The Google Nest Thermostat E is a smart thermostat that allows you to easily control the temperature of your home using your phone or voice commands. It is a sleek, white thermostat with a minimalistic design that blends well with any home decor.
With the Google Nest Thermostat E, you can set a schedule for your heating and cooling system, ensuring that your home is always at the perfect temperature when you need it. It also has an energy-saving mode that helps you reduce your energy consumption and save on your utility bills.
The installation process for the Google Nest Thermostat E is straightforward. It comes with a wiring diagram and step-by-step instructions to help you connect it to your heating and cooling system. Once installed, you can download the Nest app on your smartphone to control the thermostat remotely and access additional features, such as setting up geolocation and receiving energy usage reports.
Overall, the Google Nest Thermostat E is an advanced and user-friendly smart thermostat that can help you save energy and improve the comfort of your home. With its intuitive interface and compatibility with other smart home devices, it is an excellent choice for anyone looking to upgrade their home’s heating and cooling system.
Overview of the Google Nest Thermostat E
The Google Nest Thermostat E is a smart thermostat that offers energy-saving features and an intuitive user interface. Designed to be compatible with most heating and cooling systems, the Nest Thermostat E can easily fit into any home.
One of the standout features of the Nest Thermostat E is its Energy-Savings mode. This mode adjusts the temperature slightly to save energy without sacrificing comfort. The thermostat also provides suggestions for further energy-saving improvements, such as adjusting the temperature schedule or turning on the Eco mode. These features help homeowners reduce their energy consumption and save money on their utility bills.
The installation process for the Nest Thermostat E is straightforward, thanks to its built-in compatibility checker. The device provides a wiring diagram that guides users through the installation process step by step. The wiring compatibility checker ensures that the thermostat is compatible with the existing heating and cooling system, making the installation hassle-free.
The Google Nest Thermostat E also comes with a user-friendly interface. The device features a circular display that shows the current temperature, time, and weather conditions. Users can easily adjust the temperature using either the physical ring or the Nest app on their smartphone. The app provides remote control capabilities, allowing users to adjust the temperature even when they are away from home.
In conclusion, the Google Nest Thermostat E offers energy-saving features, simple installation, and a user-friendly interface. With its compatibility checker and easy-to-follow wiring diagram, homeowners can easily install the thermostat themselves. The device’s energy-saving features and intuitive controls make it a popular choice for those looking to reduce their energy consumption without sacrificing comfort.
Wiring Diagram for Google Nest Thermostat E
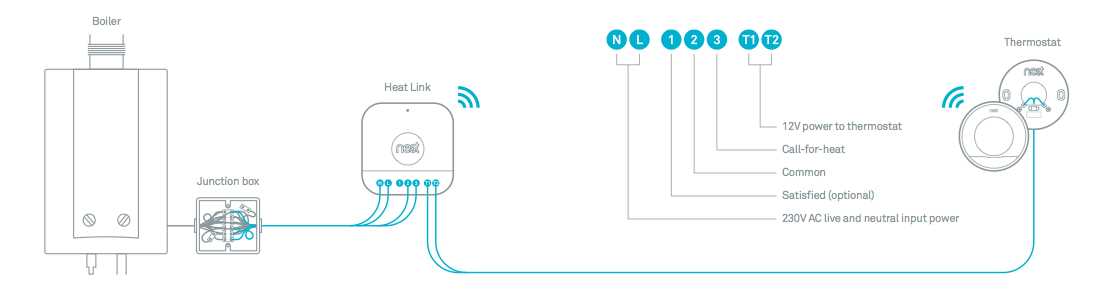
When it comes to installing a Google Nest Thermostat E, it’s important to have a clear understanding of the wiring diagram. The wiring diagram provides a visual representation of the connections that need to be made between the thermostat and your HVAC system. This ensures that the thermostat functions properly and effectively controls your heating and cooling system.
The wiring diagram for the Google Nest Thermostat E includes several key components, such as the thermostat itself, the HVAC system (which may include a furnace, air conditioner, or heat pump), and the power supply. The diagram usually consists of colored wires and labels to indicate which wire should be connected to which terminal. It’s crucial to follow the wiring diagram carefully to avoid any electrical issues or malfunctions.
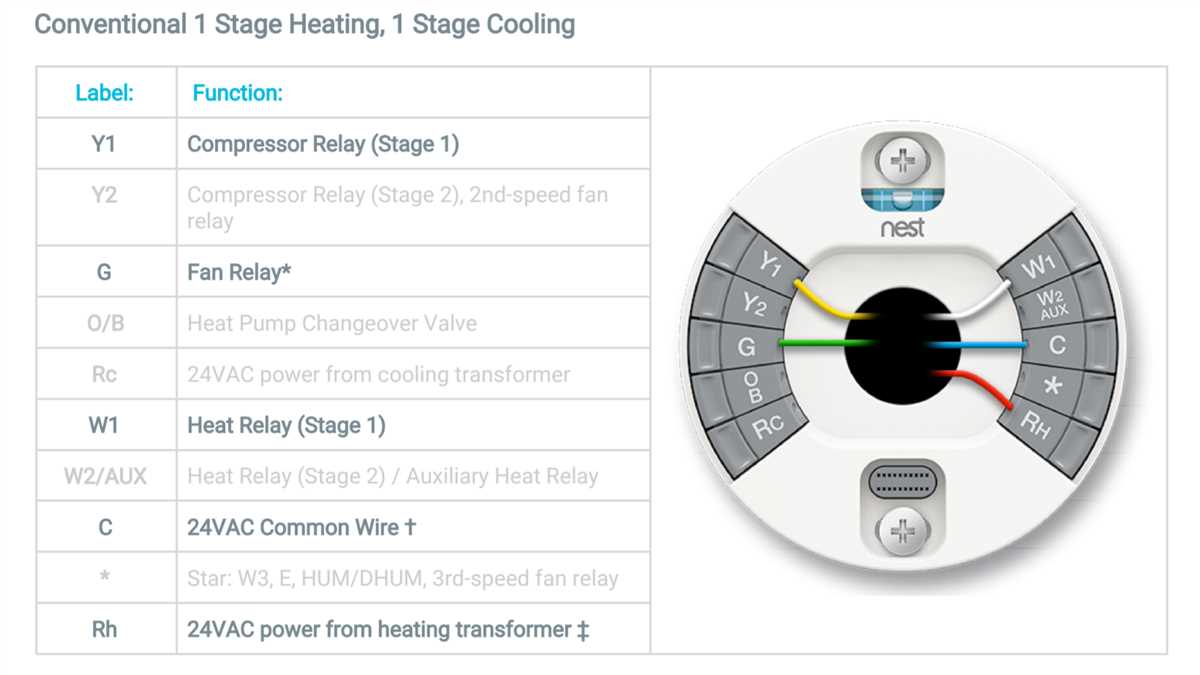
Here is a basic outline of the wiring diagram for the Google Nest Thermostat E:
- Rc/Rh: This terminal is usually connected to the red wire, which provides power from the HVAC system to the thermostat.
- W1/Aux: This terminal is typically connected to the white wire, which controls the heating function of the HVAC system.
- Y1: This terminal is commonly connected to the yellow wire, which controls the cooling function of the HVAC system.
- G: This terminal is usually connected to the green wire, which controls the fan function of the HVAC system.
- C: This terminal is connected to the common wire, which provides power to the thermostat. Not all systems require a common wire.
It’s important to note that the wiring configuration may vary depending on your specific HVAC system and the wiring setup in your home. It’s recommended to consult the official installation guide provided by Google or seek professional assistance if you’re unsure about the wiring diagram or installation process.
Understanding the Wiring Diagram
When it comes to installing or troubleshooting a Google Nest Thermostat E, understanding the wiring diagram is crucial. The wiring diagram provides a visual representation of how the thermostat should be wired to the heating and cooling system in your home. It shows the different wires and their corresponding connections.
One of the key components of the wiring diagram is the thermostat itself. The Nest Thermostat E typically has several labeled terminals where the wires are connected. These terminals include Rc, Rh, C, W1/E/W3, G, Y1, and O/B. Each terminal corresponds to a specific wire that comes from your furnace or air conditioner.
Rc and Rh: These terminals are used to connect the 24V power supply from your heating and cooling system. Rc is for cooling, while Rh is for heating.
C: The C terminal is for the common wire, which provides a constant 24V power source to the thermostat.
W1/E/W3: This terminal is used for the heat relay or auxiliary heat. If you have a heat pump or electric furnace, this wire will be connected here.
G: The G terminal is used for the fan relay. It controls the fan in your HVAC system.
Y1: This terminal is used for the cooling relay. It activates the compressor in your air conditioner.
O/B: This terminal is used for the reversing valve in a heat pump system. It determines whether the system is in heating or cooling mode.
By referring to the wiring diagram and following the instructions provided by Google Nest, you can ensure that your thermostat is wired correctly. This will allow you to control your heating and cooling system effectively, maximize energy efficiency, and enjoy the convenience of a smart thermostat.
How to Install Google Nest Thermostat E
Installing a Google Nest Thermostat E is a straightforward process that can be completed in just a few steps. To begin, ensure that you have the necessary tools and equipment, including a screwdriver and a voltage tester. It is also important to turn off the power supply to your heating and cooling system before starting the installation.
Follow these steps to install your Google Nest Thermostat E:
- Remove the old thermostat: Start by removing the cover of your old thermostat to access the wiring. Take note of the wires and their corresponding labels, as you will need this information later.
- Turn off the power supply: Locate the circuit breaker that controls your heating and cooling system, and turn it off to ensure your safety while handling the wiring.
- Disconnect the wires: Carefully disconnect the wires from your old thermostat and remove it from the wall.
- Label the wires: Use the labels provided in the Google Nest Thermostat E package to identify each wire. This step will make the installation process easier.
- Mount the Nest base: Place the Nest base on the wall and use the screws provided to secure it in place.
- Connect the wires: Match each labeled wire with the corresponding terminal on the Nest base. Insert each wire into the appropriate terminal and ensure they are secure.
- Attach the Nest display: Gently connect the display to the Nest base until it clicks into place.
- Restore power supply: Turn on the circuit breaker to restore power to your heating and cooling system.
- Complete the setup: Follow the on-screen prompts on the Nest display to complete the setup process, including connecting the thermostat to your home’s Wi-Fi network.
Once you have completed these steps, you can begin using your Google Nest Thermostat E to control your home’s heating and cooling system. Don’t forget to download the Nest app on your smartphone or tablet to have remote access and control over your thermostat.
Step-by-Step Installation Guide
Installing the Google Nest Thermostat E in your home is a straightforward process that can be completed in just a few simple steps. Follow this guide to ensure a successful installation:
1. Turn off the Power
Before starting the installation, it is important to turn off the power to your HVAC system. Locate the circuit breaker that controls your heating and cooling system and switch it off to avoid any electrical hazards.
2. Remove the Old Thermostat
Next, remove the cover of your old thermostat to expose the wiring. Take a picture of the wiring or make note of the placement and colors of the wires. Carefully disconnect the wires from the terminals and remove the old thermostat from the wall.
3. Mount the Nest Thermostat
Using the included mounting plate, position the Nest Thermostat E on the wall at the desired location. Ensure the wires can easily reach the terminals on the back of the thermostat. Use a level to ensure the thermostat is straight and mark the screw holes for drilling. Securely fasten the mounting plate to the wall.
4. Connect the Wires
Using the wiring diagram provided, connect the wires from your HVAC system to the corresponding terminals on the Nest Thermostat E. Insert each wire into the appropriate terminal and use a screwdriver to tighten the terminal screws. Double-check that the wires are securely connected and properly seated.
5. Attach the Nest Thermostat E
Gently push the Nest Thermostat E onto the mounting plate until it clicks into place. Ensure that the thermostat is level and securely attached to the wall.
6. Turn on the Power
Finally, go back to your circuit breaker and switch the power back on. The Nest Thermostat E should power on and guide you through the initial setup process. Follow the on-screen prompts to connect the thermostat to your Wi-Fi network and customize its settings.
By following these step-by-step instructions, you can easily install the Google Nest Thermostat E in your home and enjoy the benefits of a smart, energy-efficient thermostat.
Troubleshooting Common Issues with Google Nest Thermostat E
If you’re experiencing issues with your Google Nest Thermostat E, there are a few common troubleshooting steps you can follow to resolve them.
No Power or Display
If your Nest Thermostat E is not receiving power or the display is not turning on, there are a few things you can check. First, make sure the device is properly connected to your HVAC system and that the power source is functioning correctly. You can do this by checking the circuit breaker and ensuring it hasn’t been tripped. Additionally, make sure the wiring connections are secure and properly inserted. If the problem persists, you may need to contact a professional HVAC technician to further diagnose and resolve the issue.
Inconsistent Temperature
If your thermostat is not maintaining a consistent temperature, there are a few possible causes. First, check the location of your thermostat. It should be placed away from direct sunlight, drafts, and other sources of heat or cold. Additionally, make sure the thermostat is not located near a vent or a heat source, as this can impact its ability to accurately measure the temperature. If the issue continues, you can perform a manual reset on the thermostat by pressing and holding the display for 10 seconds until it restarts. If none of these steps work, it may be necessary to contact Nest support for further assistance.
Incompatible Wiring
If you’ve recently installed your Nest Thermostat E and are experiencing issues, it’s possible that your wiring is incompatible. In some cases, the Nest Thermostat E may not be compatible with certain HVAC systems or may require additional wiring modifications. You can use the Nest compatibility checker tool on their website to verify if your system is compatible. If your wiring is the issue, you may need to consult a professional HVAC technician to make the necessary adjustments or consider upgrading to a different thermostat model.
Wi-Fi Connection Problems
If you’re having trouble connecting your Nest Thermostat E to your Wi-Fi network, there are a few steps you can follow. First, ensure that your Wi-Fi network is functioning correctly and that the signal strength is strong enough for the thermostat to connect. You can try restarting your router or moving the thermostat closer to the router to improve the signal. If the problem persists, you can try resetting the Wi-Fi connection on your thermostat by going to the settings menu and selecting “Network” and then “Reset”. If none of these steps work, you may need to contact Nest support for further assistance.
Common Problems and Solutions
If you are experiencing any issues with your Google Nest Thermostat E, there are a few common problems and their solutions that you can try before reaching out for professional assistance.
1. Thermostat Not Turning On
If your thermostat is not turning on, it could be due to a power issue. Make sure that the thermostat is properly connected to the power source and that the circuit breaker is not tripped. Additionally, check if the thermostat’s batteries need to be replaced.
2. Inaccurate Temperature Readings
If your thermostat is displaying incorrect temperature readings, first check if there is any obstruction or interference near the device that could affect its sensors. You can also recalibrate the thermostat by accessing the settings menu and adjusting the temperature offset.
3. Wi-Fi Connection Problems
If your thermostat is having trouble connecting to Wi-Fi, ensure that it is within range of your router and that the Wi-Fi network is functioning properly. You might need to reset your router or re-enter your Wi-Fi credentials in the thermostat settings.
4. Issues with HVAC System
If your HVAC system is not working properly even after the thermostat is turned on, it may be a problem with the system itself. Check if the system is receiving power and if the filters need to be cleaned or replaced. If the issue persists, consult a professional technician.
5. App or Software Problems
If you are experiencing issues with the Google Nest app or the thermostat’s software, ensure that you are using the latest version of the app and that your device’s software is up to date. You can also try uninstalling and reinstalling the app or resetting the thermostat to its factory settings.
Remember that these are just some of the common problems that you may encounter with your Google Nest Thermostat E. If the issues persist or if you are unsure about any troubleshooting steps, it is advisable to contact the manufacturer’s support team or seek professional assistance.
Q&A:
What is a common problem with computers?
A common problem with computers is slow performance. This can be caused by various factors such as too many applications running at the same time, a lack of available memory, or a fragmented hard drive. To solve this problem, you can try closing unnecessary applications, freeing up memory by deleting files or running a disk defragmentation tool.
How can I fix a leaking faucet?
To fix a leaking faucet, you can start by shutting off the water supply to the faucet. Next, disassemble the faucet by removing the handle and any other relevant parts. Inspect the washers and O-rings for any signs of damage or wear and replace them if necessary. Reassemble the faucet and turn on the water supply to check if the leak has been fixed. If the problem persists, it may be best to call a plumber for further assistance.
What is a common problem with smartphones?
A common problem with smartphones is a short battery life. This can be caused by several factors including excessive usage, background apps consuming power, or a battery that needs to be replaced. To extend your smartphone’s battery life, you can try reducing the screen brightness, disabling unnecessary notifications and background app refresh, or using power-saving mode. If these steps don’t improve the battery life, it may be time to replace the battery.
How can I fix a flat tire on a bicycle?
To fix a flat tire on a bicycle, start by removing the wheel from the bike. Locate the puncture by inspecting the tire and inner tube. Once the puncture is found, use a tire lever to carefully remove one side of the tire from the rim. Take out the inner tube, patch or replace it if necessary. Before putting the tire back on, check the inside of the tire for any sharp objects that may have caused the puncture. Reinstall the tube, inflate it to the appropriate pressure, and reattach the wheel to the bike.