
If you own a 1997 Ford F250, it is important to familiarize yourself with the fuse box diagram located under the dash. The fuse box diagram illustrates the position of each fuse and lists what each fuse controls. This information is crucial for troubleshooting electrical issues and replacing blown fuses. By understanding the fuse box diagram, you can easily locate and address any electrical problems that may arise.
The fuse box diagram for a 1997 Ford F250 under dash shows a variety of fuses, including those for the ignition, headlights, tail lights, brake lights, and interior lights. It also includes fuses for the radio, power windows, power locks, and various other components. Each fuse is labeled with a number and a description, making it easy to identify the correct fuse for a particular circuit.
Replacing a blown fuse is a simple task that can be done without any special tools. By referring to the fuse box diagram, you can identify which fuse needs to be replaced and then use a fuse puller or a pair of needle-nose pliers to remove the blown fuse. Once the old fuse has been removed, it can be replaced with a new fuse of the same amperage rating.
If you are experiencing electrical issues with your 1997 Ford F250, such as a malfunctioning radio or non-working power windows, checking the fuse box diagram under the dash should be your first step. By identifying the correct fuse, you can quickly resolve the issue and get back on the road. Remember to always consult the vehicle’s owner’s manual for the most accurate and up-to-date fuse box diagram and electrical information.
What is a Fuse Box Diagram and Why is it Important for a 1997 Ford F250?
A fuse box diagram is a visual representation of the fuses and their corresponding circuits in a vehicle’s fuse box. In the case of a 1997 Ford F250, the fuse box diagram provides valuable information about the location and function of each fuse, helping the vehicle owner identify and troubleshoot electrical issues.
The fuse box diagram for a 1997 Ford F250 is especially important because it allows the vehicle owner to quickly identify which fuse protects a specific electrical component. This information is crucial when a specific electrical system or device in the vehicle malfunctions or stops working. With the fuse box diagram, the owner can easily locate the fuse responsible for the malfunctioning component and check whether the fuse is blown or needs to be replaced.
Without a fuse box diagram, troubleshooting electrical issues in a 1997 Ford F250 can be a time-consuming and frustrating process. Instead of randomly testing each fuse, the owner can refer to the diagram to quickly narrow down the potential causes of the problem. This saves time and eliminates unnecessary guesswork, allowing for a more efficient and effective repair process.
The Purpose of a Fuse Box Diagram
A fuse box diagram is a visual representation of the electrical fuses and their corresponding circuits in a vehicle. It provides a detailed illustration of the fuse box, showing the location and function of each fuse. This diagram is typically found in the owner’s manual or inside the fuse box cover.
The primary purpose of a fuse box diagram is to help vehicle owners identify which fuse controls specific electrical components. By referring to the diagram, users can quickly locate the fuse responsible for a particular function, such as the headlights, radio, or power windows. This information is invaluable when troubleshooting electrical issues or replacing blown fuses.
The fuse box diagram also serves as a safety measure. By clearly labeling each fuse and its corresponding circuit, it ensures that users can easily identify and replace faulty fuses. This can prevent further damage to the vehicle’s electrical system and reduce the risk of potential hazards, such as electrical fires.
Furthermore, a fuse box diagram aids in understanding the overall electrical layout of a vehicle. It provides an organized and easily accessible reference point for technicians and DIY enthusiasts. By studying the diagram, they can gain insight into how the different circuits are connected and devise effective troubleshooting strategies.
In summary, a fuse box diagram plays a crucial role in maintaining the functionality and safety of a vehicle’s electrical system. It allows users to quickly identify and replace fuses, troubleshoot electrical issues, and understand the overall electrical layout of their vehicle. Its clear and concise visual representation is an essential tool for any vehicle owner or technician.
Locating the Fuse Box in a 1997 Ford F250
When looking to locate the fuse box in a 1997 Ford F250, there are a few key steps to follow. The fuse box in the 1997 Ford F250 is typically located under the dashboard on the driver’s side of the vehicle. It is important to note that the location can vary slightly depending on the specific model and trim level of the F250.
To begin, start by locating the hood release latch and open the hood. Once the hood is open, locate the battery compartment on the driver’s side of the engine bay. The fuse box is commonly found in close proximity to the battery compartment.
After locating the battery compartment, carefully inspect the surrounding area under the dashboard. Look for a rectangular or square-shaped plastic cover that is labeled “Fuse Box” or “Fuse Panel.” This cover is usually secured in place with a few screws or clips.
Once the cover is removed, you will have access to the fuse box. Inside the fuse box, you will find a series of individual fuse slots, each labeled with a specific function or component. The fuses are designed to protect various electrical circuits in the vehicle, and each fuse should be checked for potential damage or burnouts if a specific component is not functioning properly.
Overall, locating the fuse box in a 1997 Ford F250 is a relatively straightforward process. By following these steps and carefully inspecting the area under the dashboard, drivers and DIY enthusiasts can easily access and troubleshoot any electrical issues that may arise in the vehicle.
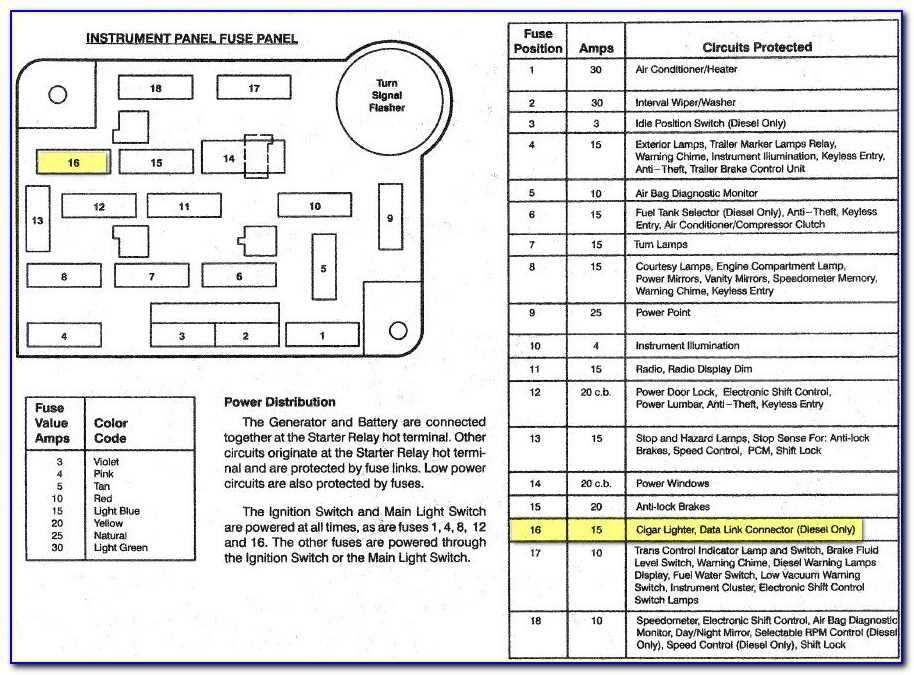
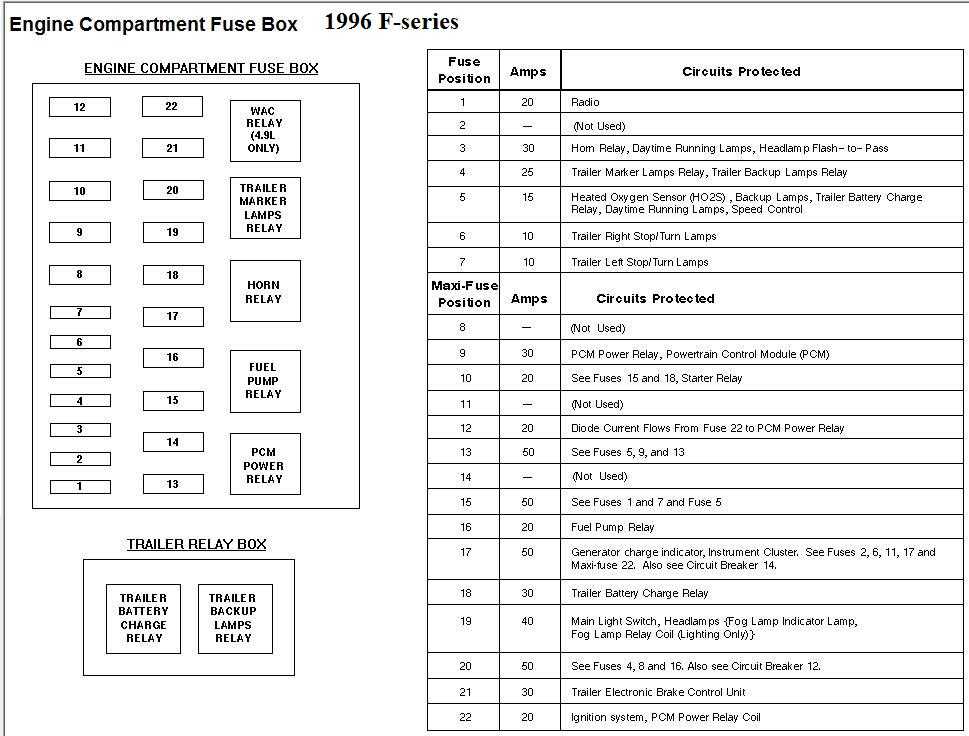
How to Read a Fuse Box Diagram
Fuse box diagrams are essential for understanding the electrical system of a vehicle. They provide a visual representation of the fuses and their corresponding circuits, which helps in troubleshooting and identifying any issues. Here are some steps to read a fuse box diagram:
1. Identify the Fuse Box Diagram: Locate the fuse box in your vehicle. It is usually located under the dash, in the engine compartment, or in the trunk. Once you have found the fuse box, look for the fuse box diagram. It is a schematic that shows the layout of the fuse box and the position of each fuse.
2. Understand the Fuse Box Layout: The fuse box diagram is usually divided into sections or rows, with each row representing a different circuit. Each fuse is represented by a number or symbol, which corresponds to the fuse’s rating. The rating indicates the maximum current that the fuse can handle before it blows and interrupts the circuit.
3. Check the Fuse Ratings: The fuse box diagram will also list the different fuse ratings for each circuit. These ratings are usually measured in amperes (A) and are represented by numbers or symbols. It is important to check the fuse ratings to ensure that you replace blown fuses with the correct ones to avoid damaging the electrical system.
4. Follow the Circuit Lines: In the fuse box diagram, each fuse is connected to a specific circuit or electrical component. The diagram will have lines or arrows that show the connection between the fuse and the circuit. By following these lines, you can easily identify the circuit associated with a particular fuse.
5. Locate the Blown Fuse: If you are experiencing an electrical issue in your vehicle, the fuse box diagram can help you identify the fuse that might be causing the problem. Look for any blown fuses by visually inspecting them or using a fuse tester. A blown fuse will have a broken wire inside it.
6. Replace the Blown Fuse: Once you have identified the blown fuse, use the fuse box diagram to find a replacement fuse with the same rating. Carefully remove the blown fuse and insert the new one in its place. Make sure to turn off the corresponding circuit or component before replacing the fuse.
Reading a fuse box diagram is an important skill for any vehicle owner. It allows you to understand the electrical system of your vehicle and effectively troubleshoot any issues that may arise. Remember to always refer to the fuse box diagram provided by the manufacturer for accurate information.
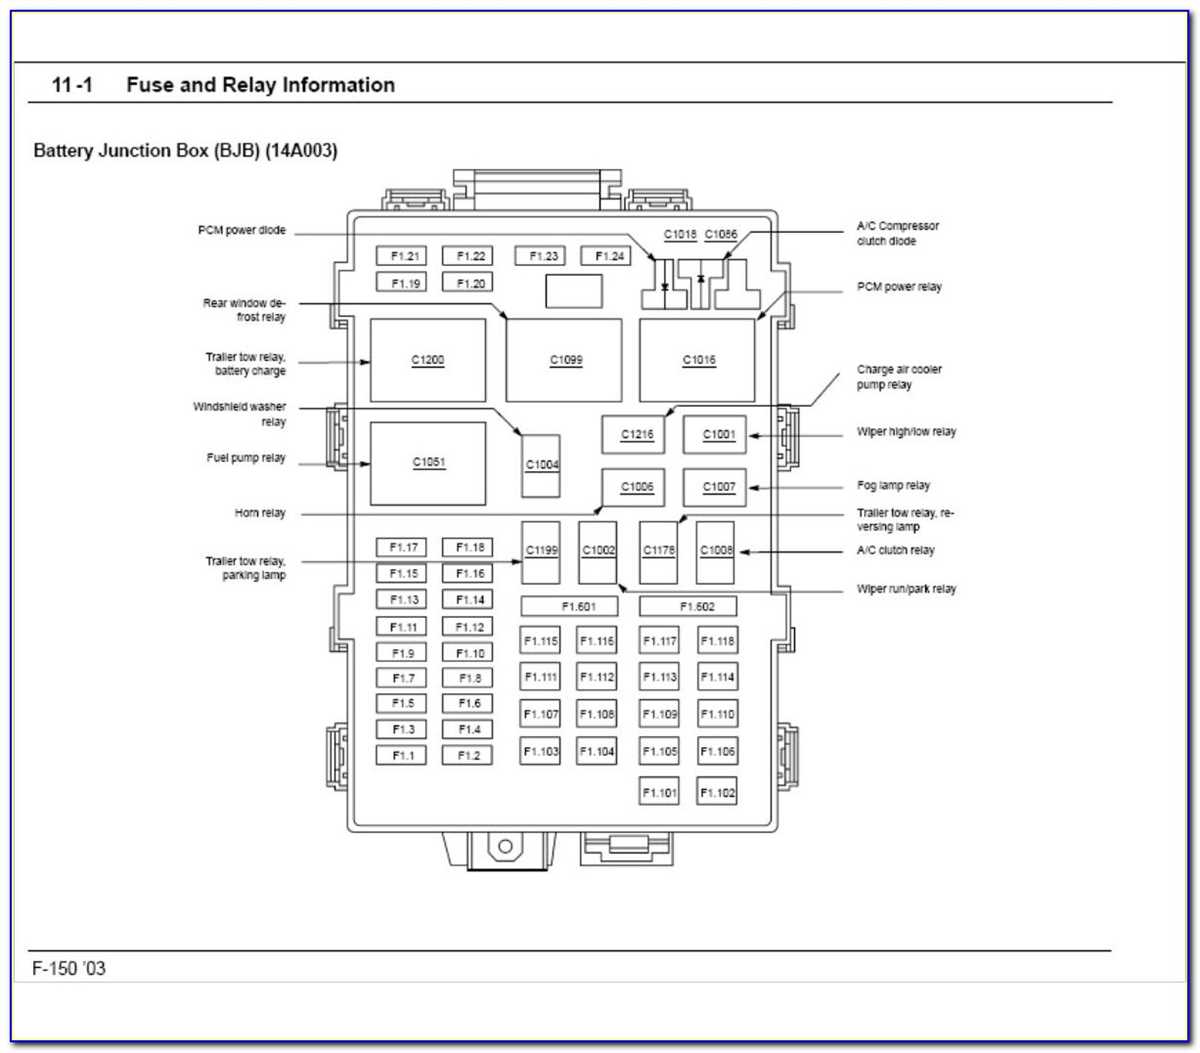
Understanding the Fuses and Relays in a 1997 Ford F250

When it comes to understanding the electrical system in a 1997 Ford F250, it is important to be familiar with the fuses and relays located in the fuse box under the dash. These components play a crucial role in protecting the electrical system and ensuring that different functions of the vehicle work properly.
The fuse box diagram under the dash provides a visual representation of the different fuses and relays and their corresponding circuits. This diagram helps in identifying the specific fuse or relay that controls a particular function in the vehicle. By referring to the diagram, troubleshooting and replacing fuses becomes easier and more efficient.
In the 1997 Ford F250, there are various fuses and relays that control different systems, such as the ignition, fuel pump, headlights, wipers, and more. Each fuse or relay has a specific amp rating, which indicates the maximum electrical current it can handle. It is important to ensure that the replacement fuse or relay has the same amp rating to avoid electrical issues or damage to the circuit.
Additionally, the fuse box diagram also provides information on the location of spare fuses and relays. These spare components can be used as replacements in case a fuse or relay fails. It is recommended to carry spare fuses and relays in the vehicle for emergencies.
Overall, understanding the fuses and relays in a 1997 Ford F250 is essential for maintaining the electrical system and troubleshooting any electrical issues that may arise. By referring to the fuse box diagram under the dash, it becomes easier to identify and replace faulty fuses or relays, ensuring that all functions of the vehicle work properly.
Common Issues and Troubleshooting for a 1997 Ford F250 Fuse Box
When it comes to the fuse box in a 1997 Ford F250, there are a few common issues that can occur. Being familiar with these issues and knowing how to troubleshoot them can save you time and money in the long run. Here are a few common problems and their potential solutions:
1. Blown Fuses
If you have a blown fuse in your 1997 Ford F250, it’s important to understand why it happened and how to fix it. Blown fuses can be caused by a variety of issues, such as a short circuit or an electrical overload. To troubleshoot a blown fuse, start by identifying the affected circuit and checking the corresponding fuse. Replace any blown fuses with ones of the same amperage rating. If the fuse continues to blow, it may indicate a larger electrical problem that requires professional attention.
2. Fuse Box Wiring Problems
In some cases, the wiring in the fuse box of a 1997 Ford F250 can become loose or damaged over time. This can lead to electrical issues and blown fuses. If you suspect a wiring problem, visually inspect the wiring connections for any signs of damage or corrosion. Tighten any loose connections and replace any damaged wiring. It may be helpful to consult a wiring diagram for your specific vehicle model to ensure proper connections.
3. Incorrect Fuse Placement
Another common issue with the fuse box in a 1997 Ford F250 is incorrect fuse placement. It’s important to ensure that the correct fuse is installed in each slot to prevent electrical problems. Refer to the fuse box diagram under the dash of your vehicle or the owner’s manual for the correct fuse placement. If you’re unsure, consult a professional or seek guidance from an authorized Ford dealership.
4. Overloaded Circuits
An overloaded circuit can also lead to issues with the fuse box in a 1997 Ford F250. If multiple electrical components are not functioning properly or if fuses constantly blow, it may indicate that the circuit is overloaded. Consider reducing the load on the circuit by unplugging unnecessary devices or using lower-wattage alternatives. If the problem persists, it may be necessary to consult a professional electrician or mechanic.
By being aware of these common issues and troubleshooting methods for a 1997 Ford F250 fuse box, you can better maintain the electrical system of your vehicle and prevent potential problems. Remember to always prioritize safety and consult a professional if you are unsure or uncomfortable with any electrical repairs.
Replacing Fuses in a 1997 Ford F250: Step-by-Step Guide
When it comes to troubleshooting electrical issues in your 1997 Ford F250, one of the first things you should check is the fuse box. Fuses can blow or become damaged, causing various electrical components in your vehicle to malfunction. Replacing a fuse is a relatively simple process, and this step-by-step guide will help you get the job done.
Step 1: Locate the Fuse Box
The fuse box in a 1997 Ford F250 is usually located under the dash on the driver’s side of the vehicle. It may also be located in the engine compartment, depending on the specific model. Refer to your owner’s manual or consult a repair guide for the exact location.
Step 2: Identify the Problem Fuse
Before replacing any fuses, it’s important to identify which one is causing the issue. Look for fuses that are visibly blown or have melted wires inside. You can also use a multimeter to check for continuity.
Step 3: Remove the Problem Fuse
Using a fuse puller or a pair of needle-nose pliers, gently grip the problem fuse and pull it straight out of the fuse box. Be careful not to touch any metal parts of the fuse box while doing this.
Step 4: Install a New Fuse
Take a new fuse with the same amperage rating as the one you removed and insert it into the empty slot in the fuse box. Make sure it is securely in place.
Step 5: Test the Electrical Component
With the new fuse installed, test the electrical component that was malfunctioning. If it functions correctly, then the fuse replacement was successful. If not, you may need to further troubleshoot the issue.
Step 6: Repeat if Necessary
If you have multiple fuses that need to be replaced, repeat steps 3 to 5 for each one. It’s important to use the correct amperage rating for each fuse to ensure proper functioning of the electrical components.
Replacing fuses in a 1997 Ford F250 is a straightforward process that can help resolve electrical issues in your vehicle. Remember to always use the correct amperage rating for each fuse and consult a professional if you are unsure or if the problem persists.