If you are an electronics enthusiast or a hobbyist, having a reliable bench power supply is essential. A bench power supply allows you to power your electronic projects and provides a stable and adjustable voltage source. While you can buy a bench power supply from a store, building your own DIY bench power supply can be a fun and rewarding project.
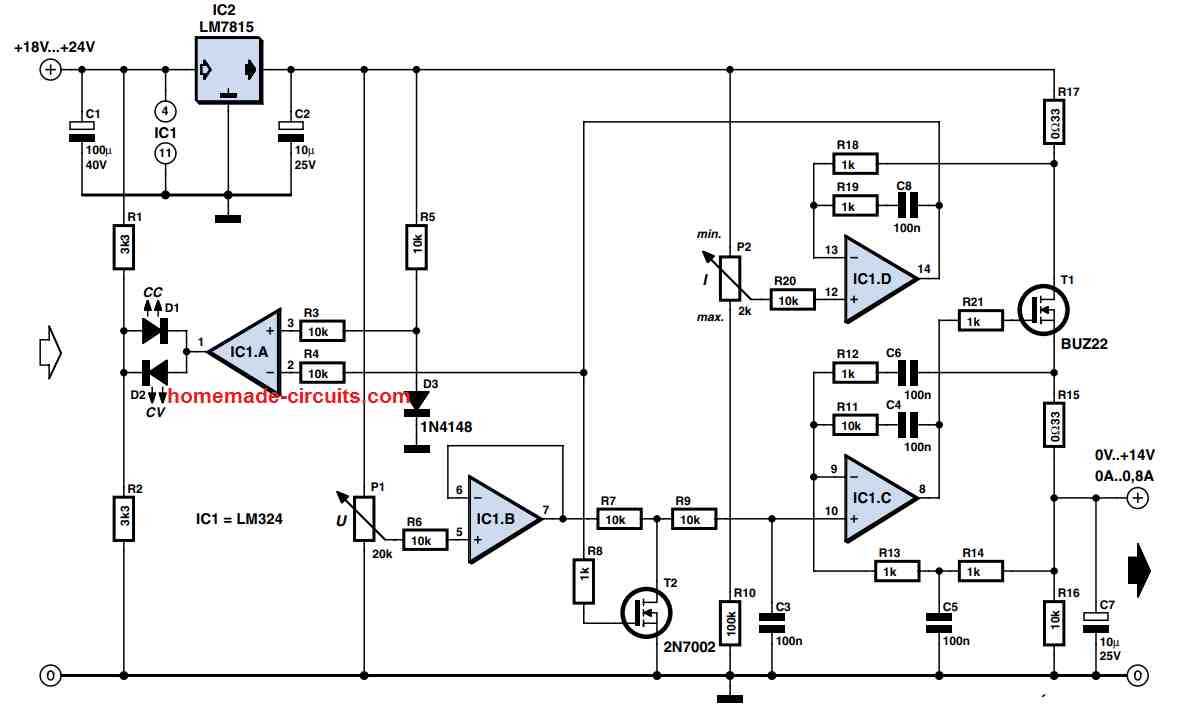
In this article, we will discuss a popular DIY bench power supply schematic that you can build yourself. This schematic is based on a linear regulator circuit and provides a stable and adjustable output voltage. The power supply can output voltages ranging from 0 to 24 volts and current up to 1 ampere, making it suitable for most electronic projects.
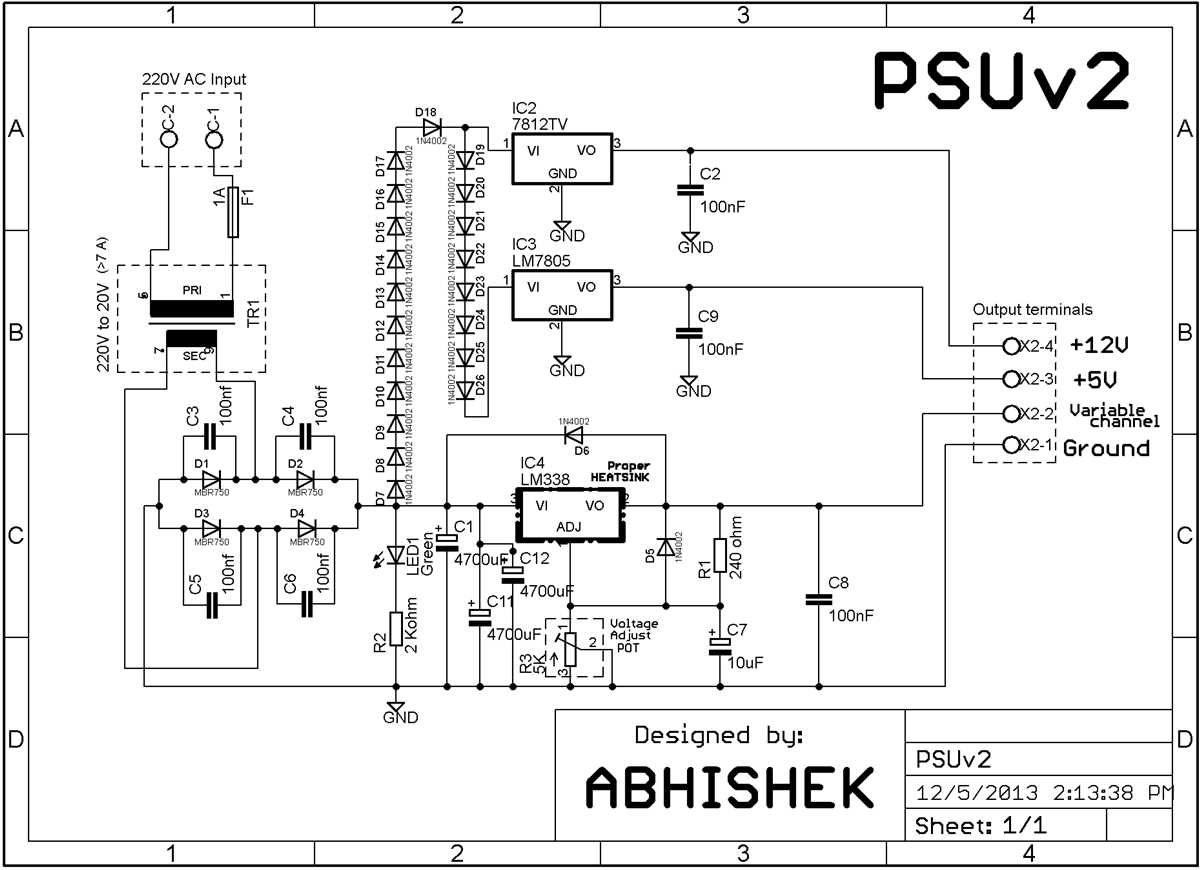
The main components of this DIY bench power supply schematic are a transformer, bridge rectifier, filter capacitors, voltage regulator, and a current-limiting resistor. The transformer steps down the input AC voltage to a lower AC voltage, which is then rectified by the bridge rectifier. The filter capacitors smooth out the rectified voltage, and the voltage regulator provides a stable and adjustable output voltage.
Building your own DIY bench power supply not only gives you a better understanding of how power supplies work but also allows you to customize the features according to your needs. With a DIY bench power supply, you can have a reliable and adjustable power source for all your electronic projects.
What is a Bench Power Supply?
A bench power supply is a versatile electrical device that provides a stable and adjustable source of electricity for testing and prototyping electronic circuits. It is an essential tool for engineers, hobbyists, and technicians who need a reliable power source to power their projects.
Unlike batteries or wall outlets, which may not provide the precise voltage and current needed for specific circuits, a bench power supply allows users to precisely control the voltage and current output, making it suitable for a wide range of applications. This level of control is especially important when working with sensitive electronic components that require precise power requirements.
A typical bench power supply consists of a transformer to step down the supplied AC voltage, a rectifying circuit to convert it into DC, and a regulating circuit to adjust the voltage and current output. It usually includes various features such as adjustable voltage and current limits, overload protection, and voltage and current displays for monitoring the output.
Bench power supplies can be either linear or switching types. Linear power supplies offer excellent voltage regulation and low output noise but are less efficient. Switching power supplies, on the other hand, are more efficient and compact but may introduce more electrical noise into the output.
Overall, a bench power supply is an indispensable tool for anyone working with electronics, as it provides a stable and adjustable power source that can be tailored to the specific needs of each circuit. It allows for accurate measurements, troubleshooting, and experimentation, making it an essential component of any electronic workshop.
Why build your own Bench Power Supply?
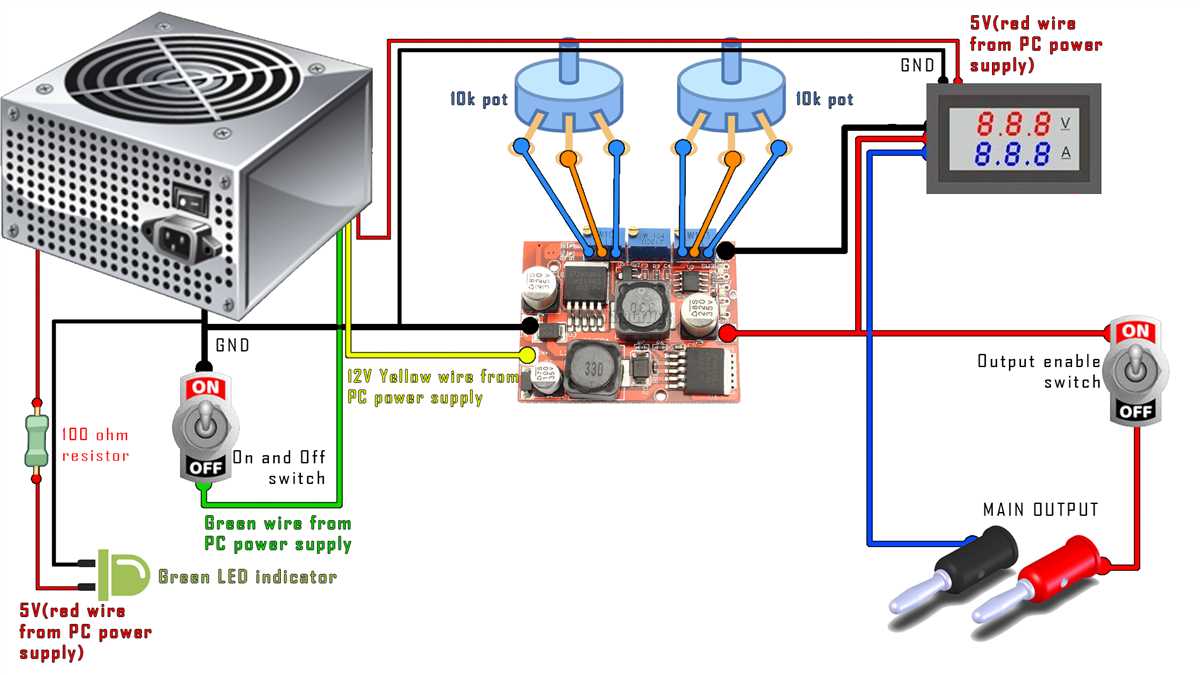
Building your own bench power supply can offer several advantages over purchasing a pre-built unit. It allows you to customize the specifications and features of the power supply according to your specific needs and requirements. Furthermore, it can be a rewarding DIY project that allows you to develop your electronics skills and understanding of power supply circuits.
One of the primary advantages of building your own bench power supply is cost-effectiveness. While pre-built power supplies can be expensive, sourcing the necessary components and building it yourself can often be more affordable. This is especially true if you already have some of the components or can find them at a lower cost.
Another advantage is the ability to have complete control over the features and specifications of the power supply. You can choose the voltage and current ranges, as well as the display and controls that best suit your needs. This level of customization allows you to tailor the power supply to the specific tasks you’ll be using it for, whether it’s for hobby electronics or professional testing and prototyping.
Building your own bench power supply can also be a learning experience. It provides an opportunity to gain a deeper understanding of power supply circuits, electronic components, and circuit design. This knowledge can be valuable for future projects and troubleshooting electrical issues. It also allows you to troubleshoot and repair the power supply if any problems arise, saving you time and money in the long run.
In conclusion, building your own bench power supply offers cost-effectiveness, customization options, and an opportunity to develop your electronics skills. It can be a fun and rewarding DIY project that allows you to have full control over your power supply specifications and features.
Advantages of DIY Bench Power Supply Schematic
Designing and building your own bench power supply using a DIY schematic can offer numerous advantages for electronics enthusiasts and professionals alike. These advantages include:
-
Cost-effective: By designing and constructing your own bench power supply, you can save money compared to purchasing a commercial power supply. DIY components are often more affordable, and you have the flexibility to choose the components based on your budget and specific needs.
-
Customization: When creating a bench power supply from a DIY schematic, you have the freedom to customize the features and functionality according to your requirements. You can choose the voltage range, current limit, and other specifications that suit your projects.
-
Learning experience: Building your own bench power supply provides an excellent educational opportunity. It allows you to learn about various electronic components, circuits, and power supply principles. Additionally, troubleshooting any issues that may arise during the construction process can enhance your troubleshooting and problem-solving skills.
-
Upgradability: With a DIY bench power supply, you have the ability to upgrade or modify the design as your needs evolve. You can easily add new features or enhance existing ones without purchasing an entirely new power supply.
-
Flexibility: A DIY bench power supply offers flexibility in terms of portability and power source. You can design a compact and portable power supply or integrate it into a larger setup. Additionally, you have the option to power the supply using AC mains or other power sources, depending on your requirements.
In conclusion, creating a bench power supply using a DIY schematic provides cost-effectiveness, customization, educational value, upgradability, and flexibility. These advantages make it an attractive option for electronics enthusiasts and professionals who require a reliable power supply for their projects.
Components for DIY Bench Power Supply Schematic
In order to build your own bench power supply, you will need several key components. These components are essential for the functionality and safety of your DIY project. Here are some of the important components you will need:
Transformer:
A transformer is a crucial component for converting the high voltage from the mains power supply to a lower voltage suitable for your bench power supply. It helps in isolating the circuit from the mains power and provides the necessary voltage for your project.
Rectifier Diodes:
Rectifier diodes are used to convert alternating current (AC) to direct current (DC). They ensure that the current flows in only one direction, which is essential for the operation of the power supply. These diodes are typically connected in a bridge rectifier configuration.
Filter Capacitors:
Filter capacitors are used to smooth out the rectified DC voltage and reduce any ripples or noise. They store energy and release it when the voltage drops, ensuring a steady and stable output voltage.
Voltage Regulator:
A voltage regulator is responsible for maintaining a constant output voltage regardless of any fluctuations in input voltage or load. It provides a stable output voltage that can be adjusted as per your requirement. Popular voltage regulators include linear regulators and switching regulators.
Current Limiting Circuit:
A current limiting circuit is used to protect your circuit and prevent any damage caused by excessive current. It ensures that the current flowing through the circuit does not exceed the specified limit and can be adjusted according to your needs.
These are just a few of the key components required for building a DIY bench power supply. Depending on your specific requirements and the features you want to include, you may need additional components such as display screens, voltage selectors, or protection circuits. It is important to research and select the right components that are compatible with your design and provide the desired functionality.
List of essential components for the project
In order to build a DIY bench power supply, there are several essential components that you will need. These components are necessary for the functionality and safety of the power supply. Here is a list of the essential components:
- Transformer: A transformer is needed to step down the main AC voltage to a lower voltage suitable for the power supply.
- Rectifier: A rectifier is used to convert the AC voltage from the transformer into DC voltage.
- Filter Capacitor: A filter capacitor is used to smooth out the DC voltage by filtering out any unwanted AC ripple.
- Regulator: A voltage regulator is used to maintain a constant DC output voltage regardless of changes in input voltage or load.
- Heat Sink: A heat sink is necessary to dissipate the heat generated by the voltage regulator and prevent overheating.
- Output Terminals: Output terminals are needed to connect the power supply to the external circuit or device.
- Fuse: A fuse is used as a safety measure to protect the power supply and connected devices from excessive current.
- Power Switch: A power switch is used to turn the power supply on or off.
- Meter: A meter, such as a voltmeter or ammeter, can be added to the power supply to measure the output voltage or current.
These components, along with other supporting components like resistors, capacitors, and connectors, are necessary to build a functional and safe DIY bench power supply. It is important to choose high-quality components and follow the schematic diagram carefully to ensure proper operation and avoid any potential hazards.
Building the DIY Bench Power Supply Schematic
Building your own bench power supply can be a rewarding and cost-effective project, allowing you to customize the capabilities and features to suit your specific needs. One popular DIY bench power supply schematic is based on the LM317 voltage regulator, which provides a variable output voltage from 1.2V to 37V and a maximum output current of 1.5A.
To build the DIY bench power supply, you will need a few key components, including the LM317 regulator, a suitable transformer, a rectifier diode, filter capacitors, and output binding posts. The LM317 regulator requires some additional components, such as resistors and capacitors, to set the desired output voltage. These components can be easily obtained from an electronics store or ordered online.
The first step in building the bench power supply is to connect the transformer to the rectifier diode. The rectifier diode converts the AC voltage from the transformer into DC voltage. This DC voltage is then filtered by the capacitor to remove any remaining AC ripple. The filtered DC voltage is then connected to the input of the LM317 regulator.
Once the input voltage is connected to the LM317 regulator, the output voltage can be set using the resistor and capacitor values. The LM317 regulator has three pins: input, output, and adjustment. The voltage can be adjusted by connecting a resistor between the adjustment pin and the output pin. The output voltage can be calculated using the formula Vout = 1.25V * (1 + R2/R1), where R1 is the resistor connected between the input and adjustment pins, and R2 is the resistor connected between the adjustment and output pins.
After setting the desired output voltage, it is important to test the bench power supply to ensure proper functionality and safety. Connect a load, such as a resistor or electronic device, to the output binding posts and measure the output voltage using a multimeter. Make sure the output voltage is within the desired range and that there is no excessive ripple or noise.
Building a DIY bench power supply allows you to have a versatile and customizable tool for your electronics projects. By selecting the appropriate components and following a schematic, you can create a power supply that meets your specific requirements and budget.
<
Components needed:
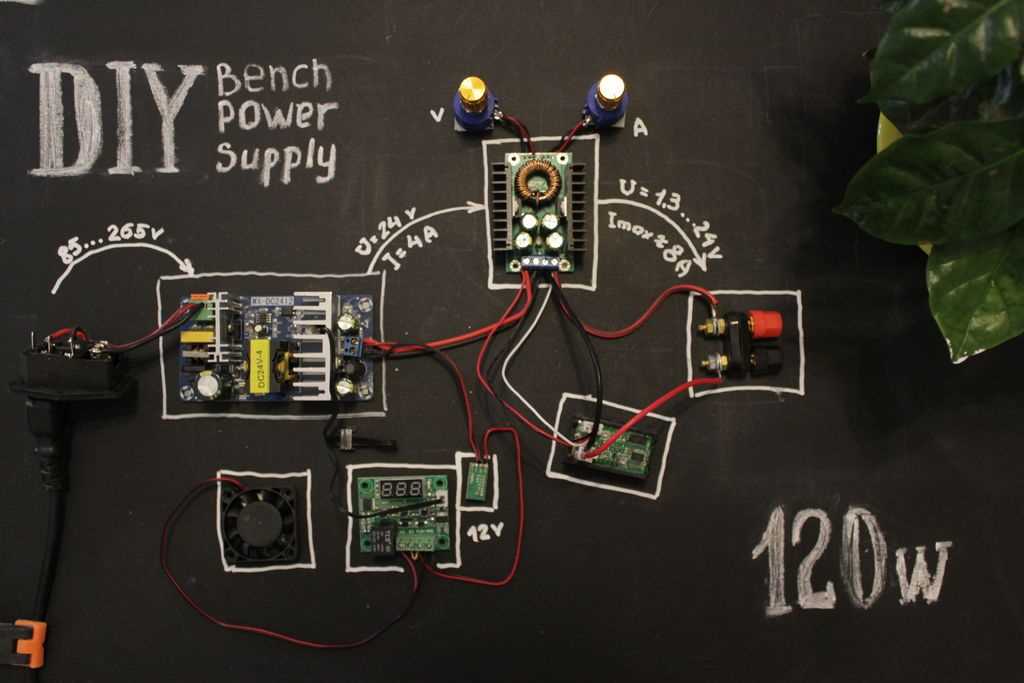
- LM317 regulator
- Transformer
- Rectifier diode
- Filter capacitors
- Output binding posts
- Resistors and capacitors for voltage adjustment
<
Steps to build the bench power supply:
- Connect the transformer to the rectifier diode.
- Filter the DC voltage using capacitors.
- Connect the filtered DC voltage to the LM317 regulator.
- Set the desired output voltage using resistors and capacitors.
- Test the bench power supply by connecting a load and measuring the output voltage.
Step-by-Step Guide to Building the Power Supply
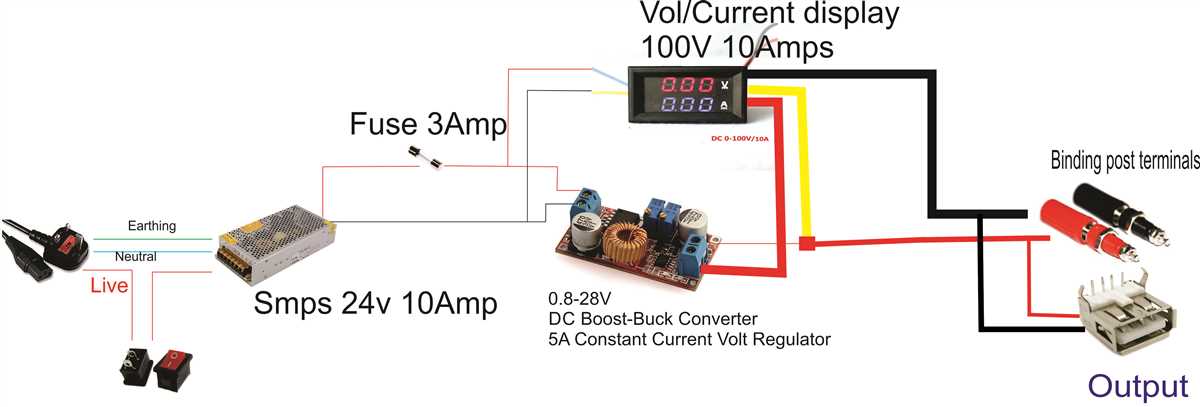
In this step-by-step guide, we will walk you through the process of building your own bench power supply from scratch. This power supply will allow you to provide a regulated and adjustable DC voltage to power your electronic projects.
1. Gather the necessary components: Before you start building the power supply, make sure you have all the required components. This includes a transformer, rectifier diodes, capacitors, voltage regulator ICs, resistors, and other necessary components.
2. Design the schematic: Use a schematic editor or design software to create the circuit diagram for your bench power supply. This schematic will serve as a blueprint for the project and guide you through the construction process.
3. Assemble the rectifier circuit: Begin the assembly process by connecting the rectifier diodes to the transformer. The rectifier circuit converts the AC voltage from the transformer to DC voltage, which is required for the power supply.
4. Build the filtering circuit: Connect the capacitors to the rectifier circuit to smooth out the DC voltage and filter out any remaining AC components. This will result in a cleaner and more stable output voltage.
5. Add the voltage regulator: Install the voltage regulator ICs to provide regulated and adjustable DC voltage. These ICs will ensure that the output voltage remains constant even with fluctuations in the input voltage or load.
6. Include additional features: Depending on your requirements, you can add additional features such as current limiting, voltage display, and overload protection to your power supply. These features will enhance the functionality and safety of your bench power supply.
7. Test and troubleshoot: Once the assembly is complete, power on the supply and test its functionality. Use a multimeter to measure the output voltage and ensure it matches the desired value. Troubleshoot any issues that may arise, such as voltage fluctuations or abnormal behavior.
By following these steps, you can successfully build your own bench power supply. Remember to follow safety precautions and double-check your work at each stage to ensure a functional and reliable power supply for your electronic projects.
Benefits of DIY Bench Power Supply
A DIY bench power supply offers several advantages over a commercially available power supply. Here are some of the key benefits:
- Cost-effective: Building your own bench power supply can be a cost-effective alternative to purchasing a pre-built one. You can often find the necessary components at a lower cost and customize the design based on your specific needs.
- Flexibility: DIY bench power supplies allow for greater flexibility in terms of voltage and current output. You can adjust the power supply to meet the requirements of different electronic devices and experiment with different voltages and currents.
- Customizability: With a DIY bench power supply, you have the freedom to customize the design and functionality according to your preferences. You can choose the features you need and add extra functionalities such as voltage displays, current limiters, or thermal protection.
- Learning opportunity: Building a DIY bench power supply is an excellent learning opportunity for electronics enthusiasts. It allows you to understand the principles behind power supplies, improve your soldering skills, and gain valuable knowledge about electronic components and circuits.
- Repairability: When you build your own power supply, you have a better understanding of its inner workings, making it easier to diagnose and repair any issues that may arise. You can also make modifications or upgrades as needed without relying on a manufacturer.
- Community support: The DIY electronics community is vast and supportive. When you build a DIY bench power supply, you can tap into this community for guidance, troubleshooting, and inspiration. There are numerous online forums, tutorials, and resources available to help you throughout the building process.
In conclusion, a DIY bench power supply offers cost-effectiveness, flexibility, customizability, a learning opportunity, repairability, and community support. It is a rewarding project for electronics enthusiasts, allowing them to have a power supply that meets their specific needs and provides a deeper understanding of power supply systems.
Q&A:
What is a DIY bench power supply?
A DIY bench power supply is a power supply device that you can build yourself using readily available components and tools. It typically provides a variable DC output voltage ranging from 0 to 30 volts and a current output ranging from 0 to 5 amps.
What are the benefits of DIY bench power supply?
There are several benefits of DIY bench power supply. Firstly, it is cost-effective as you can build it using affordable components, which is much cheaper than buying a commercial power supply. Secondly, it allows customization and flexibility, allowing you to tailor the voltage and current output to your specific needs. Additionally, DIY bench power supply projects can be educational and fun, providing valuable experience in electronics and circuit design.
What can a DIY bench power supply be used for?
A DIY bench power supply can be used for a variety of purposes. It can be used to power and test electronic circuits, components, and devices. It can also be used for prototyping and development of electronic projects. Additionally, it can be used for educational purposes, such as teaching basic electronics principles and circuit design.
Are there any drawbacks of DIY bench power supply?
While DIY bench power supply projects have many benefits, there are also some drawbacks to consider. Building a DIY bench power supply requires some level of electronics knowledge and soldering skills. It also takes time and effort to gather the necessary components and assemble the power supply. Additionally, DIY power supplies may not have the same quality and reliability as commercial ones, so it’s important to ensure proper safety measures and testing when using them.