
Wiring the pickups of a bass guitar can be a complex task, especially for those who are new to the world of instrument customization. However, with the right knowledge and tools, it is possible to create a wiring diagram that suits your needs. One popular wiring option for a bass guitar with a single pickup is the single pickup bass wiring diagram.
The single pickup bass wiring diagram is a simple and straightforward configuration that allows you to control the volume and tone of your bass using just one pickup. This diagram typically includes a volume potentiometer, a tone potentiometer, a capacitor, and a jack for your instrument cable. It is a popular choice for bass players who prefer a minimalist setup and want to focus on the natural sound of their single pickup.
When wiring your bass guitar using the single pickup bass wiring diagram, it is important to carefully follow the instructions and make sure you have the proper tools and equipment. Some common tools you may need include a soldering iron, solder, wire cutters, and a multimeter to test your connections. It is also recommended to have a wiring diagram specific to your bass model, as different basses may have slight variations in their wiring configurations.
Single Pickup Bass Wiring Diagram
In the world of bass guitars, there are many different wiring configurations that can be used to achieve different tones and effects. One popular option is the single pickup wiring diagram, which utilizes just one pickup to produce sound. This simplicity can be appealing to bassists who prefer a minimalist approach or who want to keep the focus on the tone of their pickup.
The single pickup bass wiring diagram typically consists of a volume control and a tone control, allowing the player to adjust the overall volume and tone of the instrument. These controls are wired in parallel with the pickup, meaning that the signal from the pickup is sent to both controls simultaneously. The volume control allows the player to adjust the output level of the pickup, while the tone control can be used to adjust the overall brightness or darkness of the sound.
One advantage of the single pickup wiring diagram is its simplicity. With fewer components and wiring connections, there is less room for potential issues or complications. Additionally, the minimal electronics can result in a more focused sound, allowing the natural characteristics of the pickup to shine through.
Many bassists choose to use single pickup wiring diagrams in conjunction with a high-quality, well-matched pickup. This allows them to really dial in their desired tone and get the most out of their instrument. Some popular pickups for single pickup basses include the Fender Precision Bass pickup and the Seymour Duncan Quarter Pound P-Bass pickup.
In conclusion, the single pickup bass wiring diagram offers a simple and versatile option for bassists looking to achieve their desired tone. With just a volume and tone control, this configuration allows for easy adjustments and a focused sound. Paired with a high-quality pickup, the single pickup bass wiring diagram can provide an excellent foundation for any bassist’s playing.
Understanding the Basics
The single pickup bass wiring diagram is a basic schematic that shows the layout and connections of a bass guitar with only one pickup. It is important to understand the basics of this diagram in order to properly wire and troubleshoot your bass guitar.
The diagram typically includes several key components, such as the pickup itself, volume and tone controls, and output jack. The pickup is the device that detects the vibrations of the strings and converts them into electrical signals. The volume control adjusts the overall output level, while the tone control allows you to shape the tonal characteristics of the instrument. The output jack is where you plug in your cable to connect the bass to an amplifier or other audio equipment.
Wiring the pickup: The pickup is usually connected to the volume control through a set of wires. This connection is typically depicted in the diagram using symbols that represent the pickup and its wires. It is important to follow the color-coding or labeling of the wires to ensure proper connectivity.
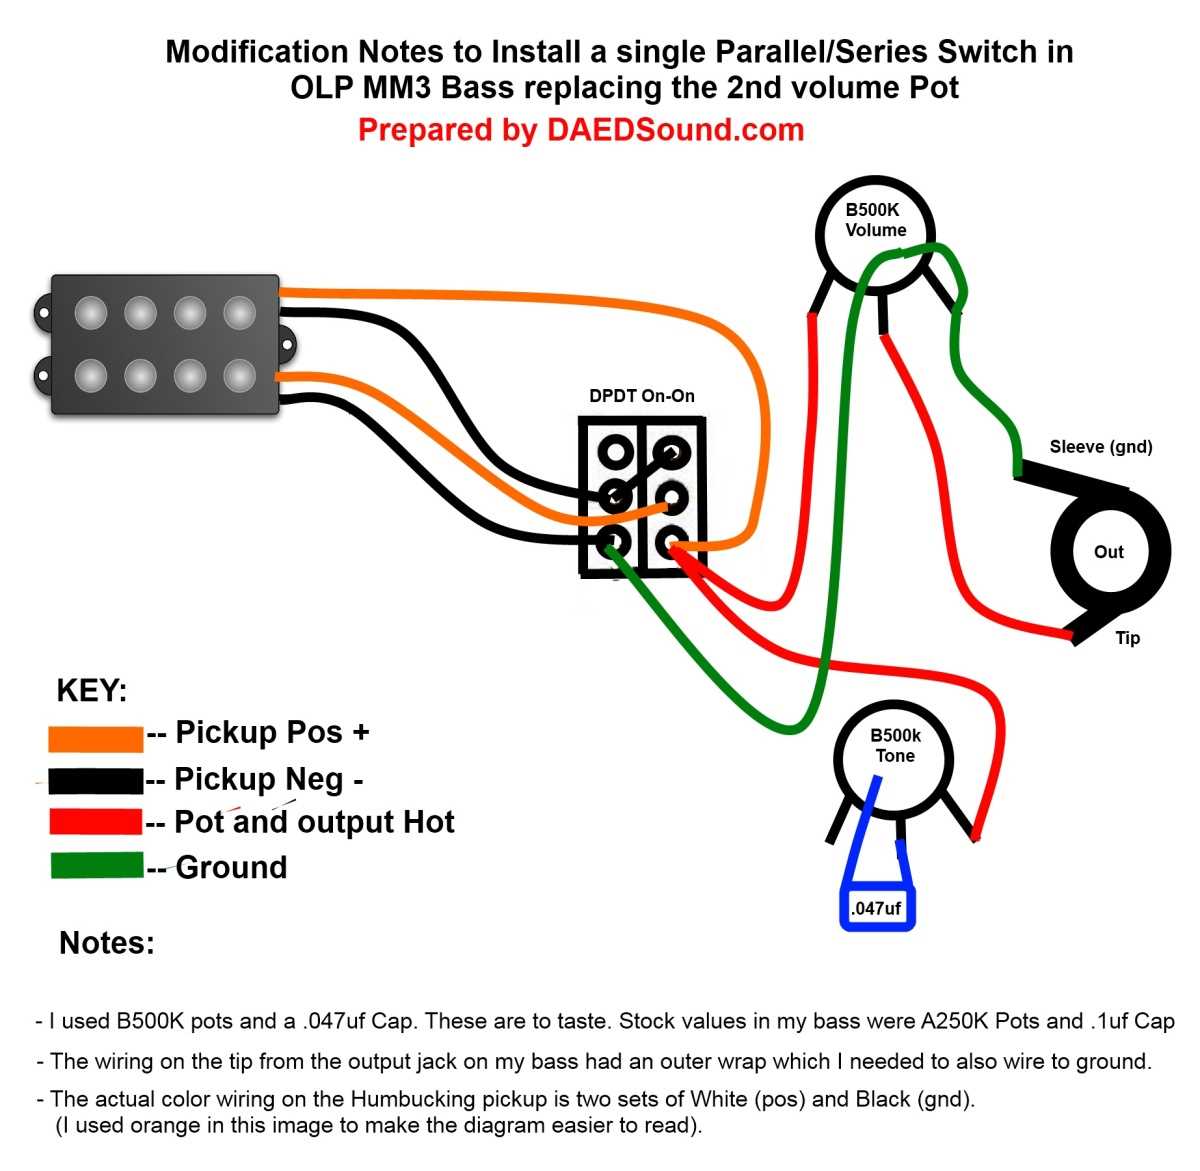
Connecting the controls: The volume and tone controls are usually connected in a circuit with the pickup and the output jack. The exact wiring configuration can vary, depending on the specific diagram and the desired functionality of the controls. It is important to carefully follow the diagram to ensure that the controls are properly connected and functioning as intended.
Understanding the signal flow: The diagram also shows the signal flow from the pickup to the controls and ultimately to the output jack. This helps you understand the path that the electrical signal takes and can be useful for troubleshooting any issues with your bass guitar’s electronics.
- Make sure to follow the wiring diagram for your specific pickup and bass model.
- Double-check all connections and ensure they are secure.
- If you encounter any issues, refer to the diagram and consult an experienced technician if necessary.
Choosing the Right Pickup
When it comes to choosing the right pickup for your single pickup bass, there are a few factors to consider. The pickup is responsible for converting the vibrations of the strings into an electrical signal that can be amplified and heard, so it plays a crucial role in the overall sound and tone of your bass.
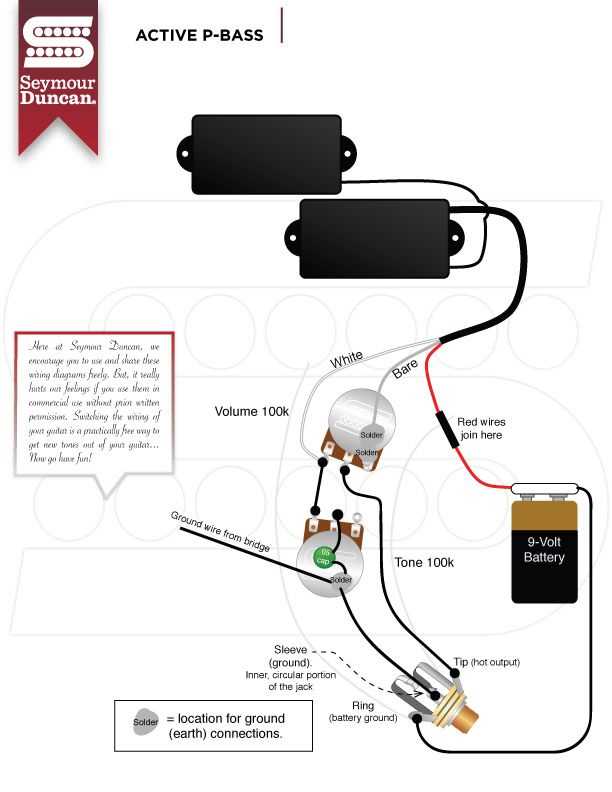
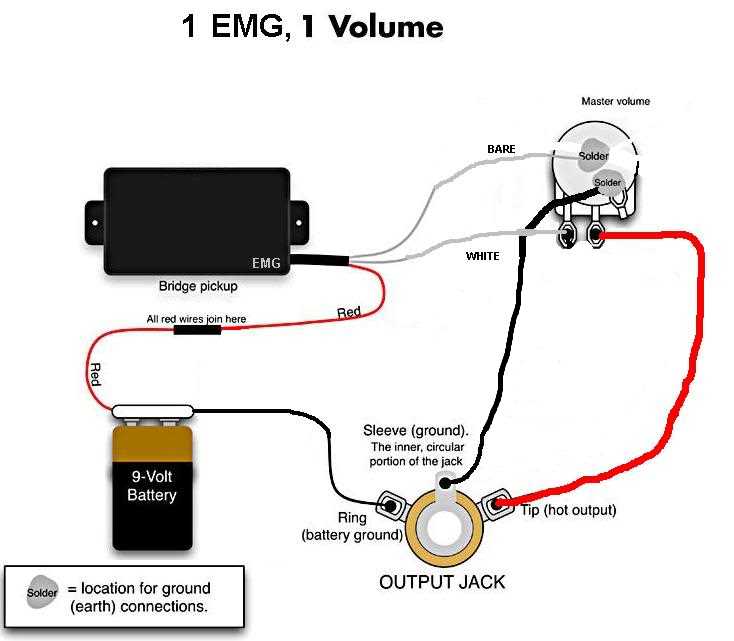
1. Pickup Type: There are different types of pickups available for bass guitars, including single-coil, humbucker, and active pickups. Single-coil pickups are known for their bright and clear tone, while humbuckers offer a thicker and warmer sound with reduced noise. Active pickups require a battery and provide a more powerful, versatile, and noise-free performance.
2. Sound Preference: Consider the sound you want to achieve with your bass. Different pickups have different tonal characteristics and can help you achieve a specific sound. For example, if you’re looking for a vintage and classic bass tone, a single-coil pickup might be the right choice. If you prefer a heavier and more aggressive sound, a humbucker or active pickup might be a better option.
3. Musical Style: Your musical style and genre should also influence your pickup choice. Different genres require different tones, and some pickups are better suited for specific styles. For example, if you play rock or metal music, a humbucker or active pickup with high output and strong midrange response might be ideal. On the other hand, if you play jazz or funk, a single-coil pickup with a bright and articulate tone might be more suitable.
4. Playing Technique: Your playing technique can also influence your pickup choice. Some pickups are more responsive to certain playing techniques, such as fingerstyle or slap bass. Experimenting with different pickups can help you find the one that complements your playing style and allows you to achieve the desired sound and tone.
Conclusion: Choosing the right pickup for your single pickup bass is a subjective decision that depends on your personal preference, musical style, and playing technique. It’s always a good idea to try out different pickups and listen to the sound they produce in order to make an informed decision. Ultimately, the right pickup will enhance your playing experience and help you achieve the desired tone and sound for your bass.
Gathering the Necessary Tools
Before you start wiring your single pickup bass, it’s important to gather all the necessary tools. Having the right tools at hand will make the process easier and more efficient. Here are some key tools you will need:
Soldering Iron
A soldering iron is an essential tool for any wiring project. It allows you to join wires and components together by melting a metal alloy called solder. When choosing a soldering iron, look for one with a fine tip and adjustable temperature settings for more precision.
Solder

Solder is the metal alloy used to create a permanent bond between wires and components. It has a low melting point and is usually made of a combination of tin and lead. However, it’s important to note that lead-free solder is now the recommended option due to health and environmental concerns.
Wire Cutters
Wire cutters are needed to trim and strip the insulation from the wires. Look for a pair with a sharp cutting edge and a comfortable grip. They should be able to cut through various gauge sizes of wire easily.
Wire Strippers
Wire strippers are used to remove the insulation from the ends of wires. They have various size notches or holes to accommodate different wire gauges. Look for a pair that is comfortable to hold and offers precise cutting and stripping abilities.
Electrical Tape
Electrical tape is used to insulate and protect exposed wires from short circuits and electrical hazards. It creates a protective barrier around the soldered connections. Look for a high-quality electrical tape that is stretchable, durable, and can withstand high temperatures.
Multimeter
A multimeter is an electronic measuring instrument used to test and troubleshoot electrical circuits. It can measure voltage, current, and resistance in your bass wiring. Having a multimeter on hand will help you ensure that your wiring is functioning correctly.
Once you have gathered these essential tools, you will be ready to start wiring your single pickup bass. Having the right tools will make the process smoother and help you achieve the desired results.
Wiring the Pickup
When it comes to wiring a single pickup bass, there are a few different options to consider. The most common setup is a single-coil pickup, which consists of a single magnet wrapped with a coil of wire. The pickup is placed near the strings of the bass and picks up the vibrations, converting them into an electrical signal that can be amplified.
To wire a single pickup bass, you will need a few basic components, including a pickup, a volume control knob, and a output jack. The wiring diagram will show you how to connect these components together to create a functioning bass guitar.
Typically, the pickup will have two wires: one for the hot signal and one for the ground. The hot wire will connect to the volume control knob, which will then connect to the output jack. The ground wire will also connect to the volume control knob, creating a complete electrical circuit.
It’s important to properly shield the wiring to minimize interference and noise. This can be done by using shielding paint or foil tape around the cavity where the electronics are housed. Additionally, grounding the bridge with a wire can help reduce unwanted noise.
Once you have the pickup wired and the shielding done, you can test the bass guitar to make sure everything is working correctly. Plug in a cable to the output jack and connect the other end to an amplifier. Turn the volume knob up and strum the strings to see if you get a signal. If everything is working properly, you should hear the sound of your bass guitar coming through the amp.
Testing and Fine-Tuning
Once the single pickup bass wiring has been completed, it is important to test and fine-tune the instrument to ensure optimal performance. This involves checking the functionality of the pickup, adjusting the tone and volume controls, and making any necessary adjustments to the overall sound.
Testing the Pickup: To test the pickup, plug the bass into an amplifier and play each string to ensure they are all captured by the pickup. Check for any dead spots or uneven volume levels, and make any necessary adjustments to the pickup height or pole piece screws to achieve a balanced sound across all strings.
Adjusting the Controls: The tone and volume controls on a single pickup bass can have a significant impact on the overall sound. Experiment with different settings to find the desired tone, and make any necessary adjustments to the control potentiometers if the sound is too bright, dull, or lacks clarity. It is also important to check that the controls are properly wired and functioning as expected.
Fine-Tuning the Sound: To fine-tune the sound, consider using EQ pedals or preamps to shape the tone further. This can help enhance certain frequencies or add more depth to the sound. Additionally, experimenting with different playing techniques, such as playing closer to the bridge or using a lighter touch, can also affect the overall sound and dynamics of the instrument.
Overall, testing and fine-tuning a single pickup bass is a crucial step in ensuring that it performs at its best. Taking the time to make any necessary adjustments to the pickup, controls, and overall sound will help achieve the desired tone and playability.
Troubleshooting Common Issues
In this section, we will discuss some common issues that you may encounter when wiring a single pickup bass and provide troubleshooting tips to help you resolve them.
No sound or weak signal
- Check the battery if your bass has an active pickup system. Replace the battery if necessary.
- Make sure the volume and tone controls are turned up.
- Inspect the wiring connections and make sure they are properly soldered and secure.
- Test the pickup with a multimeter to ensure it is functioning properly. If it is not, consider replacing the pickup.
Noisy or buzzing sound
- Check for loose or frayed wires. Repair or replace any damaged wires.
- Ensure that the metal components (bridge, strings, etc.) are properly grounded. Check the grounding wire connection.
- If using a shielded wire for the pickup, make sure the shielding is properly connected to the ground.
- Inspect the pots and switches for dirt or debris. Clean or replace them if necessary.
Inconsistent or intermittent sound
- Check for loose or broken connections. Resolder any loose or broken wires.
- Inspect the output jack and make sure it is securely connected.
- Test the pickup wiring with a multimeter to identify any faulty connections or components.
- Ensure the selector switch is functioning properly. Clean or replace it if needed.
Remember, it is always helpful to refer to the wiring diagram and double-check your work. If you are unsure or unable to resolve the issue on your own, it may be best to seek the assistance of a professional guitar technician.