
Having the right wiring diagram is crucial when installing a bathroom fan light combo. This diagram provides a clear understanding of how the different components and wires are connected, ensuring a safe and efficient installation. By following the wiring diagram, homeowners can confidently tackle this project themselves or communicate their needs to a professional electrician.
A bathroom fan light combo is a popular choice for bathrooms, as it serves two main functions: ventilation and lighting. The fan removes excess moisture and odors from the room, promoting a healthier environment. The light provides necessary illumination, making it easier to perform tasks such as shaving or applying makeup. By combining these two functions into one unit, homeowners can save space and streamline their bathroom design.
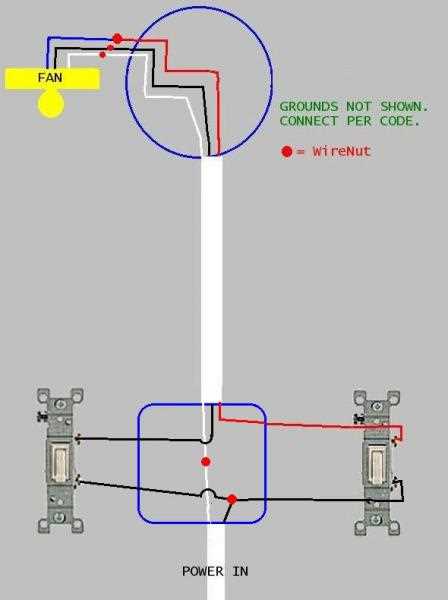
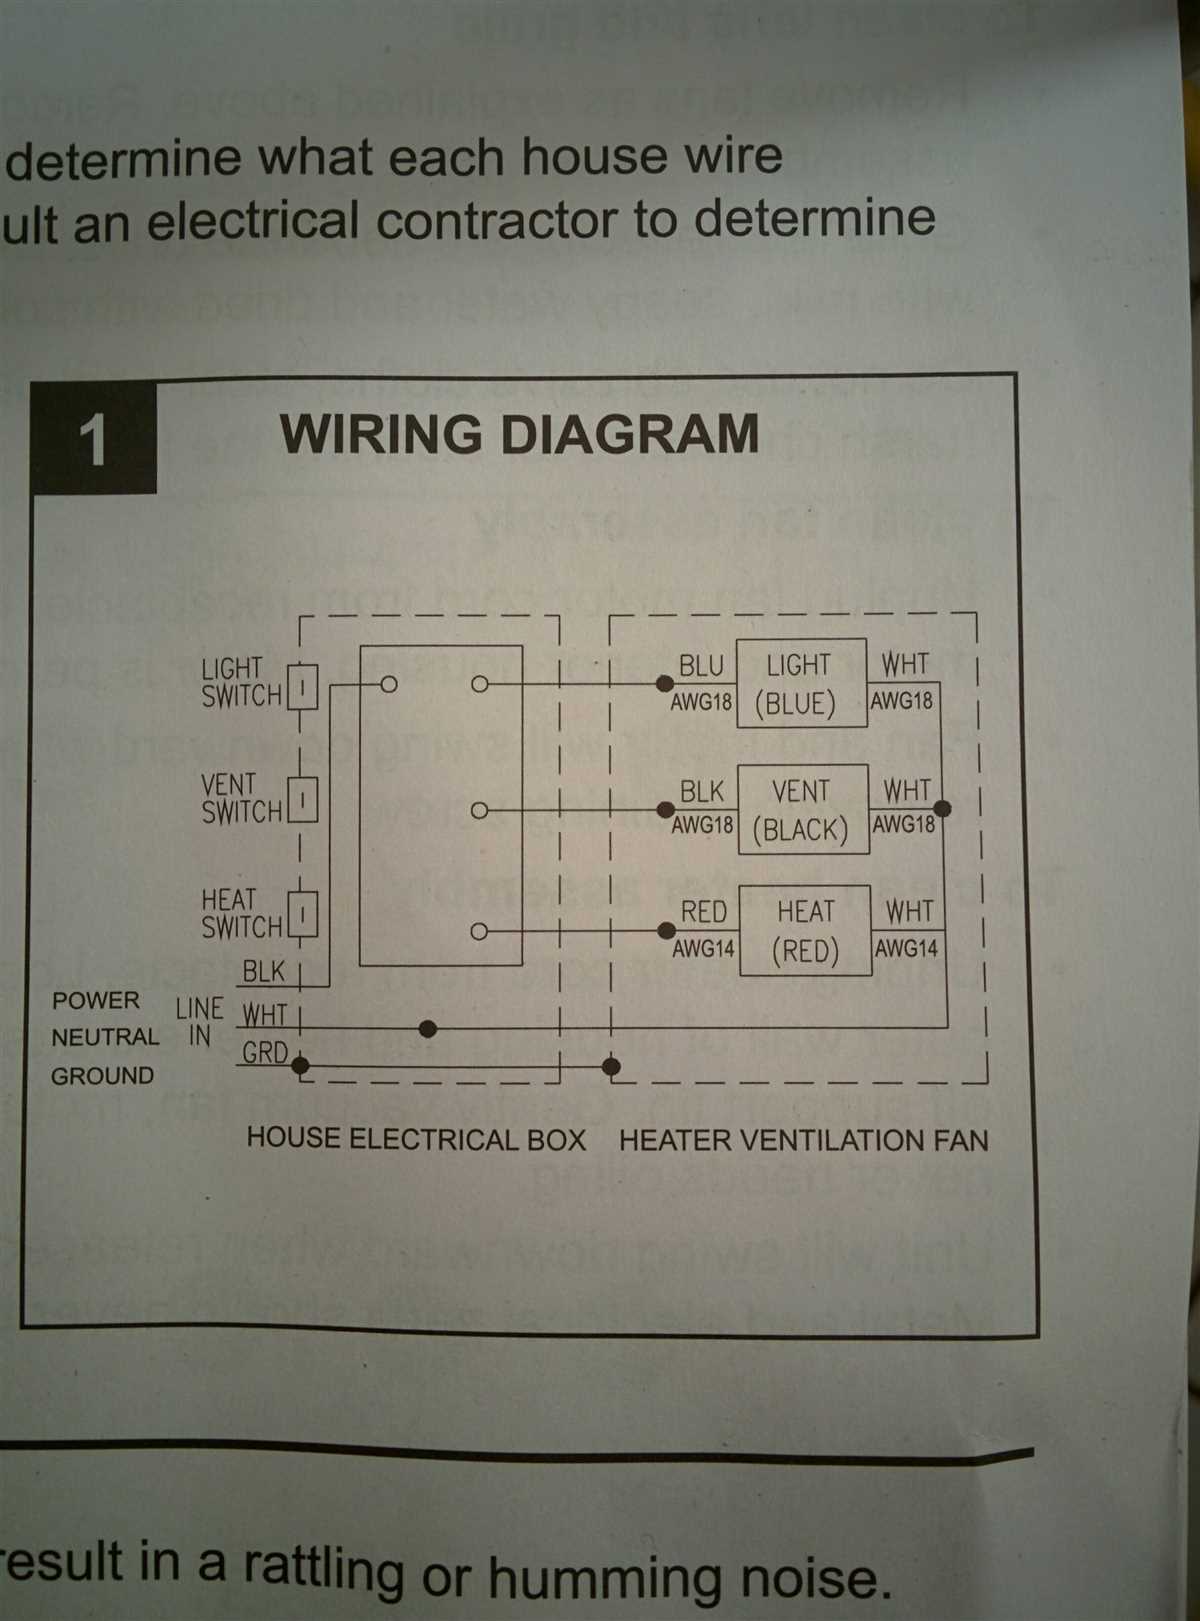
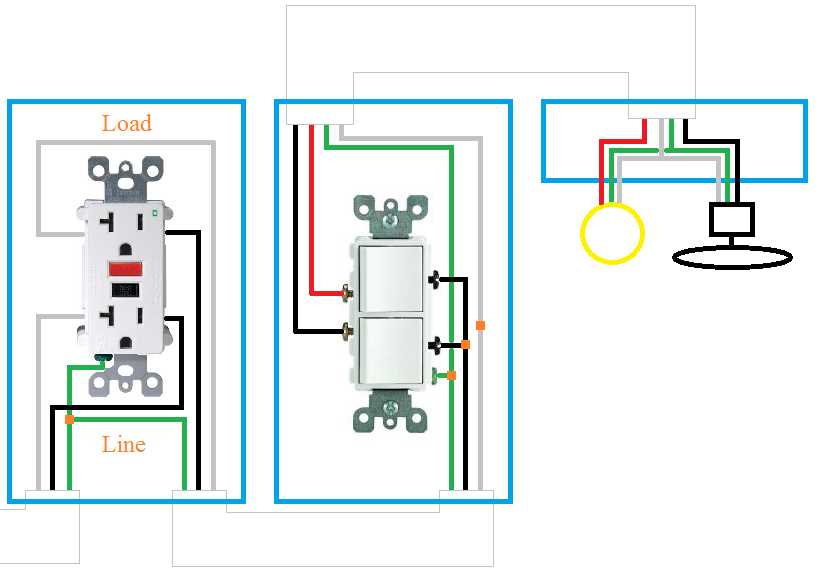
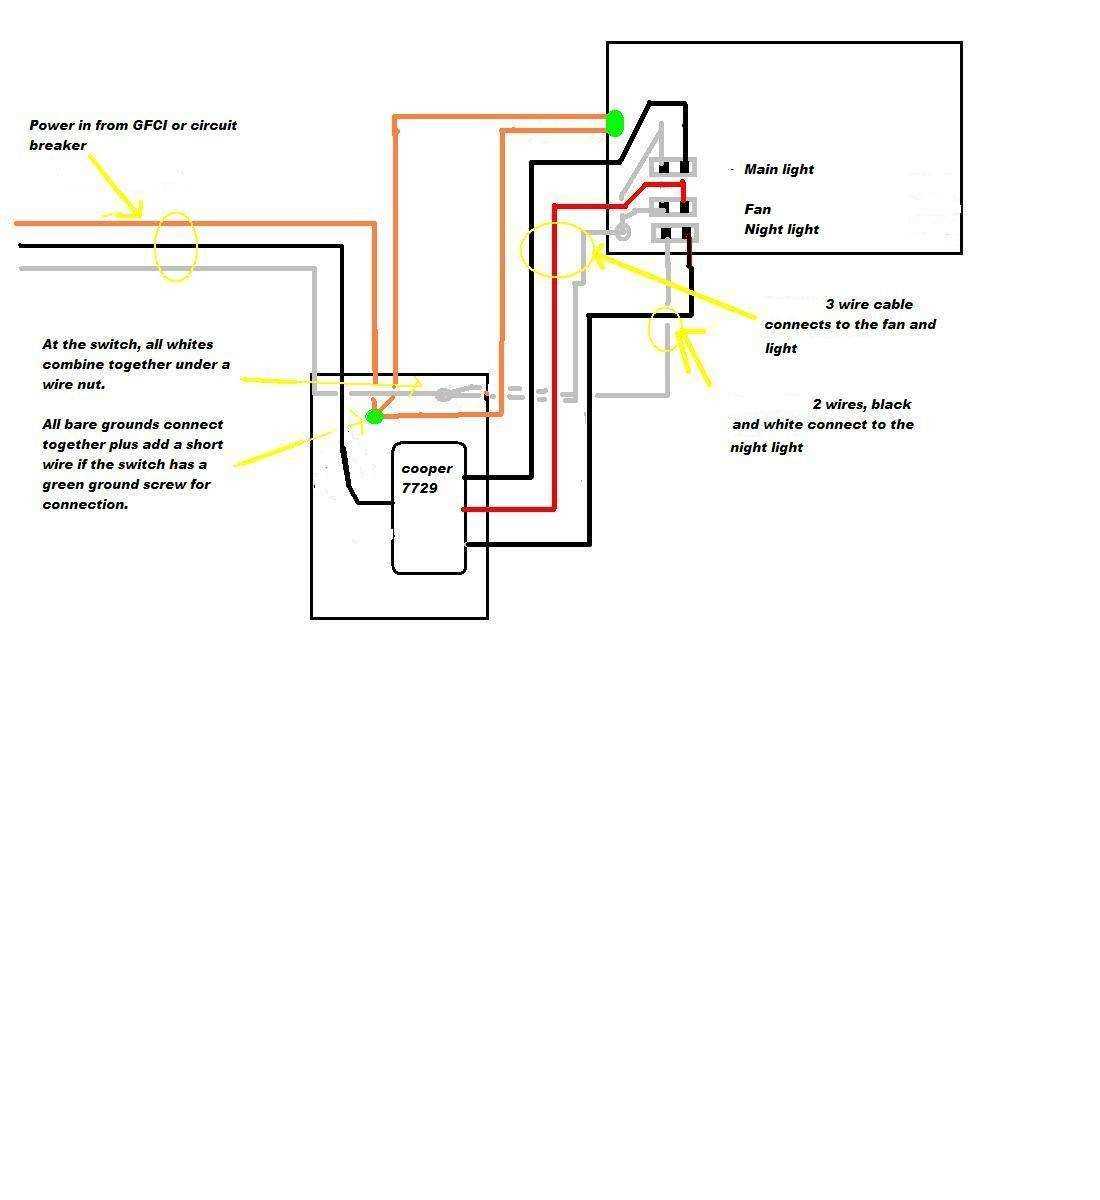
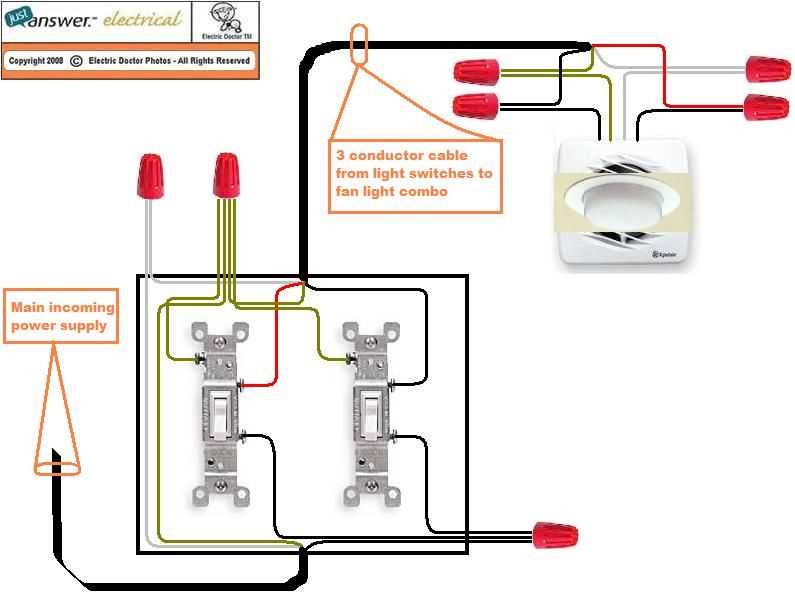
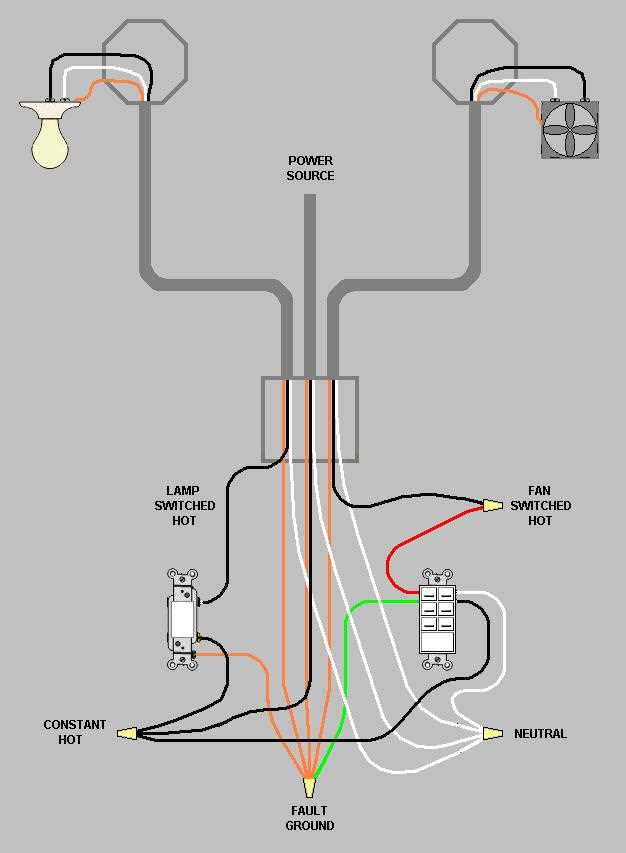
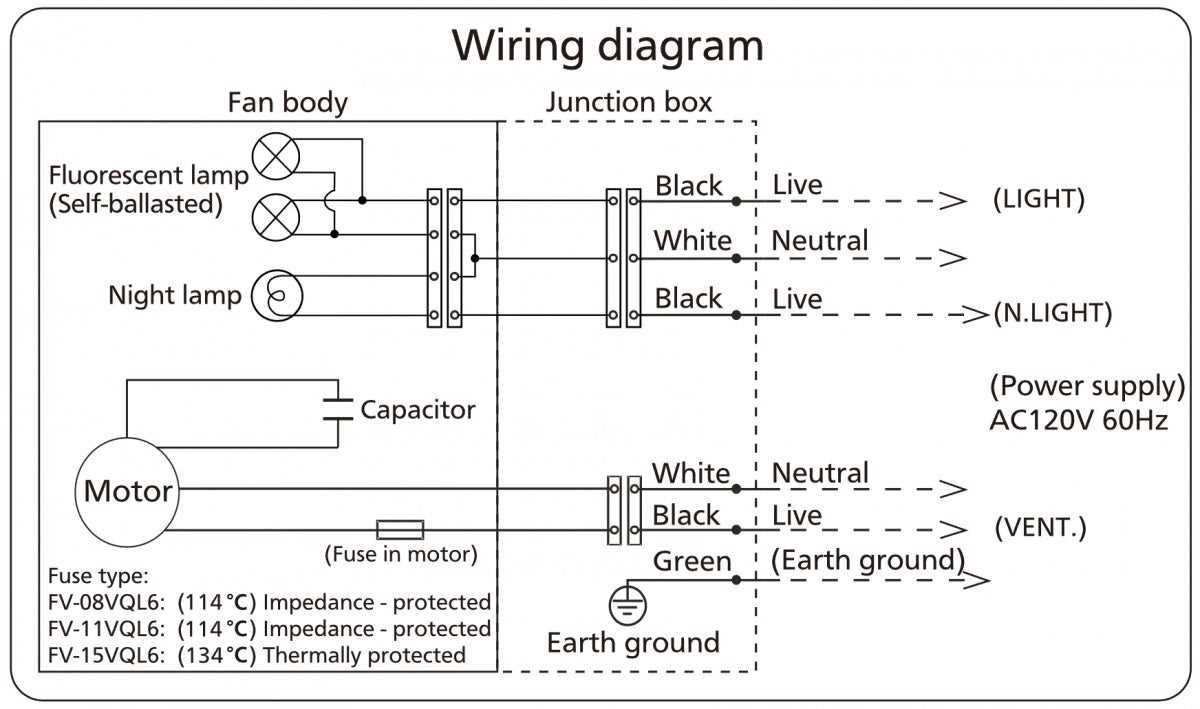
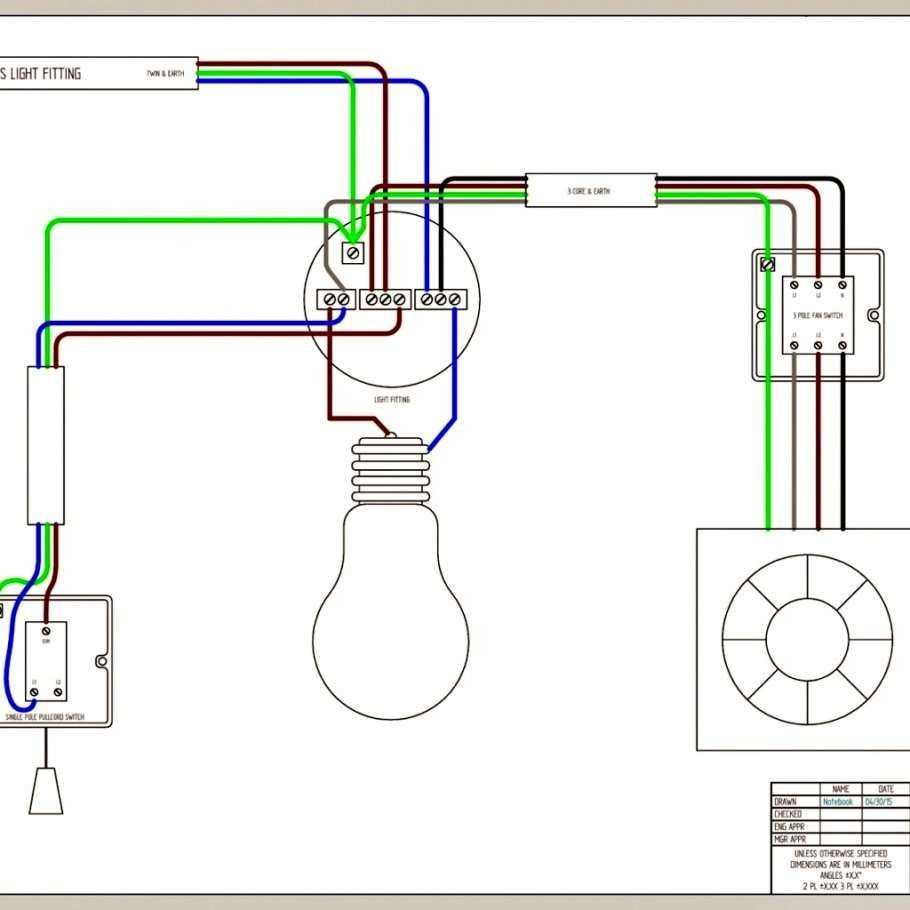
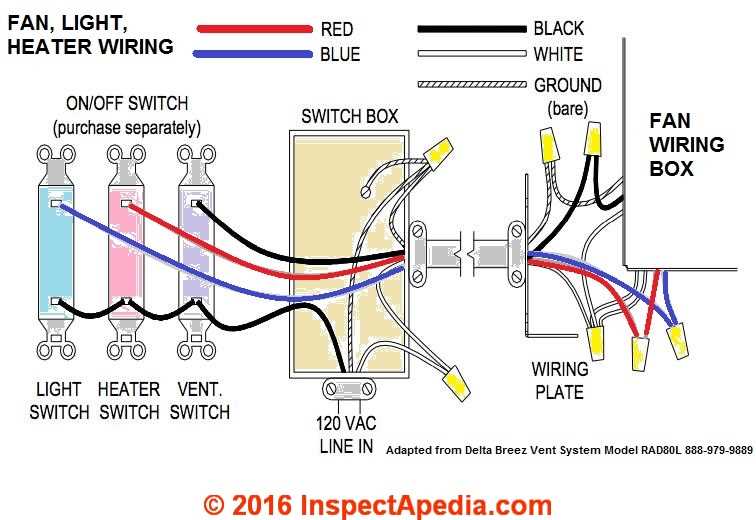
The wiring diagram for a bathroom fan light combo typically includes connections for the fan motor, light fixture, and switch. It shows the specific wires that need to be connected, such as the hot wire, neutral wire, and ground wire. It also indicates any additional features, such as a heater or nightlight, and how they should be wired. Following the wiring diagram is essential to ensure the fan and light function properly and are connected safely to the electrical system.
Bathroom Fan Light Combo Wiring Diagram: A Complete Guide
In a bathroom, it is essential to have proper ventilation and lighting. Installing a bathroom fan light combo can provide both functions in a single unit. However, wiring this combination correctly is crucial for safety and functionality.
The wiring diagram for a bathroom fan light combo typically includes connections for power supply, switch controls, and the fan and light fixtures. It is important to adhere to local electrical codes and regulations while performing the wiring process.
Step 1: Turn off the power
- Before starting any electrical work, ensure that the power supply to the bathroom is turned off. This can be done by switching off the circuit breaker or removing the fuse.
Step 2: Identify the power source
- Locate the power source, which is usually an electrical cable running from the main electrical panel to the bathroom area. This cable needs to be identified and disconnected for wiring purposes.
Step 3: Install the switch box
- Mount a switch box near the bathroom entrance to control the fan and light separately. This switch box should be securely attached to the wall and have sufficient wiring space.
Step 4: Connect the power supply
- Using approved electrical connectors, connect the power supply cable to the switch box. Carefully strip the wires, match the colors, and secure them tightly.
Step 5: Wire the fan and light fixtures
- Identify the cables leading to the fan and light fixtures. Connect the fan cable to the designated terminals in the switch box, and do the same for the light cable.
Step 6: Install the fan and light
- Mount the bathroom fan and light fixtures according to the manufacturer’s instructions. Ensure that they are securely attached and properly grounded.
Step 7: Test the wiring
- After completing the wiring, turn on the power supply and test the fan and light functions using the switches. Make sure everything is working correctly before closing up the switch box.
Following this bathroom fan light combo wiring diagram should ensure a safe and reliable installation. It is always recommended to consult a professional electrician if you are unsure about any step or if local regulations require professional installation.
Understanding the Basics of Wiring
When it comes to wiring, it is important to have a basic understanding of how electricity works and how to safely connect electrical components. Whether you are installing a new bathroom fan light combo or any other electrical device, following proper wiring techniques is crucial to ensuring both safety and functionality.
Electrical Circuits: All electrical devices are connected to an electrical circuit, which is a closed loop through which an electrical current flows. This circuit consists of a power source, such as a battery or an electrical outlet, and wires that carry the current to the device and back to the power source.
Components of Wiring:
Power Source: The power source provides the electricity that will be used by the device. It can be a battery or an electrical outlet connected to your home’s electrical system.
Wires: Wires are the conductive pathways that carry the electrical current. They are usually made of copper or aluminum and come in different gauges, with thicker wires capable of carrying higher currents.
Switches: Switches are used to control the flow of electricity within a circuit. They can be simple on/off switches or more complex devices that offer multiple settings.
Devices: Devices are the electrical components that you are connecting to the circuit, such as a bathroom fan light combo. Each device has specific wiring requirements, and it is important to follow the manufacturer’s instructions for proper installation.
Wiring Techniques:
Safety First: Before starting any wiring project, always turn off the power to the circuit at the electrical panel. Use a voltage tester to double-check that the power is indeed off before proceeding.
Proper Connections: When connecting wires, it is important to make secure and tight connections. This can be achieved by using wire nuts, which twist onto the exposed wires, or by using terminal blocks or connectors specifically designed for electrical connections.
Color Coding: Electrical wires are often color-coded to indicate their purpose. For example, black wires are typically used for hot wires carrying the current, white wires are neutral wires, and green or bare copper wires are ground wires. It is important to follow the color coding standards to ensure proper connections.
Labeling: When making connections, it is a good practice to label the wires for easy identification in the future. This can be done using colored tape or adhesive labels, indicating the purpose of each wire.
Insulation: Ensure that all exposed wires are properly insulated to prevent electrical shocks or short circuits. Use electrical tape or wire sleeves to cover any exposed areas.
Testing: Once the wiring is complete, test the device to ensure that it is working properly. If there are any issues, double-check the connections and consult the manufacturer’s instructions before proceeding.
By understanding the basics of wiring and following proper techniques, you can safely and effectively connect electrical components for various applications, including installing a bathroom fan light combo.
Gathering the Required Tools and Materials
Before you can start wiring your bathroom fan light combo, you’ll need to gather a few essential tools and materials. Having everything prepared beforehand will make the installation process much smoother and efficient. Here is a list of what you will need:
- Wire cutters and strippers: These tools will be used to cut and strip the electrical wires.
- Screwdriver set: You’ll need a variety of screwdrivers to remove and install electrical outlets and switches.
- Wire connectors: Wire connectors, also known as wire nuts, are used to join and secure the electrical wires together.
- Voltage tester: This tool is crucial for ensuring that the power to the circuit is switched off before starting any electrical work.
- Electrical tape: Electrical tape is used to insulate and protect exposed wires and connections.
- Wire staples or clips: These are used to secure the electrical wires in place along walls or ceilings.
- Bathroom fan light combo: Of course, you’ll need the actual fan light combo unit for installation.
- Electrical cables: You’ll need electrical cables to connect the fan light combo to a power source.
Make sure to check the instructions provided with your specific fan light combo to determine the exact tools and materials required. It’s also a good idea to double-check if any additional items are needed for your specific installation.
Planning the Wiring Layout
When designing the wiring layout for a bathroom fan light combo, it’s important to consider both safety and functionality. Before starting any electrical work, make sure to turn off the power supply to the area you’ll be working in.
First, determine the location of the fan and light fixtures in the bathroom. This will help you to identify the areas where you’ll need to install the necessary wiring. Draw a diagram of the bathroom layout and mark the positions of the fixtures, along with any existing electrical outlets or switches.
Next, identify the power source for the fan and light combo. This can be an existing circuit or a new one that you’ll need to install. If you’re using an existing circuit, ensure that it has enough capacity to handle the additional load of the fan and light. If a new circuit is required, consult local electrical codes to determine the appropriate wire size and circuit breaker size for the fan and light combo.
Once you’ve determined the power source, plan the route for the wiring. It’s important to keep the wiring away from areas that may come in contact with water, such as the shower or bathtub. Use appropriate conduit or cable protectors to ensure the wiring is safely hidden and secured.
Consider whether you’ll need separate switches for the fan and light, or if you prefer a single switch to control both. In either case, plan the location of the switches and determine the appropriate wiring connections.
Finally, always consult local electrical codes and regulations when planning and installing the wiring for a bathroom fan light combo. These codes ensure that the installation is done correctly and safely. If you’re unsure about any aspect of the wiring process, it’s best to consult a licensed electrician to ensure compliance with all safety standards.
Wiring the Bathroom Fan
Wiring the bathroom fan is an important step in the installation process. It involves connecting the various electrical components to ensure the fan and light functions properly. One important consideration is following the wiring diagram provided by the manufacturer.
The first step in wiring the bathroom fan is to turn off the power at the breaker box. This ensures that no electricity is flowing to the area where the fan will be installed. It is important to always work with electrical wiring when the power is turned off to avoid any accidents or injuries.
1. Gather the necessary tools and materials:
- Wiring diagram provided by the manufacturer
- Wire stripper
- Wire nuts
- Screwdriver
- Electrical tape
2. Connect the wires according to the wiring diagram:
- Identify the power source and connect it to the switch box using wire nuts.
- Run a cable from the switch box to the fan housing location.
- Connect the black wire from the power source to the black wire on the switch.
- Connect the white wire from the power source to the white wire on the switch.
- Connect the black wire from the fan to the black wire on the switch.
- Connect the white wire from the fan to the white wire on the switch.
- Connect the ground wire from the power source to the ground wire on the switch.
After all the wires have been connected, it is important to double-check the connections and make sure they are secure. Electrical tape can be used to wrap the wire nuts for added safety. Once everything is properly connected, the power can be turned back on and the bathroom fan should be ready to use.
Wiring the Bathroom Light
In order to properly wire the bathroom light, it is important to follow the wiring diagram provided by the manufacturer. This diagram will outline the specific connections and color-codings that need to be made for the light to function correctly. Before beginning the wiring process, it is crucial to turn off the power supply to the bathroom light circuit.
The first step in wiring the bathroom light is to connect the wires from the light fixture to the corresponding wires in the electrical box. This is typically done by using wire nuts to secure the connections. The wiring diagram will indicate which wires should be connected together.
Important: It is essential to ensure that the connections are tight and secure to prevent any loose wires or potential electrical hazards.
After the connections are made, the light fixture can be attached to the electrical box using the provided screws or mounting hardware. It is important to follow the manufacturer’s instructions for properly securing the light fixture.
Once the fixture is installed, the power supply can be turned back on to test the bathroom light. It is recommended to use a voltage tester to ensure that power is properly reaching the fixture before turning it on completely.
If everything is functioning correctly, the bathroom light can now be used. However, if there are any issues with the wiring or the light does not turn on, it is important to double-check the connections and consult the wiring diagram for troubleshooting steps.
Testing and Troubleshooting
Testing and troubleshooting the wiring of a bathroom fan light combo can help identify any issues and ensure that the system is functioning properly. Here are some steps to follow:
1. Check the power supply
Ensure that the power supply to the bathroom fan light combo is turned on. Check the circuit breaker or fuse box to make sure that there is power running to the fan and light.
2. Test the switches
Verify that the switches controlling the fan and light are in the correct positions. Flip the switches multiple times to check for any loose connections or faulty switches.
3. Measure the voltage
Using a multimeter, measure the voltage at the fan and light terminals. The readings should match the specifications provided by the manufacturer. If the voltage is incorrect, there may be an issue with the wiring or the power supply.
4. Inspect the wiring
Visually inspect the wiring connections for any signs of damage, such as frayed wires or loose connections. Ensure that all the wires are properly connected and secured. If any issues are found, they should be addressed and repaired.
5. Test with a different light bulb or fan motor
If the fan or light is not working, try replacing the light bulb or fan motor with a new one that is known to be working. This will help determine if the issue is with the component itself or with the wiring.
6. Seek professional help

If the above steps do not resolve the issue, it is recommended to seek the assistance of a qualified electrician. They will have the expertise and tools to diagnose and fix any underlying problems with the bathroom fan light combo wiring.
In conclusion, testing and troubleshooting the wiring of a bathroom fan light combo is important to ensure proper functionality and safety. By following the steps above and seeking professional help if needed, any issues can be identified and resolved effectively.