
When it comes to boating, one of the most important components to have on board is a float switch. A float switch is a device that is used to detect the level of water in a boat’s bilge. It is an essential part of the boat’s overall safety system, as it ensures that the bilge pump is activated when water reaches a certain level.
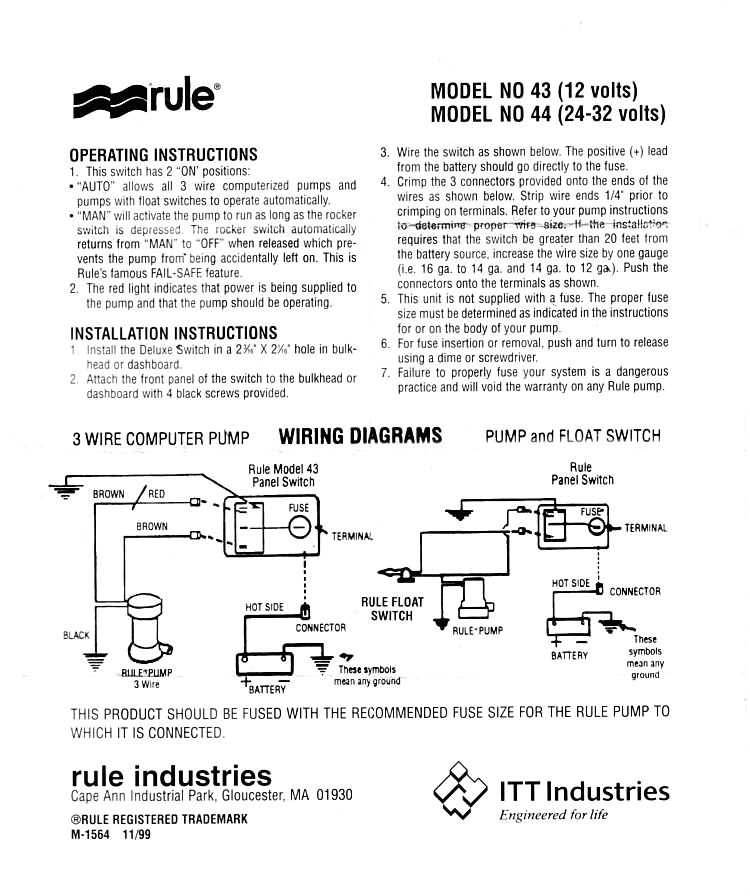
Wiring a float switch may seem like a complicated task, but it is actually quite simple. The diagram provides a visual representation of how the switch is wired in a boat. The diagram shows the various connections that need to be made between the float switch, the bilge pump, and the boat’s electrical system.
One of the key components in the wiring diagram is the float switch itself. The float switch consists of a float that is attached to a switch via a rod. As the water level in the bilge rises, the float also rises. When the float reaches a certain height, it activates the switch, which then sends a signal to the bilge pump to start pumping out the water.
The wiring diagram also shows how the float switch is connected to the boat’s electrical system. The switch needs to be wired to a suitable power source, such as the boat’s battery. It also needs to be connected to the bilge pump, which is responsible for pumping out the water. Additionally, the wiring diagram shows the various connections for the pump’s power and ground wires.
In conclusion, having a properly wired float switch is crucial for the safety of a boat. The wiring diagram provides a clear visual representation of how the various components are connected, ensuring that the switch functions correctly. By following the diagram and properly wiring the float switch, boat owners can have peace of mind knowing that their bilge pump will activate when needed.
Understanding the Basics of Boat Float Switch Wiring
If you own a boat, ensuring the proper functioning of the float switch is crucial for maintaining the safety and integrity of your vessel. A float switch is an electrical device that is commonly used in boats to detect the level of water in the bilge and automatically turn on the bilge pump when the water reaches a certain level. Understanding the basics of boat float switch wiring is essential for both boat owners and marine electricians.
Float switch installation: Before wiring the float switch, it is important to install it correctly in the boat’s bilge area. The float switch should be positioned in a way that allows it to move up and down freely with the water level. It is also important to ensure that the float switch is securely mounted to prevent any movement or damage.
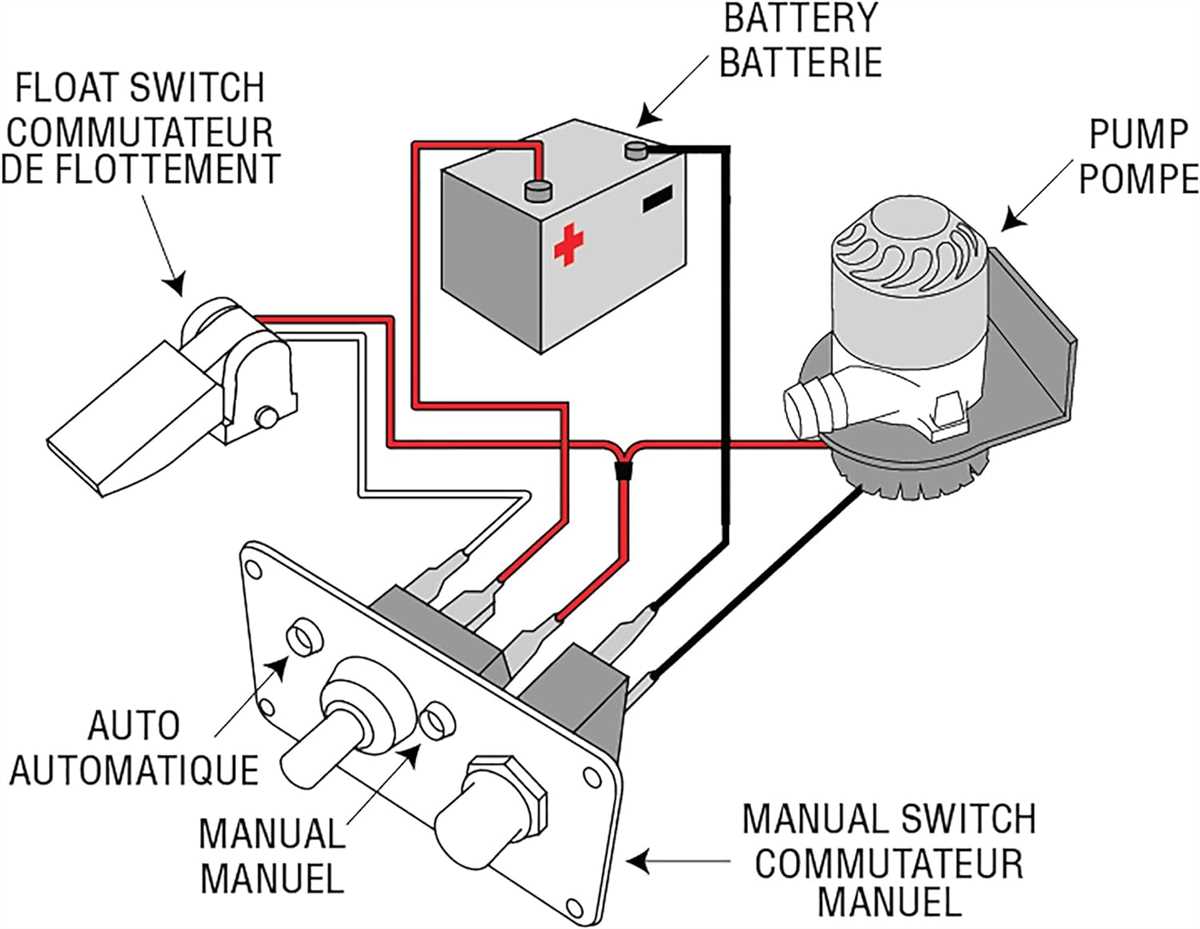
Wiring connections: The wiring connections for a boat float switch typically include three main components – the float switch, the bilge pump, and the boat’s electrical system. The float switch and the bilge pump are usually wired in series, meaning that the positive wire from the float switch is connected to the positive wire of the bilge pump, and the negative wire of the float switch is connected to the negative wire of the bilge pump.
Additionally, the float switch is usually connected to the boat’s electrical system through a control panel or a dedicated float switch controller. This allows the boat operator to monitor the status of the float switch and the bilge pump and to manually override the automatic operation if necessary. The wiring connections for the float switch controller may vary depending on the specific model and manufacturer.
Safety precautions: When working with boat float switch wiring, it is important to follow proper safety precautions to prevent electrical shocks and potential damage. Always ensure that the boat’s electrical system is turned off before starting any wiring work. It is also recommended to use appropriate wire connectors and to secure the wiring neatly to avoid any potential hazards or interference with other boat systems.
Regular maintenance: Proper maintenance of the boat float switch is essential to ensure its reliable operation. It is recommended to regularly inspect the float switch for any signs of damage or wear, such as corroded wires or loose connections. It is also important to test the float switch periodically to confirm that it is functioning correctly and activating the bilge pump at the desired water level.
In conclusion, understanding the basics of boat float switch wiring is crucial for the safety and functionality of your boat. Proper installation, wiring connections, and maintenance are essential for ensuring the reliable operation of the float switch and the bilge pump. As always, if you are unsure about any aspect of the wiring process, it is recommended to consult a professional marine electrician for assistance.
What is a Boat Float Switch?
A boat float switch is an essential component of a boat’s bilge pump system. It is designed to automatically detect the presence of water in the boat’s bilge and activate the pump to remove the water. This ensures that the boat remains buoyant and prevents potential damage from excess water accumulation.
A boat float switch consists of a buoyant float attached to an arm. When water enters the bilge, the float rises, causing the arm to activate a switch. The switch then triggers the bilge pump to start pumping out the water. Once the water level decreases and the float falls, the switch is deactivated, turning off the pump.
The boat float switch is typically installed inside the boat’s bilge, which is the lowest part of the boat where water tends to accumulate. It is crucial for the float switch to be properly wired and connected to the boat’s electrical system to ensure reliable operation. Incorrect wiring can lead to pump malfunction or failure, which can be dangerous in emergency situations where prompt water removal is necessary.
There are different types of boat float switches available, including vertical float switches and horizontal float switches. Vertical float switches are commonly used in smaller boats and have a long, narrow float that moves up and down along a vertical shaft. Horizontal float switches, on the other hand, have a wider float that moves horizontally.
Boat float switches are an important safety feature and should be regularly inspected and tested to ensure proper functioning. Additionally, it is important to follow the manufacturer’s instructions and guidelines when installing or wiring a boat float switch to ensure its reliability and effectiveness in keeping your boat safe and free from excess water.
Components of a Boat Float Switch Wiring Diagram
In order to properly wire a boat float switch, it is important to understand the components that make up the wiring diagram. The diagram outlines the connections and electrical pathways for the float switch system. Here are some key components that are typically found in a boat float switch wiring diagram:
- Float Switch: This is the main component of the system that detects the water level in the boat bilge. It is typically a mechanical or electronic switch that activates and deactivates based on the water level.
- Bilge Pump: The bilge pump is responsible for pumping out any water that accumulates in the boat bilge. It is typically connected to the float switch and activates when the water level reaches a certain point.
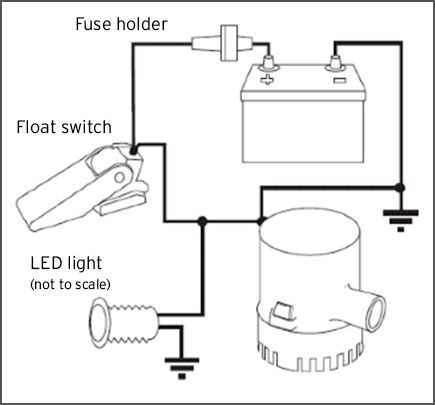
- Battery: The boat float switch system is usually powered by a battery. The battery provides the necessary electrical energy for the float switch and the bilge pump to function.
- Fuse or Circuit Breaker: To protect the system from electrical faults or overloads, a fuse or circuit breaker is typically included in the wiring diagram. This component will cut off the electrical power in case of an abnormal situation.
- Wires and Connectors: The wiring diagram will show how the various components are connected using wires and connectors. It is important to use the correct wire gauge and connectors to ensure proper electrical connections and prevent any potential hazards.
By understanding the components of a boat float switch wiring diagram, boat owners can properly install and maintain the system. It is recommended to follow the manufacturer’s instructions and guidelines when wiring the float switch system to ensure safe and reliable operation.
Step-by-Step Guide: Wiring a Boat Float Switch
Wiring a boat float switch is an essential task for any boat owner. A float switch is a critical component that controls the operation of the bilge pump, which helps to prevent the boat from flooding. By properly wiring a float switch, you can ensure that your boat remains safe and dry even in the event of water accumulation.
Before starting the wiring process, it is important to gather all the necessary tools and materials. You will need a boat float switch, a bilge pump, marine-grade wires, wire strippers, crimp connectors, heat shrink tubing, a soldering iron (optional), and a multimeter.
Step 1: Determine the Float Switch Placement

The first step is to determine the ideal placement for your float switch. It should be positioned in a location where it can easily detect the rising water level. This is typically in the bilge area of the boat. Ensure that the float switch can move freely and isn’t obstructed by any other equipment or debris.
Step 2: Connect the Wires
Start by connecting the positive wire from the float switch to the positive terminal on the bilge pump. Use crimp connectors or solder the wires together, and then cover the connection with heat shrink tubing for added protection. Repeat the process for the negative wire.
Step 3: Test the Wiring

After connecting the wires, it is important to test the wiring to ensure that everything is functioning properly. Use a multimeter to verify that there is continuity between the float switch and the bilge pump. Additionally, test the functionality of the float switch by manually raising and lowering it while monitoring the bilge pump’s operation.
Step 4: Secure the Wiring
Once the wiring has been tested and verified, it is important to secure the wires to prevent any accidental damage. Use wire ties or adhesive mounts to secure the wires along their path and keep them away from any moving parts or sharp edges.
By following these step-by-step instructions, you can confidently wire a boat float switch and ensure the safety of your boat. It is always recommended to consult the manufacturer’s instructions and guidelines for specific wiring details for your particular model of float switch and bilge pump.
Common Mistakes to Avoid in Boat Float Switch Wiring
Proper wiring of a boat float switch is essential to ensure the reliable and efficient operation of your boat’s bilge pump. However, there are some common mistakes that boat owners should avoid when wiring their float switches. These mistakes can result in malfunctioning switches or even damage to the pump system.
1. Incorrect Installation of the Float Switch

One common mistake is installing the float switch in the wrong location. The float switch should be positioned in a spot where it will be able to accurately sense the water level in the bilge. Placing it too high or too low can result in the pump not turning on when needed or running constantly, causing excess wear and tear on the pump.
2. Improper Wiring Connections
Another common mistake is improper wiring connections. It is important to follow the manufacturer’s instructions for wiring the float switch correctly. This includes using the appropriate gauge of wire and ensuring that all connections are securely tightened. Loose connections can lead to electrical arcing and potential failure of the switch.
3. Failing to Use a Fuse or Circuit Breaker
Some boat owners may overlook the importance of using a fuse or circuit breaker in the float switch wiring circuit. This protective device is crucial in preventing damage to the pump and other electrical components in the event of a short circuit or overload. Without a fuse or circuit breaker, excessive current can flow through the wiring, potentially causing a fire or damaging the pump.
4. Neglecting Regular Inspections and Maintenance
Lastly, many boat owners make the mistake of neglecting regular inspections and maintenance of their float switch and bilge pump system. Over time, debris and corrosion can accumulate in the switch, affecting its performance. It is important to clean and inspect the float switch periodically to ensure it is operating correctly. Additionally, checking the pump and its connections for any signs of wear or damage can help prevent potential issues.
By avoiding these common mistakes and following proper wiring practices, boat owners can ensure the reliable and effective operation of their boat’s float switch and bilge pump system. Regular maintenance and inspections can help identify any issues early on and prevent costly repairs in the future.
Troubleshooting Boat Float Switch Wiring Issues
A boat float switch is an essential component in a bilge pump system, responsible for detecting water levels and activating the pump to remove excess water from the boat’s bilge. However, float switch wiring issues can arise, preventing the switch from functioning properly. Here are some common problems and troubleshooting steps to resolve them.
1. No Power
If the float switch is not receiving power, it will not be able to function. Check the power source (usually the boat’s battery) and ensure that it is fully charged and connected properly. Verify that there are no blown fuses or tripped circuit breakers that may be affecting the power supply.
2. Faulty Wiring Connections
Inspect the wiring connections between the float switch, bilge pump, and power source. Loose or corroded connections can disrupt the flow of electricity and prevent the switch from operating correctly. Clean any corrosion and tighten any loose connections. It is also essential to ensure that the wiring is correctly connected according to the wiring diagram provided by the manufacturer.
3. Stuck Switch
A float switch can become stuck in the “on” or “off” position, preventing it from accurately detecting water levels. Gently tap the switch to dislodge any debris or ensure that the float is not obstructed. Lubricate the switch mechanisms if necessary to ensure smooth movement.
4. Incorrect Float Placement
If the float switch is not correctly positioned within the bilge, it may not accurately detect water levels. Ensure that the float switch is properly installed at a height that allows it to rise and fall with the water levels. Consult the manufacturer’s instructions for the correct placement.
Summary
Troubleshooting boat float switch wiring issues involves checking for power supply problems, inspecting and cleaning the wiring connections, freeing a stuck switch, and verifying correct float placement. Following these troubleshooting steps should help resolve any wiring issues and ensure the proper functioning of the float switch in the bilge pump system, providing peace of mind and preventing water damage to your boat.