
If you are a proud owner of a Cadillac car and are planning to install a new radio system, it is essential to have a proper understanding of the wiring diagram. The radio wiring diagram provides a detailed outline of the electrical connections and color codes for the different components in your Cadillac’s radio system.
A Cadillac radio wiring diagram serves as a valuable resource for both professional installers and car owners looking to upgrade their audio system. It helps ensure that the installation process goes smoothly and eliminates any guesswork when connecting wires or troubleshooting issues later on. Understanding the diagram can save time, money, and frustration by allowing you to make the correct connections right from the start.
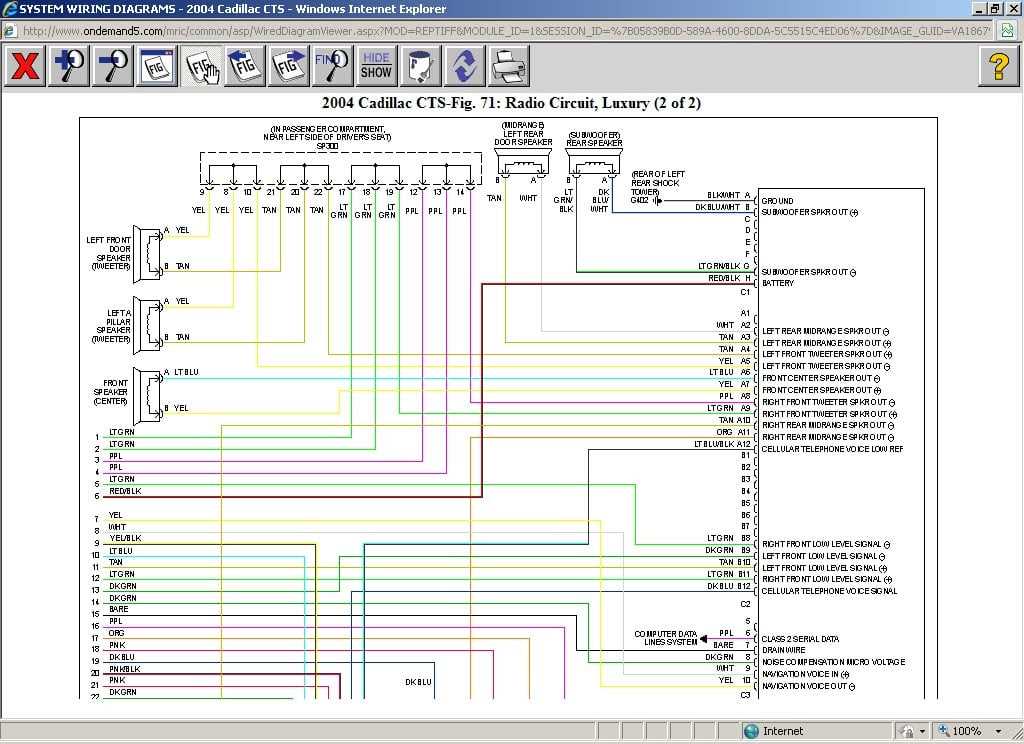
When referring to a Cadillac radio wiring diagram, it is important to note that there may be different diagrams available for different Cadillac models and years. Therefore, it is crucial to find the specific wiring diagram that matches your Cadillac’s make, model, and year to ensure compatibility and accuracy.
In this comprehensive guide, we will explore the different components in a Cadillac radio system, such as power sources, speakers, amplifiers, and antennas, and how they are interconnected. We will also discuss the color codes used in Cadillac radio wiring diagrams and their corresponding functions, making it easier for you to understand and interpret the diagram.
Cadillac Radio Wiring Diagram
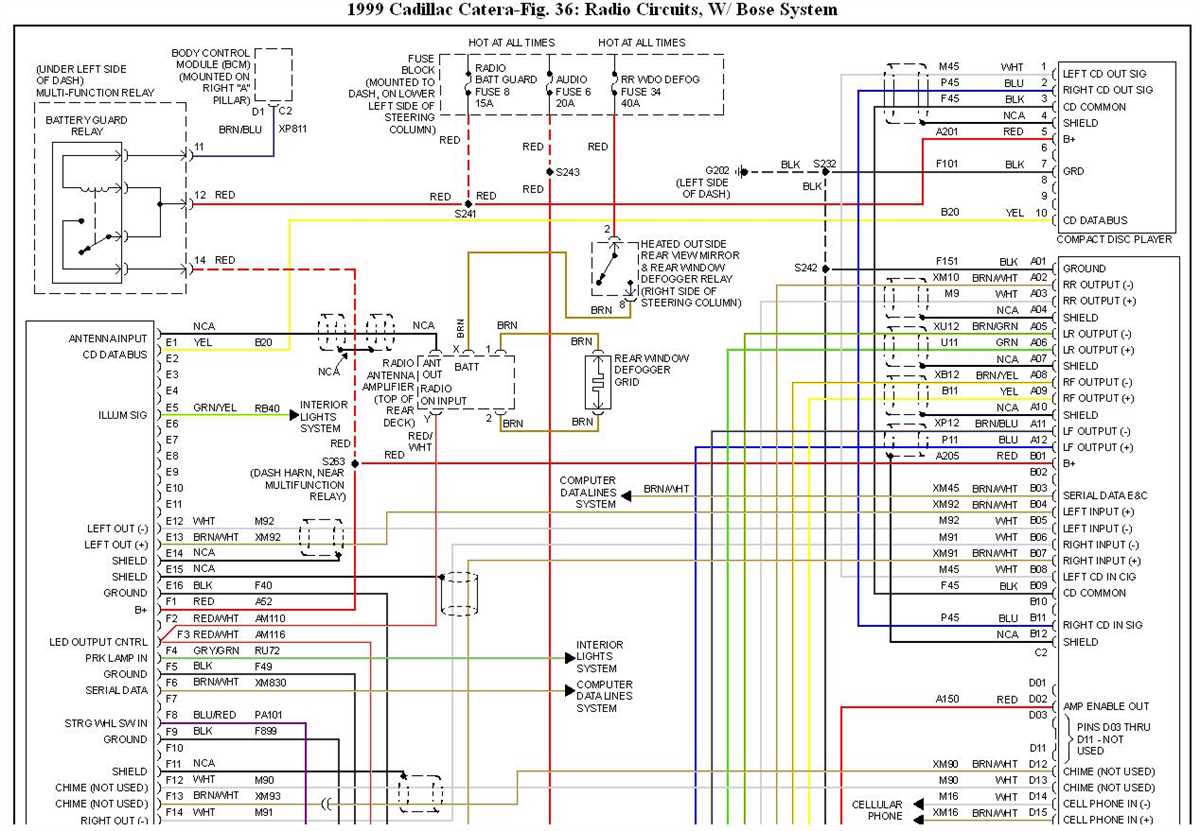
When it comes to installing an aftermarket radio in your Cadillac, having a wiring diagram is essential. A Cadillac radio wiring diagram is a detailed schematic that shows the connections between various components of the car’s audio system. It provides a visual representation of how each wire should be connected, ensuring a proper and secure installation.
While Cadillac models and radio systems may vary, a typical Cadillac radio wiring diagram will include information on the color codes for the different wires. This allows you to easily identify which wire corresponds to the power supply, ground, speaker connections, and other important components. Additionally, the diagram may also provide information on the wiring harness adapter that may be required for your specific Cadillac model.
Key Components in a Cadillac Radio Wiring Diagram
- Power Supply: The power supply wire provides the electrical current needed to operate the radio. It is usually colored red or orange.
- Ground: The ground wire completes the electrical circuit and provides a stable reference point for the radio. It is typically colored black or brown.
- Speaker Connections: The Cadillac radio wiring diagram will specify the color codes for the speaker wires, allowing you to connect the radio to the car’s speakers correctly.
- Antenna: The diagram may also include information on the antenna wire, which connects the radio to the car’s antenna for proper radio reception.
- Additional Features: Depending on the Cadillac model and radio system, the wiring diagram may also include information on additional features such as steering wheel controls, auxiliary inputs, or navigation systems.
By referring to a Cadillac radio wiring diagram, you can ensure a smooth installation process and avoid any potential wiring mistakes. It is important to follow the diagram carefully and double-check all connections before powering on the new radio. If you are unsure about any aspect of the installation, it is recommended to consult a professional car audio installer or refer to the vehicle’s service manual for specific instructions.
Benefits of Using a Wiring Diagram for Cadillac Radio Installation
When installing a new radio in your Cadillac, it is important to have a wiring diagram to ensure a proper and efficient installation. A wiring diagram is a visual representation of the electrical circuitry in a vehicle, including the connections and colors of the wires. Here are some benefits of using a wiring diagram for Cadillac radio installation:
- Accurate and Reliable Connections: A wiring diagram provides accurate information about the connections and wire colors, ensuring that you connect the radio correctly to the Cadillac’s electrical system. This helps to avoid any electrical issues or malfunctions that may occur due to incorrect wiring.
- Efficient Installation: With a wiring diagram, you can save time and effort during the installation process. Instead of guessing or trial and error, the diagram provides you with a clear guide on where each wire should be connected, making the installation faster and more efficient.
- Troubleshooting: If you encounter any issues or problems with your Cadillac radio after installation, a wiring diagram can be a valuable tool for troubleshooting. By referring to the diagram, you can easily identify any wiring errors or faulty connections, allowing you to fix the problem effectively.
- Compatibility: Every Cadillac model may have different wiring configurations, and a wiring diagram ensures compatibility between the radio and the vehicle’s electrical system. It provides you with the necessary information to select the right wires and connectors for a seamless integration of the radio into your Cadillac.
- Professional Quality Installation: By using a wiring diagram, you can achieve a professional-quality installation that looks neat and functions properly. Following the diagram ensures that you follow the correct wiring standards and guidelines, resulting in a clean and reliable radio installation.
Overall, using a wiring diagram for Cadillac radio installation offers numerous benefits, including accurate connections, efficient installation, troubleshooting assistance, compatibility assurance, and professional-quality results. It is an essential tool that can simplify the installation process and help you achieve the best performance from your Cadillac’s radio system.
Understanding the Components in a Cadillac Radio Wiring Diagram
When it comes to the wiring diagram of a Cadillac radio, understanding the different components involved is essential. A wiring diagram is a visual representation of the connections and wiring in a system, and it helps technicians and car enthusiasts troubleshoot and install stereo systems correctly.
The Harness: One of the main components in a Cadillac radio wiring diagram is the harness. The harness is a collection of wires that connect the radio to various other components in the car, such as speakers, power sources, and the antenna. Each wire in the harness is color-coded to indicate its function, making it easier to identify and connect the correct wires.
The Power Source: Another important component in a Cadillac radio wiring diagram is the power source. The power source provides electricity to the radio, allowing it to operate and play music. In most cases, the power source is the car’s battery, and the wiring diagram shows the connections between the battery and the radio.
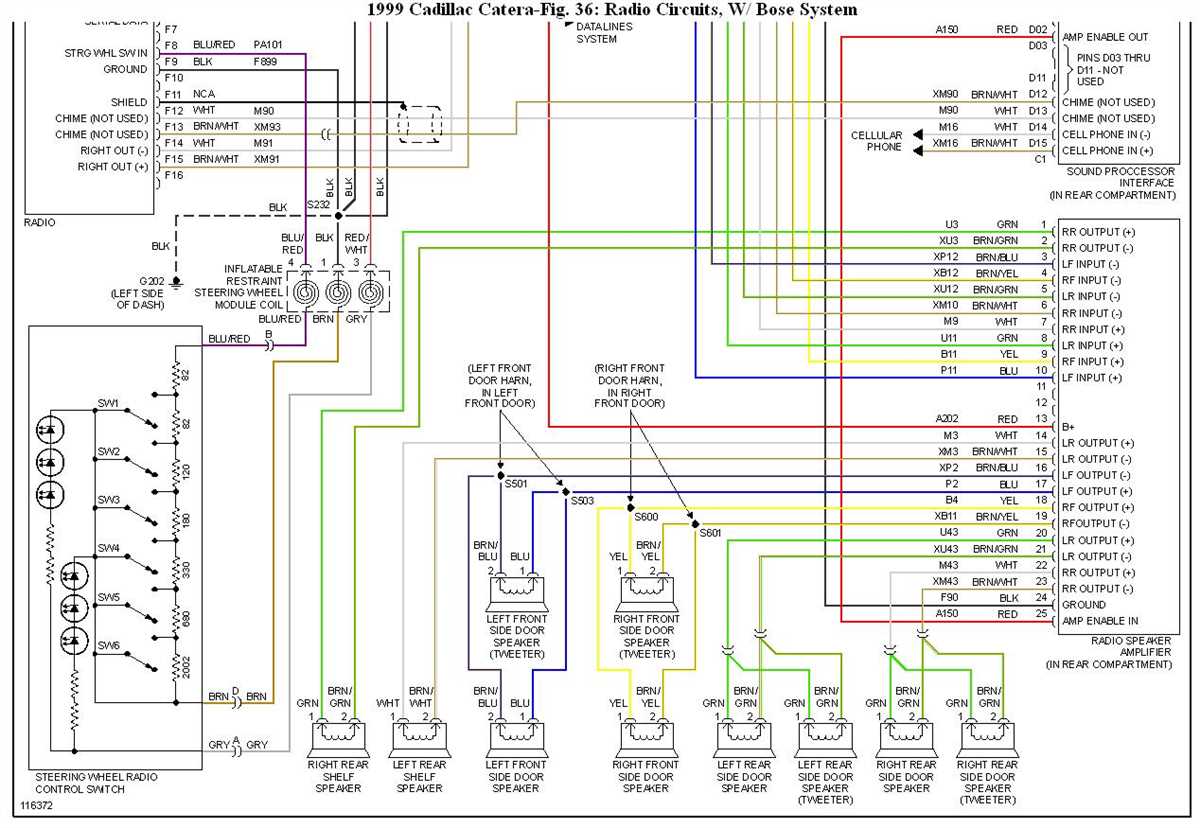
The Speaker Connections: The wiring diagram also includes the connections between the radio and the speakers. Each speaker has its own wire that needs to be connected to the radio’s wiring harness. The diagram will indicate which wires correspond to each speaker, helping to ensure that the audio is properly distributed throughout the car.
The Antenna: The antenna is another component shown in a Cadillac radio wiring diagram. The antenna receives radio signals and allows the radio to tune into different stations. The diagram will show the connection between the antenna and the radio, ensuring that the antenna is properly installed for optimal reception.
By understanding the different components in a Cadillac radio wiring diagram, technicians and car enthusiasts can successfully install and troubleshoot stereo systems. The diagram provides a visual guide to the connections and wiring, making it easier to identify and fix any issues that may arise. Whether you’re upgrading your Cadillac’s audio system or troubleshooting a problem, the wiring diagram is a valuable tool.
Step-by-Step Guide to Wiring a Cadillac Radio
In order to properly wire a Cadillac radio, it is important to follow a step-by-step guide to ensure a clean and functioning installation. Here is a comprehensive guide to wiring a Cadillac radio:
Step 1: Gather the necessary tools

Before you begin the wiring process, make sure you have all the necessary tools. This includes wire cutters, wire strippers, electrical tape, crimp connectors, and a wiring diagram specific to your Cadillac model. Having these tools and materials will make the process much easier and prevent any mistakes.
Step 2: Disconnect the battery
Before starting any wiring work, it is important to disconnect the negative terminal of the car’s battery. This will prevent any electrical accidents or short circuits during the wiring process. Safety should always be the top priority when working with car electronics.
Step 3: Remove the old radio
Use the appropriate tools to remove the old Cadillac radio from its mounting bracket. Be careful not to damage any surrounding panels or components. Follow the specific instructions for your Cadillac model to ensure the removal process is done correctly.
Step 4: Identify the wiring harness
The wiring harness is a collection of wires that connect the radio to the car’s electrical system. Identify the wiring harness specific to your Cadillac model and locate the wires for power, ground, speakers, and any additional features like antennas or steering wheel controls.
Step 5: Connect the wiring harness

Using the wiring diagram and your Cadillac’s specific instructions, match the corresponding wires from the wiring harness to the wires on the new radio. Use crimp connectors to secure the connections and make sure they are tight and secure. Double-check that all connections are properly made.
Step 6: Test the connections
Once all the wiring connections have been made, reconnect the car’s battery and test the radio for power. Turn the car’s ignition to the accessory or on position and check if the radio powers on and all the functions work properly. If there are any issues, double-check the connections or consult a professional for assistance.
Step 7: Secure the new radio
Once you have confirmed that the new Cadillac radio is functioning correctly, secure it back into its mounting bracket using the appropriate tools. Make sure it is properly aligned and securely in place. Test the radio again to ensure it is still working after securing it.
Following these step-by-step instructions will help you wire a Cadillac radio properly and ensure a successful installation. Remember to take your time and be thorough in the process to avoid any issues or mistakes.
Common Issues and Troubleshooting Tips for Cadillac Radio Wiring
The Cadillac radio wiring system, like any other car audio system, can encounter various issues that may affect its function and performance. Here are some common problems and troubleshooting tips to help you resolve them:
No Sound
If you’re not hearing any sound from your Cadillac radio, there are a few possible causes:
- Check if the volume is set to a low level or muted. Adjust the volume knob or button accordingly.
- Make sure the speakers are properly connected and not damaged. Inspect the speaker wires for any loose connections or fraying.
- Check the audio source (e.g. FM/AM radio, CD player, auxiliary input) to ensure it is working properly. Try playing a different source to see if the issue persists.
- If none of the above solutions work, there may be an issue with the amplifier or audio control unit. Consult a professional technician for further assistance.
Poor Audio Quality
If you’re experiencing poor audio quality from your Cadillac radio, here are a few troubleshooting steps to consider:
- Check if the speakers are properly connected and not damaged. Make sure the speaker wires are securely connected and not touching each other or any other metal parts.
- Try adjusting the equalizer settings on your radio to optimize the audio output. Experiment with different presets or manually adjust the bass, treble, and balance settings to find the desired sound quality.
- If you’re using a CD player, ensure that the disc is clean and free from scratches. A dirty or damaged disc can affect the audio playback.
- In some cases, an outdated or malfunctioning amplifier or audio control unit can cause poor audio quality. Consider consulting a professional technician for further diagnosis and repair.
Intermittent Power Issues
If your Cadillac radio intermittently loses power or turns off unexpectedly, the following troubleshooting tips may help:
- Check the wiring connections for any loose or corroded terminals. Ensure that all connections are secure and free from any debris or oxidation.
- If the issue occurs when driving over bumps or rough roads, there may be a loose wire or connection. Inspect the wiring harness and connections for any signs of damage or looseness.
- Consider checking the fuse related to the radio system. A blown fuse can cause intermittent power issues. Replace the fuse if necessary.
- In some cases, the radio unit itself may be faulty. Consult a professional technician to diagnose and repair any internal issues with the radio.
Remember, if you’re not comfortable with troubleshooting or making repairs to your Cadillac radio wiring system, it’s always best to seek assistance from a professional technician who specializes in car audio systems. They have the knowledge and tools to diagnose and resolve more complex issues.