
When it comes to automotive repairs, having a reliable car hoist is essential. A car hoist, also known as a car lift, is a device used to elevate vehicles so that mechanics can work underneath them. Without a car hoist, working on the undercarriage of a car can be extremely difficult and potentially dangerous.
One of the key components of a car hoist is its wiring system. The wiring diagram of a car hoist illustrates the different electrical connections and circuits within the hoist. This diagram is crucial for understanding how the hoist functions and ensuring that it is wired correctly.
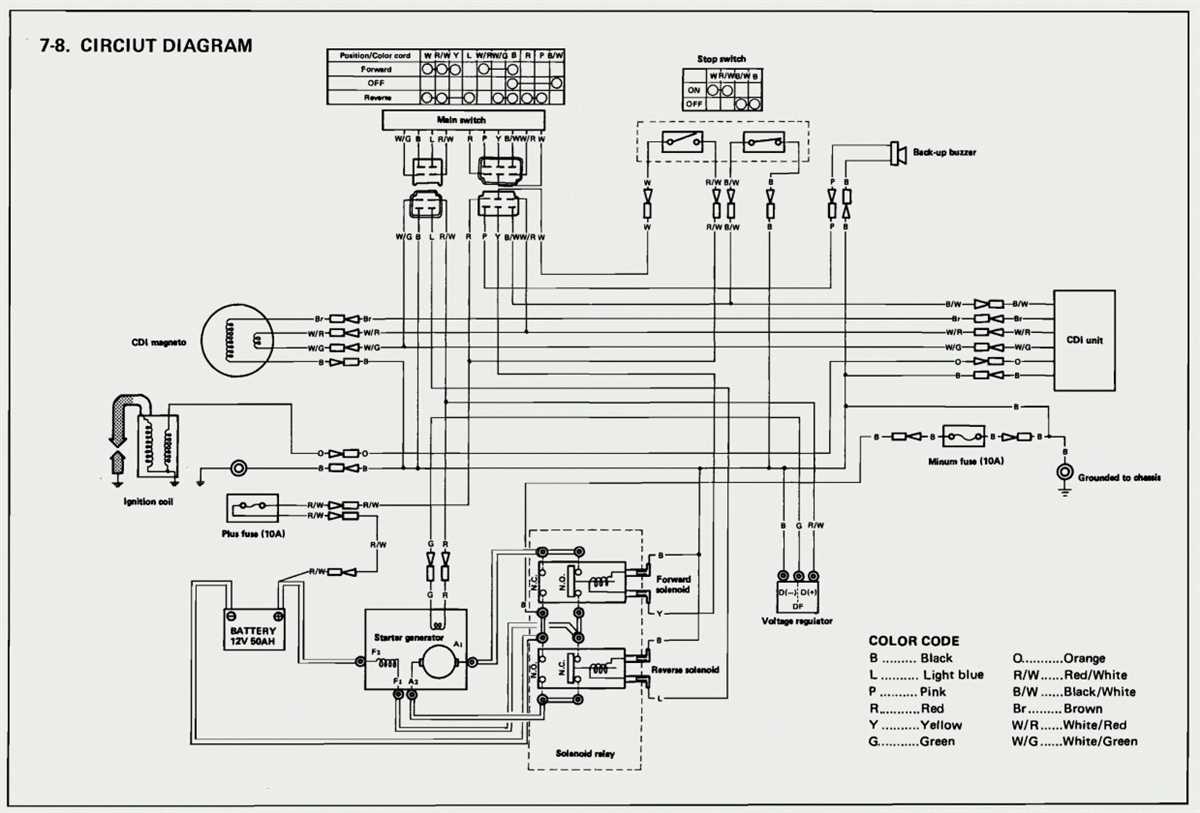
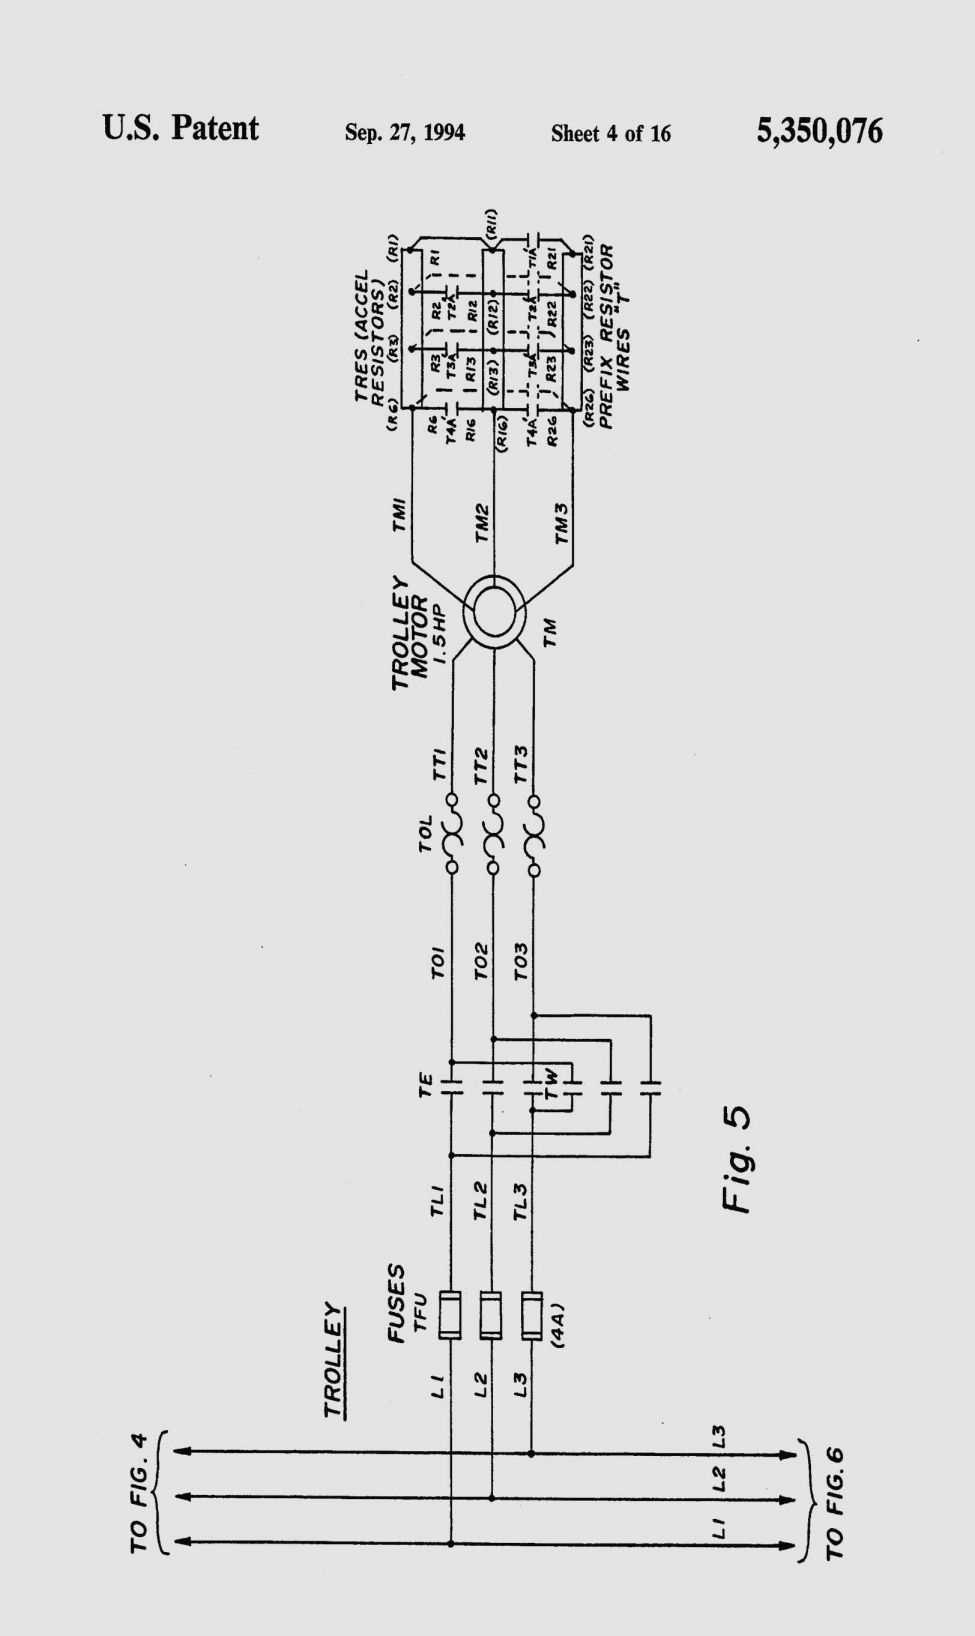
A typical car hoist wiring diagram includes various components such as motor, limit switches, solenoids, control buttons, and safety features. Each of these components plays a specific role in the operation and safety of the hoist. The wiring diagram provides a visual representation of how these components are interconnected and how electricity flows through the system.
Car Hoist Wiring Diagram
A car hoist is a valuable tool for mechanics and car enthusiasts, allowing them to safely lift and work on vehicles. The wiring diagram for a car hoist is essential for understanding how to connect the electrical components and ensure proper functioning. The diagram provides a visual representation of the electrical circuitry, showing how power is supplied to the hoist motor, controls, and safety mechanisms.
The car hoist wiring diagram typically includes various components, such as a main power supply, motor, limit switches, relays, and control buttons. It shows the connections between these components and the flow of electricity through the circuit. Often, the diagram will also indicate the voltage and current requirements for each component, helping users select the appropriate wiring and electrical components.
Key components:
- Main power supply: This is the source of electrical power for the car hoist. It is typically connected to a breaker or fuse for safety.
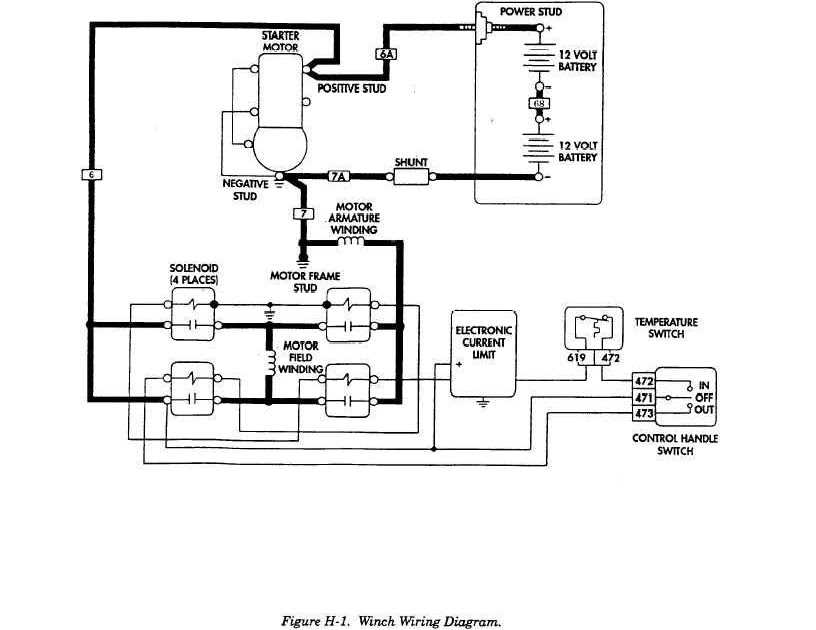
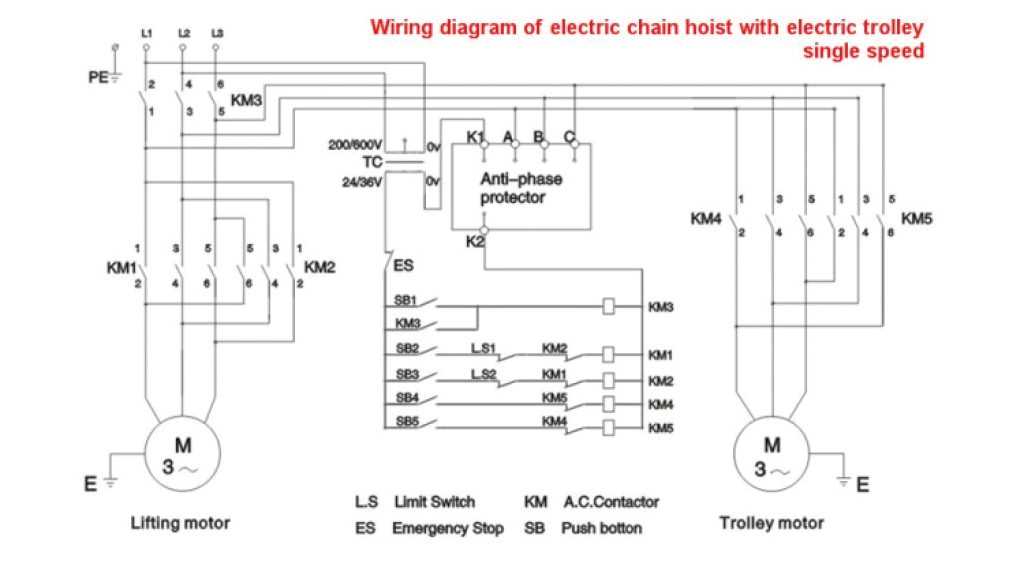
- Motor: The motor is responsible for lifting and lowering the hoist. The wiring diagram shows how the motor is connected to the power supply and any control devices.
- Limit switches: These switches help prevent the hoist from overextending or damaging the vehicle. The wiring diagram illustrates how the limit switches are wired into the circuit to control the hoist’s movement.
- Relays: Relays are used to control the flow of electricity in the circuit. The wiring diagram indicates how relays are connected to the power supply and other components to enable or disable certain functions.
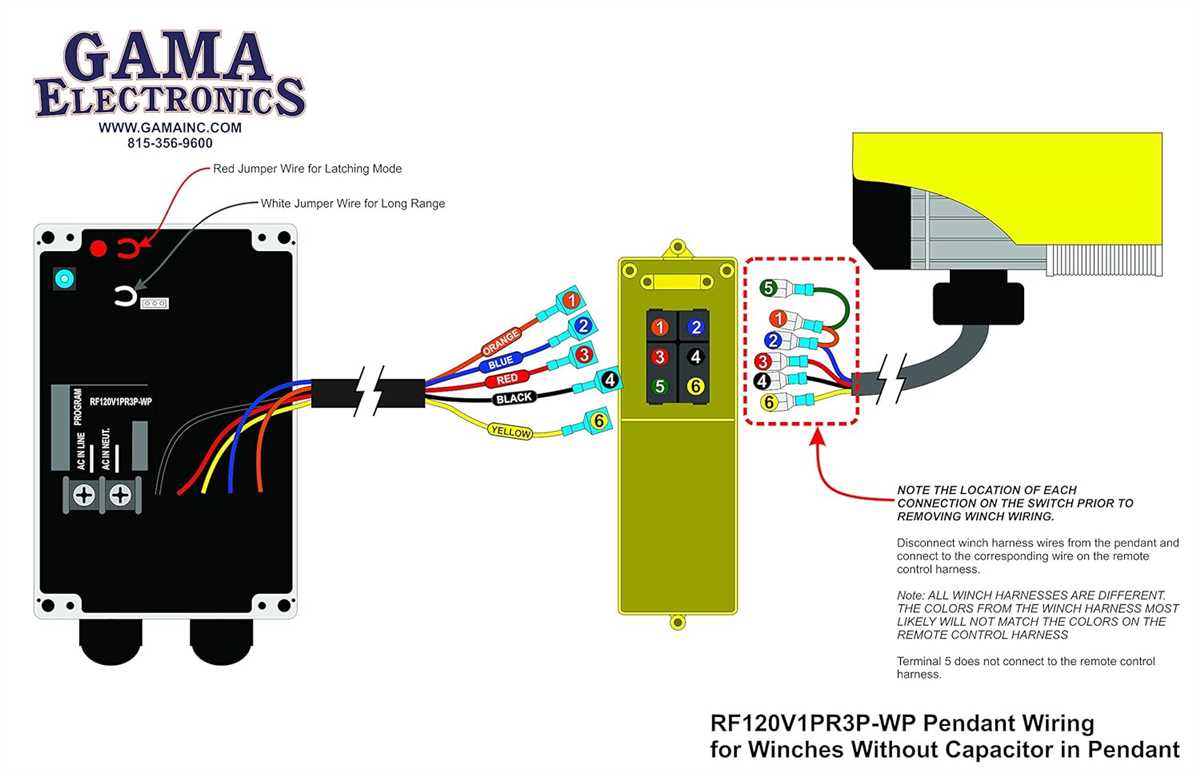
- Control buttons: Control buttons allow users to operate the hoist, such as raising or lowering the vehicle. The wiring diagram shows how these buttons are wired to the motor and other control devices.
By studying the car hoist wiring diagram, mechanics and users can gain a better understanding of how the electrical system works and how to troubleshoot any issues that may arise. It is crucial to follow the wiring diagram accurately and ensure all connections are secure and properly insulated to avoid electrical hazards while using the car hoist.
What is a car hoist?
A car hoist, also known as a car lift or car elevator, is a mechanical device used to lift vehicles off the ground to provide easier access to the underside of the vehicle for maintenance, repairs, and inspections. It consists of a sturdy metal frame, hydraulic or electric lifting mechanisms, and adjustable arms or pads that support and secure the vehicle in place.
A car hoist is an essential tool in automotive workshops, service centers, and garages, as it allows mechanics and technicians to work more efficiently and safely. By lifting the car off the ground, it eliminates the need for crawling underneath or relying on jacks, jack stands, or ramps, which can be time-consuming and potentially hazardous. With a car hoist, mechanics have full access to the undercarriage, engine, transmission, suspension, and other components, making it easier to diagnose and repair issues.
There are different types and configurations of car hoists available, including two-post hoists, four-post hoists, scissor lifts, and portable lifts. Two-post hoists are the most common, with two upright posts on either side of the vehicle, and arms that extend under the car to lift it. Four-post hoists have four columns, offering more stability and the ability to store multiple vehicles. Scissor lifts use crisscrossing arms to lift the vehicle, and portable lifts are smaller and easier to move around.
When using a car hoist, it is important to follow safety guidelines and ensure that the hoist is properly installed and maintained. Regular inspections and maintenance of the hoist’s components, such as hydraulic cylinders, hoses, and safety locks, are crucial to prevent accidents and ensure the hoist’s longevity.
- A car hoist provides easy access to the underside of a vehicle for maintenance, repairs, and inspections.
- It eliminates the need for crawling underneath or relying on jacks, jack stands, or ramps.
- There are different types of car hoists available, including two-post hoists, four-post hoists, scissor lifts, and portable lifts.
- Safety is crucial when using a car hoist, and regular inspections and maintenance are necessary to prevent accidents.
Importance of proper wiring
Proper wiring is crucial when it comes to car hoists or any type of electrical installation. Wiring plays a vital role in ensuring the safe and efficient operation of the equipment, as well as preventing accidents and electrical hazards. A well-designed and properly installed wiring system can make a significant difference in the overall performance and longevity of the hoist.
Safe operation: One of the primary reasons why proper wiring is important for a car hoist is to ensure safe operation. The wiring system should be designed to handle the electrical load and provide consistent power to the hoist without overheating or causing electrical shorts. Improper wiring can result in electrical shocks, fires, and other hazardous situations that can potentially harm workers or damage the equipment.
Efficiency: Proper wiring also contributes to the efficiency of the car hoist. A well-planned wiring layout minimizes voltage drops and ensures that the hoist receives the necessary power to perform at its best. This can improve the lifting speed, reduce energy consumption, and enhance the overall productivity of the hoist.
Preventing accidents: When wiring is done correctly, it minimizes the risk of accidents caused by electrical malfunctions. Properly insulated wires, correctly-sized breakers, and appropriate grounding help prevent short circuits, electrical fires, and other potential hazards. Additionally, having a clear and organized wiring system makes troubleshooting easier and faster, reducing downtime and increasing safety.
Compliance with regulations: Following proper wiring practices is essential for ensuring compliance with electrical codes and regulations. These regulations are in place to protect workers, equipment, and property from electrical risks. By adhering to these standards, businesses can avoid fines, legal issues, and potential damage to their reputation.
In conclusion, the importance of proper wiring cannot be overstated when it comes to car hoists. It is vital for ensuring safe and efficient operation, preventing accidents, improving efficiency, and maintaining compliance with electrical regulations. Investing time and effort in proper wiring can result in a reliable and durable hoist system that can withstand the demands of daily use.
Components of a car hoist
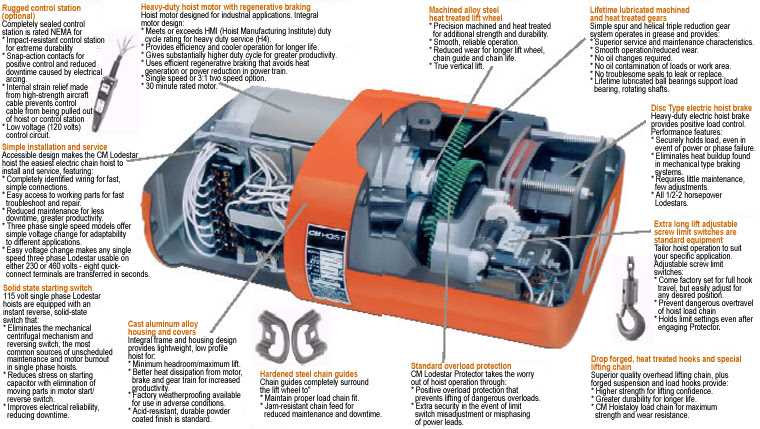
A car hoist, also known as a car lift or vehicle lift, is a piece of equipment used to elevate cars or other vehicles for maintenance or repair purposes. It consists of several key components that work together to safely and efficiently lift and support the vehicle.
1. Columns: The columns are the vertical supports of the car hoist system. They are typically made of heavy-duty steel and are securely anchored to the ground. The columns provide the structural framework for the hoist and ensure stability during lifting and lowering operations.
2. Lifting arms: The lifting arms, also called boom arms or swing arms, are mounted on the columns and extend outwards to support the vehicle. They are adjustable in length and can accommodate different types of vehicles. The lifting arms are equipped with hydraulic cylinders that provide the lifting force to raise the vehicle off the ground.
3. Hydraulic system: The hydraulic system is responsible for generating the force required to lift the vehicle. It includes a hydraulic pump, hydraulic hoses, and hydraulic cylinders. The pump pressurizes the hydraulic fluid, which is then transferred through the hoses to the cylinders. When the cylinders extend, they lift the vehicle.
4. Control panel: The control panel is where the operator controls the operation of the car hoist. It typically includes buttons or switches to raise, lower, and stop the hoist. Some control panels may also have additional features, such as safety locks or emergency stop buttons, to ensure the safety of the operator and the vehicle.
5. Safety features: Car hoists are equipped with various safety features to prevent accidents and protect the vehicle. These may include safety locks that secure the lifting arms in place, safety latches that prevent the vehicle from sliding off the lifting arms, and overload protection systems that automatically stop the hoist if the weight limit is exceeded.
Overall, the components of a car hoist work together to provide a reliable and efficient method for lifting and supporting vehicles during maintenance or repair. Proper maintenance and regular inspections are crucial to ensure the safety and longevity of the hoist.
Step-by-step wiring diagram for a car hoist
Proper wiring is essential for the safe and efficient operation of a car hoist. A step-by-step wiring diagram can help guide you through the installation process and ensure that all connections are made correctly. Here is a detailed guide on how to wire a car hoist:
Step 1: Gather the necessary tools and materials
Before starting the wiring process, make sure you have all the tools and materials needed, such as wire cutters, crimping tool, electrical tape, wire connectors, and the appropriate gauge of electrical wire.
Step 2: Identify the power source
Determine the location and source of the power for the car hoist. This is typically a dedicated circuit breaker in the electrical panel. Ensure that the power source can handle the electrical load required by the hoist.
Step 3: Disconnect the power
Prior to working on the wiring, turn off the power to the circuit breaker that supplies electricity to the hoist. This is important for safety reasons and to avoid any electrical shocks or accidents.
Step 4: Connect the power supply to the hoist
Using appropriate gauge electrical wire, connect the power supply from the circuit breaker to the input terminals of the hoist control panel. It is recommended to use wire connectors to securely fasten the wires and prevent any loose connections.
Step 5: Connect the hoist control panel to the motor
From the hoist control panel, run electrical wires to the motor control unit. Follow the manufacturer’s instructions and wiring diagrams for connecting the control panel to the motor. This usually involves connecting the control panel’s output terminals to the motor’s input terminals.
Step 6: Ground the hoist
Ensure proper grounding of the hoist to prevent electrical shock hazards. Connect a grounding wire from the hoist control panel or motor to a grounding point, typically a grounding rod or the building’s grounding system.
Step 7: Test the wiring connections
Once all the wiring connections have been made, carefully inspect and test each connection to ensure they are secure and properly connected. It is also recommended to use a multimeter to check for continuity and verify that the wiring is functioning correctly.
Following these step-by-step instructions and referring to the wiring diagram specific to your car hoist model will help ensure a successful and safe installation. If you are unsure or uncomfortable with electrical work, it is recommended to consult a qualified electrician for assistance.
Common wiring issues and troubleshooting
When dealing with car hoist wiring, there are several common issues that may arise. It’s important to be aware of these problems and know how to troubleshoot them in order to ensure the safe operation of the hoist.
1. Loose or disconnected wires
One common wiring issue is loose or disconnected wires. This can happen due to vibrations or accidental pulling of the wires. To troubleshoot this issue, check all the connections and tighten any loose wires. If any wires are disconnected, reconnect them properly.
2. Short circuits
A short circuit can occur when exposed wires come into contact with each other or with a metal surface. This can result in a blown fuse or a tripped circuit breaker. To troubleshoot a short circuit, inspect all the wires for any signs of damage or exposed conductors. If any issues are found, repair or replace the affected wires.
3. Overloaded circuits
An overloaded circuit can cause the hoist to malfunction or even pose a fire hazard. This can happen if the hoist is drawing more current than the circuit can handle. To troubleshoot this issue, check the amp rating of the circuit and compare it to the power requirements of the hoist. If necessary, upgrade the circuit or redistribute the load among multiple circuits.
4. Faulty switches or controls
If the hoist fails to operate or experiences intermittent issues, the problem may lie with the switches or controls. Check the wiring connections to the switches and controls to ensure they are secure and properly connected. If the switches or controls are not functioning correctly, they may need to be replaced.
Overall, addressing common wiring issues in a car hoist is essential for maintaining safety and preventing malfunctions. Regular inspections and proper maintenance can help identify and resolve these problems effectively.
Q&A:
What are some common wiring issues?
Some common wiring issues include loose connections, crossed wires, improper cable routing, and overloaded circuits.
What should I do if I find a loose connection?
If you find a loose connection, you should turn off the power supply before attempting to resecure the wires. You can use a screwdriver or wire connectors to tighten the connection.
How can I identify crossed wires?
You can identify crossed wires by the improper functionality of the circuit or appliance. You may notice flickering lights, dimmed bulbs, or irregular performance.
What are the consequences of improper cable routing?
Improper cable routing can lead to cable damage, increased electrical resistance, and potential fire hazards. It can also make it difficult to locate and fix wiring issues in the future.
What should I do if I experience an overloaded circuit?
If you experience an overloaded circuit, you should immediately unplug some devices to reduce the demand on the circuit. It is also advisable to consult an electrician to ensure the proper distribution of electrical load in your home or facility.
What are some common wiring issues?
Some common wiring issues include loose connections, faulty wiring, improper grounding, and overloaded circuits.
How can I troubleshoot wiring issues?
To troubleshoot wiring issues, you can start by checking for loose connections and tightening them if necessary. You can also use a voltage tester to check for faulty wiring and ensure that all components are properly grounded. If you suspect an overloaded circuit, you can try redistributing the load or consulting an electrician to upgrade your electrical system.