
Understanding how the HVAC control board is wired is essential for proper functioning of your heating, ventilation, and air conditioning system. The control board serves as the brain of the system, receiving signals from thermostats and other sensors to regulate the temperature and airflow throughout your home or office.
The wiring of the control board can vary depending on the specific make and model of your HVAC system, but there are some common elements to be aware of. One of the most important connections is the power supply, which ensures that the control board receives the necessary voltage to operate. This is typically a 24-volt connection, but it’s important to consult the wiring diagram or manual for your specific system to ensure proper installation.
In addition to the power supply, the control board is also connected to various components of your HVAC system, such as the blower motor, gas valve, and condenser unit. These connections ensure that the control board can send signals to these components to turn them on or off, adjust the speed and direction of the blower motor, and control the flow of gas or refrigerant.
Proper wiring of the control board is crucial for the overall performance and efficiency of your HVAC system. Incorrect wiring can lead to malfunctions, inefficient operation, and even potential safety hazards. If you’re unsure about how to wire the control board, it’s best to consult a professional HVAC technician who can ensure that everything is connected correctly and functioning as it should.
HVAC Control Board Wiring
In the complex world of HVAC systems, the control board plays a crucial role in maintaining and regulating the functioning of the system. The control board serves as the central hub, connecting various components and controlling their operation. Understanding the wiring of an HVAC control board is essential for troubleshooting and repairing any issues that may arise.
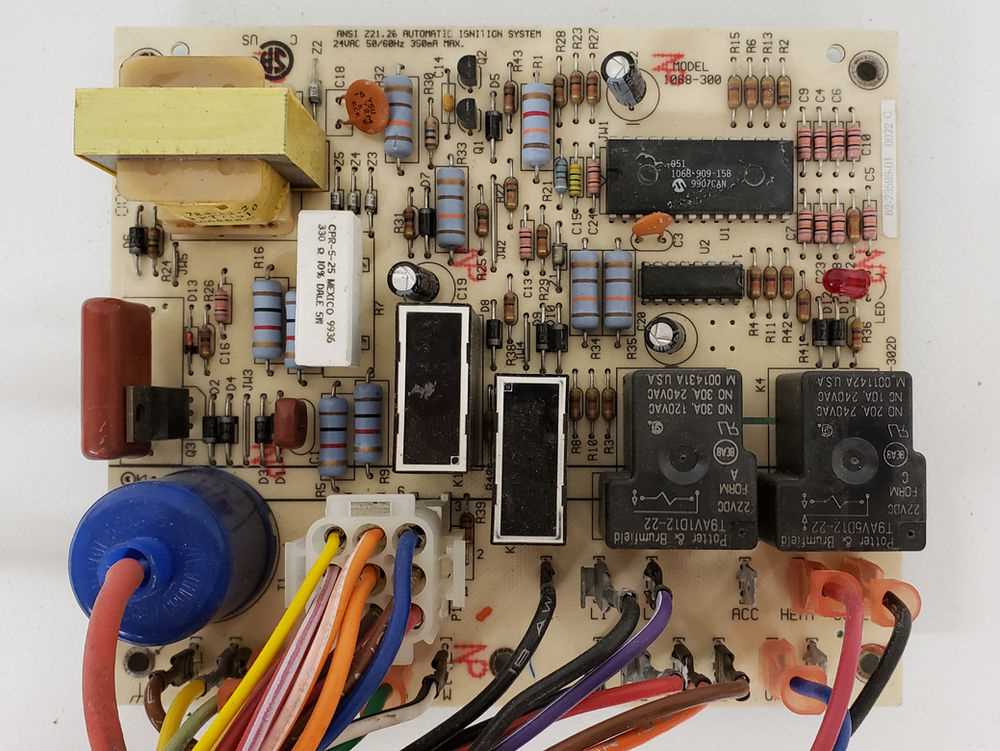
The wiring of an HVAC control board consists of various components, including relays, transformers, capacitors, and switches. These components work together to control the operation of the heating, ventilation, and air conditioning system. Each component has specific terminals on the control board that need to be properly connected to ensure the system functions correctly.
When wiring an HVAC control board, it is important to follow the specific wiring diagram provided by the manufacturer. This diagram will outline the correct connections for each component and ensure that the system operates as intended. It is crucial to double-check the wiring connections to avoid any potential electrical issues and to ensure the safety of the system.
Additionally, proper labeling of the wiring connections is essential for future reference and troubleshooting. Labeling each wire with its corresponding component or terminal will make it easier to identify and diagnose any problems that may arise. Regular maintenance and inspection of the wiring connections can help identify any loose or damaged wires that may need to be repaired or replaced.
In conclusion, understanding the wiring of an HVAC control board is crucial for proper operation and maintenance of the system. Following the manufacturer’s wiring diagram, properly connecting each component, and labeling the wiring connections will ensure that the system functions efficiently and safely. Regular inspection and maintenance of the wiring connections will help identify and resolve any issues before they escalate into major problems.
Understanding the HVAC Control Board
HVAC control boards play a crucial role in the overall operation and functionality of heating, ventilation, and air conditioning systems. These control boards serve as the ‘brain’ of the system, controlling and coordinating the various components and functions of the HVAC system to ensure optimal performance.
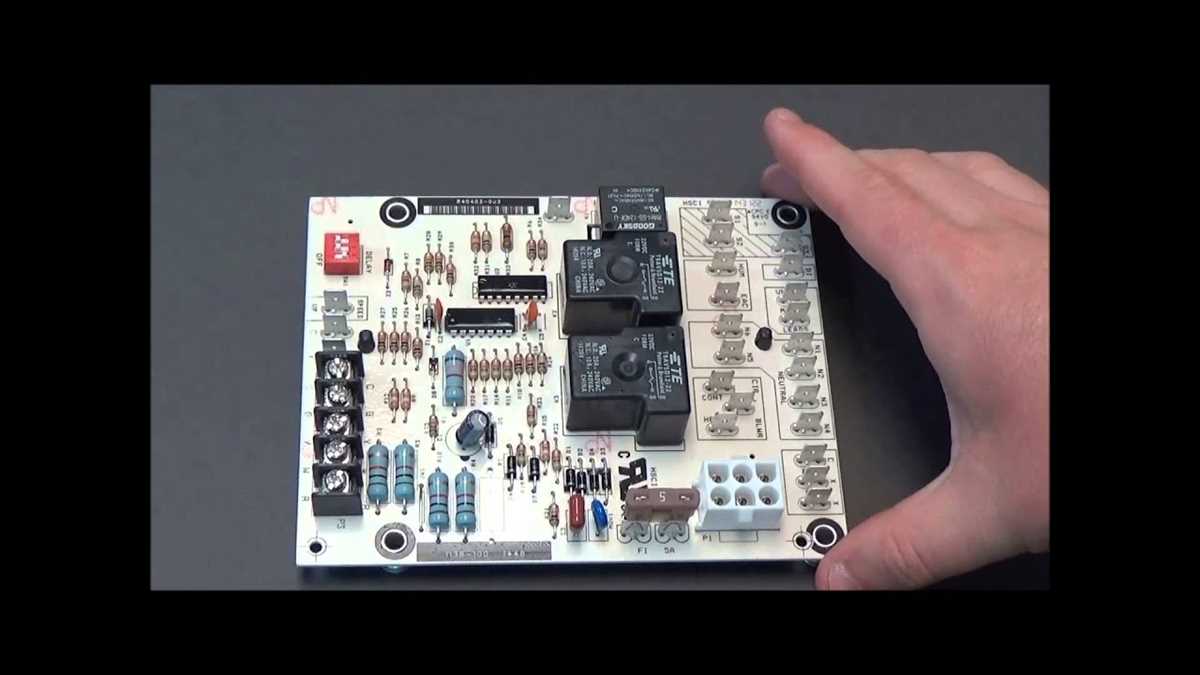
The control board is typically located within the furnace or air handler unit, and it acts as a central hub for communication between the thermostat, blower motor, gas valve, ignition system, and other components. It receives signals from the thermostat, which indicate the desired temperature and settings, and then executes the necessary actions to achieve those settings.
The control board consists of various circuitry, including relays, transformers, microprocessors, and other components that facilitate the control and operation of the HVAC system. These components work together to regulate temperature, airflow, and other functions to maintain a comfortable indoor environment.
Components of the HVAC Control Board:
- Microprocessor: The microprocessor is the heart of the control board, responsible for processing signals and executing commands based on the inputs it receives.
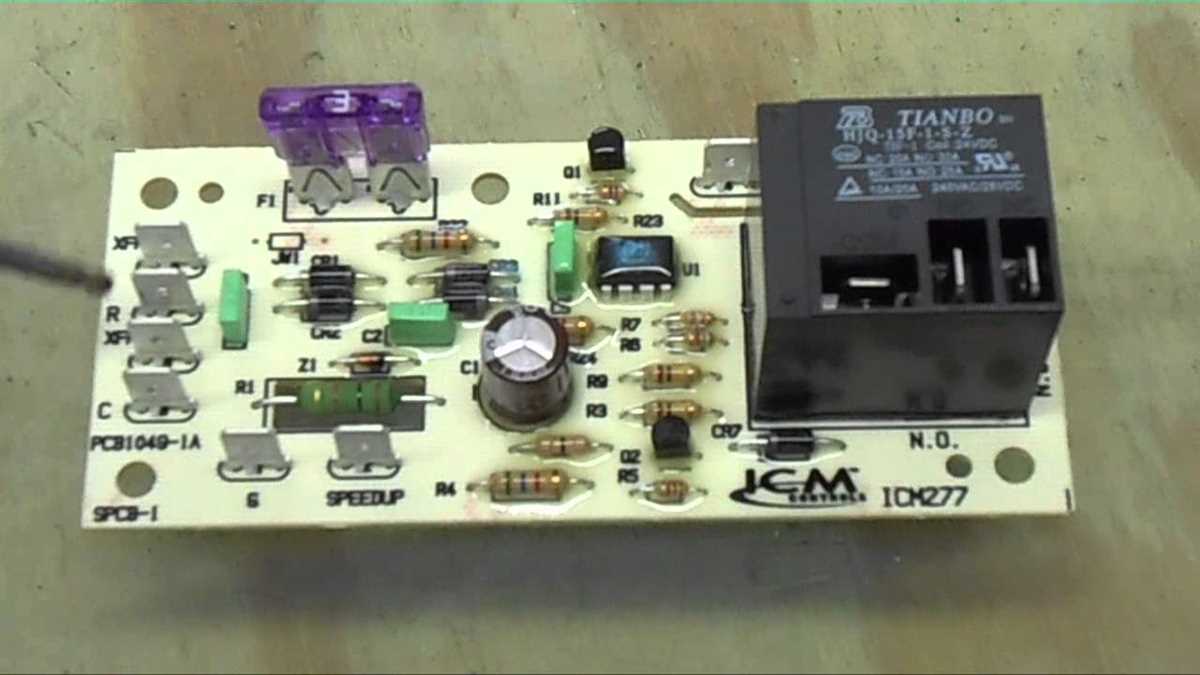
- Relays: Relays are electromechanical switches that control the flow of electricity to different components in the HVAC system, such as the blower motor, compressor, and fan.
- Transformers: Transformers are used to step down the voltage from the main power supply to a lower voltage that is suitable for powering the control board and other components.
- Sensors: Sensors, such as temperature and pressure sensors, provide the control board with information about the current conditions in the system, allowing it to make adjustments as needed.
- Diagnostic LEDs: Some control boards are equipped with diagnostic LEDs that indicate the status of the system and help in troubleshooting if any issues arise.
In conclusion, the HVAC control board is a vital component in the overall operation and control of heating, ventilation, and air conditioning systems. By understanding its role and components, homeowners and HVAC professionals can better diagnose and resolve issues with their systems, ensuring optimal performance and comfort.
The Importance of Proper Wiring
In the field of HVAC control board wiring, proper wiring is crucial for the efficient operation and longevity of the system. Incorrect or haphazard wiring can lead to various issues, including system malfunctions, reduced energy efficiency, and even potential safety hazards.
Reduced energy efficiency: An HVAC system relies on effective wiring connections to ensure that electricity flows properly and efficiently. Improperly wired control boards can lead to energy wastage, as they may not accurately communicate with other components of the system. This can result in unnecessary cycling, overuse of resources, and increased energy costs.
System malfunctions: The control board is the brain of an HVAC system, responsible for coordinating and regulating the operation of various components. Incorrectly wired control boards can disrupt the flow of information and commands between different parts of the system, leading to system malfunctions and inconsistent performance. This can result in discomfort for occupants and costly repairs.
Safety hazards: Proper wiring is essential to ensure the safe operation of an HVAC system. Faulty or inadequate wiring can lead to electrical issues, such as short circuits or overheating, which can pose a fire risk. In addition, improper wiring may also interfere with the system’s safety features, such as emergency shut-off switches or sensors, potentially compromising the safety of the occupants.
Improved system performance: On the other hand, proper wiring enhances the overall performance of the HVAC system. It allows for accurate communication and synchronization between various components, ensuring smooth operation and optimal performance. Well-wired control boards help to maintain consistent temperatures, efficient energy usage, and reliable functioning of the entire HVAC system.
Overall, proper wiring is crucial for the efficient and safe operation of an HVAC system. Investing time and effort into ensuring correct connections and wiring practices can prevent issues, optimize energy usage, and prolong the lifespan of the system.
Common Wiring Mistakes to Avoid
When it comes to HVAC control board wiring, it is crucial to ensure that everything is properly connected to avoid any potential issues. Making mistakes in the wiring process can lead to malfunctions, equipment damage, and even safety hazards. Here are some common wiring mistakes to avoid:
- Incorrect wire sizing: Using wires that are too thin or too thick can cause problems. Thick wires can overcrowd the terminal, making it difficult to make a secure connection. On the other hand, thin wires may not be able to handle the electrical load, leading to overheating and potential fire hazards. It is important to use the correct wire gauge for each connection.
- Loose connections: Loose connections can lead to intermittent operation, equipment failure, and even electrical fires. It is crucial to ensure that all wire connections are tight and secure. Using the appropriate tools to properly tighten the wire terminals can help prevent loose connections.
- Wrong polarity: Connecting wires with the wrong polarity can cause the equipment to operate incorrectly or not at all. It is important to pay attention to the polarity markings on the control board and ensure that the wires are connected accordingly. Reversing the polarity can damage the equipment and lead to costly repairs.
- Failure to label wires: Failing to label wires properly can make troubleshooting and repairs more difficult in the future. It is important to label each wire with its corresponding function or destination to ensure easy identification. This can save time and prevent confusion when working on the system.
- Overcrowded wiring: Stuffing too many wires into a junction box or control panel can lead to poor airflow, overheating, and increased risk of electrical shorts. It is important to ensure that there is enough space for the wires and that they are neatly organized. This can also help with troubleshooting and maintenance in the future.
- Ignoring manufacturer instructions: Each HVAC system may have specific wiring requirements and guidelines provided by the manufacturer. It is essential to carefully read and follow these instructions to ensure proper installation and operation. Ignoring these instructions can result in equipment damage and void warranties.
In conclusion, avoiding common wiring mistakes is crucial for the proper functioning and safety of HVAC control board wiring. Taking the time to double-check connections, wire sizing, polarity, and labeling can help prevent costly repairs and potential hazards.
Step-by-Step Guide for Wiring a Control Board
Wiring a control board for your HVAC system is an important step in ensuring the proper functioning of your heating and cooling system. The control board is the central component that regulates and coordinates all the different parts of your HVAC system. Whether you are installing a new control board or replacing an old one, following these step-by-step instructions will help you wire it correctly.
Gather the necessary tools and equipment
Before you begin wiring the control board, make sure you have all the necessary tools and equipment. This includes a screwdriver, wire strippers, wire nuts, electrical tape, and the wiring diagram for your specific control board model. It is important to have the right tools on hand to ensure a safe and efficient installation process.
Turn off the power
The next step is to turn off the power to your HVAC system. This can usually be done by switching off the circuit breaker that supplies power to the system. Make sure to verify that the power is off by using a voltage tester before you proceed with any wiring work. Safety should always be the top priority when working with electrical components.
Identify the terminals on the control board
Once the power is off, locate the control board in your HVAC system. Identify the different terminals on the control board and refer to the wiring diagram to understand their functions. These terminals will be labeled and color-coded, making it easier to match the corresponding wires.
Strip the wires and make connections
Using your wire strippers, carefully strip the insulation off the ends of the wires that need to be connected to the control board. Securely attach the wires to the appropriate terminals on the control board, making sure to match the colors and follow the wiring diagram. Use wire nuts to secure the connections and wrap them with electrical tape for added protection.
Double-check and test the connections
Once all the connections are made, double-check to ensure that everything is wired correctly. Inspect each connection to make sure it is secure and properly insulated. Once you are satisfied with the wiring, you can reapply power to the HVAC system and test the control board to ensure it is functioning as expected.
Following these step-by-step instructions will help you wire a control board for your HVAC system successfully. Remember to always prioritize safety and consult the wiring diagram for your specific control board model to ensure accurate connections. If you are unsure or uncomfortable with any step of the process, it is recommended to seek assistance from a professional HVAC technician.
Testing and Troubleshooting Control Board Wiring
Proper control board wiring is essential for the efficient operation of an HVAC system. However, issues may arise that require testing and troubleshooting of the control board wiring to pinpoint the problem and ensure it is resolved quickly. This process involves a systematic approach that includes inspecting the wiring connections, checking for faulty components, and using appropriate testing tools.
1. Inspect the wiring connections: Begin by visually inspecting the control board wiring for any loose or disconnected connections. Tighten any loose wires and secure any disconnected wires properly. Pay attention to the color-coded terminals and ensure that each wire is connected to the appropriate terminal as specified in the wiring diagram.
2. Check for faulty components: Faulty components in the control board, such as relays or capacitors, can disrupt the proper functioning of the HVAC system. Use a multimeter to test the continuity, resistance, and voltage of these components. If a component is found to be faulty, it should be replaced with a new one that matches the specifications of the original component.
3. Use appropriate testing tools: In addition to a multimeter, other testing tools may be required to diagnose control board wiring issues. For example, an amp probe can be used to measure current flow through specific wires or components. A voltage tester can help identify if there is a voltage drop in the system. Consult the user manual or manufacturer’s guidelines for the recommended testing tools and techniques for your specific HVAC system.
4. Follow safety precautions: When testing and troubleshooting control board wiring, it is important to follow safety precautions to prevent any accidents or damage. Make sure the HVAC system is powered off and disconnected from the electrical supply before performing any tests or repairs. Use insulated tools and work in a well-ventilated area to minimize the risk of electrical shock.
By following these testing and troubleshooting steps, HVAC technicians can effectively identify and resolve control board wiring issues. Regular maintenance and inspections can also help prevent future problems and ensure the smooth operation of the HVAC system.
Upgrading or Replacing Control Board Wiring

If you are considering upgrading or replacing your HVAC control board wiring, there are several factors to take into account. First and foremost, it is important to remember that working with electrical wiring can be dangerous if you do not have the proper training and experience. It is always recommended to hire a professional electrician or HVAC technician to handle any wiring upgrades or replacements.
When upgrading or replacing control board wiring, you should consider the following:
- Compatibility: Ensure that the new control board wiring is compatible with your HVAC system. Check the specifications and consult with a professional if you have any doubts.
- Safety: Follow all safety guidelines and procedures when working with electrical wiring. Make sure to turn off the power supply and use appropriate safety equipment.
- Accuracy: Double-check all connections and make sure they are secure. Improper wiring can lead to system malfunctions or even electrical hazards.
- Documentation: Take detailed notes and photographs of the existing wiring before making any changes. This will help you reference the original setup if needed and ensure that the new wiring is installed correctly.
- Testing: After completing the wiring upgrade or replacement, test the system to ensure that all components are functioning properly. Monitor the system for any irregularities or issues.
- Professional assistance: If you are unsure about any aspect of upgrading or replacing control board wiring, it is best to consult with a professional. They have the knowledge and experience to safely and effectively handle these types of tasks.
Overall, upgrading or replacing control board wiring can improve the functionality and efficiency of your HVAC system. However, it is crucial to prioritize safety and seek professional assistance when needed. By following the proper procedures and guidelines, you can ensure a successful wiring upgrade or replacement.