
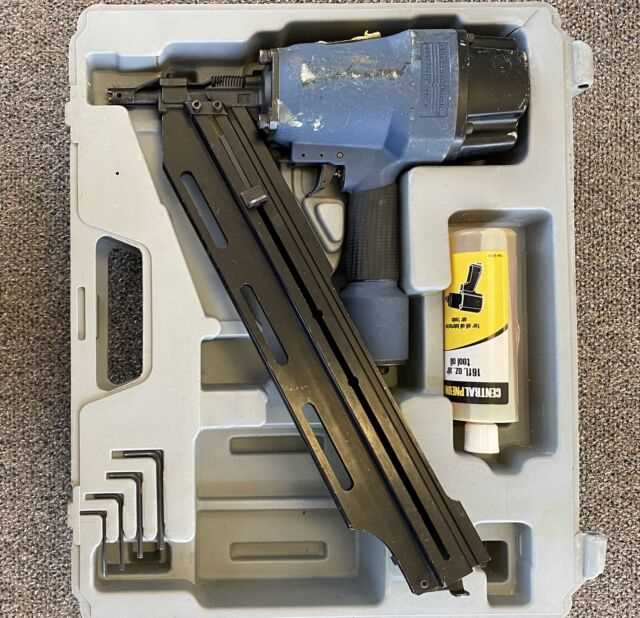
When it comes to construction and woodworking projects, having the right tools is essential. One such tool that is commonly used in these industries is a framing nailer. A framing nailer is a powerful and versatile tool that allows for quick and efficient installation of nails. One popular brand of framing nailers is Central Pneumatic, known for their durability and reliability.
Understanding the different parts of a framing nailer is important for both maintenance and troubleshooting purposes. A parts diagram can help you identify the different components of a Central Pneumatic framing nailer and their respective functions. This diagram can be extremely useful for anyone looking to repair or replace a specific part of their nailer.
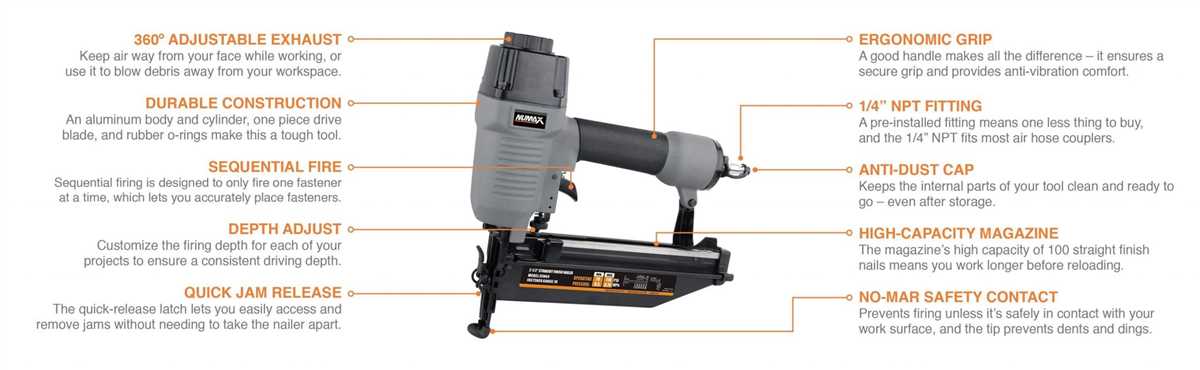
The parts diagram typically includes labels for the main components such as the trigger assembly, magazine, piston driver, and air inlet. These parts work together to ensure smooth operation and consistent nail driving. By familiarizing yourself with the different parts of a framing nailer, you can better understand how the tool functions and troubleshoot any issues that may arise.
The Central Pneumatic framing nailer is a powerful tool used in construction and woodworking projects. It is designed to drive nails into wood or other materials quickly and efficiently. To understand how the nailer works and how to troubleshoot any issues that may arise, it is helpful to have a diagram of its parts.
Central Pneumatic Framing Nailer Parts Diagram
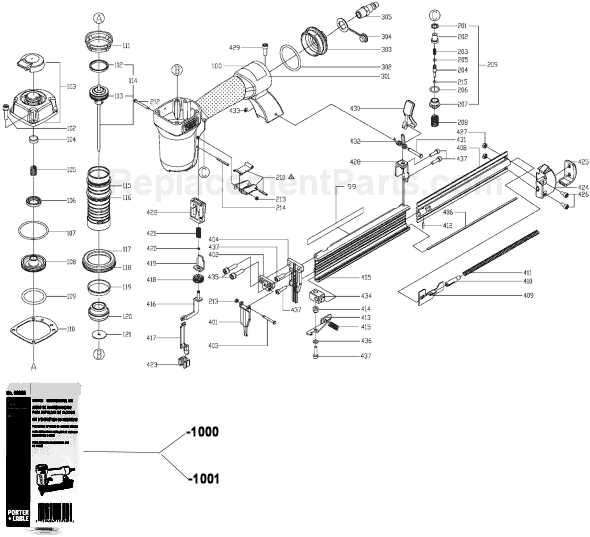
The Central Pneumatic framing nailer parts diagram provides a detailed breakdown of all the components that make up the nailer. It includes labels for each part, making it easy to identify and understand how they fit together. Some of the key parts you may find in the diagram include:
- Trigger Mechanism: The trigger mechanism is responsible for activating the nailer and driving the nails into the material. It consists of a trigger and a firing valve.
- Magazine: The magazine is where the nails are loaded. It holds a strip of nails and feeds them into the nail chamber for firing.
- Nail Chamber and Piston: The nail chamber is where the nails are held before being driven into the material. The piston is responsible for pushing the nails from the chamber into the material.
- Depth Adjustment: The depth adjustment allows you to control how deep the nails are driven into the material. It is typically located near the trigger mechanism.
- Exhaust Port: The exhaust port is where the compressed air is released after each firing. It helps to keep the nailer clean and reduces the risk of debris getting into the mechanism.
By referring to the Central Pneumatic framing nailer parts diagram, you can easily identify the different components of the nailer and understand how they work together. This knowledge can be useful for troubleshooting issues or performing maintenance on the nailer. It is also helpful when ordering replacement parts or accessories for the nailer.
The Importance of Understanding Central Pneumatic Framing Nailer Parts Diagram
When it comes to using a central pneumatic framing nailer, it is crucial to have a thorough understanding of its parts diagram. This diagram provides a visual representation of the various components of the nailer, allowing users to identify and troubleshoot any issues that may arise during operation. Whether you are a professional carpenter or a DIY enthusiast, having a good grasp of the parts diagram can help ensure the efficient and safe use of the framing nailer.
One of the primary reasons why understanding the central pneumatic framing nailer parts diagram is important is for maintenance and repair purposes. By familiarizing yourself with the different parts and their functions, you will be able to identify any worn or damaged components that may need to be replaced. This can prevent potential malfunctions and extend the lifespan of your nailer.
Here are some key components that are typically included in a central pneumatic framing nailer parts diagram:
- Trigger and safety: These are the parts that control the firing mechanism of the nailer. Understanding how they work together is crucial for safety and proper operation.
- Nail feed system: This includes the magazine, nail pusher, and other components that facilitate the loading and feeding of nails into the nailer.
- Piston and cylinder: These are the main components responsible for driving the nails into the material. Understanding their function and proper maintenance can ensure optimal performance.
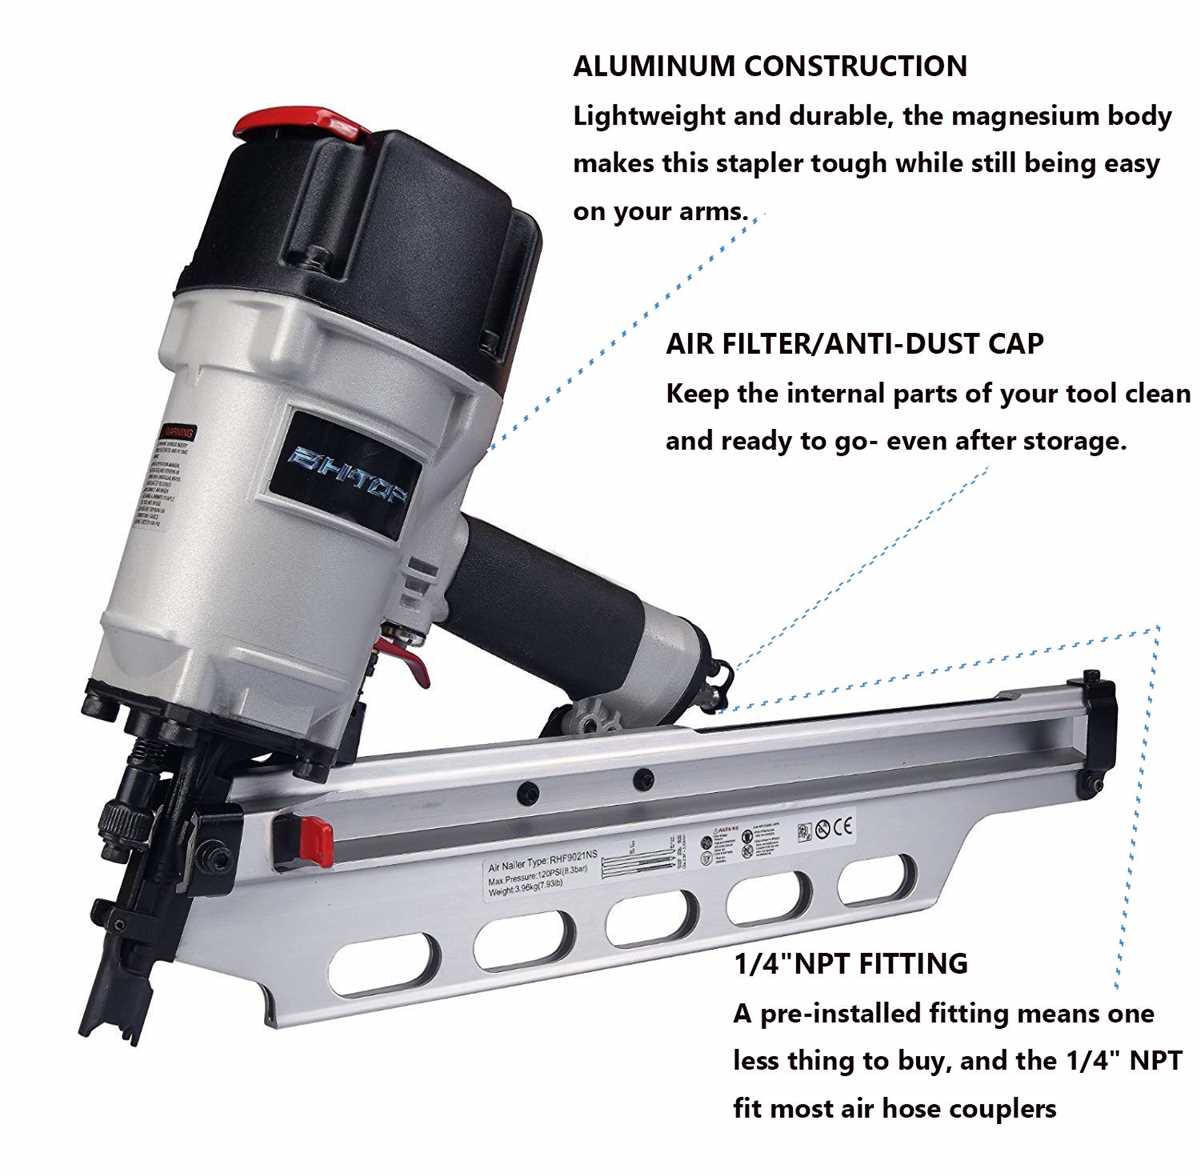
- Air compressor connections: The central pneumatic framing nailer relies on air pressure to operate. Knowing how to connect and disconnect the nailer to the air compressor is essential for functionality.
By referring to the parts diagram, you can easily locate and identify these essential components, giving you a better understanding of how the nailer operates. This knowledge can be invaluable when troubleshooting issues, making adjustments, or undertaking routine maintenance tasks.
Overall, taking the time to study and understand the central pneumatic framing nailer parts diagram can greatly enhance your ability to effectively and safely use the tool. It allows you to better comprehend the inner workings of the nailer, identify potential problems, and ensure its optimal performance for years to come.
Main Components of a Central Pneumatic Framing Nailer
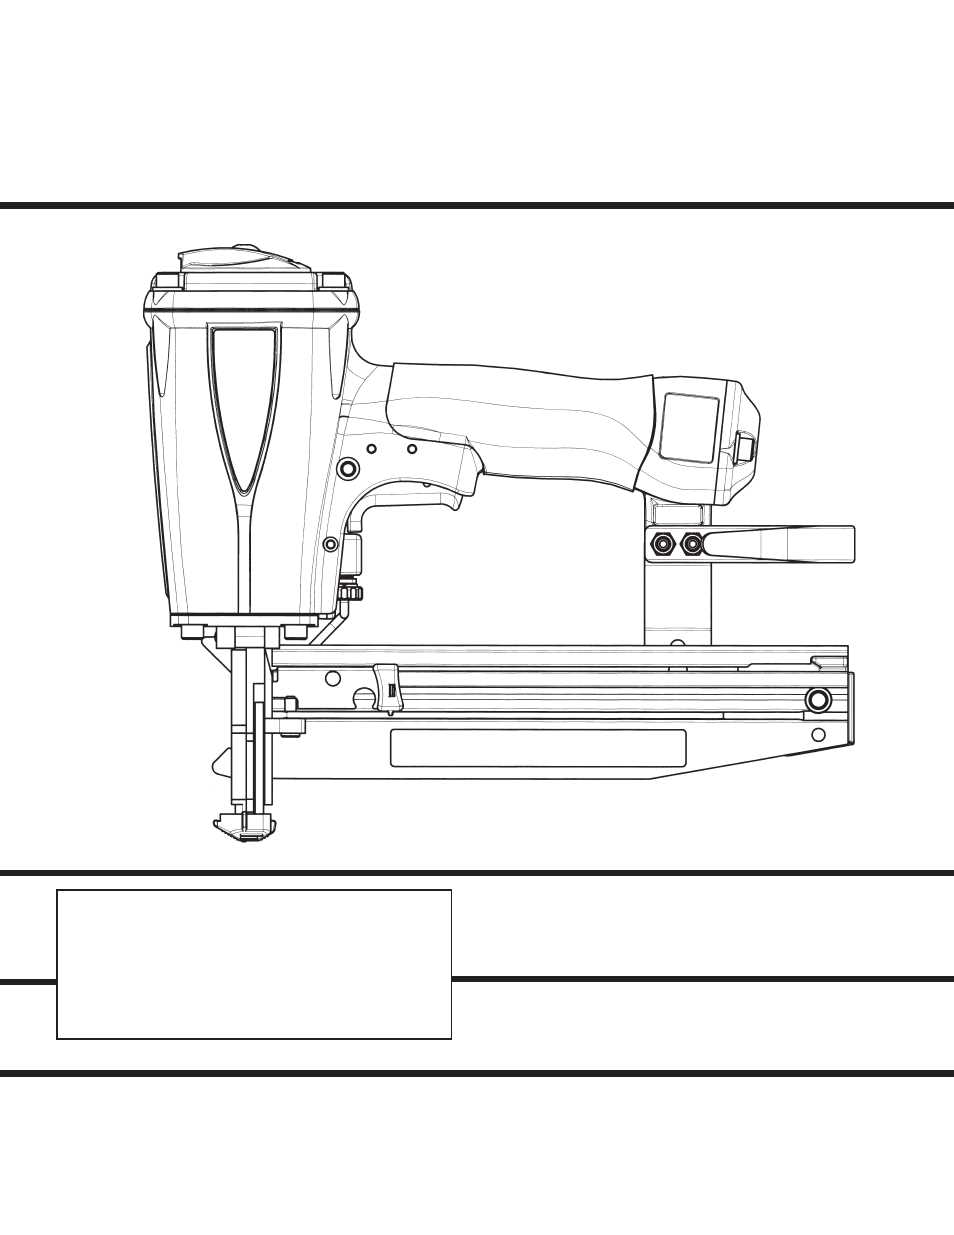
A Central Pneumatic Framing Nailer is a powerful tool used for quickly and effortlessly driving nails into wood. It is commonly used in construction and carpentry projects to expedite the process of assembling wooden structures. Understanding the main components of this tool can help users efficiently operate and maintain it.
1. Magazine: The magazine is the part of the framing nailer that holds the nails. It is typically located on the bottom of the tool and has a capacity to hold a specific number of nails. The nails are stacked in a row within the magazine and are fed into the nailer one at a time as needed.
2. Firing trigger: The firing trigger is the mechanism that activates the nailer to drive a nail. It is usually a lever or button conveniently located near the handle of the nailer. When the trigger is squeezed, it engages the internal mechanisms of the nailer to push the nail into the material being fastened.
3. Depth adjustment: The depth adjustment feature allows users to control how deeply the nails are driven into the wood. This is important because different materials and applications require different nail depths. The depth adjustment can usually be accessed through a knob or dial located on the side or top of the nailer.
4. Air compressor connection: As a pneumatic tool, a Central Pneumatic Framing Nailer requires an air compressor to provide the necessary power for driving the nails. The nailer is equipped with a connection point where an air hose from the compressor can be attached. This connection allows pressurized air to flow into the nailer and activate the driving mechanism.
5. Safety features: Safety features are an essential part of any power tool, including framing nailers. Common safety features found on Central Pneumatic Framing Nailers include a safety tip that must be pressed against the material before the nailer can be fired, as well as a trigger lock that prevents accidental firing.
These are the main components that make up a Central Pneumatic Framing Nailer. By understanding how these components work together, users can effectively and safely use this tool for their woodworking projects.
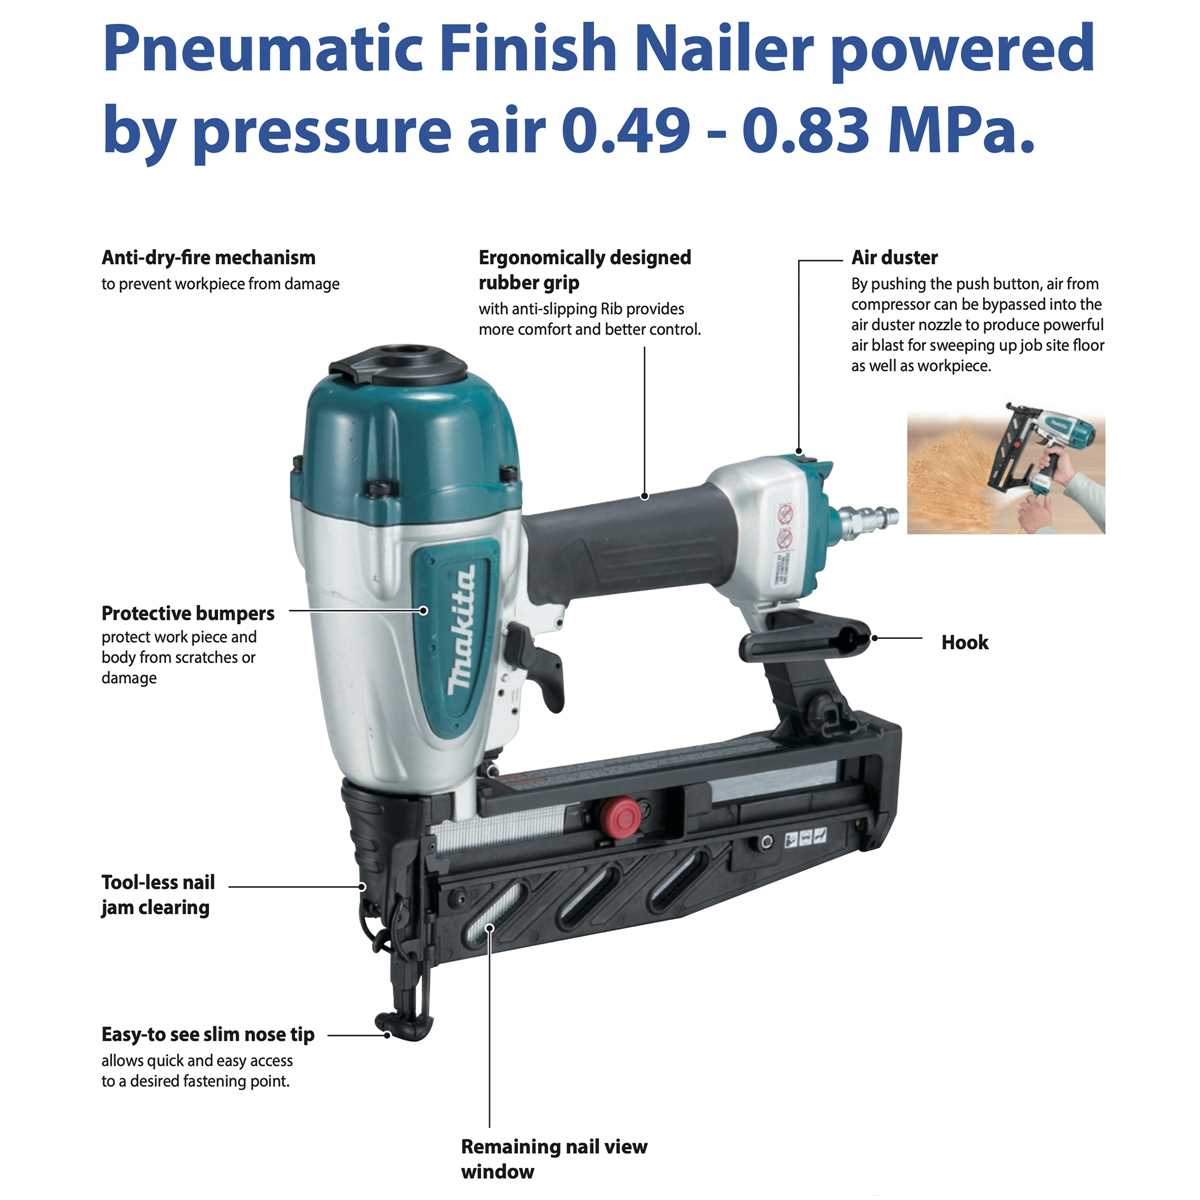
Exploring the Inner Workings of a Central Pneumatic Framing Nailer
When it comes to construction and woodworking projects, a central pneumatic framing nailer is an essential tool. Understanding how this tool works and its various parts can help you utilize it effectively and ensure its proper maintenance.
The central pneumatic framing nailer is a powerful air-powered tool used to drive nails into wood or other materials. It operates by harnessing the power of compressed air to push the nails into the material with force. To achieve this, the tool is equipped with several key components.
- Compressor: The central pneumatic framing nailer requires a compressor to supply the necessary compressed air. The compressor pressurizes air and delivers it to the nailer through a hose.
- Air Hose: The air hose connects the compressor to the nailer, allowing the compressed air to flow into the tool.
- Trigger: The trigger is the control mechanism that activates the nailer. When pressed, it releases the compressed air, driving the nail into the material.
- Nail Magazine: The nail magazine is a storage compartment that holds the nails. It feeds the nails into the firing chamber, ready for each sequential nail firing.
- Firing Mechanism: The firing mechanism is responsible for driving the nails. It consists of a piston, cylinder, and striker plate. When the trigger is activated, the piston pushes the striker plate, which forces the nail into the material.
- Depth Adjustment: Some central pneumatic framing nailers have a depth adjustment feature, allowing you to control the depth at which the nails are driven into the material. This is useful for ensuring the nails are properly embedded without damaging the surface.
By understanding the inner workings of a central pneumatic framing nailer and its various parts, you can use the tool more effectively and troubleshoot any issues that may arise. Regular maintenance, such as cleaning and lubricating the tool, is essential to prolong its lifespan and ensure optimal performance.
Common Issues with Central Pneumatic Framing Nailer Parts and How to Troubleshoot Them
The Central Pneumatic Framing Nailer is a powerful tool commonly used in construction and woodworking. However, like any tool, it can experience issues from time to time. Understanding common issues with the nailer parts and how to troubleshoot them can help you keep your tool in good working condition.
1. Jammed Nail Magazine
One common issue with the Central Pneumatic Framing Nailer is a jammed nail magazine. If you find that the nails are not advancing or are getting stuck, the first thing to check is the magazine. Remove any nails or debris that may be causing the jam using a pair of pliers or a screwdriver. Additionally, ensure that the magazine spring is properly aligned and functioning correctly.
2. Air Leaks
Another issue that may occur with the framing nailer is air leaks. If you notice that air is escaping from the tool, check for loose or damaged seals. Tighten any loose screws or fittings and replace any worn-out seals. It is also important to make sure that the air hose connection is secure and not damaged.
3. Weak Nail Firing
Weak or inconsistent nail firing can be frustrating when using a framing nailer. If you are experiencing this issue, start by checking the air pressure. Adjust the air pressure to the recommended PSI for your specific nailer. If the problem persists, inspect the piston head and driver blade for wear or damage. Clean or replace these parts as needed. It is also important to regularly lubricate the nailer with a lightweight oil to ensure smooth operation.
4. Clogged Air Filter
A clogged air filter can cause issues with the airflow in the nailer, leading to inconsistent performance. To troubleshoot this issue, locate the air filter on your nailer and remove any dust or debris that may be blocking it. Clean the filter using compressed air or water (if applicable), and ensure it is completely dry before reattaching it. Regularly cleaning or replacing the air filter will help maintain optimal performance.
By understanding these common issues and knowing how to troubleshoot them, you can keep your Central Pneumatic Framing Nailer in good working condition. Regular maintenance, such as cleaning, lubricating, and inspecting the nailer, will also help prevent future issues and prolong the lifespan of your tool.
Where to Find Replacement Parts for your Central Pneumatic Framing Nailer
If you own a Central Pneumatic Framing Nailer, it’s likely that at some point you may need to find replacement parts. Whether it’s a worn-out trigger, a broken driver blade, or a missing o-ring, having access to the right parts can make all the difference in keeping your tool in working order.
One of the best places to find replacement parts for your Central Pneumatic Framing Nailer is directly from the manufacturer. Central Pneumatic offers a wide range of official replacement parts for their nailers, ensuring that you get the right fit and compatibility for your specific model. Their website is easy to navigate, with detailed diagrams and descriptions to help you identify the exact parts you need.
Another option for finding replacement parts is through online retailers and marketplaces. Websites like Amazon, eBay, and specialized tool parts stores often carry a variety of Central Pneumatic Framing Nailer parts. It’s important to verify the authenticity and compatibility of the parts before making a purchase, so reading customer reviews and checking seller ratings can help ensure you’re getting a quality product.
If you prefer to shop in-person, check with your local hardware stores or home improvement centers. They may carry a selection of replacement parts for Central Pneumatic nailers, or be able to order them for you. These stores often have knowledgeable staff who can assist you in finding the right parts and answer any questions you may have.
When searching for replacement parts, it’s important to have the model number or specific part number handy. This will ensure that you are getting the correct part for your Central Pneumatic Framing Nailer. Taking care of your tool and replacing worn or damaged parts promptly will help extend its lifespan and ensure optimal performance on your projects.
In conclusion
Whether you choose to purchase replacement parts directly from Central Pneumatic, online retailers, or local stores, having access to the right parts is essential for maintaining and repairing your Central Pneumatic Framing Nailer. By being proactive and taking care of your tool, you can continue tackling your framing projects with ease and confidence.
Tips for Proper Maintenance and Care of Your Central Pneumatic Framing Nailer
Proper maintenance and care are essential for ensuring the longevity and performance of your Central Pneumatic framing nailer. By following the tips below, you can keep your tool in top shape and avoid any unnecessary repairs or replacements:
- Regular Cleaning: After each use, it’s crucial to clean your nailer thoroughly. Remove any debris, sawdust, or nails that may have gotten stuck. Use compressed air or a brush to clean the nailer’s components, including the magazine, nosepiece, and feed mechanism. This will prevent any build-up that can lead to jamming or misfiring.
- Lubrication: Lubricate the moving parts of your nailer regularly. Apply a few drops of pneumatic tool oil to the air inlet before each use. This will ensure smooth operation and prevent excessive wear and tear.
- Proper Storage: When not in use, store your framing nailer in a clean and dry place. Dust, moisture, and extreme temperatures can negatively impact the tool’s performance. Keep it in its original case or in a protective carrying bag to prevent damage.
- Inspect and Replace Worn Parts: Regularly inspect your nailer for any signs of wear or damage. Check the O-rings, seals, and gaskets for cracks or degradation. Replace any worn or damaged parts immediately to maintain optimal performance and prevent air leaks.
- Follow Manufacturer’s Guidelines: Always refer to the manufacturer’s manual for specific maintenance instructions and guidelines. Different models may have slightly different maintenance requirements, so it’s essential to follow the recommended procedures.
By following these tips and properly maintaining your Central Pneumatic framing nailer, you can ensure that it will continue to operate efficiently and reliably. Regular cleaning, lubrication, and inspection will help prevent costly repairs and extend the lifespan of your tool. Remember to always prioritize safety and follow proper handling procedures when using and maintaining your framing nailer.