
When it comes to upgrading or modifying your Chevy’s electrical system, one of the first things you should consider is the alternator. The alternator is responsible for charging the battery and providing power to the electrical components of your vehicle. One popular option for Chevy owners is the one-wire alternator, known for its simplicity and ease of installation.
A Chevy one-wire alternator eliminates the need for complicated wiring harnesses and external voltage regulators. With just one wire, this type of alternator can provide all the power your vehicle needs. This makes it a popular choice for enthusiasts looking to simplify their electrical system and eliminate any potential points of failure.
In a one-wire alternator setup, the single wire connects to the battery terminal, effectively connecting the alternator to the battery. This simple setup allows the alternator to automatically start charging as soon as the engine is running. It also eliminates the need for an ignition switch wire and various other connections found in traditional alternator setups.
With a Chevy one-wire alternator, installation is straightforward. You won’t need to worry about connecting multiple wires or locating the right connections. Instead, you can focus on enjoying the benefits of a simplified electrical system and reliable power delivery.
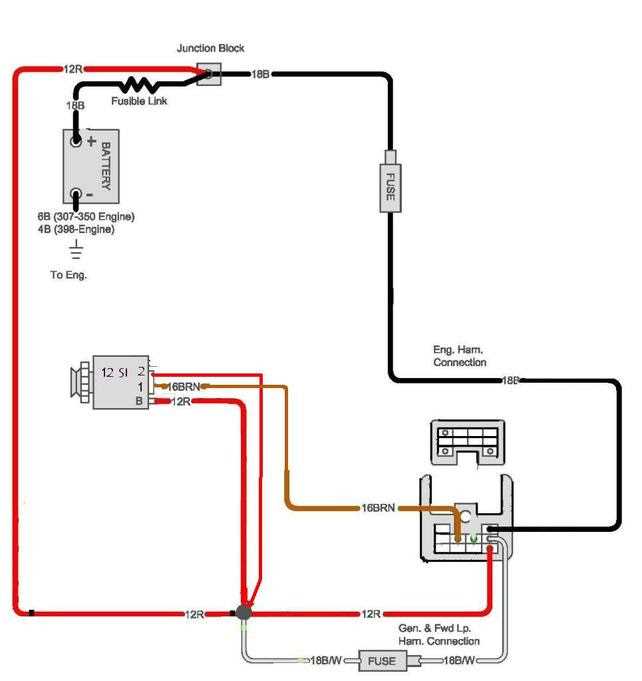
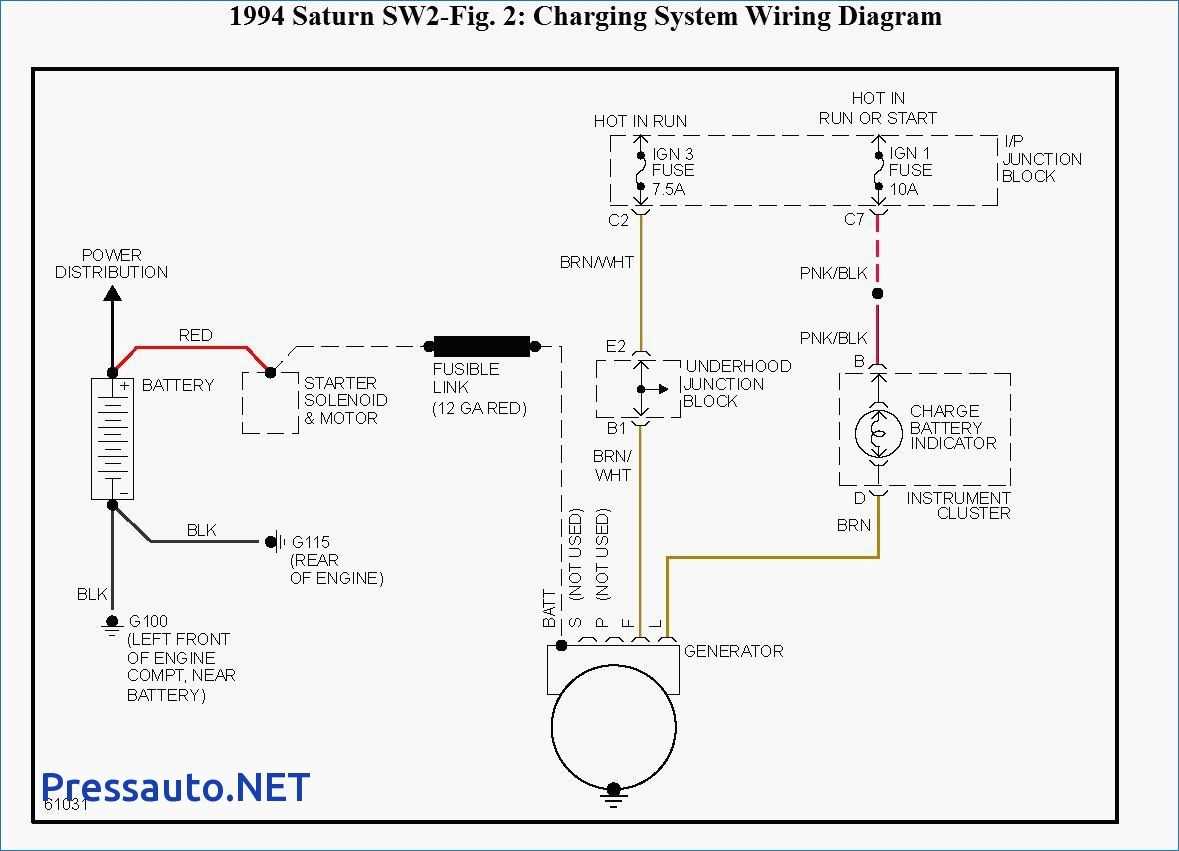
Chevy One Wire Alternator Wiring Diagram
When it comes to upgrading or replacing the alternator in your Chevy vehicle, one popular option is to install a one-wire alternator. This type of alternator eliminates the need for complicated wiring, making it an attractive choice for DIY enthusiasts. Here is a basic wiring diagram for installing a one-wire alternator in your Chevy.
Step 1: Disconnect the battery. Before working on any electrical components, it is important to disconnect the battery to prevent any accidental shocks or damage.
Wiring Diagram:
- Connect the positive terminal of the alternator to the positive terminal of the battery: This is the main power connection. The positive terminal of the alternator should be connected directly to the positive terminal of the battery using a heavy-gauge wire.
- Ground the alternator: The alternator needs to be properly grounded to function. Connect a heavy-gauge wire from the casing of the alternator to a grounded point on the engine block or chassis.
- Optional: Connect the ignition switch to the alternator: This step is optional, but can be useful for controlling the alternator with the ignition switch. Connect a wire from the “IGN” (or “I” or “BAT”) terminal on the ignition switch to the “L” or “R” terminal on the alternator.
Once you have completed the wiring according to the diagram, double-check all connections to ensure they are secure. Reconnect the battery and start the engine to test the new alternator. If everything is working properly, the battery should be charging and the alternator should be providing power to the vehicle’s electrical system.
This one-wire alternator wiring diagram is a basic guide, and it’s always a good idea to consult the specific wiring instructions provided by the manufacturer of your alternator. Additionally, it’s important to use high-quality wiring and connectors to ensure a reliable and safe electrical connection.
Understanding the Chevy One Wire Alternator
The Chevy one wire alternator is a popular choice for custom and classic car enthusiasts. It offers simplicity and ease of installation compared to the traditional three-wire alternator. With the one wire alternator, everything needed to charge the battery is done through a single wire.
The main advantage of the Chevy one wire alternator is its simplicity. The one wire design eliminates the need for complex wiring schemes and voltage regulators. This makes it easier for DIY enthusiasts to install and wire the alternator in their vehicles. Additionally, the one wire alternator provides a more reliable and efficient charging system.
The Chevy one wire alternator works by using the built-in voltage regulator to control the amount of electricity being sent to the battery. When the engine is running, the alternator produces electricity and sends it directly to the battery through the one wire. The voltage regulator inside the alternator regulates the voltage and ensures that the battery is charged at the correct level.
When installing the Chevy one wire alternator, it is important to properly ground the alternator to the engine or chassis. This helps ensure a good electrical connection and prevents any potential grounding issues. It is also recommended to use a heavy-gauge wire to connect the alternator to the battery, as this will minimize voltage drop and maximize charging efficiency.
In conclusion, the Chevy one wire alternator offers a simple and efficient solution for charging the battery in custom and classic cars. Its one wire design eliminates the need for complex wiring and voltage regulators, making installation easier for enthusiasts. Understanding how the alternator works and properly wiring it can help ensure a reliable charging system for your vehicle.
Benefits of Using a One Wire Alternator
One wire alternators provide several benefits over traditional multi-wire alternators in automotive applications. These alternators are designed to be simple and easy to install, making them a popular choice among car enthusiasts and mechanics.
Simplified Wiring: One of the main advantages of a one wire alternator is its simplified wiring system. Traditional alternators require multiple wires to be connected to the battery, voltage regulator, and other components. With a one wire alternator, only a single wire is needed to connect the alternator to the battery. This results in a cleaner and more organized wiring setup, reducing the chances of electrical issues and simplifying troubleshooting.
Improved Output: Another benefit of using a one wire alternator is its ability to provide a higher output compared to traditional alternators. One wire alternators typically have a higher amperage output, allowing them to provide a greater amount of electrical power to the vehicle’s electrical system. This is especially beneficial for vehicles with aftermarket accessories, such as high-powered audio systems or additional lighting, that require a larger electrical load.
Easy Installation: Installing a one wire alternator is generally much easier and quicker compared to traditional alternators. The simplified wiring system means less time and effort spent on connecting multiple wires. Additionally, one wire alternators are often designed to be a direct replacement for standard alternators, making installation even easier. This can save both DIY car enthusiasts and professional mechanics valuable time and effort.
Increased Reliability: One wire alternators are known for their reliability and durability. Their simpler design means there are fewer components that can fail or malfunction. Additionally, the lack of multiple wires and connections reduces the chances of loose or corroded connections, which can cause electrical issues. This increased reliability means that vehicles equipped with one wire alternators are less likely to experience alternator failures, ensuring a consistent and reliable power supply.
Overall, the use o
Step-by-Step Guide to Wiring a Chevy One Wire Alternator
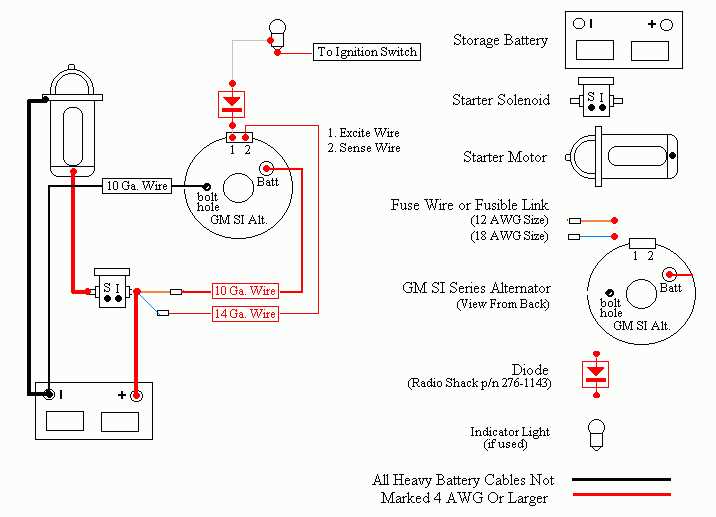
Wiring a Chevy one wire alternator is a straightforward process that can be completed by following a few simple steps. This type of alternator is commonly used in hot rods, street rods, and other custom vehicles. It eliminates the need for an external voltage regulator and simplifies the wiring process. Here is a step-by-step guide to wiring a Chevy one wire alternator.
Gather the necessary materials and tools
Before beginning the wiring process, gather all the necessary materials and tools. You will need a Chevy one wire alternator, a battery, a battery cable, a fuse holder, a fuse, and a few electrical connectors. Additionally, you will need wire strippers, crimping pliers, and electrical tape. Having everything ready beforehand will help streamline the process.
Connect the battery cable
The first step is to connect the battery cable to the alternator. Locate the main terminal on the back of the alternator and attach the positive end of the battery cable to it. This connection is essential as it provides power to the alternator. Ensure the connection is tight and secure to minimize any potential electrical issues.
Install the fuse holder
To protect the electrical system, install a fuse holder between the alternator and the battery. This will prevent any damage or electrical fires in case of a short circuit. Mount the fuse holder in a convenient location and connect the other end of the battery cable to one side of the fuse holder. Connect a short piece of wire from the other side of the fuse holder to the terminal labeled “BAT” on the alternator.
Connect the electrical connectors
Next, connect the necessary electrical connectors to the alternator. One wire will go from the “1” or “L” terminal on the alternator to the ignition switch. Another wire will go from the “2” or “S” terminal on the alternator to the battery positive terminal. These connections are vital for the proper functioning of the alternator and the electrical system of the vehicle.
Finish the wiring
Once all the connections have been made, double-check the wiring to ensure everything is properly connected and secured. Use wire strippers and crimping pliers to make secure connections and cover them with electrical tape for added protection. Test the wiring by starting the engine and verifying that the alternator is charging the battery.
By following this step-by-step guide, you can easily wire a Chevy one wire alternator. It is a simple process that can be completed with basic electrical knowledge and the right tools. With a properly wired alternator, your vehicle’s electrical system will function efficiently and reliably.
Common Issues and Troubleshooting Tips
When installing a one-wire alternator in a Chevy vehicle, there are a few common issues that may arise. Understanding these problems and having some troubleshooting tips can help you resolve them quickly and efficiently.
No Charging
If your one-wire alternator is not charging the battery, there are a few potential causes. One common issue is an improper connection. Check that the alternator is properly grounded and that the main power wire is connected securely to the battery. Additionally, make sure the alternator belt is tight and properly aligned.
If the connections and belt are in good condition, the next step is to test the alternator. Use a multimeter to check the voltage output at the alternator’s output terminal. The voltage should be around 13-14 volts. If the voltage is significantly lower or zero, it might indicate a faulty alternator that needs to be replaced.
Inconsistent Charging
If your alternator is intermittently charging the battery or providing inconsistent voltage, there are a few troubleshooting steps you can take. Start by checking the voltage regulator. This component is responsible for regulating the alternator’s output and ensuring a consistent charge. If the regulator is faulty, it may cause charging inconsistencies. Consider replacing it if necessary.
Another potential issue could be a faulty battery or corroded battery terminals. Ensure the battery is in good condition and clean any corrosion from the terminals. A weak or damaged battery can prevent the alternator from charging consistently.
Overcharging
In some cases, a one-wire alternator may overcharge the battery, leading to potential damage. This can be caused by a malfunctioning internal regulator. If you notice that the alternator is consistently providing a voltage higher than 14 volts, it is likely overcharging the battery.
To fix this issue, you may need to replace the alternator or have the regulator repaired. It is crucial to address this problem promptly to prevent damage to the battery or other electrical components.
When installing a one-wire alternator, it is essential to ensure all connections are secure and that the alternator is properly grounded. Regular maintenance, such as checking the belt tension and cleaning the battery terminals, can help prevent issues with the alternator. If you encounter any problems, troubleshooting the potential causes outlined above can help you identify and resolve the issue quickly.
Tips for Properly Installing a Chevy One Wire Alternator

Properly installing a Chevy one wire alternator is crucial for the efficient and reliable operation of your vehicle’s charging system. Here are some tips to help you ensure a successful installation:
- Obtain the correct alternator: Make sure you have the correct type and model of a one wire alternator that is compatible with your Chevy vehicle. Refer to the manufacturer’s specifications or consult an expert if you are unsure.
- Prepare the wiring: Before installing the alternator, check and prepare the wiring. Make sure all connections are clean and secure and that any damaged wires are repaired or replaced. Ensure that all connections are properly insulated to prevent short circuits or electrical issues.
- Mount the alternator: Find an appropriate location to mount the alternator in your vehicle. Ideally, it should be mounted securely to minimize vibration and potential damage. Follow the manufacturer’s instructions for proper mounting procedures.
- Connect the wiring: Connect the wiring according to the manufacturer’s instructions. Ensure that the positive terminal of the alternator is connected to the positive terminal of the battery or power source. Double-check all connections to ensure they are properly secured and tight.
- Test the system: After installation, test the charging system to ensure it is functioning correctly. Start the engine and check for proper charging voltage using a voltmeter. The voltage should be within the range specified by the manufacturer.
Following these tips will help you properly install a Chevy one wire alternator and ensure the efficient operation of your vehicle’s charging system. Remember to always refer to the manufacturer’s instructions and consult an expert if needed. A properly installed and functioning alternator is essential for maintaining a reliable and functional electrical system in your Chevy vehicle.
Q&A:
What is a one-wire alternator?
A one-wire alternator is a type of alternator that only requires a single wire to be connected to the battery for it to operate.
What are the benefits of using a one-wire alternator?
Some benefits of using a one-wire alternator include simplified wiring, easier installation, and improved reliability.
How do you properly install a one-wire alternator in a Chevy?
To properly install a one-wire alternator in a Chevy, start by disconnecting the negative battery cable. Then, remove the existing alternator and bracket. Next, mount the one-wire alternator in the same location as the old alternator and secure it with a bracket. Finally, connect the positive battery cable to the alternator’s main terminal.
Do you need to modify the wiring on a Chevy to install a one-wire alternator?
No, one of the advantages of a one-wire alternator is that it eliminates the need for complicated wiring modifications. Simply connect the single wire to the battery and you’re good to go.
Are there any precautions to take when installing a one-wire alternator in a Chevy?
Yes, it’s important to make sure the alternator is properly grounded and that all connections are secure. Additionally, double-check the belt tension and alignment to prevent any issues with the alternator’s performance.
What is a one wire alternator?
A one wire alternator is an alternator that only requires one wire to operate. This makes it easier to install and simplifies the wiring process.