
The Sony DSX B700 is a popular car stereo unit that offers a wide range of features and functionality. Whether you’re upgrading your existing car audio system or installing a new one, understanding the wiring diagram is essential to ensure a successful installation.
The wiring diagram for the Sony DSX B700 outlines the connections and color codes for the various wires that need to be attached to the unit. This diagram provides valuable information about the input and output connections, power supply, speaker connections, and other essential components.
By following the wiring diagram, you can easily connect the Sony DSX B700 to your car’s speakers, amplifier, and power supply. The diagram also helps in troubleshooting any potential issues that may arise during or after the installation process.
It is important to refer to the Sony DSX B700 wiring diagram specific to your car’s make and model, as different cars may have different wiring configurations. This ensures a proper and seamless integration of the car stereo unit into your vehicle’s audio system.
Whether you’re a professional car audio installer or a DIY enthusiast, having access to the Sony DSX B700 wiring diagram is a valuable resource that can help you achieve the best possible audio experience in your car.
Connecting the power wires
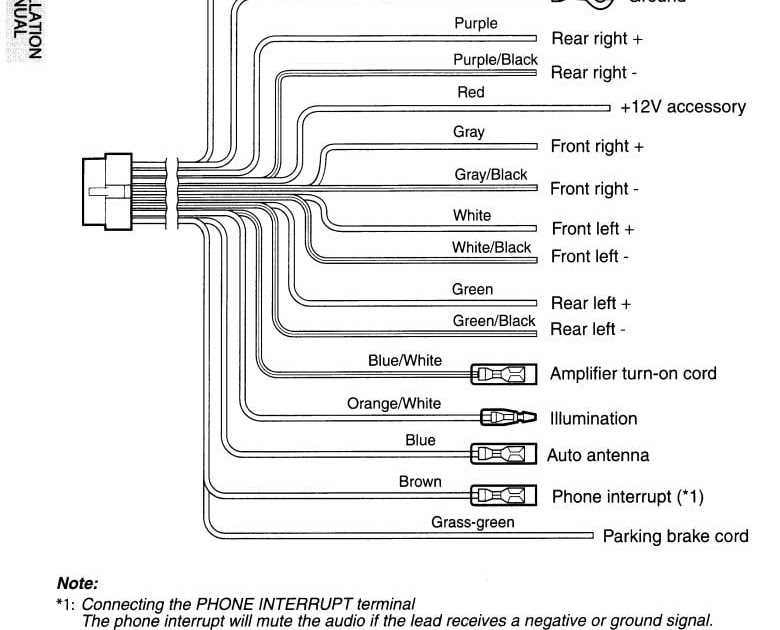
When installing a Sony DSX B700 car stereo, it is important to properly connect the power wires to ensure proper functionality and prevent any potential electrical issues. The power wires consist of the red wire, which is the positive wire, and the yellow wire, which is the constant power wire. It is also recommended to connect the black wire, which is the ground wire, to a suitable grounding point in the vehicle.
To connect the power wires, start by locating the vehicle’s wiring harness. This harness can usually be found behind the car stereo or in the dashboard. Once located, identify the wires that correspond to the power wires of the Sony DSX B700 stereo.
1. Red wire: Connect the red wire of the Sony DSX B700 stereo to the wire in the vehicle’s harness that provides 12-volt power when the ignition is turned on. This wire is typically labeled as the “ignition” or “accessory” wire. Strip the end of the red wire and twist it together with the corresponding wire in the vehicle’s harness. Secure the connection with electrical tape or wire connectors.
2. Yellow wire: Connect the yellow wire of the Sony DSX B700 stereo to the wire in the vehicle’s harness that provides constant 12-volt power. This wire is typically labeled as the “battery” or “constant” wire. Strip the end of the yellow wire and twist it together with the corresponding wire in the vehicle’s harness. Secure the connection with electrical tape or wire connectors.
Make sure to double-check all the connections before reassembling the car stereo and turning on the ignition. Incorrectly connecting the power wires can lead to electrical malfunctions or damage to the stereo. If unsure about the wiring, consult the wiring diagram provided by Sony or seek assistance from a professional car audio installer.
Connecting the speaker wires
When installing the Sony DSX-B700 car stereo, it is important to properly connect the speaker wires to ensure optimal sound quality. The speaker wires are responsible for transmitting the audio signals from the car stereo to the speakers, and it is crucial to make the correct connections to avoid any issues or damage.
To connect the speaker wires, follow these steps:
- Identify the speaker wires: The Sony DSX-B700 car stereo usually comes with a wiring harness that includes color-coded wires. The speaker wires are typically labeled and can be identified by their color. Common colors for speaker wires include white, gray, green, and purple.
- Strip the ends of the speaker wires: Using a wire stripper, carefully remove the insulation from the ends of the speaker wires. This will expose the metal conductor, allowing for a clean and secure connection.
- Match the wires: Each speaker wire has a positive (+) and negative (-) terminal. Match the corresponding positive and negative wires from the car stereo to the respective positive and negative terminals on the speakers. This ensures that the audio signals are transmitted correctly and in-phase.
- Make the connections: Once the wires are matched, make the connections by either using crimp connectors, soldering the wires together, or using wire nuts. Ensure that the connections are tight and secure to prevent any loose connections that can affect sound quality.
- Test the connections: Before completing the installation, it is important to test the connections to ensure proper functionality. Turn on the car stereo and play some audio to check if the sound is being produced from the speakers. If the audio is clear and balanced, the speaker wires have been correctly connected.
Following these steps will help you properly connect the speaker wires when installing the Sony DSX-B700 car stereo, ensuring optimal sound quality and performance.
Installing additional accessories

When it comes to installing additional accessories for your Sony DSX B700, it’s important to follow the correct wiring diagram to ensure everything is connected properly. This will ensure that the accessories work seamlessly with your head unit and that no damage is done to any of the components.
Before starting the installation process, gather all the necessary tools and accessories. This may include items such as wiring harnesses, RCA cables, crimp connectors, and a wire stripper. It’s also important to have a copy of the wiring diagram specific to your Sony DSX B700 model.
1. Determine the location
Start by choosing the ideal location for your additional accessory. Whether it’s a subwoofer, amplifier, or any other component, make sure there is enough space and that it can be securely mounted.
2. Connect the power supply
Follow the wiring diagram to connect the power supply for your accessory. This may involve connecting to the vehicle’s battery or using a dedicated power source. Make sure to use the appropriate gauge wire for the power supply to avoid any voltage drop or damage to the accessory.
3. Connect the ground
Next, locate a suitable grounding point near the accessory and connect the ground wire. Ensure that the grounding point is clean and free of any paint or corrosion for optimal electrical conductivity.
4. Connect the audio signals
If your accessory requires audio signals, such as a subwoofer or amplifier, the wiring diagram will indicate where to connect the RCA cables or speaker wires. Follow the diagram carefully to ensure the correct channels are connected.
5. Test and finalize
Once all the connections are made, test the accessory to ensure it is working correctly. Make any necessary adjustments or corrections if needed. Secure all the cables and wires to prevent any interference or accidental disconnections.
By following these steps and referring to the wiring diagram, you can confidently install additional accessories for your Sony DSX B700 head unit. Remember to take your time and double-check all connections to ensure a proper and reliable installation.
Troubleshooting Common Issues
Here are some common issues that users may encounter when installing or using the Sony DSX B700 car stereo, along with possible solutions:
-
No Power: If the stereo does not turn on, check the wiring connections to ensure they are properly connected. Make sure the car’s battery is not dead and that the stereo’s fuse is intact.
-
Poor Sound Quality: If the sound from the stereo is distorted or unclear, check the speaker connections and ensure they are securely attached. Adjust the equalizer settings on the stereo to optimize the sound output.
-
No FM Reception: If the stereo is having trouble receiving FM radio signals, check the antenna connection and make sure it is securely plugged in. Reposition the antenna if necessary to improve reception.
-
Bluetooth Connection Issues: If the stereo is not connecting to a Bluetooth device, ensure that the device’s Bluetooth function is turned on and in discoverable mode. Delete any previously paired devices from the stereo’s memory and try pairing again.
-
CD Player Malfunction: If the CD player is not working properly, make sure the CD is inserted correctly and not scratched or damaged. Clean the CD player lens using a lens cleaner if necessary.
Overall, the Sony DSX B700 is a reliable car stereo that offers a range of features and functions. However, like any electronic device, it may encounter occasional issues. By following the troubleshooting steps outlined above, most problems can be resolved effectively, ensuring continued enjoyment of the stereo’s features.