
A doorbell is an essential component of any home, providing a convenient way for visitors to announce their arrival. However, in some instances, a single doorbell may not be sufficient, especially in larger homes or multi-family residences. This is where a dual doorbell system comes into play.
A dual doorbell system allows for the installation of two doorbells, typically for use at different entrances. This setup ensures that no matter which entrance guests arrive at, they can easily alert someone inside. To understand how to install a dual doorbell system, it’s important to familiarize oneself with the wiring diagram.
The dual doorbell wiring diagram outlines the necessary steps to connect the doorbells to the existing electrical system. It provides a visual representation of the wires and connections required, making the installation process more manageable for both homeowners and electricians. By following the wiring diagram carefully, one can ensure a smooth and efficient installation of their dual doorbell system.
Whether you’re a homeowner looking to enhance the accessibility and convenience of your home, or an electrician seeking guidance on installing a dual doorbell system, this article will serve as a comprehensive guide. Read on to discover the necessary steps, materials, and precautions involved in connecting and wiring two doorbells to create a dual doorbell system.
Dual Doorbell Wiring Diagram
Installing a dual doorbell system can provide convenience and flexibility for your home or office. With a dual doorbell system, you can have separate chimes or ringers for the front and back doors, allowing you to easily identify which doorbell is being activated. Wiring a dual doorbell system may seem complicated, but following a wiring diagram can help simplify the process.
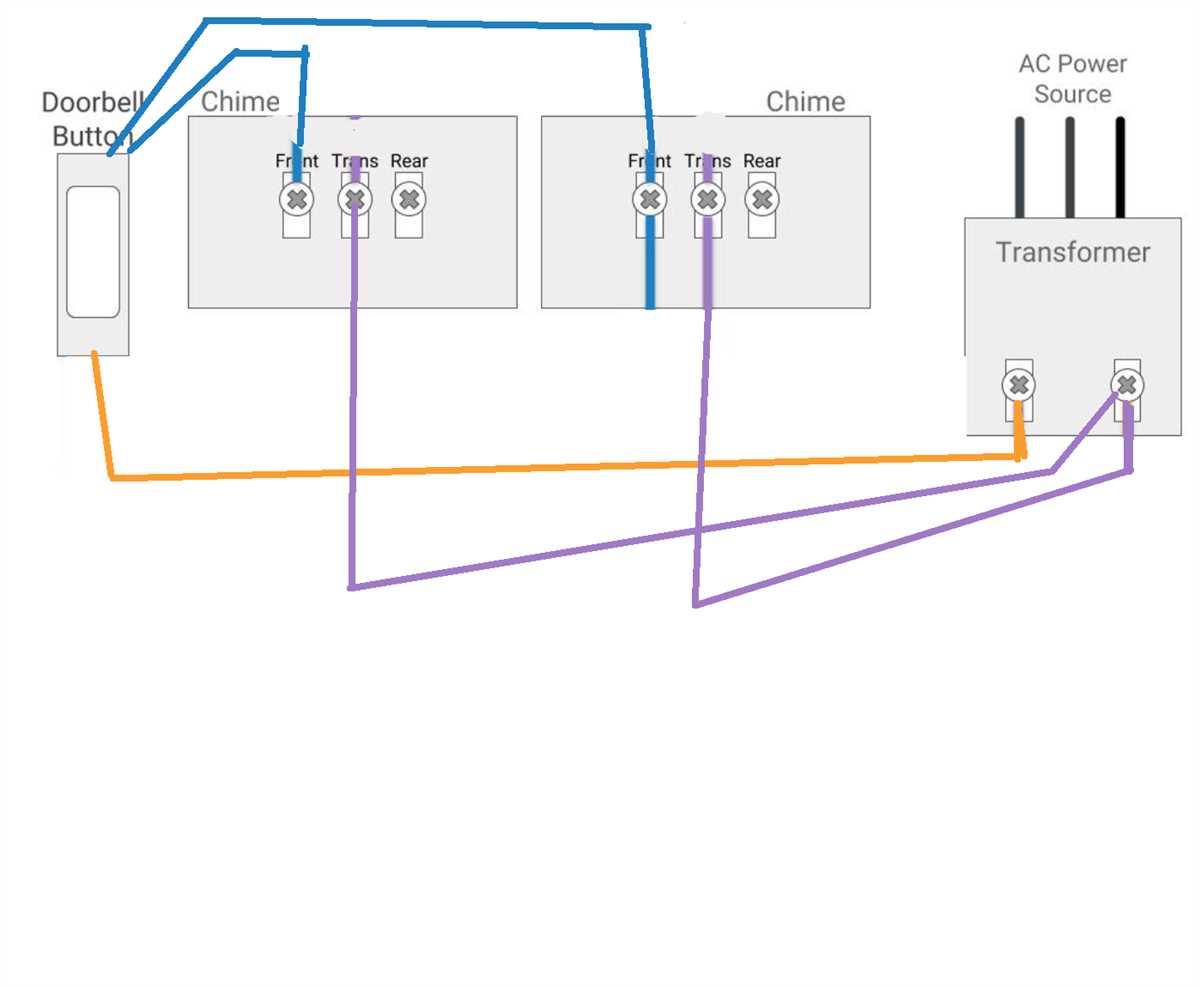
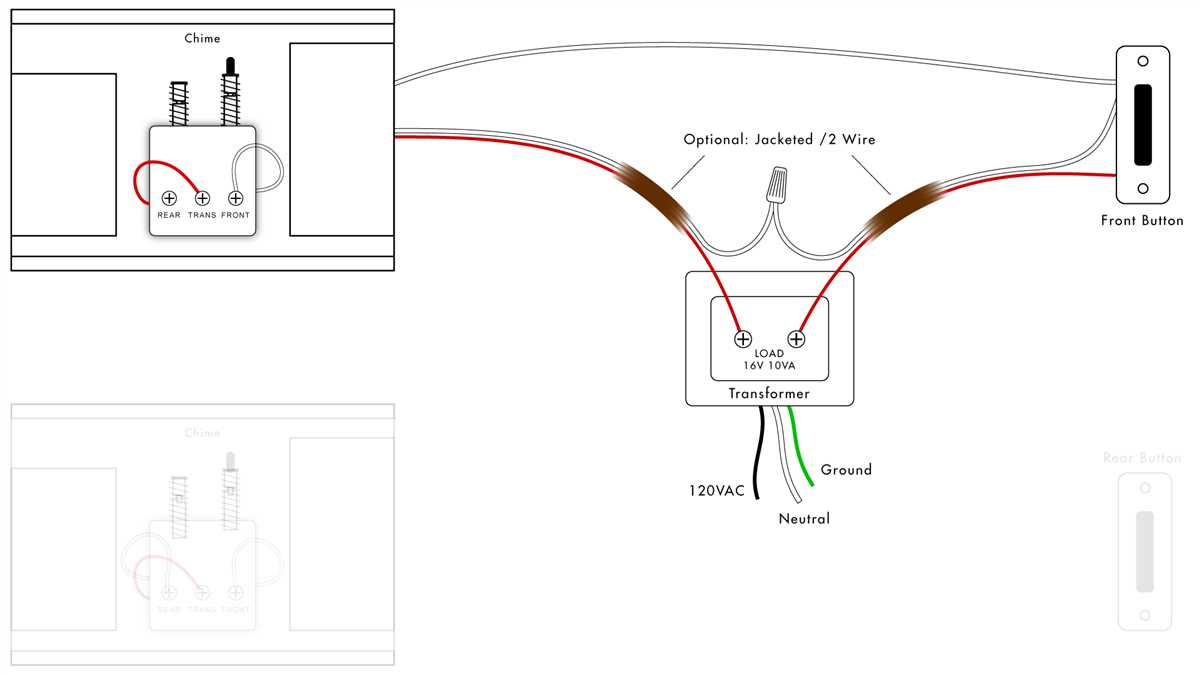
The wiring diagram for a dual doorbell system typically includes two separate transformers, one for each doorbell. Each transformer is connected to a separate doorbell button and a separate chime or ringer. The transformers are connected to a common wire, which is then connected to the main doorbell unit.
Here is a step-by-step guide to wiring a dual doorbell system:
- Identify the location for the main doorbell unit, as well as the front and back doorbell buttons and chimes.
- Install the two transformers near the main doorbell unit. Connect the primary side of each transformer to a separate 120-volt AC power source.
- Connect one wire from each transformer’s secondary side to the corresponding doorbell button.
- Connect the other wire from each doorbell button to the corresponding doorbell chime or ringer.
- Connect the remaining wire from each doorbell chime or ringer to the common wire.
- Connect the common wire to the main doorbell unit.
- Test the system by pressing each doorbell button to ensure that the correct chime or ringer is activated.
By following a dual doorbell wiring diagram and carefully connecting the wires, you can easily install a dual doorbell system that meets your specific needs.
Understanding Dual Doorbell Systems
A dual doorbell system is a popular choice for homes and buildings that have two separate entrances. This type of system allows for the installation of two doorbells, each connected to a different entrance. Understanding how a dual doorbell system works can help homeowners or installers wire and configure it correctly.
Wiring Diagram:
- Each doorbell will have its own transformer that connects to the main electrical panel.
- The wiring for each doorbell starts at the transformer and is connected to the respective doorbell button at each entrance.
- The doorbell buttons are then wired to the chimes or bells inside the house.
- When a visitor presses either doorbell button, it completes the circuit and triggers the chime or bell associated with that entrance.
Benefits of a Dual Doorbell System:
- Convenience: Having separate doorbells for each entrance allows homeowners to easily differentiate between visitors at the front door and back door.
- Security: Dual doorbell systems can enhance security by providing an additional layer of protection for multiple entrances. Homeowners can be alerted when someone is at either door.
- Customization: With a dual doorbell system, homeowners can personalize the chime or bell for each entrance, allowing for a unique sound or melody to be associated with each door.
Components needed for Dual Doorbell Wiring
Dual doorbell wiring requires a few specific components to properly connect and operate two doorbells. These components include:
- Two Doorbells: The first essential component is, of course, the two doorbells themselves. These can be traditional doorbells that ring when pressed or modern wireless doorbells that can be connected to a mobile device.
- Doorbell Buttons: Each doorbell should have its own button, typically placed near the front entrance of the respective doors. These buttons act as the trigger for the doorbell sound.
- Doorbell Chimes: The doorbell chimes produce the audible sound when the buttons are pressed. In dual doorbell wiring, there will usually be two doorbell chimes connected, one for each doorbell.
- Transformers: Doorbell transformers are necessary to convert the high voltage electricity from the main power supply into a lower voltage that can be safely used by the doorbells and chimes. Dual doorbell wiring requires two transformers, one for each doorbell.
- Wiring: To connect all the components together, appropriate wiring is needed. This wiring carries the electrical signals and powers the doorbells and chimes. Typically, low voltage wiring such as bell wire or thermostat wire is used for dual doorbell wiring.
- Junction or Transformer Box: In order to neatly and safely organize the wiring connections, a junction or transformer box may be used. This box provides a central location for connecting the doorbells, chimes, and transformers.
By having these components in place and properly connected, dual doorbell wiring can be set up to have separate doorbell sounds for each entrance, providing convenience and security for a home or business.
Step-by-step Guide to Dual Doorbell Wiring
Installing a dual doorbell system can provide added convenience and security to your home. With two separate doorbell buttons and chimes, you can easily differentiate between front and back door visitors. Here is a step-by-step guide to wiring a dual doorbell system.
Materials needed:
- Two doorbell buttons
- Two doorbell chimes
- Doorbell transformer
- Low voltage electrical wire
- Screwdrivers
- Wire strippers
- Wire connectors
Step 1: Choose the locations
Determine the locations where you want to install the front and back doorbell buttons. Make sure the spots are easily accessible and visible to visitors. Similarly, choose the areas where you want to install the chimes inside your home.
Step 2: Turn off the power
Before starting any electrical work, turn off the power to the doorbell system at the circuit breaker. This will ensure your safety during the installation process.
Step 3: Install the doorbell buttons
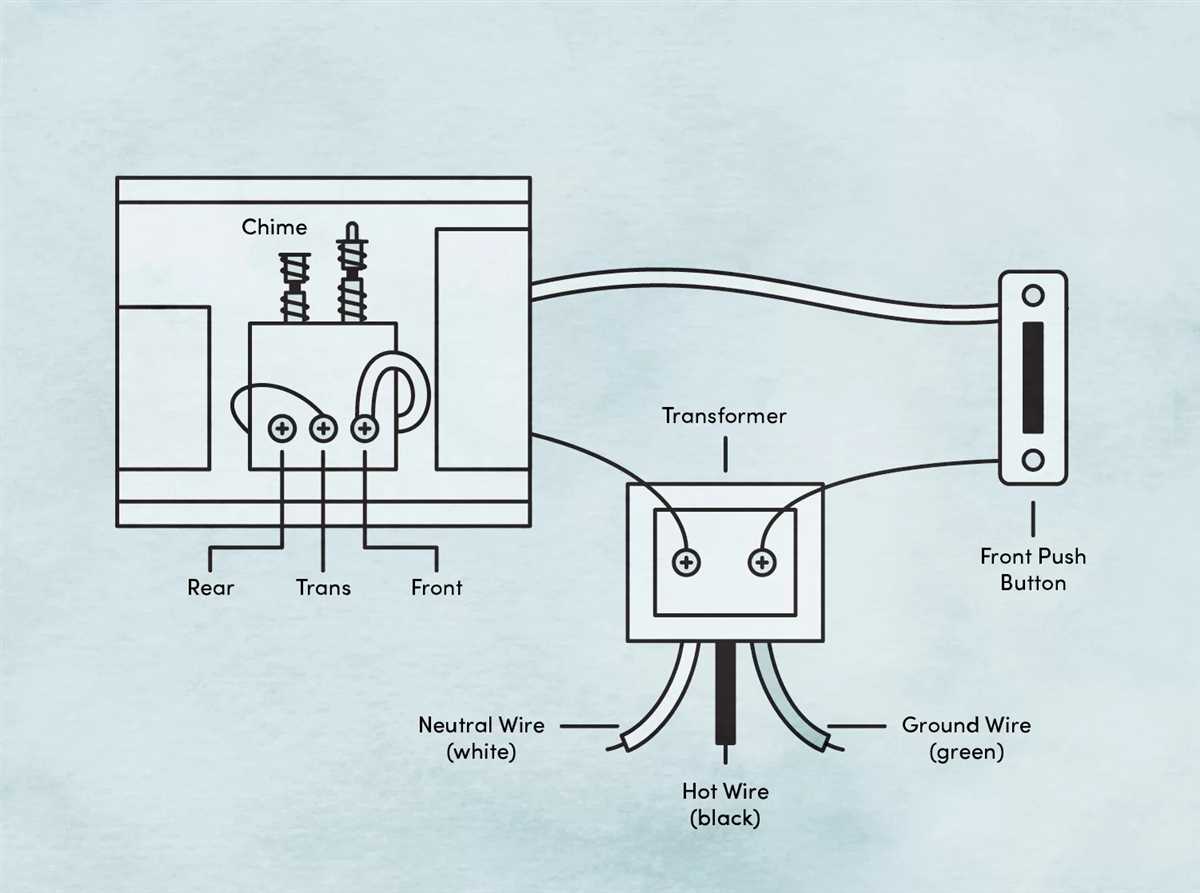
Using a screwdriver, remove the existing doorbell buttons, if any, from the desired locations. Connect the low voltage electrical wire to the screws on the back of the new doorbell buttons, following the manufacturer’s instructions. Secure the buttons to the wall or doorframe using screws or adhesive.
Step 4: Connect the wires to the transformer

Locate the doorbell transformer, which is usually installed near the main electrical panel or in the attic. Connect the low voltage electrical wires from the doorbell buttons to the transformer following the manufacturer’s instructions. Use wire connectors to join the wires securely.
Step 5: Install the doorbell chimes
Choose the locations inside your home where you want to install the chimes. Remove the existing chimes, if any, and connect the low voltage electrical wires to the corresponding terminals on the new chimes. Use wire connectors to secure the connections. Mount the chimes on the wall or ceiling using screws or adhesive.
Step 6: Test the doorbell system
Once all the wiring is completed, turn the power back on at the circuit breaker. Test the doorbell system by pressing each button to ensure both chimes are functioning. Adjust the volume or chime settings as desired.
By following these steps, you can easily install a dual doorbell system in your home. Enjoy the convenience of having separate doorbell buttons and chimes for your front and back doors!
Troubleshooting Dual Doorbell Wiring
When it comes to dual doorbell wiring, there can be several issues that can arise. Whether you are installing a new dual doorbell system or troubleshooting an existing one, it is important to understand the common problems and how to resolve them.
One common issue with dual doorbell wiring is a lack of power. If your doorbell is not functioning or is working intermittently, it could be due to a lack of power. Check the power source, such as the transformer, to ensure it is providing the necessary voltage. You can use a multimeter to test the voltage and determine if the power supply is the problem. If the voltage is low, you may need to replace the transformer to ensure proper functioning of the doorbell system.
Another potential problem with dual doorbell wiring is a faulty connection. Over time, the wiring connections can become loose or damaged, resulting in a loss of signal. Inspect the wiring connections at both the doorbell buttons and the chime unit to ensure they are secure. You may need to rewire or tighten the connections to restore proper functioning.
In some cases, the issue may lie with the doorbell buttons themselves. If one or both of the buttons are not working, they may need to be replaced. Inspect the buttons for any visible damage or signs of wear and tear. It is also possible that the buttons may have become dirty or corroded, preventing them from making a proper connection. Clean the buttons thoroughly and try again. If the problem persists, consider replacing the buttons.
In conclusion, troubleshooting dual doorbell wiring requires identifying potential issues with the power supply, wiring connections, or doorbell buttons. By inspecting and testing these components, you can determine the cause of the problem and take appropriate measures to resolve it. Remember to follow proper safety precautions when working with electrical components and consult a professional if you are unsure.
Safety Precautions for Dual Doorbell Wiring
When wiring a dual doorbell system, it is important to take necessary safety precautions to avoid any potential hazards. Here are some safety tips to keep in mind:
- Turn off power: Before starting any wiring work, make sure to turn off the power supply to the doorbell system. This will help prevent electrical shocks and other accidents.
- Use proper tools: Use insulated tools specifically designed for electrical work. This will minimize the risk of electric shock and ensure safe handling of wiring components.
- Follow manufacturer instructions: Always refer to the manufacturer’s instructions for the dual doorbell system and follow them carefully. This will ensure proper installation and prevent any potential damage or malfunction.
- Avoid exposed wiring: Make sure to properly conceal and secure all wiring connections to prevent any accidental contact or damage. Exposed wiring can pose a risk of electrical shock or fire.
- Test before finalizing: Before finalizing the installation, test the dual doorbell system to ensure it is working properly. This will help identify any issues or errors that need to be addressed before using the doorbell system.
- Consult a professional: If you are unsure about any aspect of the dual doorbell wiring, it is best to consult a licensed electrician or professional for assistance. They can provide guidance and ensure that the wiring is done correctly and in compliance with safety standards.
By following these safety precautions, you can ensure a safe and successful installation of a dual doorbell system in your home or building. Remember to prioritize safety and seek professional help when needed.