
The Duo Sonic is a legendary electric guitar that has been synonymous with rock and roll since its introduction in the 1950s. Known for its compact design and versatile tone, the Duo Sonic has become a favorite among both beginner and professional guitarists. One important aspect of owning a Duo Sonic is understanding its wiring diagram, which dictates how the various components of the guitar are connected. In this article, we will provide a comprehensive guide to understanding the Duo Sonic wiring diagram and help you wire your guitar for optimal performance.
Understanding the wiring diagram of your Duo Sonic is essential for troubleshooting any issues, modifying your guitar’s electronics, or simply for understanding how it all works. The diagram outlines the wiring connections for the various components of the guitar, such as the pickups, volume and tone controls, and the switch. By following the wiring diagram, you can ensure that your guitar is wired correctly and that all the components are functioning as intended.
When it comes to wiring your Duo Sonic, there are several key components that you need to be familiar with. These include the pickups, volume and tone controls, the switch, and the output jack. Each of these components has specific connections that need to be made, and the wiring diagram provides a visual representation of how these connections should be made. By following the diagram and understanding the function of each component, you can wire your Duo Sonic to achieve the desired tone and functionality.
Duo Sonic Wiring Diagram: A Complete Guide
The Duo Sonic is a popular electric guitar model produced by Fender. With its unique design and versatile sound, many guitarists are drawn to this instrument. Understanding the wiring diagram of the Duo Sonic can help guitarists customize their instrument’s sound and troubleshoot any issues that may arise.
Components and Connections
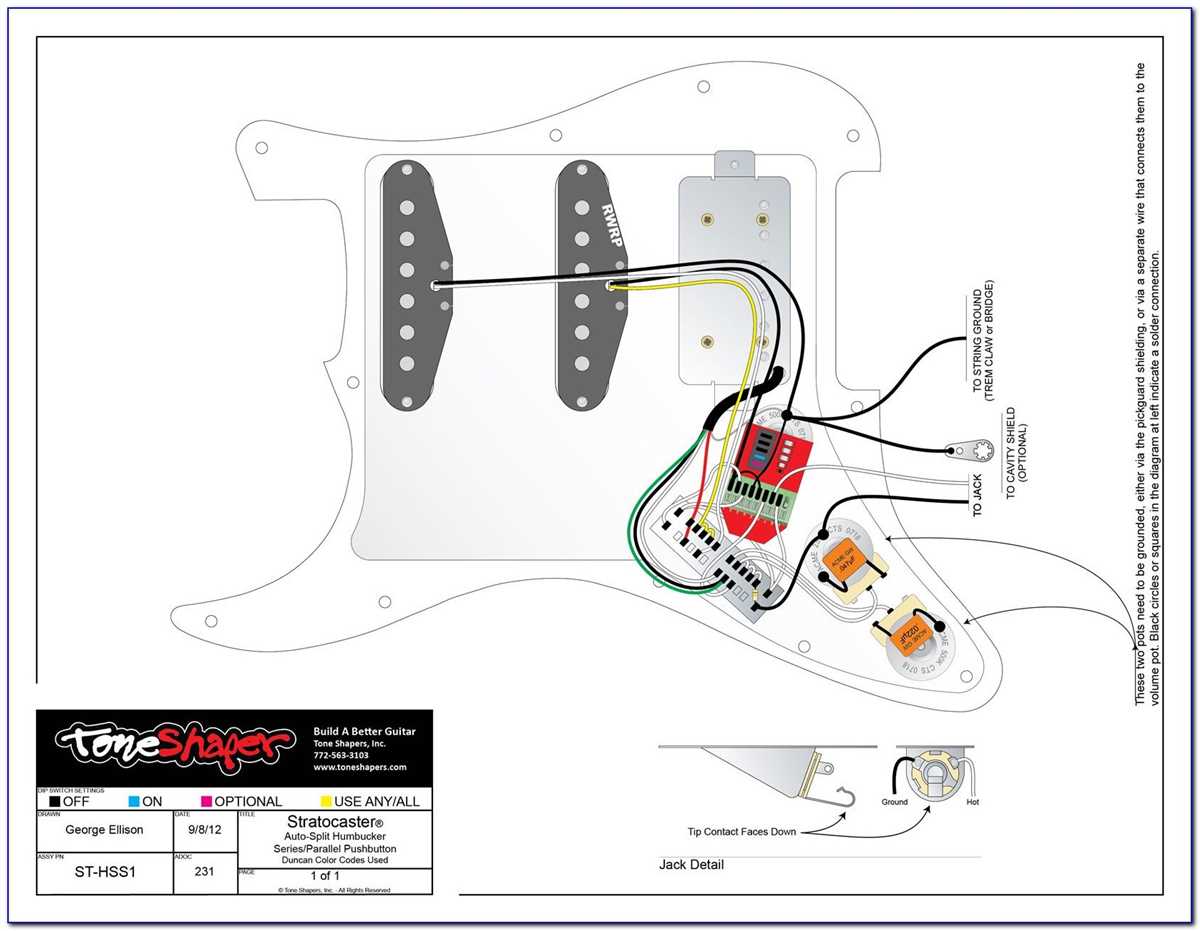
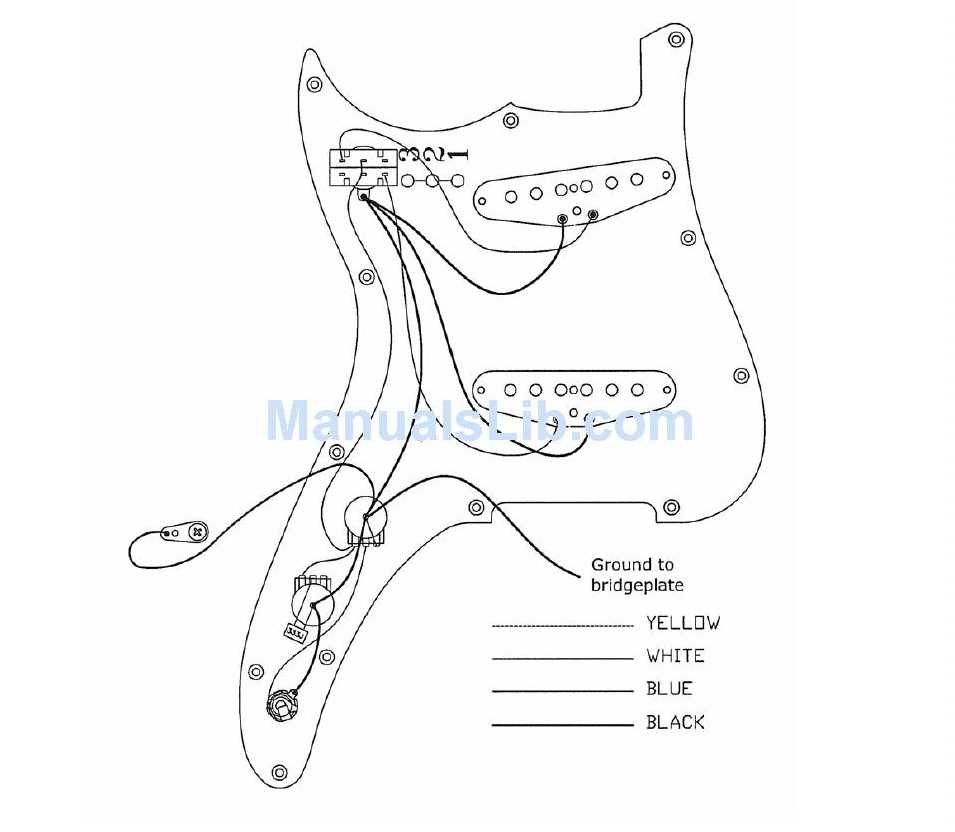
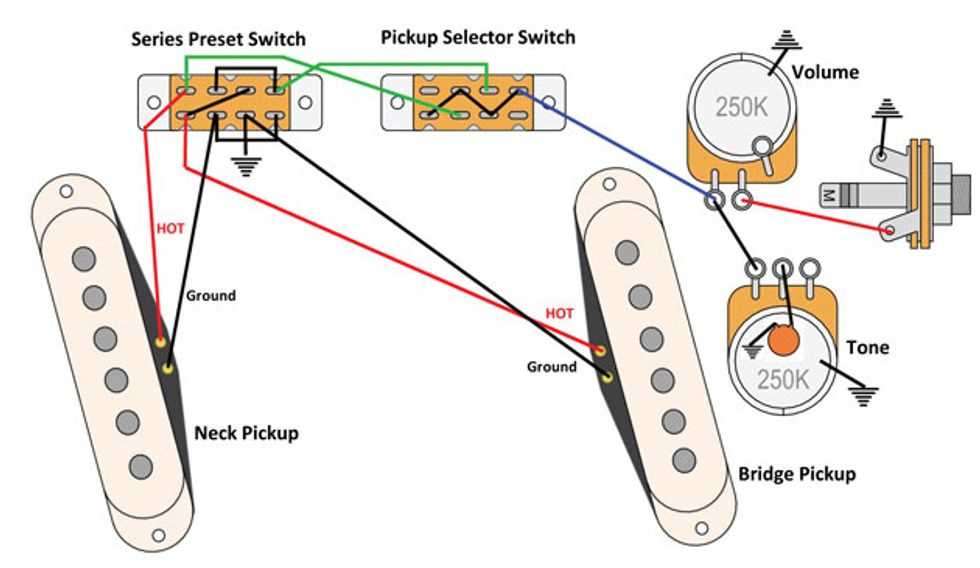
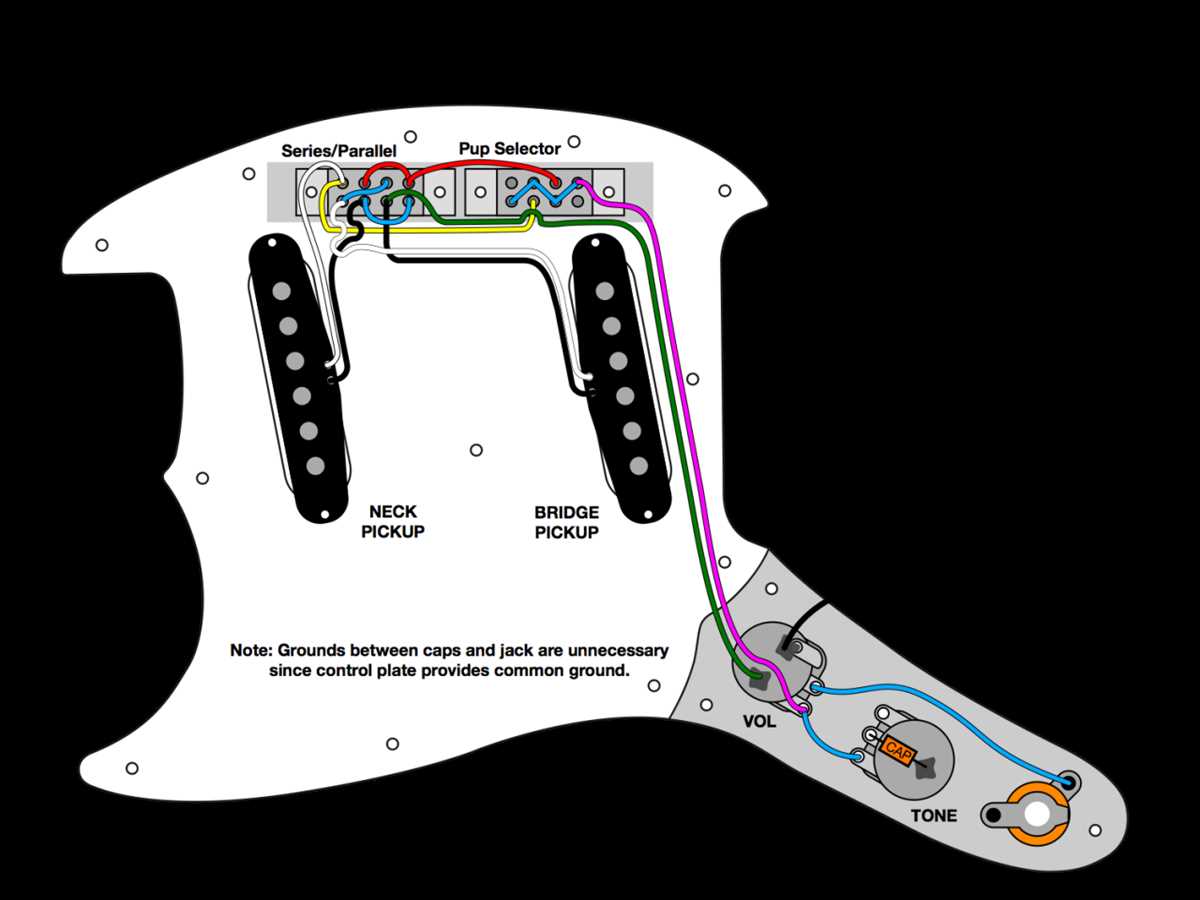
The Duo Sonic wiring diagram consists of various components and their connections. These include the pickups, switches, pots (potentiometers), and output jack. Each component contributes to the overall sound and functionality of the guitar. By following the wiring diagram, guitarists can easily understand how these components interact with each other.
Circuit Configuration
The Duo Sonic wiring diagram depicts the circuit configuration of the guitar. This includes the series and parallel connections of the pickups, the tone and volume controls, and the switch positions. Understanding the circuit configuration enables guitarists to modify the wiring to achieve different tones or to troubleshoot problems with the instrument’s sound.
Modifications and Customizations
Guitarists often modify their Duo Sonic wiring to suit their playing style or tonal preferences. This can involve changing the pickups, adding switches or coil splits, or rewiring the controls. By referring to the wiring diagram, guitarists can easily make these modifications and create a unique sound that reflects their individuality.
Troubleshooting
In the event of any issues with the sound or functionality of the Duo Sonic, the wiring diagram serves as a valuable troubleshooting tool. By visually inspecting the diagram and comparing it to the actual wiring, guitarists can identify any faulty connections or components that may be causing the problem. This can save time and money by allowing guitarists to pinpoint the issue and make necessary repairs.
Overall, the Duo Sonic wiring diagram is an essential resource for guitarists who own this model. Whether customizing the sound, troubleshooting issues, or simply understanding how the instrument works, the wiring diagram provides a comprehensive guide for all aspects of the Duo Sonic’s electrical system.
Understanding the Basics of Duo Sonic Guitars
The Duo Sonic is a popular electric guitar model manufactured by Fender. It is known for its compact size and versatile sound, making it a favorite choice among musicians of all genres. Whether you are a beginner or a professional guitarist, understanding the basics of the Duo Sonic can help you make the most of this instrument.
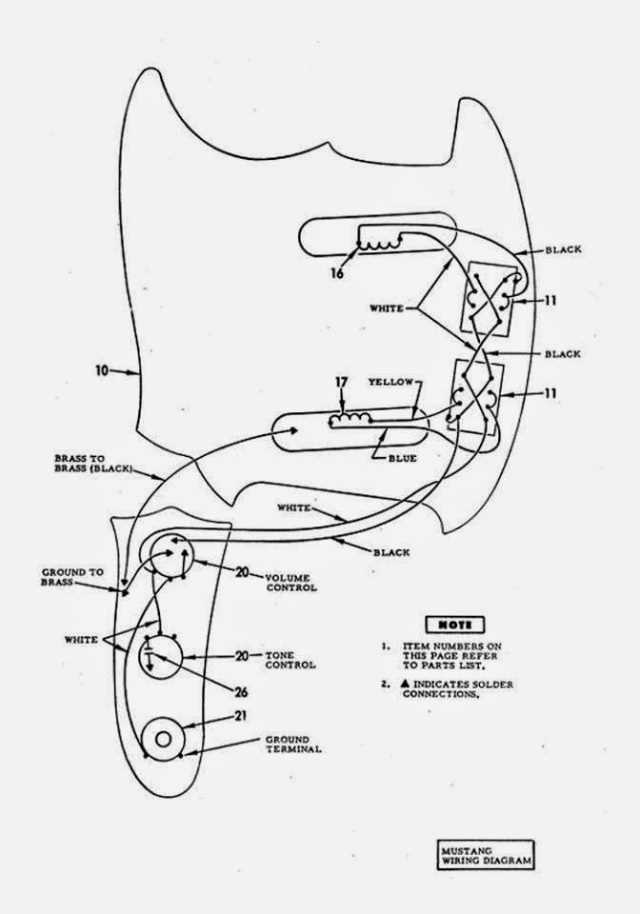
One of the key features of the Duo Sonic is its unique wiring system. The wiring diagram of the Duo Sonic is crucial in understanding how the different components of the guitar are connected. This diagram shows the layout of the pickups, switches, and controls, allowing you to better understand how to modify the sound of your guitar.
The Duo Sonic typically has two single-coil pickups, which can be controlled using a three-way switch. This switch allows you to select between the neck pickup, the bridge pickup, or a combination of both. Additionally, the Duo Sonic has two control knobs – one for volume and one for tone. These controls can be used to further shape the sound of the guitar to suit your playing style.
Another interesting feature of the Duo Sonic is its shorter scale length, which makes it easier to play for those with smaller hands or those who prefer a shorter reach. This shorter scale length also adds to the unique tone and feel of the Duo Sonic, giving it a distinct sound that sets it apart from other guitars.
In conclusion, understanding the basics of the Duo Sonic guitar, including its wiring diagram and unique features, can greatly enhance your playing experience. Whether you are looking to explore different tones or simply improve your playing technique, the Duo Sonic offers a versatile platform for experimentation and musical expression.
Tools and Materials Needed for Wiring
When it comes to wiring your Duo Sonic guitar, there are several tools and materials that you will need to have on hand. These items are essential for completing the wiring process and ensuring that your guitar is set up correctly. Here is a list of the tools and materials that you will need:
1. Soldering Iron
A soldering iron is an essential tool for any wiring job. It is used to melt solder and create a secure connection between wires and components. Make sure you have a good quality soldering iron that is suitable for small electronics work.
2. Solder
Solder is a metal alloy that is melted and used to create a strong electrical connection. It is important to use the correct type of solder for guitar wiring, typically a rosin-core solder with a diameter of 0.022 inches. Make sure you have enough solder on hand for the job.
3. Wire Strippers
Wire strippers are used to remove the insulation from the ends of wires. This allows for easy soldering and connection of wires to components. Make sure you have a pair of wire strippers that are suitable for the gauge of wire you will be working with.
4. Wire Cutters
Wire cutters are used to cut wires to the desired length. They are also useful for trimming excess wire once connections have been made. Make sure you have a pair of wire cutters that can handle the gauge of wire you will be working with.
5. Screwdrivers
You may need screwdrivers of various sizes and types to remove and install components on your guitar. It is a good idea to have a set of screwdrivers on hand to ensure that you have the right tool for the job.
6. Electrical Tape
Electrical tape is used to insulate and protect electrical connections. It can be used to wrap exposed wires or secure soldered connections. Make sure you have electrical tape on hand to ensure a tidy and secure wiring job.
In addition to these tools, you will also need the wiring diagram for your Duo Sonic guitar and any necessary replacement components or wiring harnesses. Having all of these tools and materials ready before you start the wiring process will make the job much easier and ensure that you have everything you need to complete the task successfully.
Step-by-Step Instructions for Wiring a Duo Sonic Guitar

The Duo Sonic is a popular electric guitar model known for its versatile sound and compact size. Whether you are a guitar enthusiast looking to customize your instrument or a seasoned musician wanting to replace or upgrade the wiring in your Duo Sonic, this step-by-step guide will help you navigate through the process.
1. Gather the necessary tools and materials:
- Soldering iron
- Solder
- Wire cutter/stripper
- Replacement pickups (if applicable)
- Wiring diagram for Duo Sonic
- Electrical tape
2. Prepare the guitar:
- Start by removing all the strings from the guitar to have better access to the control cavity.
- Remove the control plate or pickguard to expose the electronics.
- If you are replacing the pickups, unsolder the wires from the existing pickups.
- Clean the control cavity and remove any dust or debris that may affect the wiring process.
3. Connect the components:
- Refer to the wiring diagram for the Duo Sonic to identify the connections for each component.
- Begin by soldering the ground wires together and connecting them to the back of the volume or tone pots.
- Connect the hot wires from each pickup to the appropriate terminals on the switch or volume pot.
- Use electrical tape to secure and insulate the soldered connections, preventing them from shorting or coming loose.
4. Test and troubleshoot:
- Reinstall the control plate or pickguard onto the guitar.
- Attach new strings to the guitar and tune them.
- Test each pickup and control to ensure they are functioning correctly.
- If you encounter any issues, double-check your wiring connections and consult the wiring diagram for any errors.
With these step-by-step instructions, you can confidently wire your Duo Sonic guitar and customize its sound to your liking. Remember to take your time, follow the wiring diagram carefully, and test the guitar thoroughly to ensure optimal performance. Happy wiring!
Troubleshooting Common Issues
When it comes to troubleshooting common issues with a Duo Sonic wiring diagram, there are a few areas to check that can often be the source of the problem. By understanding these potential issues and their solutions, you can ensure that your Duo Sonic guitar is working properly and producing the desired sound.
1. No Sound
If you’re not getting any sound from your Duo Sonic guitar, there are a few possible causes to consider. First, check the volume knob on your guitar to make sure it’s turned up and not on a low setting. Next, check the cable that connects your guitar to the amplifier to ensure it’s properly plugged in and not damaged. Finally, check the amplifier itself to confirm that it’s functioning correctly.
2. Poor Sound Quality
If you’re experiencing poor sound quality, such as static or buzzing, there are a few potential causes to investigate. Start by inspecting the cable for any damage or loose connections. It’s also worth checking the input jack on your guitar to ensure it’s clean and free from any debris or corrosion. Additionally, try plugging your guitar into a different amplifier to see if the issue persists, as the problem could lie with the amp rather than the guitar.
3. Intermittent Sound
If you’re experiencing intermittent sound where the sound cuts in and out, there are a few possible causes to check. First, inspect the cable for any damage or loose connections, as this can cause a loss of signal. Additionally, check the pickup selector switch on your guitar to ensure it’s not loose or malfunctioning. Finally, try plugging your guitar into a different amplifier to see if the issue persists, as the problem could lie with the amp rather than the guitar wiring.
By troubleshooting these common issues with a Duo Sonic wiring diagram, you can quickly identify and resolve any problems with your guitar’s sound. Remember to double-check all connections and components before seeking professional assistance, as many issues can be easily resolved with basic troubleshooting techniques.
Upgrading and Customizing the Wiring
When it comes to upgrading and customizing the wiring of your Duo Sonic guitar, the options are endless. Whether you’re looking to improve the overall sound quality, add additional pickups, or modify the switching options, there are plenty of ways to tailor the wiring to suit your specific needs and preferences.
One popular upgrade is to replace the stock pickups with higher quality ones. This can significantly enhance the tone and versatility of your guitar. You can also experiment with different types of pickups, such as single-coil, humbucker, or even P90 pickups, to achieve different sounds and styles.
Another option is to modify the switching options. Many players prefer to have more control over their guitar’s tone, and upgrading the wiring can allow for additional pickup combinations. For example, you could install a push-pull potentiometer to engage or disengage a pickup, or wire the pickups in series or parallel for different tonal options.
If you’re feeling adventurous, you can even install a coil-splitting feature, which allows you to split a humbucker pickup into a single-coil mode. This can give you access to a wider range of sounds, from full and powerful humbucker tones to bright and twangy single-coil tones.
Overall, upgrading and customizing the wiring of your Duo Sonic can be a fun and rewarding project. It gives you the opportunity to personalize your guitar and shape its sound to your liking. Whether you’re a seasoned player looking to take your instrument to the next level or a beginner eager to explore different sonic possibilities, the wiring upgrades can help you achieve the desired results.