
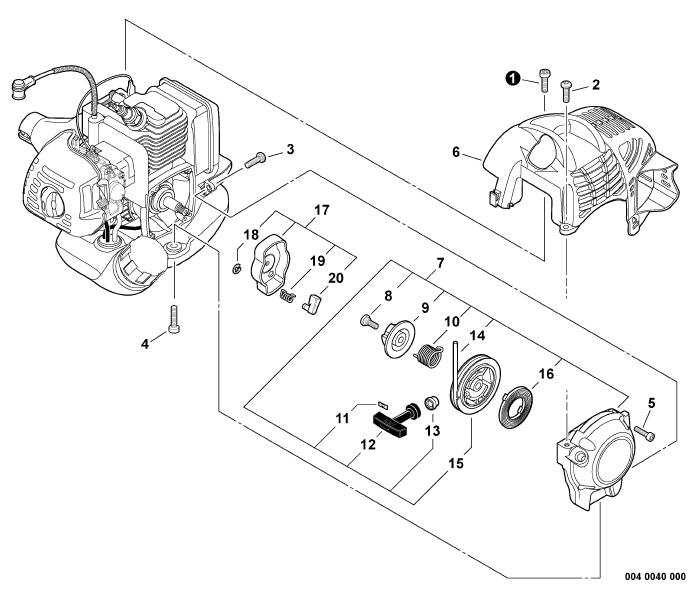
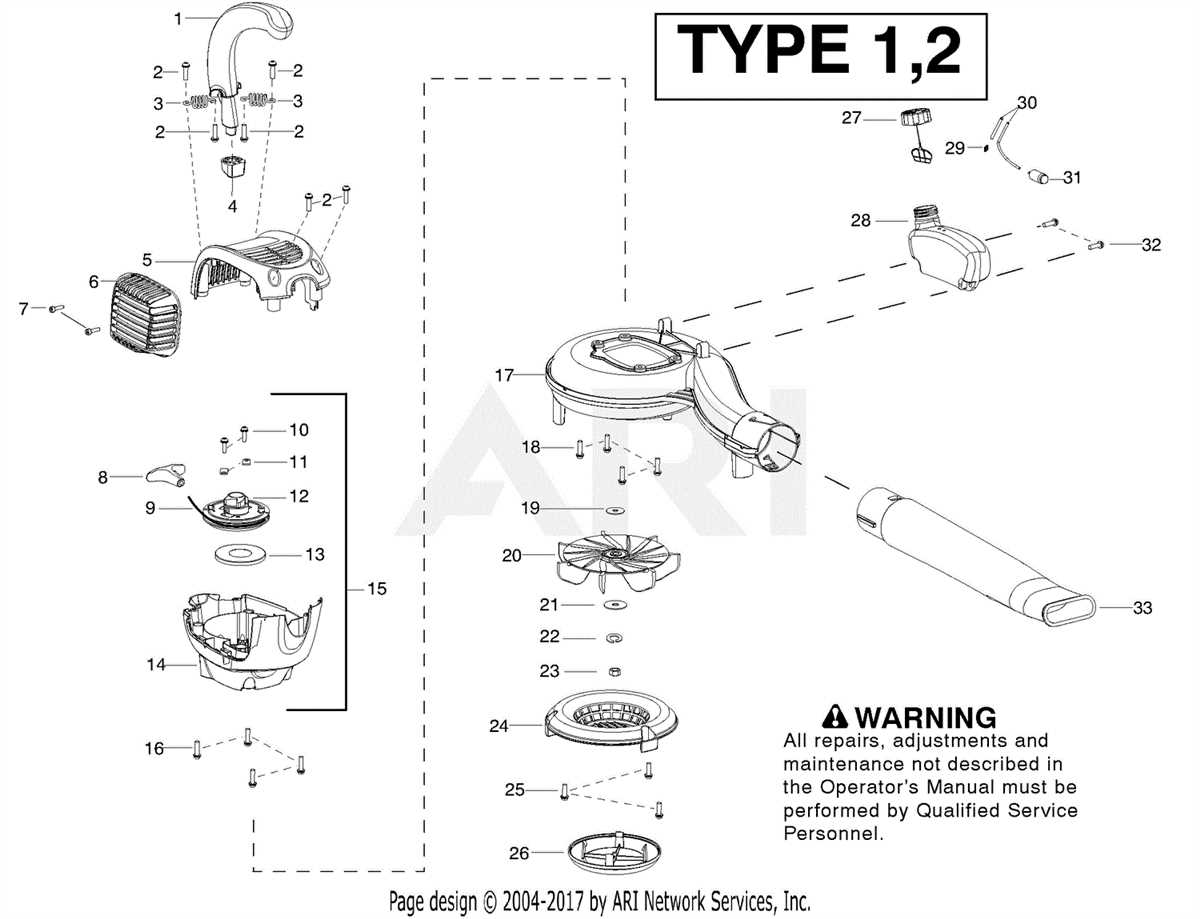
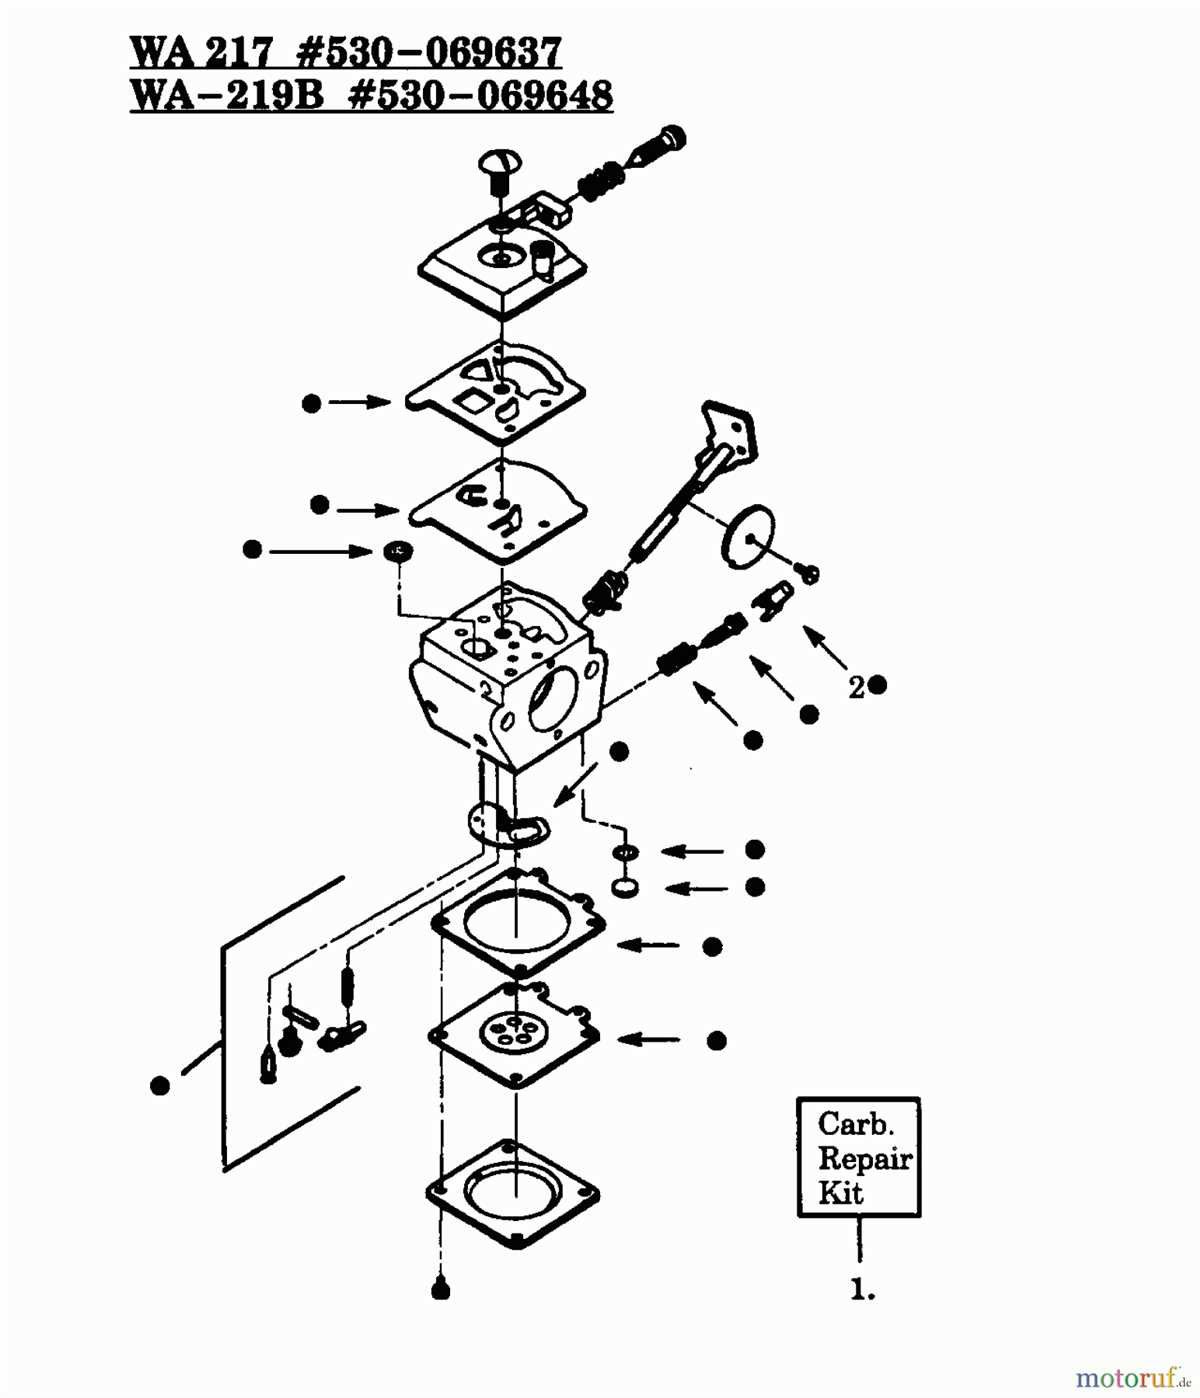
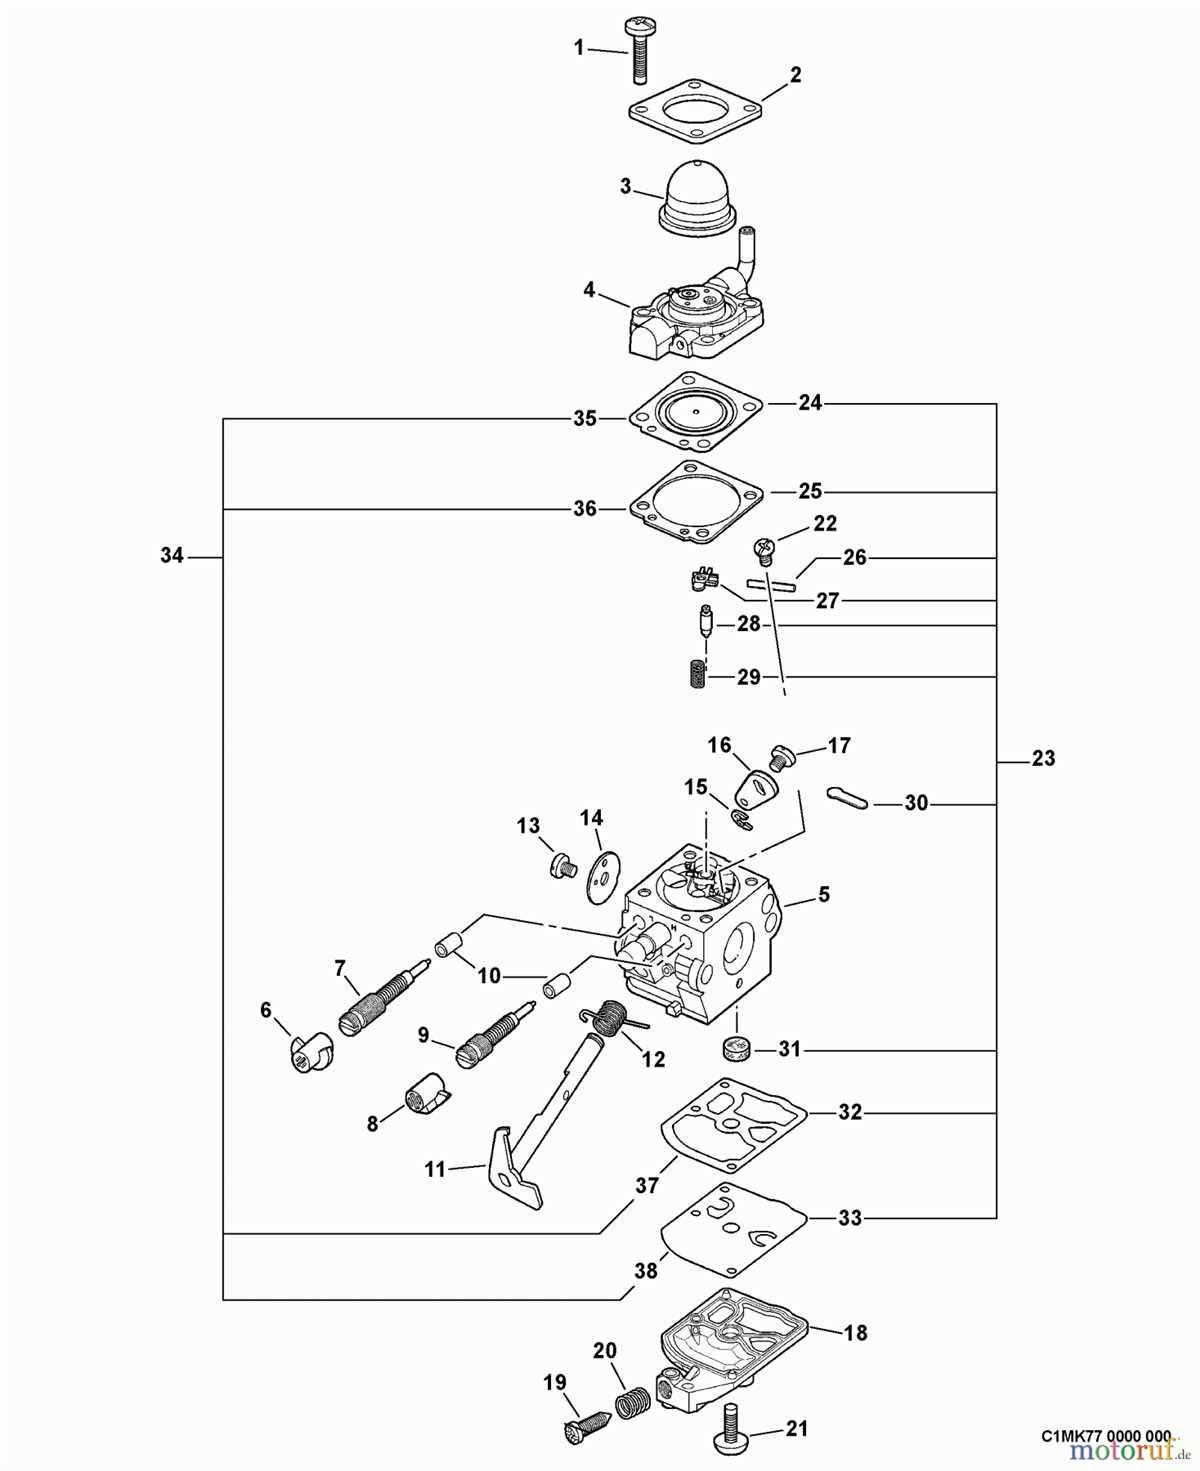
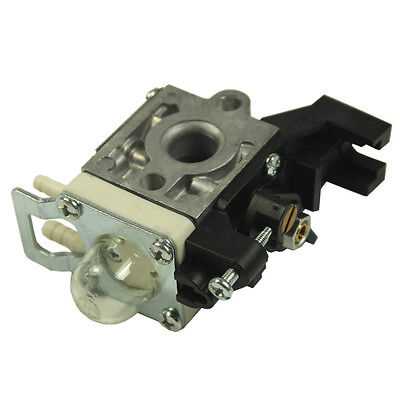
When it comes to maintaining and troubleshooting your Echo weed eater, understanding the carburetor is essential. The carburetor is an important component of the fuel system that mixes air and fuel in the correct ratio for combustion. If your weed eater is not starting or running properly, a faulty carburetor could be the culprit.
Having a diagram of the carburetor can be a valuable tool in diagnosing and fixing any issues with your Echo weed eater. It provides a visual representation of the different parts and their connections, making it easier to identify any faulty components or misalignments. Whether you are a seasoned professional or a DIY enthusiast, a carburetor diagram can help you navigate through the complex assembly of the fuel system.
An Echo weed eater carburetor diagram typically includes labels and arrows that indicate the different parts, such as the fuel pump, choke plate, throttle lever, and needle valves. It also shows the precise locations and orientations of these parts, allowing you to disassemble and reassemble the carburetor correctly.
Additionally, a carburetor diagram can assist you in troubleshooting common problems, such as poor engine performance, rough idling, or difficulty starting. By following the diagram and checking each component, you can identify any clogged passages, damaged seals, or worn-out parts that may require cleaning or replacement.
In conclusion, having access to an Echo weed eater carburetor diagram can save you time and frustration when dealing with carburetor-related issues. Whether you are repairing your weed eater yourself or seeking assistance from a professional, the diagram serves as a valuable reference to ensure proper maintenance and optimal performance of your Echo weed eater.
Echo Weed Eater Carburetor Diagram
If you’re having trouble with your Echo weed eater and suspect that the problem lies with the carburetor, it can be helpful to have a diagram to refer to. The carburetor is an essential component of the weed eater’s engine, responsible for mixing the fuel and air to create the combustion needed to power the tool. Understanding the different parts of the carburetor and their function can make it easier to diagnose and fix any issues you may be experiencing.
Here is a breakdown of the key components you’ll find in an Echo weed eater carburetor:
- Main body: This is the main housing of the carburetor and provides support for the various components.
- Diaphragm assembly: The diaphragm assembly helps regulate the fuel flow in the carburetor.
- Primer bulb: The primer bulb is used to manually introduce fuel into the carburetor to aid in starting the engine.
- Main fuel jet: The main fuel jet controls the amount of fuel that is mixed with the air.
- Inlet needle: The inlet needle regulates the flow of fuel from the fuel tank to the carburetor.
- Idle speed screw: The idle speed screw allows you to adjust the engine’s idle speed.
- Limiter caps: The limiter caps are small caps that cover certain adjustment screws to prevent tampering.
By referring to a diagram specific to your Echo weed eater model, you can identify these components and understand how they work together. This knowledge can help you troubleshoot and fix any carburetor-related issues, such as fuel leaks, poor performance, or difficulty starting the engine.
Overview of Echo Weed Eater Carburetor
The carburetor is an essential component of an Echo weed eater. It is responsible for mixing air and fuel in the correct proportions to ensure the engine runs smoothly and efficiently. Understanding the basic diagram of an Echo weed eater carburetor can help users troubleshoot and maintain it.
The Echo weed eater carburetor diagram typically consists of several parts, including the throttle valve, fuel pump, idle adjustment screw, and fuel filter. These parts work together to control the flow of air and fuel into the engine.
1. Throttle Valve: The throttle valve regulates the amount of air and fuel mixture entering the engine. It is controlled by the throttle trigger, allowing the user to increase or decrease the engine speed.
2. Fuel Pump: The fuel pump is responsible for delivering fuel from the fuel tank to the carburetor. It often has a filter to prevent debris from entering the engine.
3. Idle Adjustment Screw: The idle adjustment screw allows the user to adjust the engine’s idle speed. Turning the screw clockwise increases the idle speed, while turning it counterclockwise decreases it.
4. Fuel Filter: The fuel filter helps remove impurities and debris from the fuel before it enters the carburetor. It is crucial to regularly clean or replace the fuel filter to maintain optimal performance.
Proper maintenance of the Echo weed eater carburetor is essential for the weed eater’s overall performance. Regularly cleaning and inspecting the carburetor, replacing worn-out parts, and ensuring proper fuel mixture are necessary for smooth operation. Consult the manufacturer’s manual or seek professional assistance for detailed instructions on maintaining the carburetor.
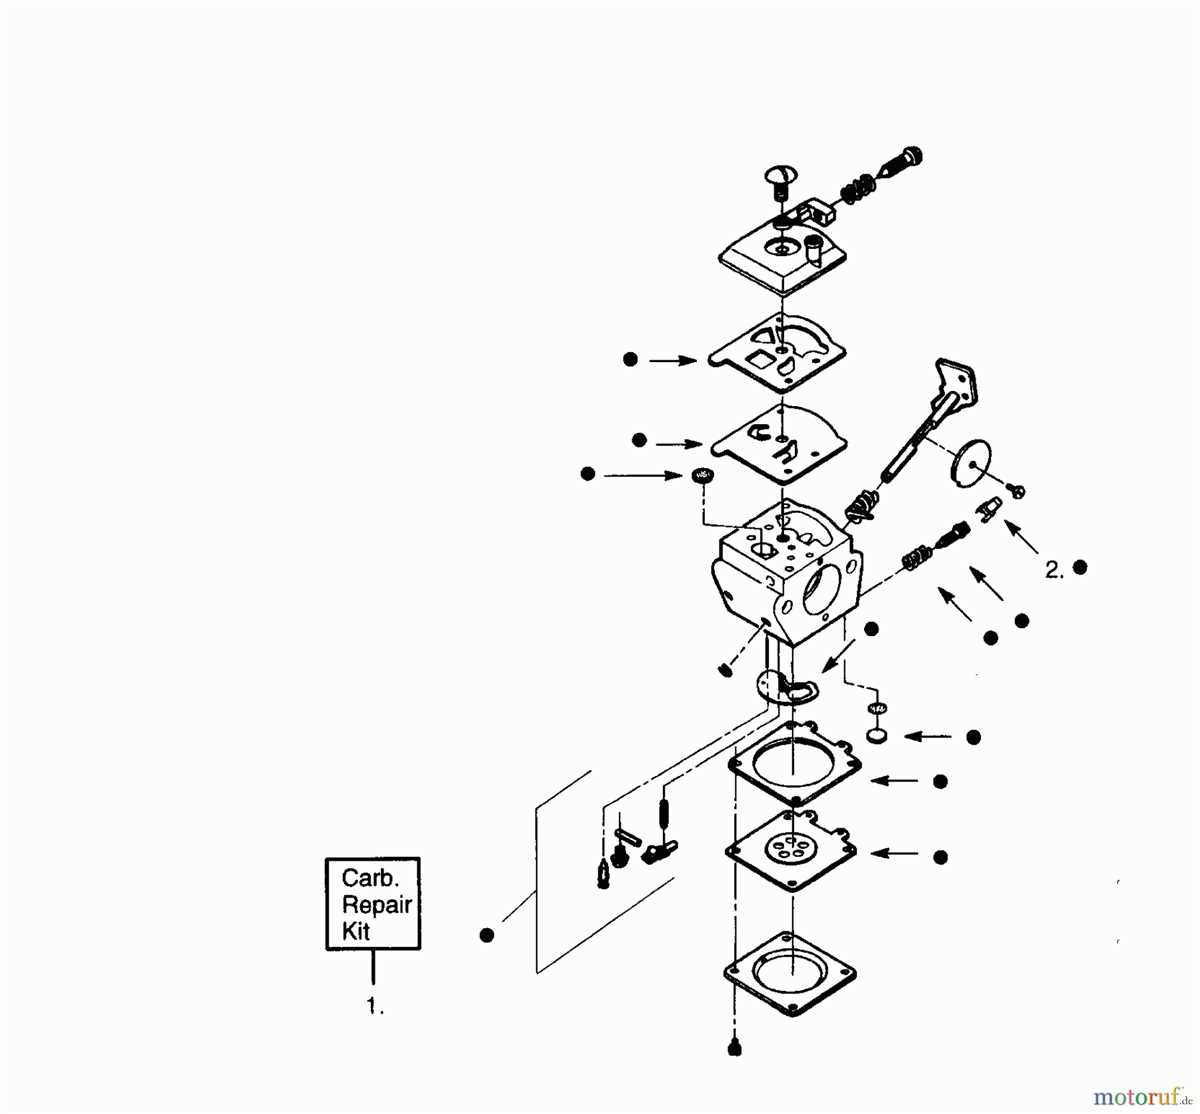
Understanding the Parts of Echo Weed Eater Carburetor
The carburetor is an essential component of an Echo weed eater, responsible for mixing air and fuel to create a combustible mixture for the engine. Understanding the various parts of the carburetor is crucial for proper maintenance and troubleshooting. Let’s take a closer look at the different components of an Echo weed eater carburetor.
Main Body
The main body of the carburetor houses several key parts, including the throttle valve, fuel inlet, and mixing chamber. The throttle valve controls the amount of air entering the carburetor, which affects the engine’s speed. The fuel inlet allows fuel to enter the carburetor from the fuel tank, while the mixing chamber is where the air and fuel are combined.
Float and Needle Valve
The float and needle valve work together to regulate the fuel level in the carburetor, ensuring a consistent supply to the engine. The float, typically made of plastic or metal, floats on top of the fuel in the carburetor bowl. As the fuel level rises, the float pushes against the needle valve, closing off the fuel inlet to prevent overflow.
Jets
The carburetor jets are small openings that control the flow of fuel and air within the carburetor. The main jet regulates fuel flow at high engine speeds, while the idle jet controls fuel flow when the engine is idling. Over time, these jets can become clogged with debris, leading to poor engine performance. Regular cleaning or replacing may be necessary.
Choke and Primer Bulb
The choke and primer bulb are important for starting a cold engine. The choke restricts the airflow, creating a richer fuel mixture for easier starting. The primer bulb, when pressed, draws fuel from the carburetor bowl and sends it into the engine, aiding in the initial ignition process.
Gaskets and Diaphragms
Gaskets and diaphragms provide seals and control the flow of fuel and air within the carburetor. They can wear out over time and may need to be replaced to maintain proper functionality. It is important to inspect and replace any damaged or deteriorated gaskets or diaphragms to prevent air leaks and ensure optimal performance.
By familiarizing yourself with the parts of the Echo weed eater carburetor, you can better understand how it works and troubleshoot any issues that may arise. Regular maintenance and proper care of these components will contribute to your weed eater’s longevity and performance.
How to Clean and Maintain Echo Weed Eater Carburetor
The carburetor is an essential component of an Echo weed eater, as it helps to mix air and fuel in the right proportions for combustion. Over time, however, the carburetor can become clogged with dirt, debris, and old fuel, which can affect the weed eater’s performance. Regular cleaning and maintenance of the carburetor is important to ensure that the weed eater continues to run smoothly.
To clean and maintain the Echo weed eater carburetor, you will need a few basic tools such as a screwdriver, carburetor cleaner, compressed air, and a soft brush. Start by turning off the weed eater and allowing it to cool down. Then, locate the carburetor on the engine, which is usually a small metal or plastic component near the air filter.
Next, remove the air filter cover and air filter to access the carburetor. Use a screwdriver to carefully remove any screws or bolts holding the carburetor in place. Once the carburetor is detached, spray carburetor cleaner onto the exterior and interior of the carburetor, making sure to remove any dirt or debris.
Afterward, use a soft brush to scrub away any remaining residue and then rinse the carburetor thoroughly with water. Make sure to dry the carburetor completely before reinstalling it. Additionally, use compressed air to blow out any particles or excess cleaner from the carburetor’s openings.
Once the carburetor is clean, reattach it to the weed eater, ensuring that all screws or bolts are securely tightened. Finally, replace the air filter and air filter cover, making sure they are fitted properly. This regular cleaning and maintenance of the Echo weed eater carburetor will help to extend its lifespan and ensure optimal performance.
To clean and maintain an Echo weed eater carburetor:
- Turn off the weed eater and let it cool down.
- Locate the carburetor and remove the air filter cover and air filter.
- Use a screwdriver to detach the carburetor and spray it with carburetor cleaner.
- Scrub away any residue with a soft brush and rinse the carburetor with water.
- Dry the carburetor completely and use compressed air to blow out any remaining particles.
- Reattach the carburetor to the weed eater, ensuring all screws are tightened.
- Replace the air filter and air filter cover.
Troubleshooting Common Issues with Echo Weed Eater Carburetor
The carburetor is an essential component of an Echo weed eater, responsible for mixing fuel and air to create the combustion needed for the engine to run. However, like any mechanical device, the carburetor can sometimes experience problems that affect its performance. Here are some common issues with the Echo weed eater carburetor and troubleshooting tips to address them.
Clogged Fuel Jets
One of the most common issues with the Echo weed eater carburetor is clogged fuel jets. Over time, small particles or debris can clog the fuel jets, preventing the proper flow of fuel. This can result in poor engine performance or even the engine not starting at all. To troubleshoot this issue, you can remove the carburetor and clean the fuel jets using a carburetor cleaner. Make sure to follow the manufacturer’s instructions and use caution when handling flammable liquids.
Incorrect Fuel Mixture
Another common problem with the Echo weed eater carburetor is an incorrect fuel mixture. Using the wrong fuel-to-oil ratio can cause the engine to run poorly or even damage the carburetor. Make sure to consult your Echo weed eater’s user manual for the correct fuel mixture. If you suspect that the fuel mixture is incorrect, you can drain the fuel tank and refill it with the proper mixture. It’s also essential to use fresh, high-quality fuel and oil to prevent clogs or other issues.
Stuck Float Valve
A stuck float valve can also cause problems with the Echo weed eater carburetor. The float valve controls the amount of fuel that enters the carburetor bowl. If the float valve gets stuck in the closed position, it can restrict the fuel flow and prevent the engine from running. To troubleshoot this issue, you can inspect the float valve for any debris or damage. Cleaning or replacing the float valve may be necessary to restore proper fuel flow.
Leaking Gaskets or Seals
Leaking gaskets or seals can lead to air leaks, which can disrupt the proper fuel-air mixture in the carburetor. If you notice fuel leaking from the carburetor or experience inconsistent engine performance, it’s possible that a gasket or seal is damaged or worn out. Inspecting the carburetor for any visible signs of leaks and replacing any faulty gaskets or seals can help resolve this issue.
- Regular maintenance and cleaning of the Echo weed eater carburetor can also help prevent issues.
- Be sure to follow the manufacturer’s recommendations for maintenance intervals and procedures.
- If you’re unsure about troubleshooting or repairing the carburetor yourself, it’s best to seek assistance from a professional or authorized Echo dealer.
Replacing Echo Weed Eater Carburetor
When your Echo weed eater is not starting or running properly, a faulty carburetor could be the culprit. The carburetor is responsible for mixing air and fuel to create the combustion needed for the engine to run. Over time, it can become clogged with debris, causing issues with the weed eater’s performance.
Replacing the carburetor on your Echo weed eater is a relatively straightforward process that can be done at home with a few basic tools. Before starting, make sure you have the correct replacement carburetor for your specific model of Echo weed eater. You can consult the user manual or contact the manufacturer to ensure you get the right part.
Here are the steps to replace the carburetor on your Echo weed eater:
- First, remove the air filter cover and the air filter from the weed eater. This will give you access to the carburetor.
- Next, disconnect the fuel lines from the carburetor. Take note of which line goes where so you can reconnect them correctly later.
- Using a screwdriver, loosen the screws that hold the carburetor in place. Gently pull the carburetor away from the engine.
- Take your new carburetor and align it with the mounting holes on the weed eater’s engine. Carefully push it into place.
- Tighten the screws to secure the carburetor to the engine.
- Reconnect the fuel lines to the new carburetor, making sure to match them to the correct ports.
- Replace the air filter and the air filter cover.
- Give the weed eater a test run to ensure the new carburetor is working properly.
By following these simple steps, you can replace the carburetor on your Echo weed eater and restore its performance. However, if you are unsure or uncomfortable performing this task yourself, it is always best to consult a professional technician who can handle the job for you.
Tips for Optimizing Performance of Echo Weed Eater Carburetor
Proper maintenance and adjustment of the carburetor is crucial for the optimal performance of your Echo weed eater. Here are some tips to help you get the most out of your carburetor:
- Clean the Carburetor: Regularly inspect and clean the carburetor to remove any dirt, debris, or clogs that may affect its performance. Use a carburetor cleaner and a small brush to carefully clean the components.
- Check the Air Filter: A dirty or clogged air filter can restrict airflow and lead to poor carburetor performance. Clean or replace the air filter as needed to ensure proper air intake.
- Inspect the Fuel System: Check the fuel lines, fuel filter, and fuel tank for any damage or blockages. Replace any worn-out or damaged parts to maintain a consistent fuel supply to the carburetor.
- Adjust the Carburetor: Refer to the Echo weed eater carburetor diagram for guidance on adjusting the carburetor. Follow the manufacturer’s instructions and make small adjustments to the idle speed and mixture screws to achieve the optimal fuel-air mixture.
- Use Fresh Fuel: Always use fresh, high-quality fuel that is specifically formulated for two-stroke engines. Stale or contaminated fuel can cause carburetor problems and affect the overall performance of your weed eater.
By following these tips and regularly maintaining your Echo weed eater carburetor, you can ensure that it operates at its peak performance and provides efficient and reliable cutting power.