
The Farmall Super A is a classic tractor that was first manufactured in the 1940s. It is beloved by farmers and collectors alike for its durability and reliability. One of the most important aspects of maintaining a Super A is ensuring that its wiring is in proper working order. A wiring diagram is a useful tool that can help to identify and troubleshoot any issues with the electrical system of the tractor.
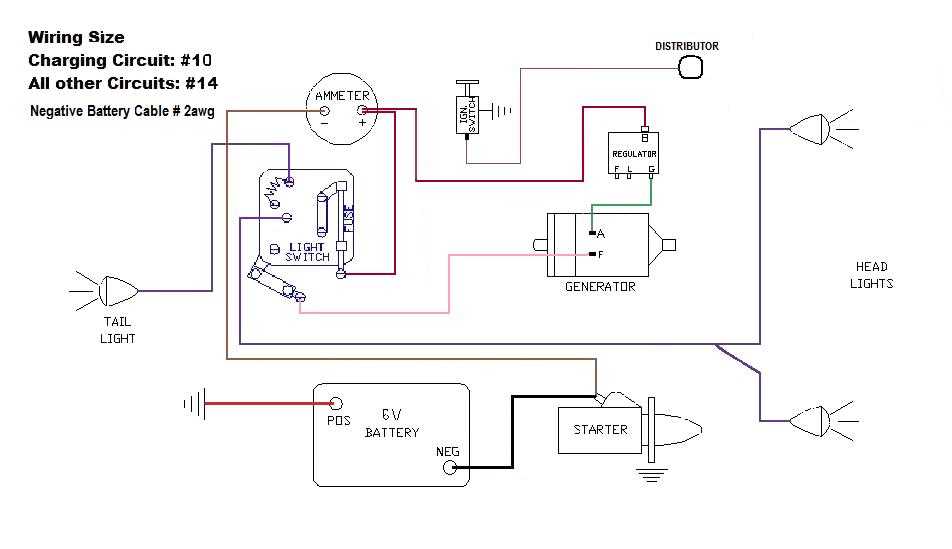
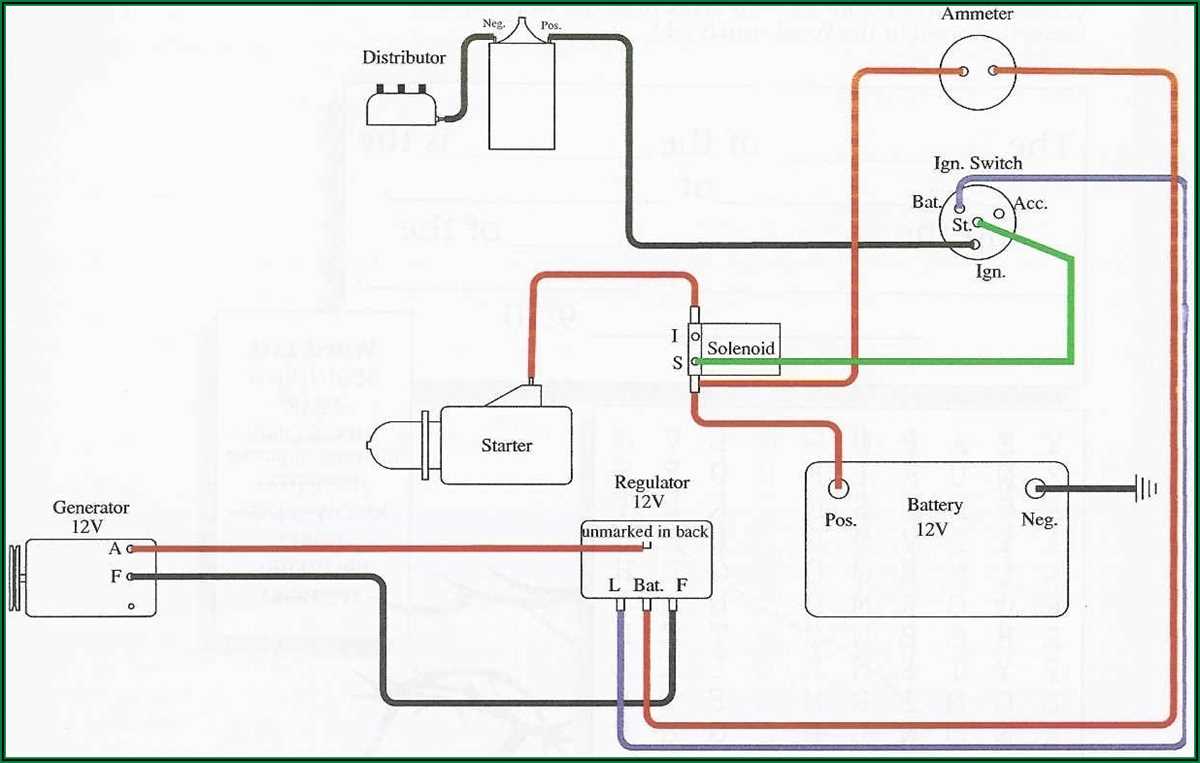
The Farmall Super A operates on a 12-volt electrical system, which was a major advancement in its time. The increased voltage provides more power to the various electrical components of the tractor, allowing it to handle heavier workloads. However, the 12-volt system also requires a more complex wiring setup compared to the earlier 6-volt system used in the Farmall A.
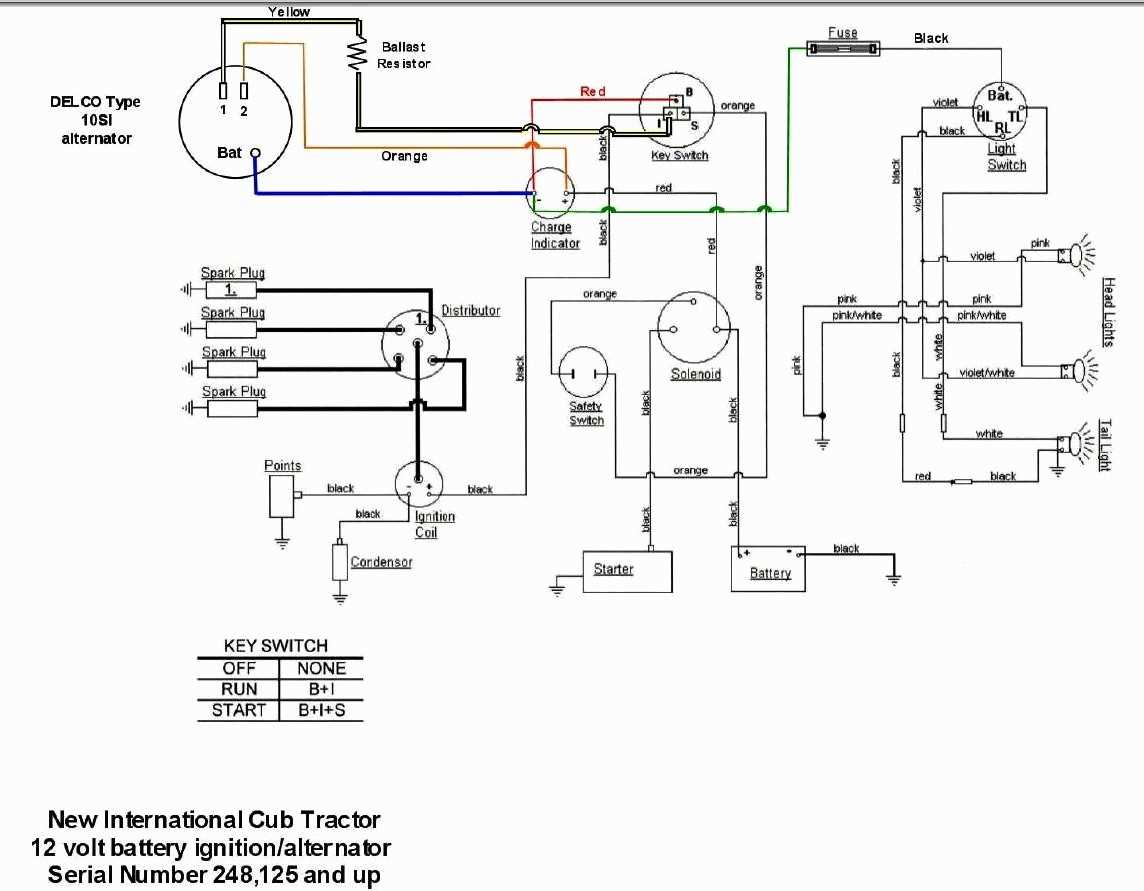
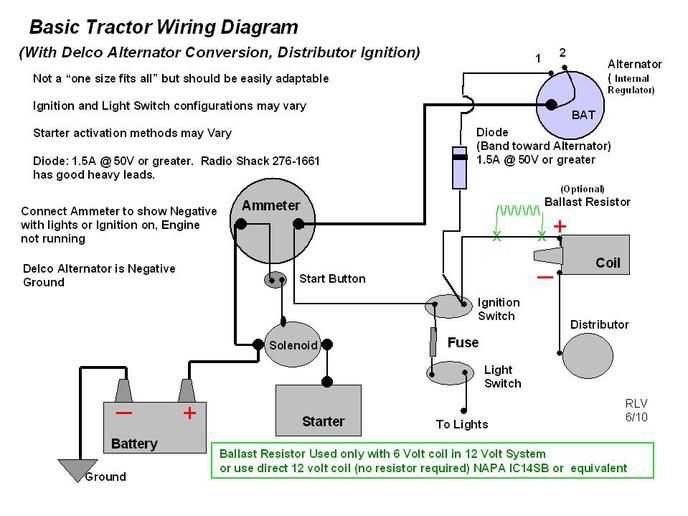
A wiring diagram for the Farmall Super A 12-volt system can be an invaluable resource for owners and mechanics. It provides a visual representation of the electrical connections and components, making it easier to understand how everything is supposed to be wired. This makes troubleshooting and repairing any electrical issues much simpler.
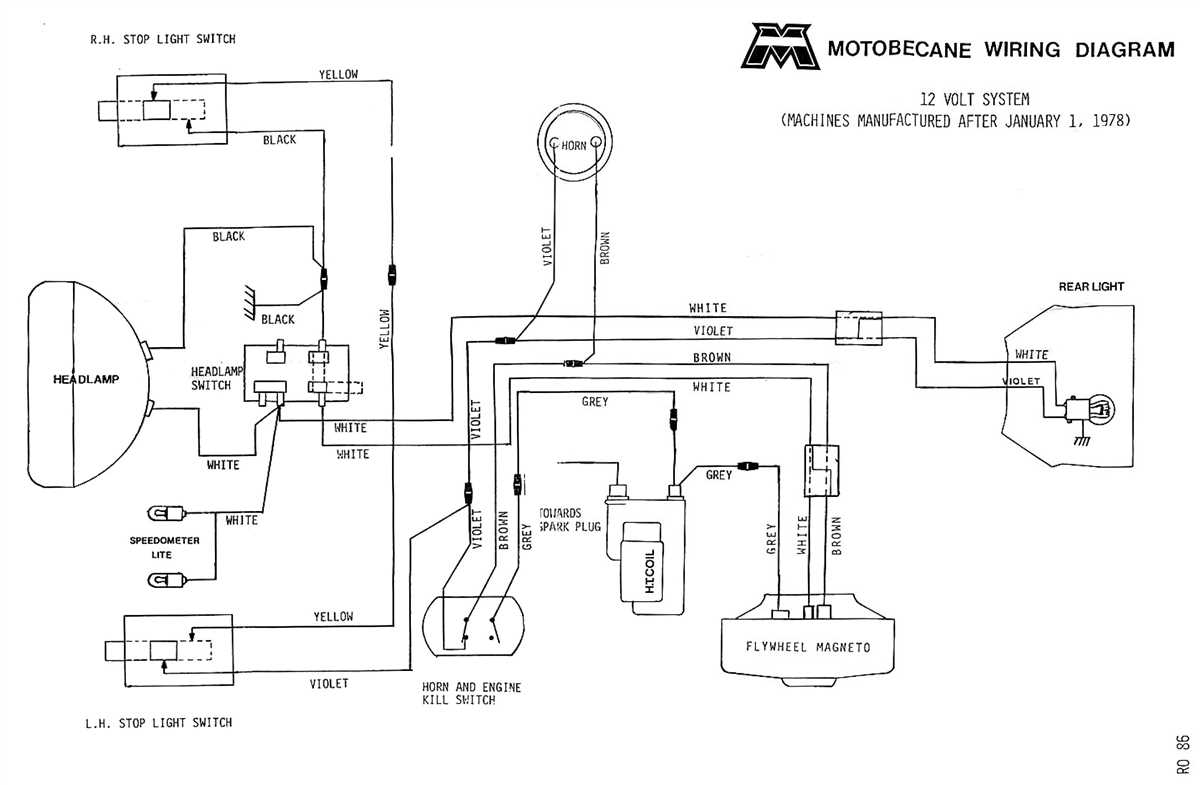
Farmall Super A 12 Volt Wiring Diagram
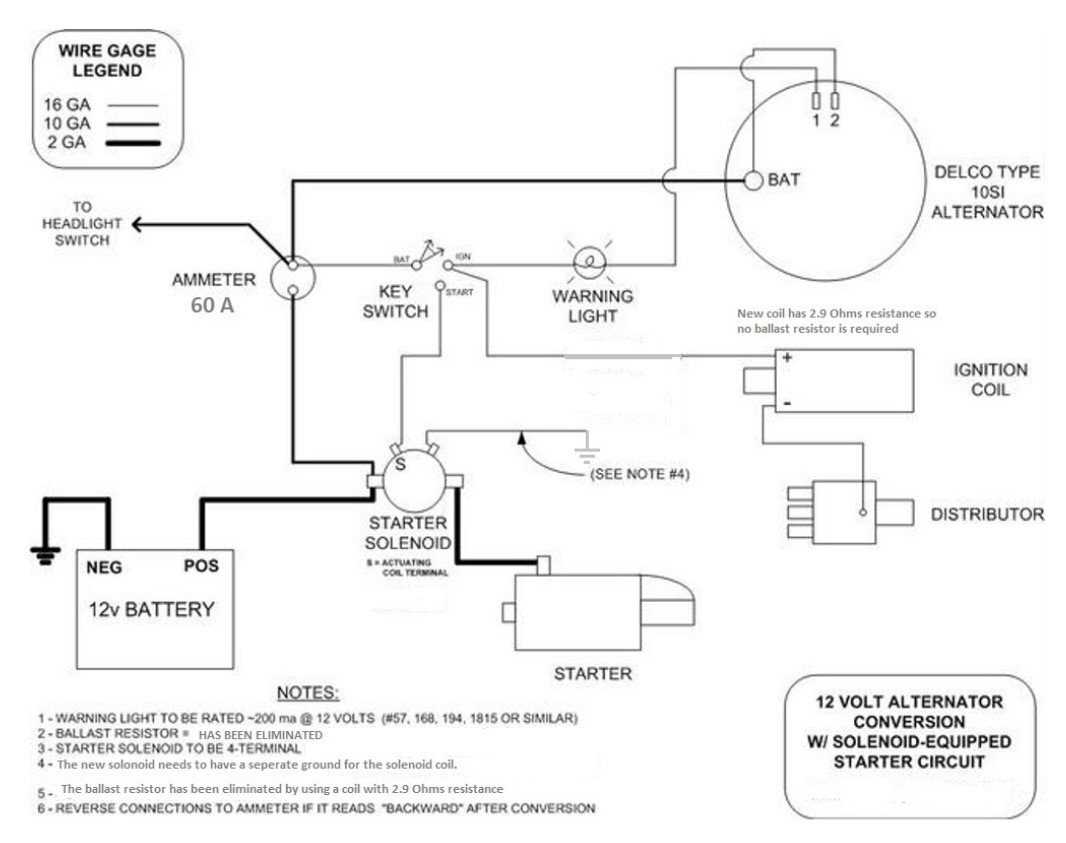
When it comes to wiring the Farmall Super A tractor for 12 volts, it’s important to have a clear diagram to follow. Making the switch from a 6-volt system to a 12-volt system requires understanding the various components and how they should be connected. The wiring diagram provides a visual representation of these connections, making it easier to complete the conversion correctly.
The diagram typically includes information on the battery, starter, generator, ignition switch, lights, and other electrical components. Each component is represented by a symbol and connected with lines indicating the flow of electricity. It’s essential to follow the diagram precisely to ensure that everything is connected correctly and functioning as it should.
Here is an example of a Farmall Super A 12-volt wiring diagram:
“`html
| Component | Wire Color | Connection |
|---|---|---|
| Battery | Red | Positive (+) terminal |
| Starter | Black | Connects to starter solenoid |
| Generator | Green | Connects to generator terminal |
| Ignition Switch | Orange | Connects to ignition coil |
| Lights | Yellow | Connects to light switch |
“`
By carefully following the wiring diagram, you can ensure that your Farmall Super A tractor is wired correctly for 12 volts. This will provide a more reliable electrical system that is better suited for modern accessories and equipment.
Overview of Farmall Super A
Farmall Super A is a model of tractors produced by International Harvester from 1947 to 1954. It is a compact tractor designed for small to medium-sized farms. The Farmall Super A was an upgraded version of the original Farmall A, featuring improved horsepower, better fuel efficiency, and additional features.
The Super A was powered by a four-cylinder gasoline engine with a displacement of 113 cubic inches, delivering around 18 horsepower. It had a 6-volt electrical system, but many owners have converted it to a 12-volt system for better performance. The tractor was capable of pulling various attachments, including plows, mowers, and tillage equipment, making it versatile for different agricultural tasks.
The Farmall Super A had a compact size and a tight turning radius, allowing for easy maneuverability in narrow spaces and around obstacles. It featured a cushioned seat for increased operator comfort and a manual transmission with four forward gears and one reverse gear. The tractor also had a three-point hitch system for attaching implements and an optional hydraulic system for additional functionality.
Despite its age, the Farmall Super A remains popular among vintage tractor enthusiasts and collectors. Its simple and reliable design, along with its compact size, make it ideal for small farming operations and hobby farmers. The availability of spare parts and a dedicated community of enthusiasts ensure that the Super A can be maintained and restored for years to come.
Importance of Having a Wiring Diagram
When it comes to working with electrical systems, having a wiring diagram is essential. This diagram serves as a roadmap, providing a visual representation of the electrical connections and components within a system. Without a wiring diagram, it can be challenging to troubleshoot issues, make modifications, or perform repairs.
A wiring diagram acts as a guide, allowing individuals to understand the layout and interconnections of wires and components. It provides vital information such as wire colors, connector locations, and the function of each wire. This information is crucial when dealing with complex electrical systems that may involve multiple circuits, switches, and sensors.
Identifying problems:
One of the primary benefits of having a wiring diagram is the ability to identify and troubleshoot electrical problems more efficiently. With a clear visual representation of the system, individuals can trace the path of wires, locate potential faults or breaks, and determine if there are any loose connections or damaged components.
Modifications and upgrades:
Another advantage of having a wiring diagram is the ability to make modifications or upgrades to the electrical system. Whether it’s adding new components, upgrading existing ones, or integrating aftermarket accessories, a wiring diagram can provide the necessary information to ensure a seamless and safe installation process.
Enhanced safety:
Working with electricity can be hazardous if not done properly. Having a wiring diagram allows individuals to understand how the electrical system is designed and how each component interacts with one another. This knowledge not only helps with troubleshooting and repairs but also ensures that any modifications or upgrades are done correctly, minimizing the risk of electrical hazards or malfunctions.
In conclusion, having a wiring diagram is crucial when working with electrical systems. It provides a visual representation of the system, assists in troubleshooting, enables modifications and upgrades, and enhances overall safety. Whether you are a professional technician or a DIY enthusiast, having a wiring diagram is an essential tool to have in your toolbox.
Components of the Farmall Super A Wiring System
The Farmall Super A tractor is equipped with a 12-volt electrical system, which consists of various components that work together to provide power and control for the machine. Understanding the different parts of the wiring system is important for troubleshooting and maintaining the tractor’s electrical system.
Battery: The battery is the heart of the electrical system and provides power to start the tractor. The Farmall Super A uses a 12-volt battery, which should be regularly checked for proper charging and maintained at an optimal level. It is important to ensure the battery terminals are clean and securely connected to prevent any loss of power.
Starter Motor: The starter motor is responsible for cranking the engine when the ignition switch is turned. It receives power from the battery to engage the engine and start the tractor. If the starter motor fails or shows signs of malfunction, it may need to be repaired or replaced.
Alternator: The alternator is responsible for charging the battery while the tractor is running. It converts mechanical energy from the engine into electrical energy to recharge the battery and power other electrical components. Regular maintenance of the alternator is necessary to ensure proper charging and prevent any power loss.
Distributor and Ignition System: The distributor and ignition system work together to provide spark to the engine’s cylinders, allowing combustion to occur and the engine to run. The distributor distributes high voltage from the ignition coil to the spark plugs, while the ignition system controls the timing of the spark. Regular maintenance and troubleshooting of these components are essential for ensuring proper engine performance.
Lights and Wiring Harness: The Farmall Super A is equipped with various lights, including headlights, taillights, and work lights. These lights play an important role in providing visibility during operation. The wiring harness connects all the electrical components and ensures proper power distribution throughout the system. Regular inspection and maintenance of the lights and wiring harness are necessary to prevent any electrical failures.
In summary, the wiring system of the Farmall Super A tractor consists of key components such as the battery, starter motor, alternator, distributor and ignition system, lights, and wiring harness. Proper maintenance, troubleshooting, and regular inspections of these components are crucial for ensuring the tractor’s electrical system operates effectively and efficiently.
Step-by-Step Guide to Wiring the Farmall Super A
The Farmall Super A is a popular tractor used in farming and agriculture. With its 12-volt electrical system, it is important to properly wire the tractor to ensure it functions correctly. Here is a step-by-step guide to wiring the Farmall Super A.
Gather the necessary tools and materials:
- Wire strippers
- Electrical tape
- 12-volt battery
- Wiring diagram for the Farmall Super A
- Wire connectors
- Screwdrivers
Familiarize yourself with the wiring diagram:
Before starting the wiring process, it is important to study the wiring diagram specific to the Farmall Super A. This will help you understand the layout and connections required for the electrical system.
Disconnect the battery:
Prior to beginning any electrical work, make sure to disconnect the battery to avoid any accidents or short circuits.
Remove the old wiring:
Using a screwdriver, carefully remove the old wiring from the tractor. Take note of the connections and where they are located on the tractor.
Install the new wiring:
Referencing the wiring diagram, begin installing the new wiring. Start with the main power wire and work your way through the system, connecting each wire to its designated location. Use wire connectors and electrical tape to secure the connections.
Double-check the connections:
Once all the wiring has been installed, go back and double-check each connection to ensure they are secure and properly connected. Test the connections by turning on the tractor’s electrical system and checking that all lights and accessories are functioning correctly.
Reconnect the battery:
After confirming that all connections are secure and the electrical system is functioning correctly, reconnect the battery to power the tractor.
Test the tractor:
Start the tractor and test all electrical components to ensure they are working properly. This includes the lights, horn, gauges, and any other electrical accessories on the tractor.
Following these step-by-step instructions will help you wire the Farmall Super A correctly and ensure its electrical system is in proper working order.
Troubleshooting Common Wiring Issues
When it comes to wiring issues with a Farmall Super A 12 volt system, there are a few common problems that can arise. These issues can cause the tractor to have electrical problems or even prevent it from starting. Here are some of the most common wiring issues and how to troubleshoot them:
No Power
If you find that your Farmall Super A is not receiving any power, the first thing to check is the battery. Make sure it is fully charged and properly connected. If the battery is fine, check the wiring connections from the battery to the ignition switch and starter. Look for any loose or corroded connections that may be preventing power from reaching the electrical components.
Flickering Lights
If the lights on your Farmall Super A are flickering or not working properly, the most likely cause is a faulty ground connection. Check the ground wire for any loose connections or corrosion. You may need to clean the connections or replace the ground wire. Additionally, check the light bulbs to make sure they are in good condition and properly seated in their sockets.
Intermittent Starting Issues
If your Farmall Super A is having intermittent starting issues, it could be due to a bad ignition switch or a faulty starter solenoid. First, check the ignition switch by turning it on and off several times to see if it engages the starter consistently. If the ignition switch is functioning properly, then the issue may lie with the starter solenoid. Inspect the wiring connections to the solenoid and make sure they are secure and free from corrosion.
Short Circuits
Short circuits can cause various electrical issues in the Farmall Super A. If you suspect a short circuit, visually inspect the wiring harness for any damaged or exposed wires. Use a multimeter to test for continuity and check for any abnormal readings that could indicate a short. It’s important to address any short circuits promptly to avoid further damage to the electrical system.
Remember, if you are unsure about any aspect of troubleshooting or repairing electrical wiring issues on your Farmall Super A, it is best to consult a professional technician or reference a wiring diagram specific to your tractor model. Wiring issues can be complex and require specialized knowledge to resolve effectively and safely.
Conclusion
Troubleshooting common wiring issues in a Farmall Super A 12 volt system can be challenging, but with the proper knowledge and tools, it is possible to diagnose and resolve many problems. By checking the battery, wiring connections, ground, ignition switch, starter solenoid, and addressing any short circuits, you can often resolve electrical issues and ensure the proper functioning of your tractor. Remember to always prioritize safety and consult professional help when needed.
Q&A:
How can I troubleshoot a dead outlet?
If you have a dead outlet, the first thing you should do is check the circuit breaker to see if it has tripped. If it has, simply resetting the breaker may solve the problem. If the breaker has not tripped, you can try to reset the GFCI outlet connected to the dead outlet. If none of these solutions work, it may be necessary to call an electrician to inspect and fix the issue.
Why are my lights flickering?
There can be several reasons why your lights are flickering. One common cause is a loose connection in the circuit. Check all light bulbs to make sure they are screwed in tightly. If the flickering persists, it may be a sign of a more serious electrical issue, such as a faulty wiring or a problem with the electrical panel. In such cases, it is best to call a professional electrician to diagnose and repair the problem.
What should I do if I experience an electrical shock when touching an appliance?
If you experience an electrical shock when touching an appliance, the first step is to immediately unplug the appliance from the power source. If you are unable to do so, turn off the power to your entire house through the main circuit breaker. After disconnecting the appliance, assess the severity of the shock and seek medical attention if necessary. It is also recommended to have a licensed electrician inspect the appliance and wiring to prevent further incidents.
Why do my circuit breakers keep tripping?
There can be several reasons why your circuit breakers keep tripping. Some common causes include overloading the circuit with too many appliances or devices, short circuits caused by damaged wiring, or ground faults caused by moisture. To troubleshoot the issue, try unplugging some appliances or devices from the circuit and resetting the breaker. If the breaker continues to trip, it may be necessary to call an electrician to diagnose and fix the underlying problem.