
Having a reliable lawn mower is essential for maintaining a beautiful and well-kept yard. Huskee is a reputable brand that offers a range of lawn mowers known for their durability and performance. Understanding the wiring diagram of your Huskee lawn mower is crucial for troubleshooting electrical issues and ensuring proper operation.
The wiring diagram is a visual representation of the electrical components and their connections within the lawn mower. It shows the path of electrical current and helps identify the various wires and their functions. This information is invaluable when it comes to diagnosing problems and making necessary repairs.
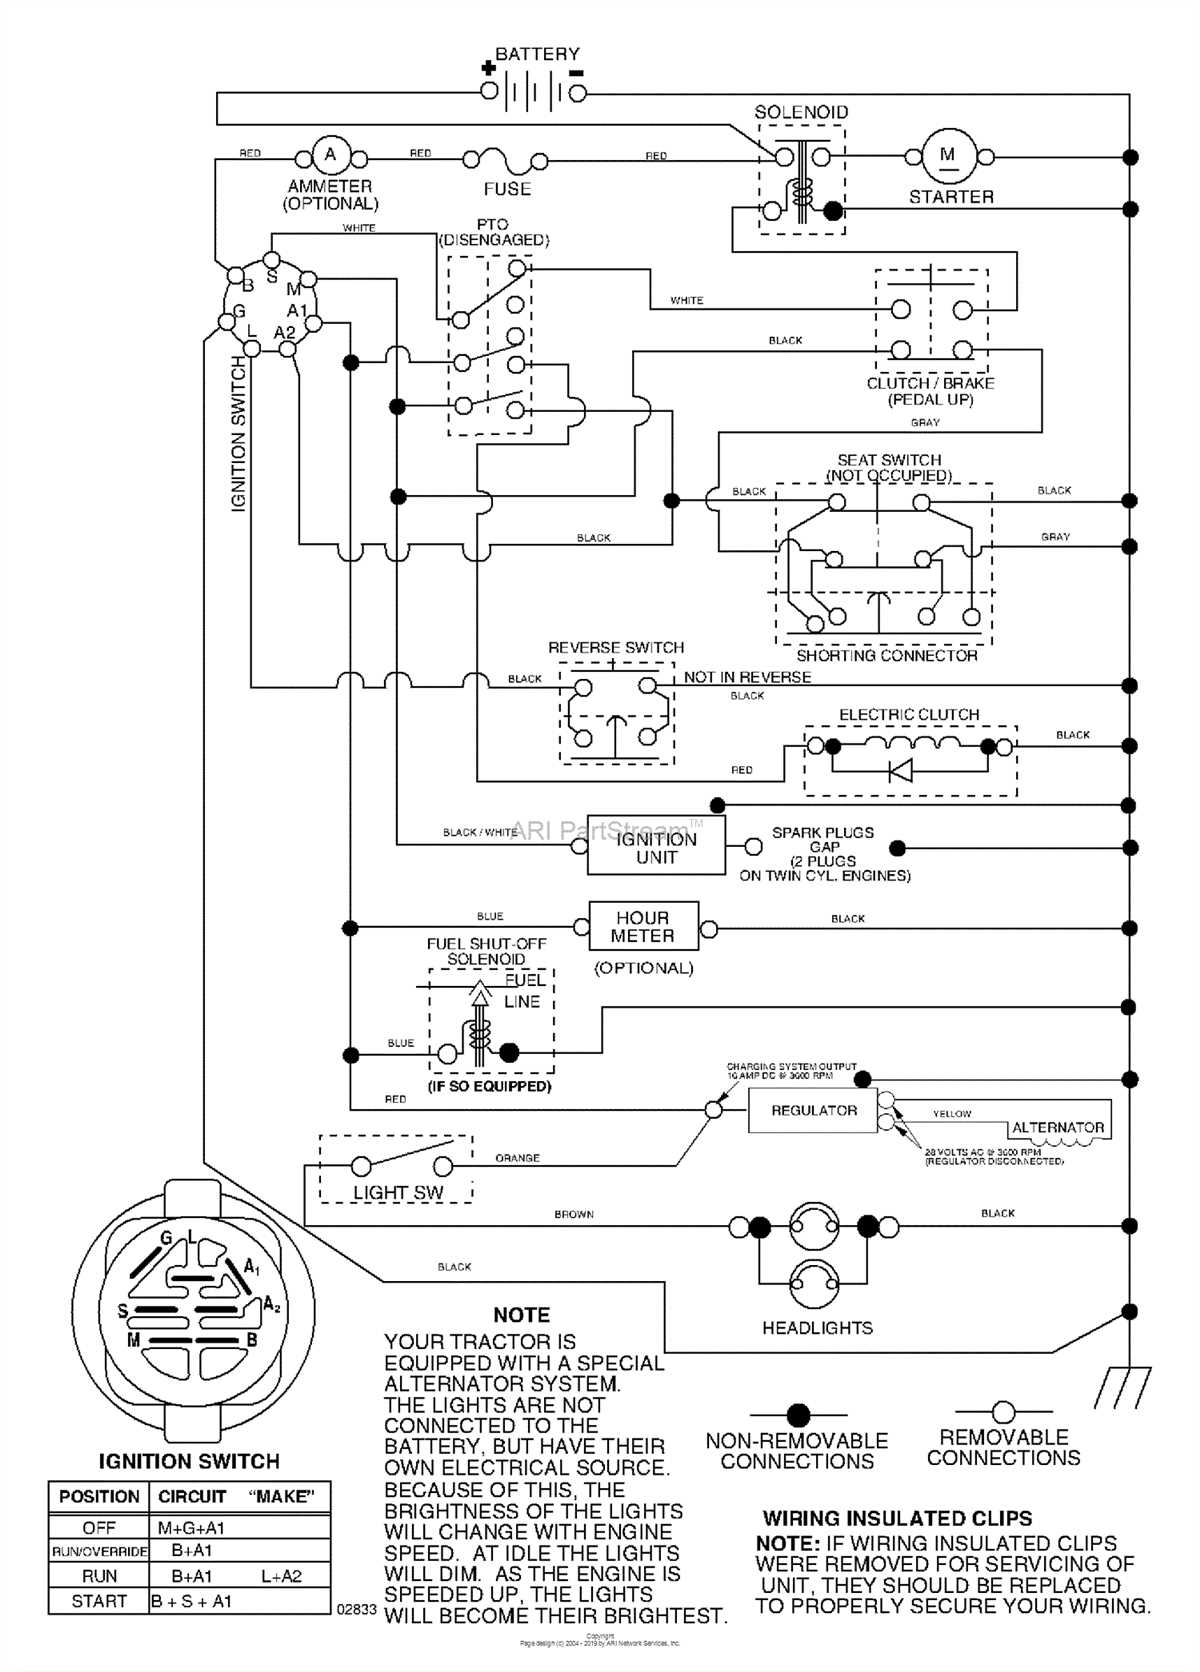
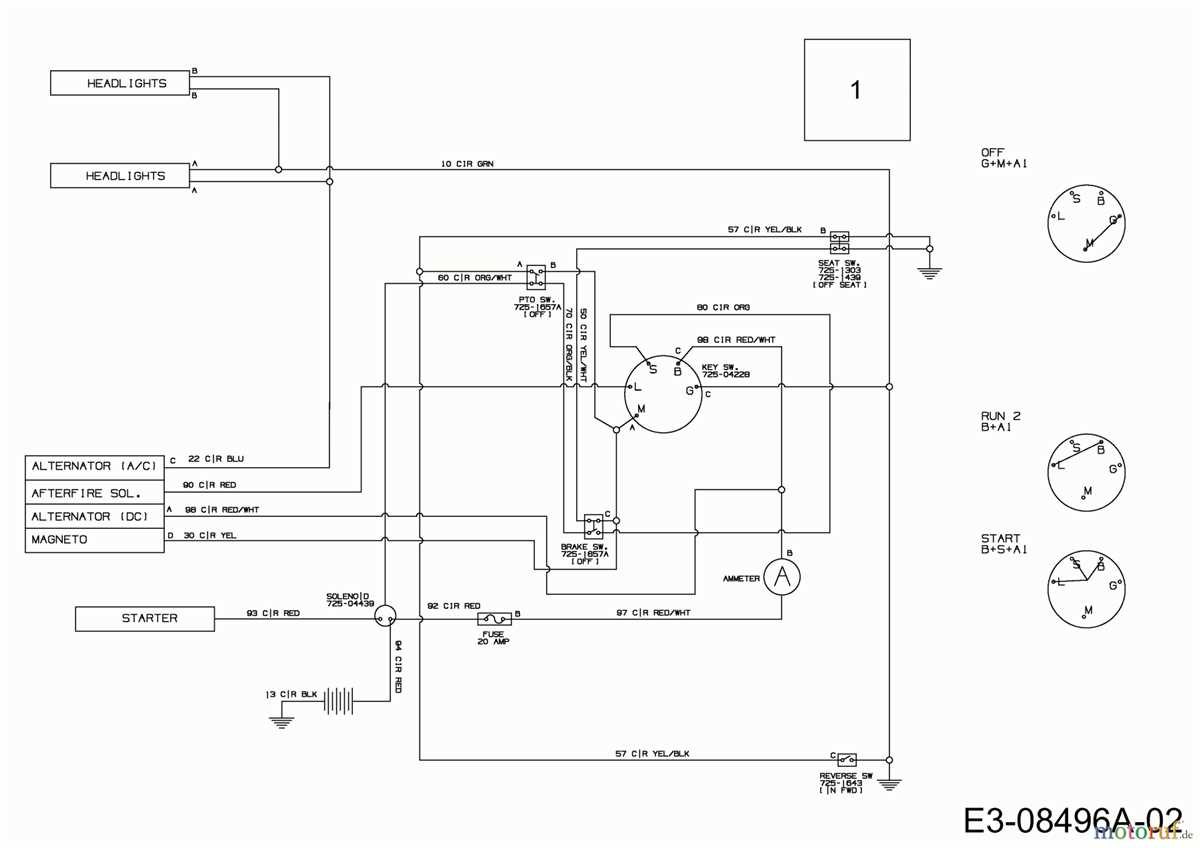
With a Huskee wiring diagram, you can easily identify the ignition switch, starter solenoid, battery, alternator, and other crucial components. It also provides information on how the wires are interconnected, allowing you to follow the electrical circuit and locate any faults or damaged connections.
Whether you are a DIY enthusiast or a professional technician, having access to a Huskee lawn mower wiring diagram can save you time and money. It empowers you to troubleshoot and fix electrical issues on your own, eliminating the need for costly repairs or replacements. Understanding the wiring diagram is a valuable skill that can come in handy for any Huskee lawn mower owner.
Huskee Lawn Mower Wiring Diagram
If you are looking for the wiring diagram for your Huskee lawn mower, you have come to the right place. Having a wiring diagram can be extremely helpful when troubleshooting electrical issues or performing repairs on your lawn mower. A wiring diagram is a visual representation of the electrical connections and components in a system, and it provides a roadmap for understanding and troubleshooting the electrical system of your Huskee lawn mower.
When searching for a Huskee lawn mower wiring diagram, it is important to have the model number of your mower handy. The model number can typically be found on a sticker or plate on the mower itself. Once you have the model number, you can search for the specific wiring diagram that matches your mower. Huskee is a popular brand of lawn mower, so there are many resources available online where you can find the wiring diagram for your specific model.
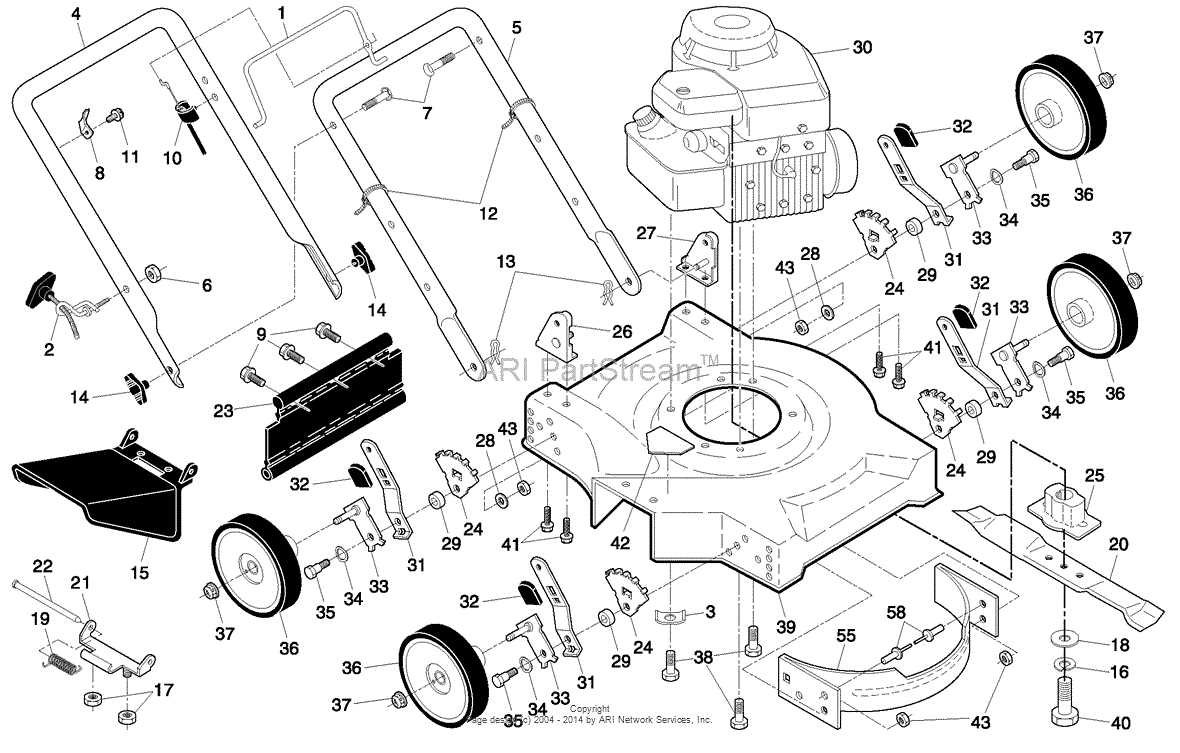
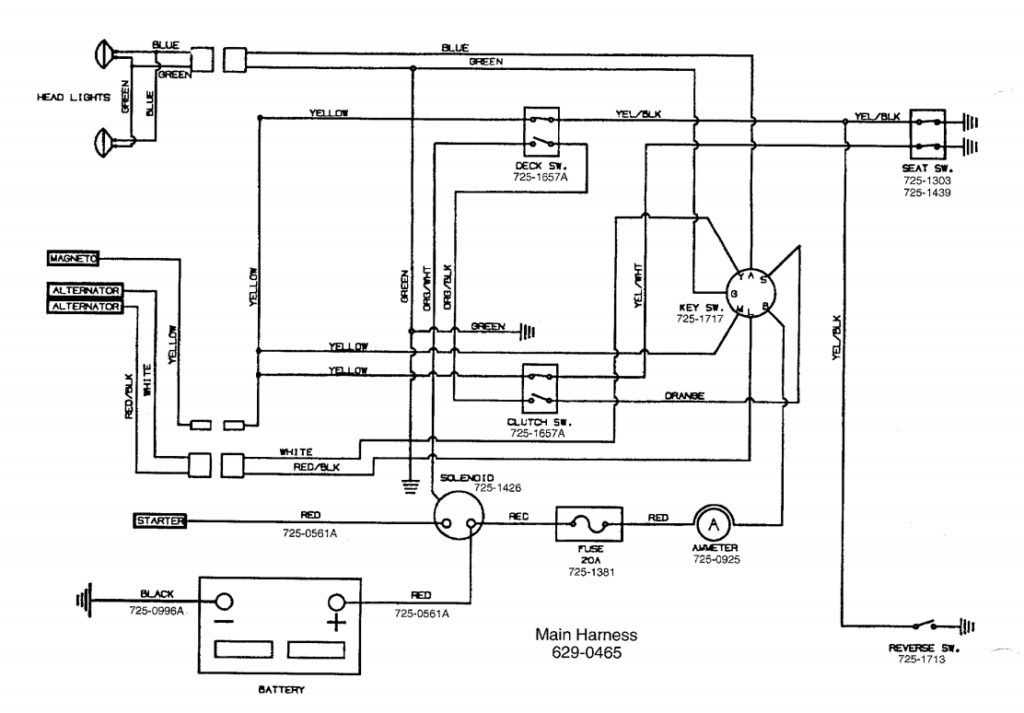
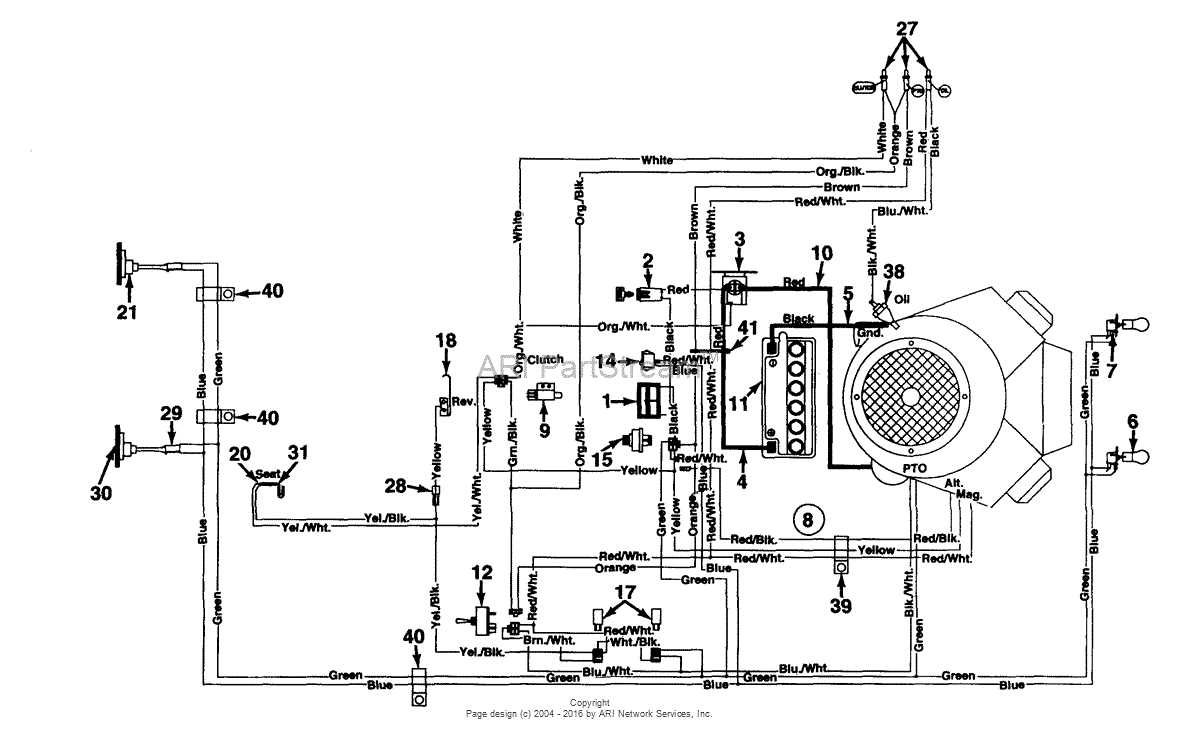
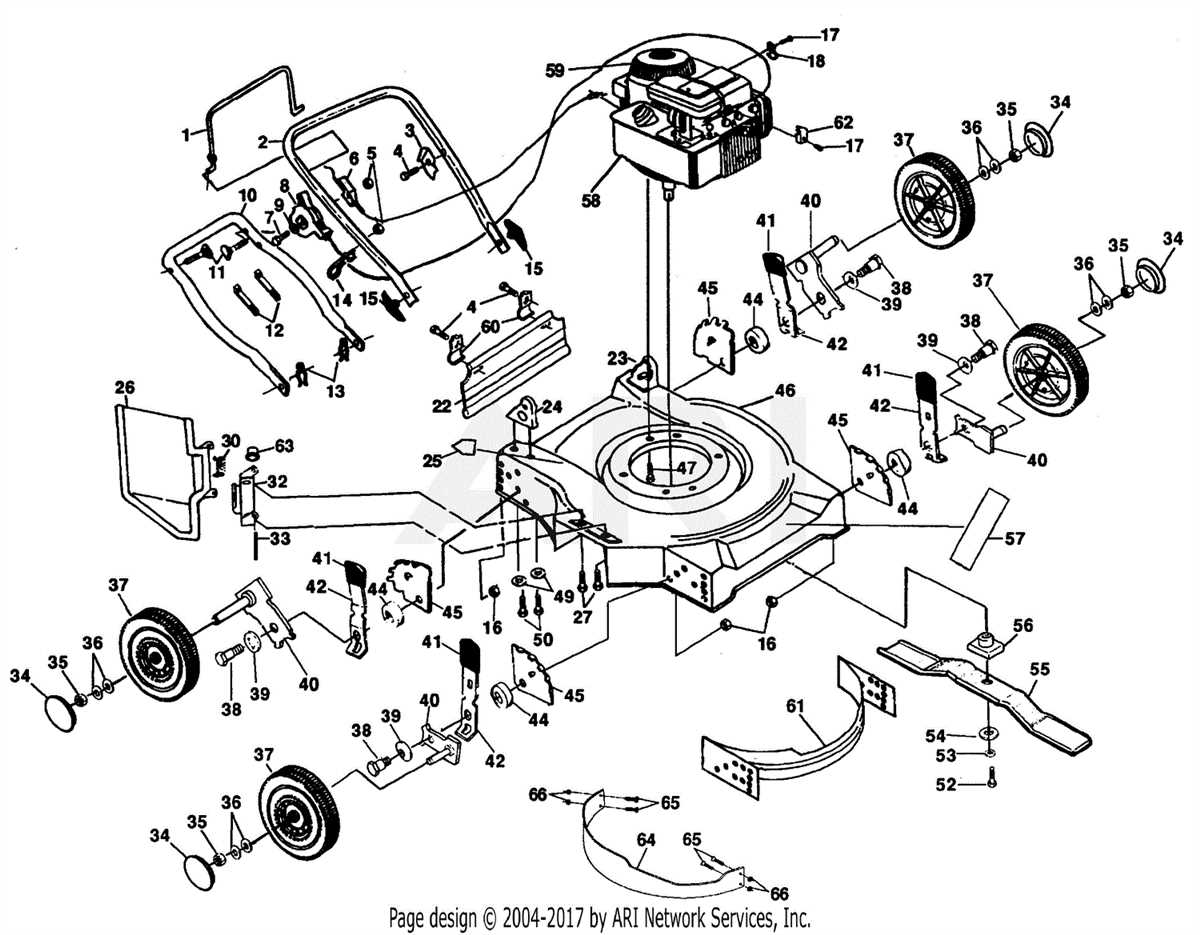
A typical Huskee lawn mower wiring diagram includes detailed information about the various components in the electrical system, such as the ignition switch, solenoid, starter motor, battery, lights, and more. It also shows the connections between these components, including the color-coding of the wires. By following the wiring diagram, you can easily identify and locate the components and wires in your Huskee lawn mower’s electrical system.
If you are experiencing electrical issues with your Huskee lawn mower, consulting the wiring diagram can help you identify the source of the problem. It can also guide you through the process of inspecting and testing the different components in the electrical system to determine if any repairs or replacements are needed. Whether you are a lawn mower repair professional or a DIY enthusiast, having a wiring diagram for your Huskee lawn mower can save you time and frustration when troubleshooting electrical problems.
What is a wiring diagram and why is it important for a Huskee lawn mower?
A wiring diagram is a visual representation of the electrical connections and wiring layout of a specific machine or system. In the case of a Huskee lawn mower, a wiring diagram can provide a detailed map of how the various components and electrical circuits are connected. It shows the pathways through which electricity flows, allowing technicians and owners to troubleshoot and repair any issues that may arise. The diagram typically includes symbols to represent different electrical components, such as switches, relays, and motors, making it easier to understand the overall circuitry.
Having a wiring diagram is important for a Huskee lawn mower because it allows users to understand the electrical system and diagnose problems accurately. With the diagram, owners can easily identify specific components and their connections, making it easier to test for continuity, check for faulty wiring, or replace damaged parts. This can save time and money by preventing unnecessary replacement of working components and ensuring that any repairs are done correctly. Additionally, a wiring diagram can help ensure the safety of both the operator and the equipment, as it provides guidance for proper electrical connections and prevents potential electrical hazards.
Common Electrical Problems and Troubleshooting Tips for Huskee Lawn Mowers
Electrical problems can occur in Huskee lawn mowers, causing issues with starting, cutting, or powering the mower. Understanding and troubleshooting these problems can help you get your Huskee lawn mower back up and running smoothly. Here are some common electrical problems and tips for troubleshooting:
1. Dead Battery:
A dead battery is a common issue that can prevent your Huskee lawn mower from starting. If your mower is not starting or has a weak start, the first thing to check is the battery. Ensure that the battery is securely connected and fully charged. If the battery is old or not holding a charge, it may need to be replaced.
2. Faulty Ignition Switch:
If you have checked the battery and it is working properly, but your Huskee lawn mower still does not start, the problem may lie with the ignition switch. The ignition switch activates the electrical system and starts the engine. Check the ignition switch for any signs of damage or wear. If the switch is faulty, it should be replaced to restore proper functionality.
3. Wiring Issues:
Wiring problems can cause various electrical issues in a Huskee lawn mower. Inspect the wiring harness for any signs of damage, such as frayed or loose wires. Ensure that all connections are clean and tight. If you find any damaged or loose wires, they should be repaired or replaced. Be sure to follow the wiring diagram specific to your Huskee lawn mower model to ensure correct connections.
4. Faulty Safety Switches:
Huskee lawn mowers are equipped with safety switches that prevent the mower from starting or running if certain conditions are not met, such as the seat being occupied or the cutting deck engaged. If your mower is not starting or cutting, check the safety switches for any issues. Ensure that the seat switch, blade engagement switch, and other safety switches are functioning properly. Replace any faulty switches to restore proper operation.
By following these troubleshooting tips and checking for common electrical problems, you can identify and resolve issues with your Huskee lawn mower. If you are unsure or uncomfortable with performing electrical repairs, it is always recommended to seek assistance from a qualified professional or authorized Huskee dealer.
Step-by-step guide to wiring a Huskee lawn mower
Wiring a Huskee lawn mower may seem daunting at first, but with a step-by-step guide, it can be a straightforward process. Here, we will outline the necessary steps to successfully wire your Huskee lawn mower.
Gather the necessary tools and equipment
Before you begin the wiring process, make sure you have all the necessary tools and equipment. This may include wire cutters, wire strippers, electrical tape, and a wiring diagram specific to your Huskee lawn mower model. Having these tools on hand will make the process much smoother.
Disconnect the battery and remove the existing wiring
Prior to starting the wiring process, it is crucial to disconnect the battery to ensure safety. Once the battery is disconnected, carefully remove the existing wiring from the mower, taking note of how it is connected and where each wire leads. This will help when installing the new wiring.
Refer to the wiring diagram and identify the wires
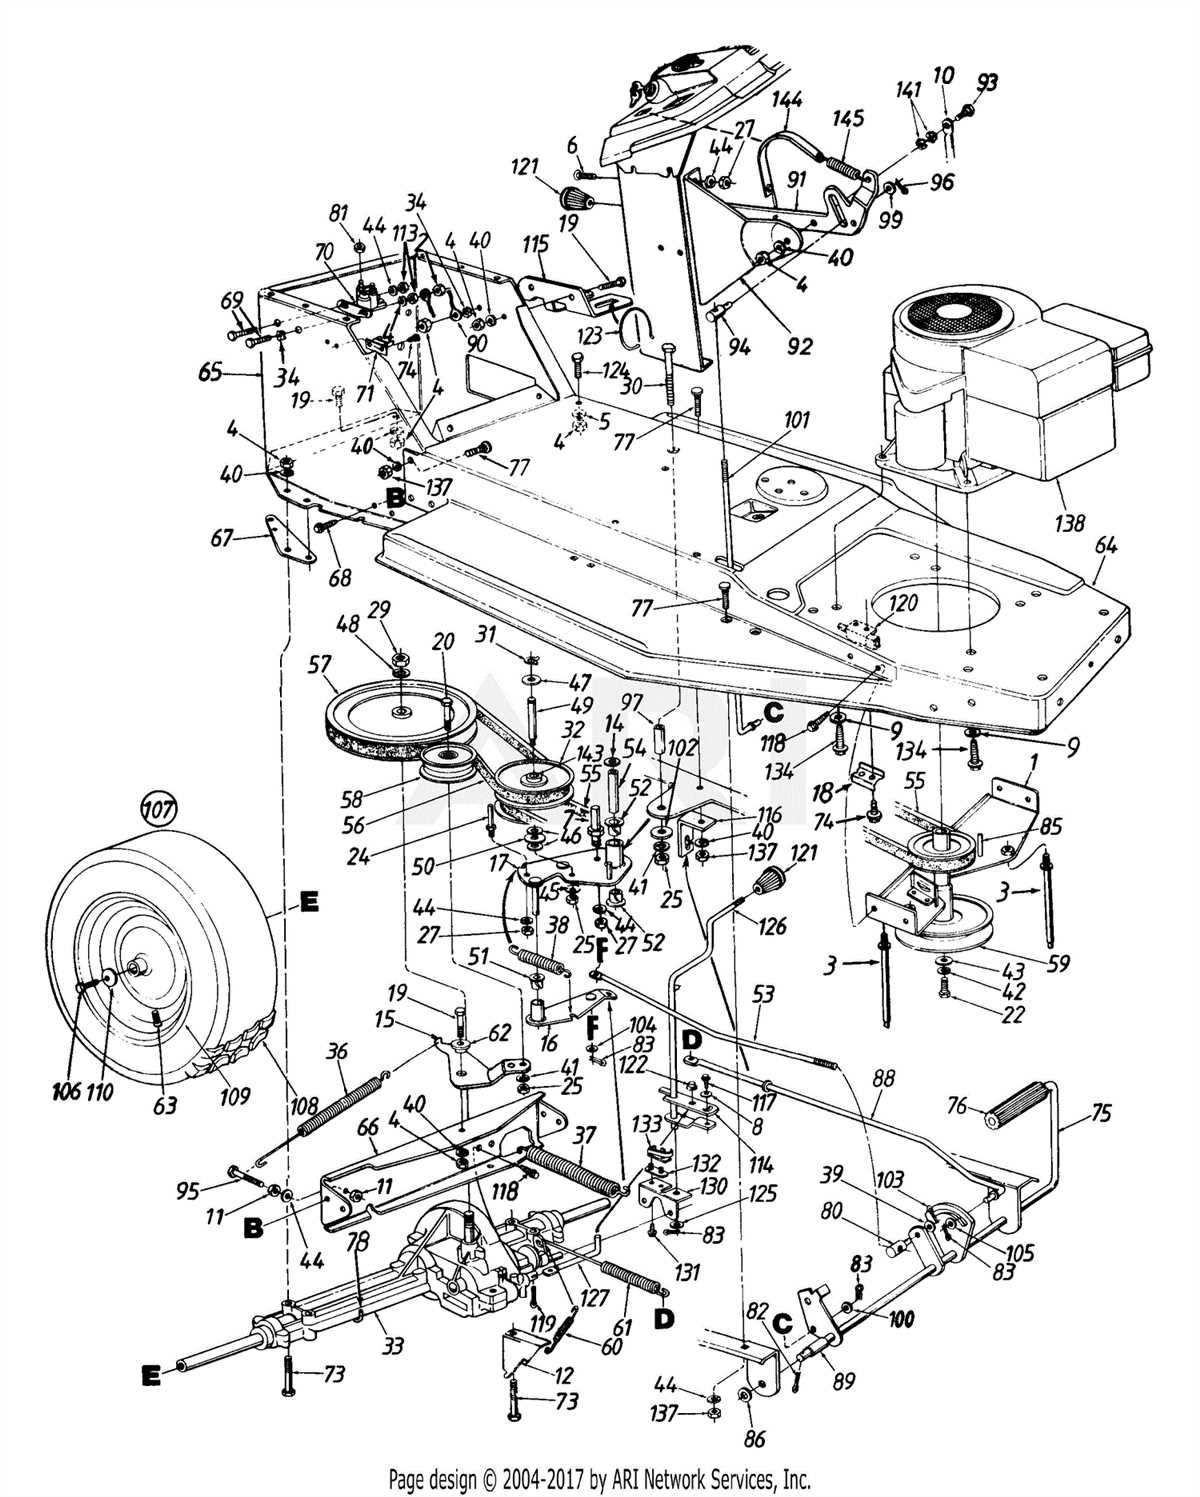
Consult the wiring diagram specific to your Huskee lawn mower model to identify the different wires and their functions. This diagram will provide a visual representation of how the wires should be connected. Take your time to understand the diagram thoroughly before proceeding.
Cut and strip the wires
Using wire cutters and wire strippers, carefully cut and strip the wires according to the lengths indicated in the wiring diagram. This will ensure proper connection and prevent any loose connections or overlapping wires.
Connect the wires according to the diagram
Using the wiring diagram as a guide, connect the wires to their corresponding terminals or connectors. Take care to match the colors and positions of the wires accurately to avoid any errors. Secure the connections with electrical tape to ensure they remain in place.
Test the wiring before reassembling

Once all the wires are connected, it is important to test the wiring before reassembling the mower. Reconnect the battery and turn on the ignition to ensure that everything is functioning correctly. If there are any issues, double-check the connections and consult the wiring diagram again.
By following this step-by-step guide, you can successfully wire your Huskee lawn mower. Remember to prioritize safety and attention to detail throughout the process to ensure a properly functioning wiring system.
Tips for maintaining the electrical system of a Huskee lawn mower
Proper maintenance of the electrical system in your Huskee lawn mower is crucial for its performance and longevity. Here are some tips to help you take care of the electrical components:
1. Regularly check the battery:
The battery is a vital part of the electrical system. Make sure to check the battery’s charge level regularly and recharge it when necessary. Clean the battery terminals and cables to prevent corrosion. Replace the battery if it no longer holds a charge or if it is damaged.
2. Inspect the wiring:
Periodically inspect the wiring harness and connections for any signs of wear, fraying, or damage. Replace any damaged or worn-out wires to ensure proper electrical flow to the mower’s components.
3. Clean and lubricate switches and connectors:
Dirt, debris, and moisture can affect the performance of switches and connectors. Clean them regularly using a soft brush or a compressed air canister. Apply a light coating of dielectric grease to protect the connections from moisture and corrosion.
4. Test and replace fuses as needed:
Fuses protect the electrical system from power surges and prevent damage to the components. Check the fuses periodically and replace any blown fuses with the appropriate rating. Be sure to follow the manufacturer’s specifications for fuse replacements.
5. Keep the electrical system dry:
Water and moisture can cause electrical shorts and damage the components. Avoid mowing wet grass or operating the mower in rainy conditions. If the mower gets wet, dry it thoroughly before using it again.
6. Consult the wiring diagram:
Refer to the wiring diagram specific to your Huskee lawn mower model whenever you need to troubleshoot or repair any electrical issues. The diagram will help you identify the different components and their connections, ensuring accurate diagnosis and repair.
By following these tips, you can ensure that the electrical system of your Huskee lawn mower remains in good condition, providing reliable performance and extending the lifespan of your machine.
Q&A:
How often should I check the battery of my Huskee lawn mower?
It is recommended to check the battery of your Huskee lawn mower at least once a month to ensure it is properly charged and in good condition.
What should I do if the battery of my Huskee lawn mower is not holding a charge?
If the battery of your Huskee lawn mower is not holding a charge, you should first check the connections and clean them if necessary. If the problem persists, it may be necessary to replace the battery.
Are there any specific maintenance tasks I should perform on the electrical system of my Huskee lawn mower?
Yes, there are a few specific maintenance tasks you should perform on the electrical system of your Huskee lawn mower. These include checking and tightening all electrical connections, cleaning the battery terminals, and inspecting the wiring for any signs of damage.
Can I use a regular automotive battery charger to charge the battery of my Huskee lawn mower?
No, it is not recommended to use a regular automotive battery charger to charge the battery of your Huskee lawn mower. Instead, it is recommended to use a battery charger specifically designed for lawn mower batteries to ensure safe and proper charging.
What should I do if my Huskee lawn mower’s electrical system is not working properly?
If your Huskee lawn mower’s electrical system is not working properly, you should first check the fuse to see if it is blown or damaged. If the fuse is fine, you may need to check the wiring and connections for any issues or damage. If necessary, it may be best to consult a professional for further assistance.
How often should I inspect the electrical system of my Huskee lawn mower?
It is recommended to inspect the electrical system of your Huskee lawn mower at least once a year. This will help ensure that all the components are in good working condition and prevent any potential issues.
What are some signs that there may be a problem with the electrical system of my Huskee lawn mower?
Some signs that there may be a problem with the electrical system of your Huskee lawn mower include a dead battery, dim or flickering headlights, difficulty starting the engine, and intermittent power loss. If you notice any of these signs, it is important to address the issue as soon as possible to prevent further damage.