
Understanding the wiring diagram of a GM starter is crucial for any automotive enthusiast or mechanic. Whether you are restoring a classic car or working on a modern vehicle, having a clear understanding of the starter wiring can save you time and prevent costly mistakes. In this article, we will discuss the basics of GM starter wiring, including the different components involved and their respective connections.
At the heart of every GM starter is a solenoid, which is responsible for engaging the starter motor when the ignition key is turned. The solenoid is typically mounted on the starter and is connected to the battery, ignition switch, and starter motor via a series of wires. The wiring diagram outlines the specific connections between these components, allowing you to trace any electrical issues and make the necessary repairs.
One of the first things to understand is the difference between the main power source and the control circuit. The main power source is the positive terminal of the battery, which supplies power directly to the starter motor through a heavy-duty cable. On the other hand, the control circuit includes the ignition switch, solenoid, and any related wiring. Understanding this distinction is essential for troubleshooting and making repairs.
In addition to the main power source and control circuit, the wiring diagram will also indicate any additional components that may be present, such as relays or fuses. These components are designed to protect the starter or other electrical systems from damage in the event of a power surge or short circuit. Familiarizing yourself with these components and their connections will help you understand the overall electrical system and ensure its proper functioning.
Overall, a GM starter wiring diagram provides a roadmap for understanding the electrical connections and components of the starter system. By referring to this diagram, you can troubleshoot electrical issues, make repairs, and ensure that your vehicle’s starter is functioning properly. Whether you are a seasoned mechanic or a hobbyist, having a clear understanding of your vehicle’s electrical system is essential for maintaining and repairing your car.
Understanding the basics of GM starter wiring
In order to understand the basics of GM starter wiring, it is important to have a clear understanding of how the starter motor functions. The starter motor is responsible for starting the engine by engaging the flywheel, which ultimately turns the engine crankshaft. When the ignition key is turned, it sends an electrical signal to the starter solenoid, which in turn activates the starter motor.
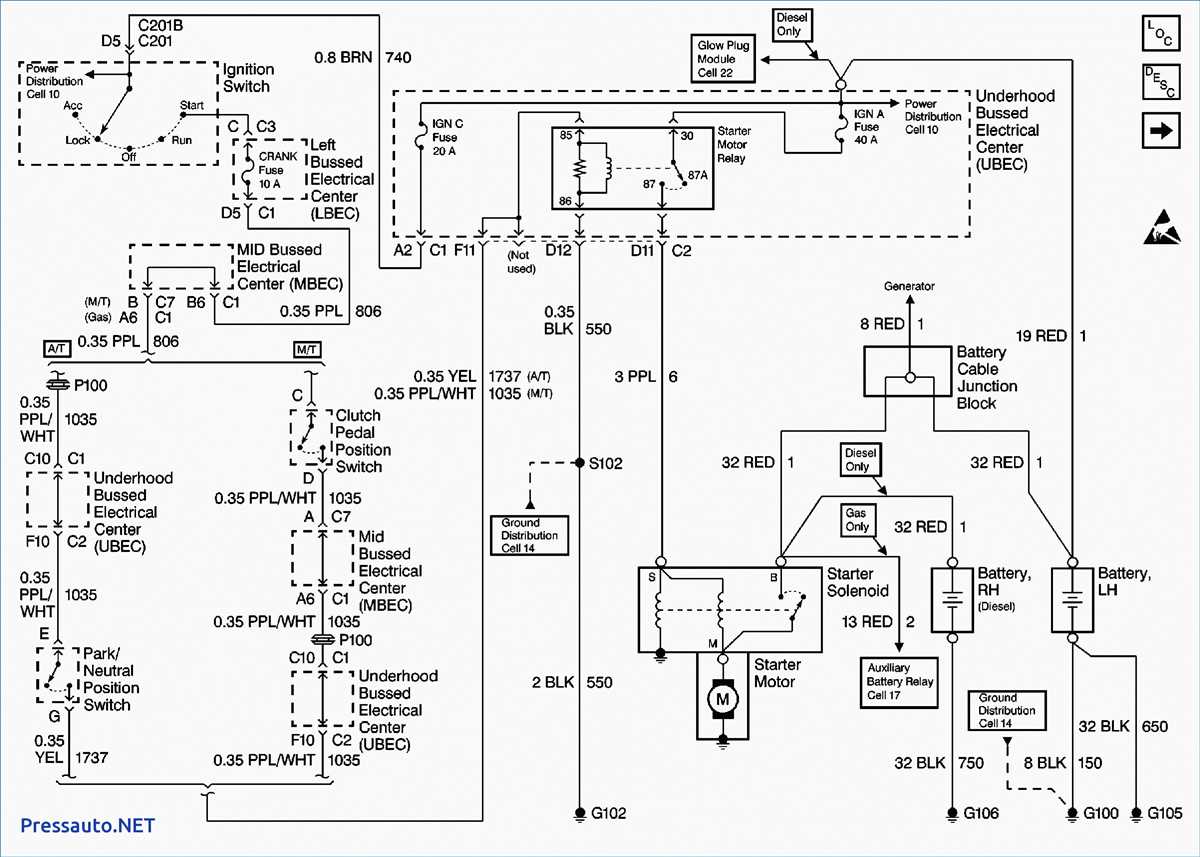
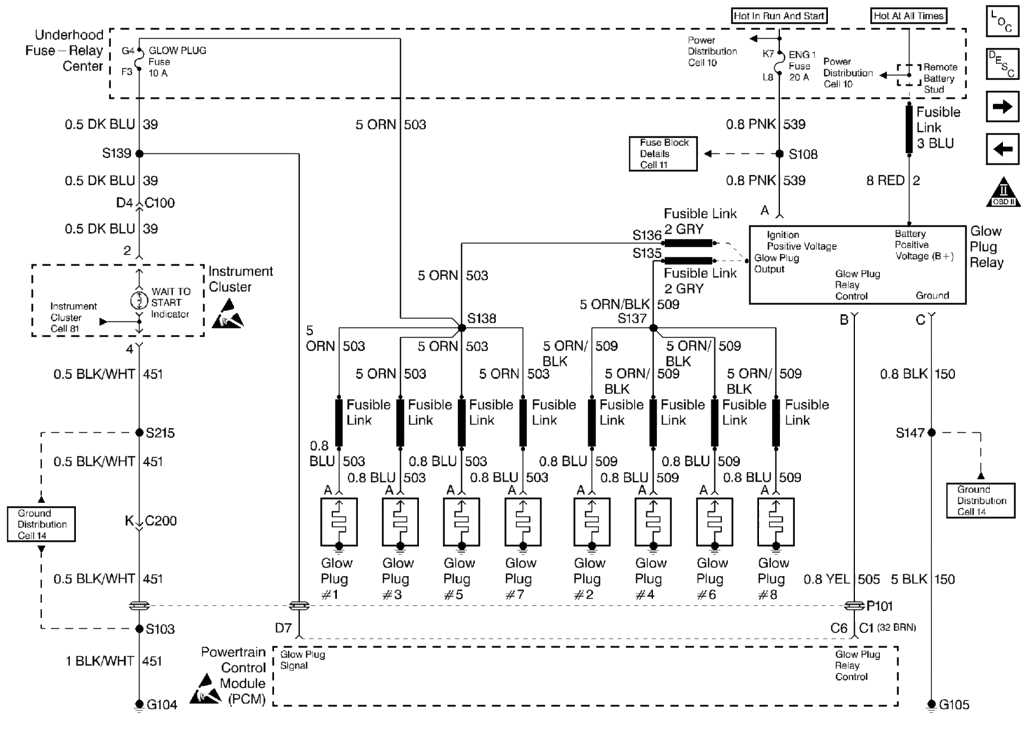
The GM starter wiring diagram provides a visual representation of the electrical connections and components involved in the starter system. It typically includes the battery, ignition switch, starter solenoid, starter motor, and the necessary wiring connections. The diagram illustrates the flow of electrical current and how the components interact with each other to start the engine.
One important aspect to note in the GM starter wiring diagram is the presence of a starter relay or solenoid. This component acts as a switch, allowing a large electrical current to flow from the battery to the starter motor when the ignition key is turned. The starter relay or solenoid serves as a safety mechanism, preventing the starter motor from engaging if the engine is already running. It also ensures that the starter motor receives the necessary electrical current to start the engine.
Additionally, the GM starter wiring diagram may also include other components such as fuses, fusible links, and wiring connectors. These components are important for protecting the electrical system from damage and ensuring proper functionality of the starter system.
Overall, understanding the basics of GM starter wiring is crucial for troubleshooting and diagnosing any issues related to the starter system. By examining the wiring diagram and familiarizing oneself with the electrical connections and components, it becomes easier to identify any potential problems and make the necessary repairs or replacements.
Common issues with GM starter wiring
GM starter wiring can experience a few common issues that can prevent the starter from functioning properly. These issues can lead to difficulties starting the vehicle or even complete starter failure. It is important to understand these common problems in order to diagnose and fix them effectively.
1. Loose connections: One of the most common issues with GM starter wiring is loose connections. Over time, the connections between the starter, battery, and ignition switch can become loose or corroded, causing intermittent or no power to reach the starter. It is important to regularly check and tighten these connections to ensure proper functionality.
2. Faulty ignition switch: Another common issue is a faulty ignition switch. When the ignition switch fails, it can prevent power from reaching the starter, resulting in the vehicle not starting. This can be diagnosed by testing the voltage at the starter solenoid when the ignition switch is turned to the start position.
3. Broken or damaged wiring: Wiring can become damaged over time, leading to issues with the starter. This can be caused by wear and tear, rodents chewing on the wiring, or exposure to the elements. It is important to inspect the wiring for any signs of damage and replace it if necessary.
4. Starter solenoid failure: The starter solenoid is responsible for engaging the starter motor when the ignition switch is turned to the start position. If the solenoid fails, it can prevent the starter motor from engaging, resulting in the vehicle not starting. Solenoid failure can be diagnosed by testing the voltage at the solenoid when the ignition switch is turned to the start position.
By understanding these common issues with GM starter wiring, vehicle owners or mechanics can effectively diagnose and fix any problems that may arise. Regular maintenance and inspections can help prevent these issues and ensure the reliable starting of the vehicle.
Step-by-step guide to wiring a GM starter
In order to properly wire a GM starter, it is important to follow a step-by-step guide to ensure that the wiring is done correctly. Wiring a GM starter can be a straightforward process if you have the proper tools and knowledge. Here is a step-by-step guide to wiring a GM starter:
1. Disconnect the battery: Before starting any wiring work, it is important to disconnect the battery to prevent any electrical accidents. Make sure to remove the negative terminal first to avoid any sparks.
2. Gather the necessary tools: Make sure you have the necessary tools for the job, including a wrench, wire cutters, wire strippers, electrical tape, and a GM starter wiring diagram. The diagram will help you understand the wiring connections and ensure that you connect the wires correctly.
3. Locate the starter: Find the location of the GM starter in your vehicle. It is typically located near the engine or transmission. If you are unsure, refer to the vehicle’s manual or consult a professional mechanic.
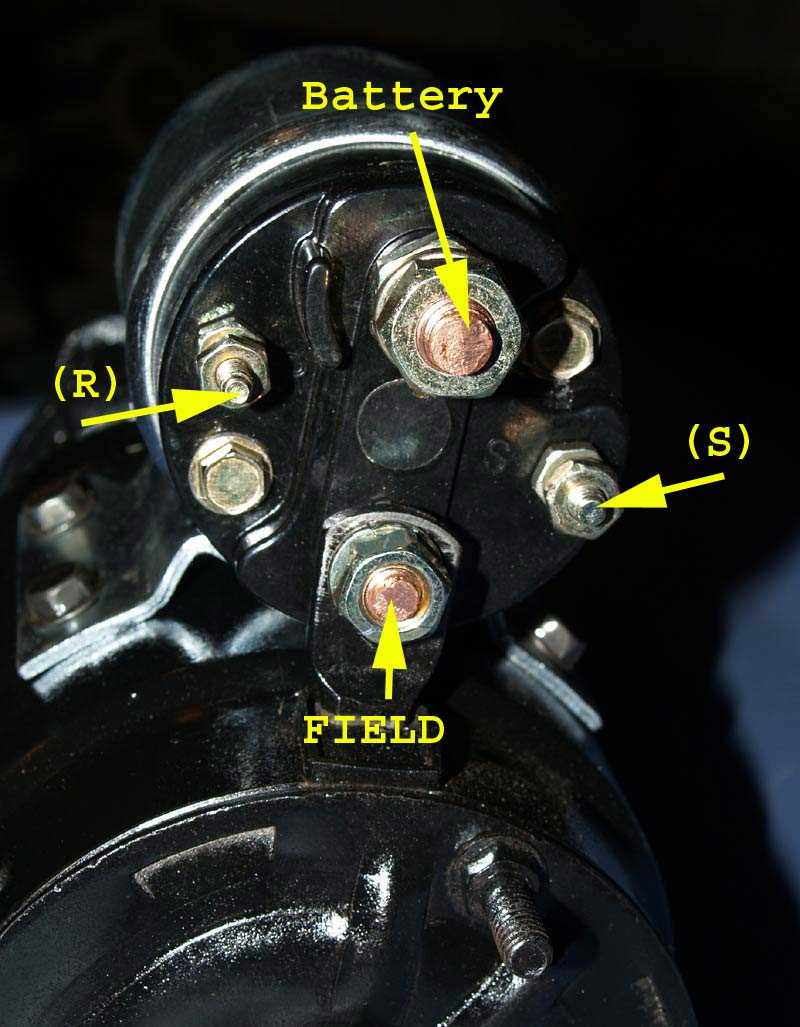
4. Identify the terminals: Identify the terminals on the GM starter. There are usually three or four terminals, including the battery terminal, ignition switch terminal, solenoid terminal, and sometimes an accessory terminal. Refer to the GM starter wiring diagram to identify the terminals correctly.
5. Connect the battery terminal: Connect the positive battery cable to the battery terminal on the GM starter. Make sure it is securely tightened using a wrench.
6. Connect the ignition switch terminal: Connect the wire from the ignition switch to the ignition switch terminal on the GM starter. Make sure the wire is properly stripped and securely connected.
7. Connect the solenoid terminal: Connect the wire from the solenoid to the solenoid terminal on the GM starter. Again, make sure the wire is properly stripped and securely connected.
8. Connect the accessory terminal (if applicable): If your GM starter has an accessory terminal, connect the accessory wire to this terminal. This terminal is usually used to power additional accessories such as a radio or lights.
9. Inspect the wiring connections: Once all the wires are connected, double-check all the wiring connections to ensure they are secure and properly connected. Use electrical tape to cover any exposed wires.
10. Reconnect the battery: Once you are confident that all the wiring connections are correct, reconnect the battery by attaching the positive terminal first and then the negative terminal.
Following these steps and referring to the GM starter wiring diagram should help you wire your GM starter correctly. However, if you are unsure or uncomfortable with the wiring process, it is always recommended to seek the assistance of a professional mechanic.
Troubleshooting GM Starter Wiring Problems
When it comes to starting your GM vehicle, the starter wiring plays a crucial role in ensuring a smooth and efficient ignition process. However, like any other electrical system, starter wiring can sometimes encounter problems, causing starting issues or even complete failure. In order to troubleshoot these issues, it is important to understand the common problems that can occur and how to address them.
One common problem with GM starter wiring is loose or corroded connections. Over time, the connections between the starter, battery, and ignition switch can become loose or corroded, hindering the flow of electricity and preventing the starter from functioning properly. To address this issue, it is important to carefully inspect the wiring connections and clean or tighten them as necessary. Additionally, it may be necessary to replace any damaged or corroded wiring to ensure a reliable connection.
Another issue that can arise with GM starter wiring is a faulty ignition switch. If the ignition switch is not sending the proper signal to the starter, it will not engage and the vehicle will not start. In this case, it may be necessary to replace the ignition switch to resolve the issue. It is important to consult the vehicle’s wiring diagram to properly identify the ignition switch and ensure a correct replacement.
In some cases, the issue may lie with the starter motor itself. A worn or damaged starter motor can cause starting problems, despite the wiring being in good condition. If the starter motor is not engaging or is making a grinding noise, it may need to be replaced. It is important to consult the vehicle’s wiring diagram to properly identify the starter motor and ensure a correct replacement.
In conclusion, troubleshooting GM starter wiring problems requires careful inspection and diagnosis of the connections, ignition switch, and starter motor. By identifying and addressing common issues such as loose or corroded connections, faulty ignition switches, or worn starter motors, it is possible to resolve starting issues and ensure reliable vehicle ignition.
Upgrading GM starter wiring for improved performance
The wiring of a starter in a GM vehicle plays a crucial role in its overall performance. Upgrading the starter wiring can significantly enhance the starting capabilities and overall reliability of the vehicle. In this article, we have explored the importance of proper starter wiring and provided a step-by-step guide on upgrading the wiring for improved performance.
- Understanding the importance of starter wiring: The starter wiring is responsible for transmitting power from the battery to the starter motor, initiating the combustion process in the engine. Upgrading the starter wiring can improve the delivery of power, reduce voltage drop, and ensure a consistent and efficient starting performance.
- Identifying the components: Before upgrading the starter wiring, it is essential to familiarize yourself with the components involved. This includes the starter solenoid, starter motor, battery, ignition switch, and the various wires connecting these components.
- Preparing for the upgrade: Prior to upgrading the starter wiring, it is crucial to disconnect the battery to prevent any accidental electrical shocks. Gather the necessary tools, such as wire cutters, crimping tools, electrical tape, and new wire connectors.
- Upgrading the wiring: Begin by removing the existing starter wiring, ensuring to label each wire for easy reinstallation. Replace any worn-out or damaged wires with new, high-quality wires. Use the appropriate wire size for the specific vehicle and starter motor being used.
- Properly connecting the wires: Crimp the wire connectors onto the ends of the new wires and securely attach them to their respective components. Ensure all connections are tight and free of any corrosion or damage.
- Testing and finalizing the upgrade: After completing the wiring upgrade, reconnect the battery and test the starter system. Verify that the starter motor engages smoothly and the engine starts without any issues. Inspect all connections for any signs of overheating or loose wiring.
By upgrading the starter wiring in a GM vehicle, you can enhance its starting capabilities and ensure a more reliable performance. Properly upgraded wiring can lead to improved power delivery, reduced voltage drop, and a consistent and efficient starting process. As always, it is essential to follow proper safety precautions and consult a professional if needed. With the upgraded wiring in place, you can enjoy a more reliable and efficient vehicle.