
When it comes to electric guitars, one of the most essential tools for achieving unique and distinctive tones is the guitar pedal. These small devices, also known as effects pedals or stompboxes, alter the sound of the guitar by modifying certain frequencies, adding effects, or shaping the signal in various ways. Understanding the circuit diagram of a guitar pedal is crucial for musicians and electronics enthusiasts who want to build their own custom effects or troubleshoot existing ones.
A guitar pedal circuit diagram provides a visual representation of the electronic components and their interconnections within the pedal. It shows the flow of the signal, the different stages of processing, and how the components work together to produce the desired effect. By studying and analyzing the circuit diagram, one can gain a deeper understanding of how the pedal functions and make informed decisions about modifications or repairs.
Typically, a guitar pedal circuit consists of several key components such as transistors, resistors, capacitors, and potentiometers. These components work together to shape and manipulate the guitar signal. The circuit diagram illustrates the specific values and connections of these components, allowing the designer or technician to troubleshoot any issues and make modifications to achieve the desired sound.
Whether you are a guitarist looking to experiment with different effects or an electronics enthusiast seeking to delve into the world of guitar pedal design, understanding the circuit diagram is an essential skill. It opens up a realm of possibilities, from building your own unique effects pedals to diagnosing and repairing existing ones. So grab your soldering iron and start exploring the fascinating world of guitar pedal circuitry!
Guitar Pedal Circuit Diagram: A Complete Guide to Understanding
A guitar pedal circuit diagram is a visual representation of the electronic components and connections used in a guitar effects pedal. It provides a roadmap for understanding how the pedal works and allows for troubleshooting and modifications. Understanding guitar pedal circuit diagrams is essential for anyone interested in DIY pedal building or troubleshooting common issues.
Components: The circuit diagram typically includes symbols for various electronic components such as resistors, capacitors, transistors, diodes, and integrated circuits. These components interact with each other in specific ways to produce the desired guitar effect.
Signal Flow: One of the key aspects of understanding a guitar pedal circuit diagram is understanding the signal flow. The input signal from the guitar enters the pedal, passes through various components such as amplifiers and filters, and exits as the processed output signal. Following the signal flow in the diagram helps to identify the function and role of each component.
Connections: The circuit diagram shows how the components are connected using lines and symbols. These connections determine the electrical pathways through which the signal flows and the interactions between different components. Understanding the connections is crucial for troubleshooting and making modifications to the pedal circuit.
Power Supply: Guitar pedals require a power source to function. The circuit diagram indicates how the pedal is powered, whether it’s through batteries or an external power supply. It also shows where the power is distributed to different components within the circuit.
Modifications and Customization: A circuit diagram provides a foundation for modifying and customizing guitar pedals. By understanding the diagram, enthusiasts can experiment with different component values, add or remove components, or modify the signal flow to create unique sounds and effects.
Resources: There are various resources available online that provide guitar pedal circuit diagrams for popular pedals. These resources can be helpful for learning and understanding different circuit designs. Additionally, there are software tools available that allow users to create and simulate circuit diagrams, making it easier to experiment with pedal designs.
Conclusion: Understanding guitar pedal circuit diagrams is an essential skill for anyone interested in DIY pedal building or troubleshooting. By familiarizing yourself with the components, signal flow, connections, and power supply, you can gain a deeper understanding of how guitar pedals work and how to customize them to create unique sounds.
Benefits of Using a Guitar Pedal Circuit Diagram in Your DIY Projects
When it comes to building your own guitar pedals, having a clear and accurate circuit diagram is crucial. Whether you are a seasoned DIY enthusiast or just starting out, using a guitar pedal circuit diagram can bring several benefits to your projects. Here are a few reasons why:
1. Precision and Accuracy
Using a circuit diagram provides you with a precise and accurate representation of the pedal’s electrical components and their connections. This ensures that you can build the pedal correctly and avoid any potential errors or mishaps along the way. With a clear diagram, you can easily identify each component and its specific role in the circuit.
2. Time and Effort Saving
Having a circuit diagram on hand can save you a significant amount of time and effort. Instead of having to figure out the pedal’s wiring and connections on your own, you can simply follow the diagram and build the pedal accordingly. This allows you to complete your DIY project more efficiently and move on to the next one.
3. Customization Possibilities
A circuit diagram can serve as a starting point for customizing your guitar pedal. By understanding the different components and their connections, you can make modifications and additions to the circuit to suit your personal preferences and achieve the desired sound. With a clear diagram, you can easily identify which parts can be altered or replaced.
4. Troubleshooting and Repair
In the event that your DIY pedal malfunctions or needs repair, a circuit diagram can be invaluable. It allows you to trace the signal path and identify any potential issues or faulty components. With a clear understanding of the circuit, troubleshooting and repairing becomes much easier and more efficient.
Overall, using a guitar pedal circuit diagram in your DIY projects provides precision, saves time and effort, opens up customization possibilities, and aids in troubleshooting and repair. It is an essential tool that every DIY pedal builder should have in their arsenal.
Understanding the Basics of a Guitar Pedal Circuit Diagram
A guitar pedal circuit diagram is a visual representation of the electrical components and connections used in a guitar effects pedal. It is an essential tool for understanding how the pedal works and for troubleshooting and modifying it.
Components: The circuit diagram typically includes various components such as resistors, capacitors, transistors, diodes, and integrated circuits. Each component plays a specific role in shaping the guitar’s signal and creating the desired effect.
Signal Path: The diagram shows the signal path, which is the path the audio signal takes from the input to the output of the pedal. It illustrates how the signal is processed and affected by the different components in the circuit.
Power Supply: The circuit diagram also includes information about the power supply for the pedal. It shows how the pedal is powered, whether it is through a battery or an external power source, and how the power is distributed to the various components.
Connections: The diagram displays the connections between the components using lines and symbols. It shows how the components are connected to each other and to the input and output jacks of the pedal. Understanding these connections is crucial for troubleshooting and modifying the pedal.
Schematic Symbols: The circuit diagram uses various schematic symbols to represent different components and their functions. Understanding these symbols is essential for interpreting the diagram correctly.
Overall, a guitar pedal circuit diagram provides a detailed and visual representation of the pedal’s internal workings. It allows guitarists and technicians to understand how the pedal functions and to make modifications or diagnose and fix any issues that may arise. Whether you’re a beginner learning about pedal circuits or an experienced guitarist looking to modify your effects, understanding the basics of a guitar pedal circuit diagram is essential.
Components and Their Functions in a Guitar Pedal Circuit Diagram
In a guitar pedal circuit diagram, various components are used to shape and modify the audio signal from the guitar. Each component plays a specific role in the overall functionality of the pedal. Understanding these components and their functions is essential for designing and troubleshooting guitar pedals.
1. Input Jack
The input jack is where the guitar signal is connected to the pedal. It allows the guitarist to plug their instrument into the pedal and start the signal flow. The input jack is typically a 1/4″ mono connector.
2. Gain Stage
The gain stage is responsible for amplifying the guitar signal. It is usually achieved using a transistor or an op-amp, which boosts the signal’s amplitude. The gain stage can be adjusted to achieve different levels of distortion or overdrive.
3. Tone Control
The tone control circuit is used to shape the frequency response of the pedal. It typically consists of a potentiometer (knob) and a capacitor. By adjusting the tone control, the guitarist can increase or decrease the amount of high frequencies in the signal, allowing for tonal customization.
4. Effect Circuit
The effect circuit is where the magic happens. It can be a variety of circuits depending on the type of effect pedal, such as a distortion, delay, or modulation circuit. This circuit modifies the audio signal in a specific way to achieve the desired effect.
5. Output Jack
The output jack is where the modified signal leaves the pedal and is sent to an amplifier or another pedal in the signal chain. Similar to the input jack, it is usually a 1/4″ mono connector.
These components work together in a guitar pedal circuit diagram to create the desired guitar effects. By understanding their functions, one can design and modify guitar pedals to achieve specific sonic characteristics.
Step-by-Step Guide to Building a Guitar Pedal Circuit
If you’re a guitar player looking to add some new sounds to your arsenal, building your own guitar pedal circuit can be a rewarding and creative project. With a basic understanding of electronics and some soldering skills, you can create a custom pedal to suit your own unique style. In this guide, we will walk you through the process of building a guitar pedal circuit step-by-step.
Step 1: Gather the Necessary Components
The first step in building a guitar pedal circuit is to gather all the necessary components. These include resistors, capacitors, transistors, diodes, op-amp chips, potentiometers, jacks, switches, and a circuit board. You can find these components at your local electronics store or order them online. Make sure to check the specifications and ratings of each component to ensure they are compatible with your project.
Step 2: Design the Circuit
Once you have all the components, it’s time to design the circuit. You can find guitar pedal circuit diagrams online or design your own. This diagram will show you how the components should be connected to create the desired effect. It’s important to carefully plan and double-check your circuit design to avoid any mistakes.
Step 3: Solder the Components
With the circuit design in hand, it’s time to start soldering the components onto the circuit board. Begin by placing the resistors and capacitors in their designated spots and solder them in place. Be sure to trim off any excess leads. Then, solder the transistors, diodes, op-amp chips, potentiometers, jacks, and switches according to the circuit diagram. Take your time and double-check your soldering to ensure solid connections.
Step 4: Test and Troubleshoot
Once all the components are soldered, it’s time to test the circuit and troubleshoot any issues. Connect your guitar and amplifier to the circuit and test it out. Check for any unwanted noise, distortion, or signal loss. Use a multimeter to check for any shorts or open circuits. If you encounter any problems, carefully retrace your steps and inspect the soldering for any mistakes or loose connections.
Step 5: Enclose the Circuit
After you have successfully tested and troubleshooted the circuit, it’s time to enclose it. This can be done using a sturdy enclosure, such as a metal or plastic pedal case. Drill holes for the jacks, switches, and knobs, and mount them securely. Make sure to provide proper grounding and shielding to prevent any interference. Finally, close the enclosure and secure it with screws.
By following this step-by-step guide, you can easily build your own guitar pedal circuit and unleash your creativity. Experiment with different components and circuit designs to create unique sounds and effects. Enjoy the satisfaction of playing through a pedal that you built yourself!
Troubleshooting Common Issues in Guitar Pedal Circuits
When it comes to building or repairing guitar pedal circuits, it’s not uncommon to encounter issues along the way. These issues can range from simple connectivity problems to more complex component failures. Troubleshooting these problems requires a systematic approach and a good understanding of circuit design and operation. Here are some common issues you might come across and how to troubleshoot them:
No sound or weak signal:
If you find that your guitar pedal is not producing any sound or the signal is weak, there could be several causes. Firstly, check all the connections in the circuit to ensure that everything is properly connected. Pay close attention to the input and output jacks, as well as the connection between the guitar and the pedal. If the connections are fine, the problem could be with the components themselves. Start by testing the transistors and capacitors, as these are often the culprits in signal loss issues. Replace any faulty components and retest the circuit to see if the problem is resolved.
Noisy or distorted signal:
If you’re experiencing excessive noise or distortion in your guitar pedal’s signal, it could be due to a few different factors. First, check for any loose connections or bad solder joints, as these can introduce noise into the circuit. Make sure all components are securely soldered in place. If the connections are fine, the issue may be with the grounding in the circuit. Check that the ground connections are solid and that there are no ground loops causing noise. Additionally, faulty capacitors or op-amps can also cause distortion. Test these components and replace any that are not functioning properly.
Power issues:
Power problems are another common issue in guitar pedal circuits. If your pedal is not turning on or the LED indicator is not lighting up, check the power supply connections. Ensure that the correct voltage and polarity are being supplied to the circuit. If the power supply connections are fine, the issue may be with the power filtering circuitry. Test the capacitors and diodes in the power section of the circuit and replace any faulty components. It’s also worth checking the power switch itself to ensure it is functioning properly.
By following these troubleshooting steps, you’ll be able to diagnose and resolve common issues in guitar pedal circuits. Remember to double-check all connections and test components thoroughly to ensure the best performance from your pedal.
Enhancing Sound Quality with Guitar Pedal Circuit Modifications
Guitar pedals are an integral part of a musician’s toolkit, allowing them to shape and manipulate their tone to create unique sounds. While off-the-shelf pedals can offer a wide range of effects, many players prefer to customize their pedals by modifying the circuitry. These modifications can enhance the sound quality and provide a more personalized tone.
One popular modification is changing the op-amp within the pedal. The op-amp is responsible for amplifying the guitar signal, and by selecting a higher-quality op-amp, the overall sound quality can be improved. This can result in a clearer and more transparent tone, with increased dynamics and better fidelity.
Another circuit modification that can enhance sound quality is the addition of a buffer. A buffer is a unity gain amplifier that ensures the signal remains strong and unaffected by any impedance mismatch between the guitar and pedal. By adding a buffer to the input or output stage of a pedal, the tonal loss and signal degradation that can occur when connecting multiple pedals together in a signal chain can be minimized. This can result in a more balanced and consistent tone.
Furthermore, adjusting the values of certain components within the pedal circuit, such as resistors and capacitors, can also have an impact on the sound quality. Changing the values can alter the frequency response of the pedal, allowing for more control over the tone shaping. This can be particularly useful for achieving specific desired sounds or emulating the characteristics of vintage pedals.
In conclusion, modifying the circuitry of guitar pedals can significantly enhance the sound quality and provide a personalized tone. By changing the op-amp, adding a buffer, or adjusting component values, players can achieve a clearer, more dynamic, and balanced tone that suits their individual preferences. It is important, however, to have some knowledge of electronics and to exercise caution when making these modifications to ensure the pedal remains functional and safe to use.
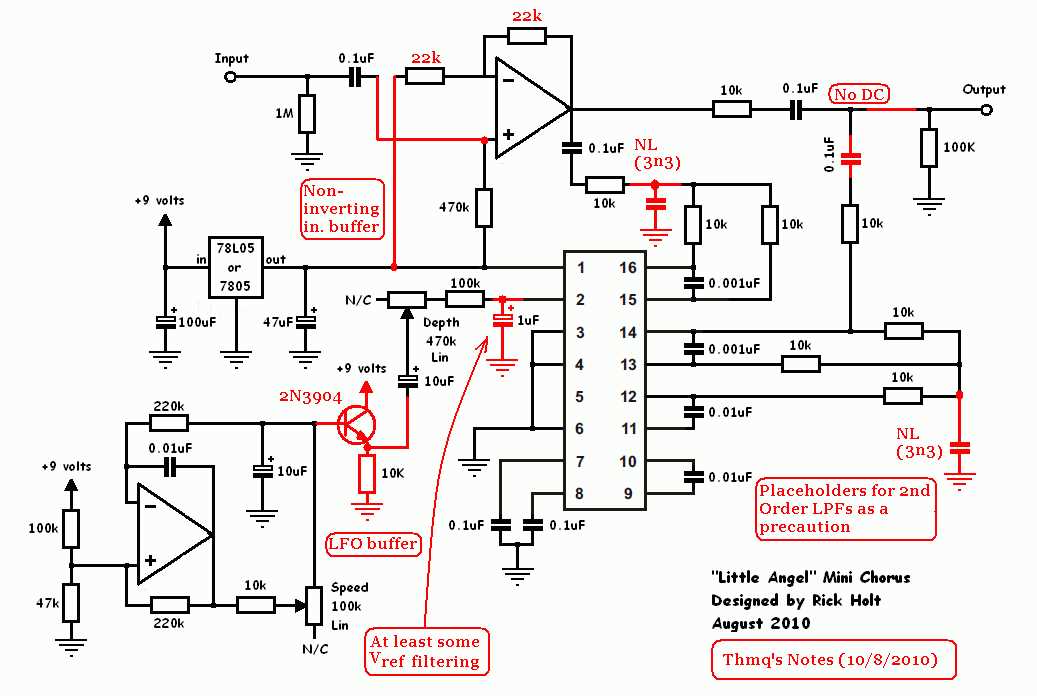
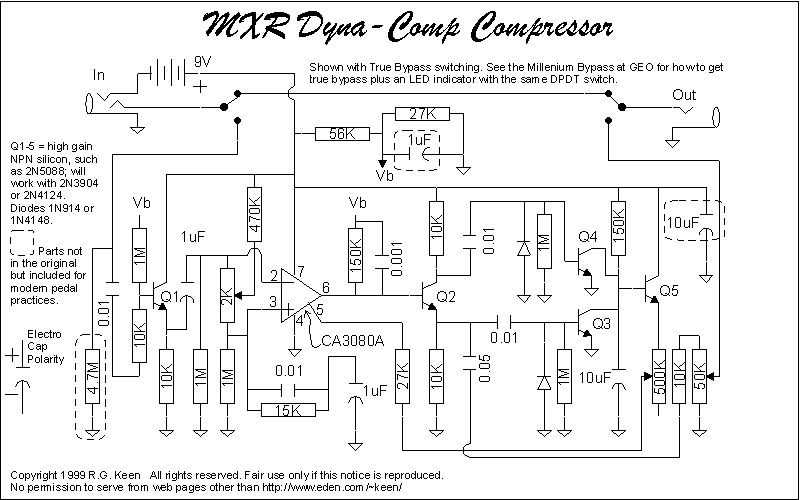
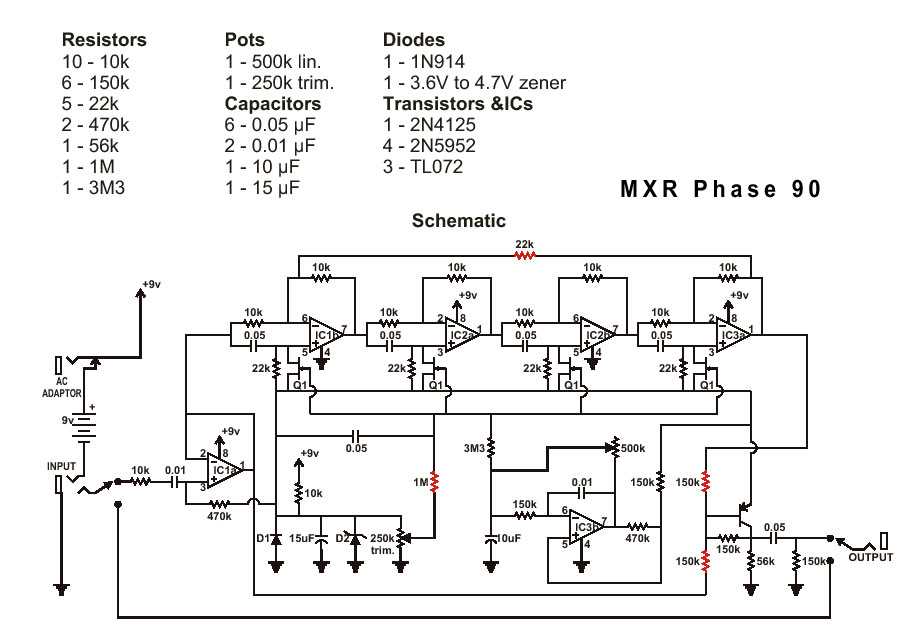
Popular Guitar Pedal Circuit Diagrams for Different Genres

In the world of guitar effects pedals, there are countless circuit diagrams available for musicians to explore and experiment with. These diagrams provide a blueprint for building or modifying guitar pedals to achieve different sounds and tones. Each genre of music often has its own set of popular pedal circuit diagrams that musicians use to create the desired effect. Here are a few examples:
1. Blues Circuit Diagram:
Tube Screamer Circuit
This circuit diagram is synonymous with blues guitarists, as it is known for its warm overdrive and mid-range boost. The Tube Screamer circuit is commonly used to recreate the classic blues tone of artists like Stevie Ray Vaughan and Eric Clapton.
2. Rock Circuit Diagram:
Big Muff Pi Circuit
The Big Muff Pi circuit is a staple in rock music, known for its heavy distortion and sustain. It has been used by iconic rock guitarists such as David Gilmour and Jimi Hendrix. The circuit diagram allows musicians to achieve that signature wall of fuzz and sustain associated with rock music.
3. Metal Circuit Diagram:
Metal Zone Circuit
The Metal Zone circuit diagram is a favorite among metal guitarists, offering high-gain distortion and powerful tone shaping capabilities. This circuit is often used to achieve the aggressive and heavily distorted sound heard in genres like heavy metal and thrash metal.
4. Ambient Circuit Diagram:
Delay and Reverb Circuit
Ambient music often relies on lush and atmospheric soundscapes. A combination of delay and reverb circuits allows guitarists to create expansive and ethereal tones. These circuits can be used to add depth and create a sense of space in the music.
These are just a few examples of the popular circuit diagrams used in different genres of music. It’s important to note that musicians often customize and modify these circuits to suit their own preferences and create unique sounds. Whether you’re a blues guitarist looking for creamy overdrive, a metal shredder in search of bone-crushing distortion, or an ambient musician aiming for ethereal tones, there’s a circuit diagram out there to help you achieve your desired sound.