
When it comes to customizing a Harley Davidson motorcycle, one of the most popular modifications is upgrading the handlebars. With a new set of handlebars, riders can enhance their riding experience and add a unique touch to their bike. However, installing new handlebars often involves rewiring the controls and switches, which can be a daunting task for many riders. That’s where a handlebar wiring diagram for Harley Davidson comes in handy.
A handlebar wiring diagram is a detailed schematic that illustrates the electrical connections and components of the handlebar controls. It provides riders with a clear understanding of where each wire should be connected, ensuring a proper and safe installation. Whether you’re a seasoned DIY mechanic or a beginner, having a handlebar wiring diagram will make the installation process easier and more efficient.
Harley Davidson handlebar wiring diagrams can vary depending on the year and model of the bike, as well as the specific handlebars being installed. They typically include information about the wire colors, connector types, and switch functions. By following the diagram, riders can confidently disassemble and reassemble the control switches, ensuring that everything is correctly wired.
In this comprehensive guide, we will explore the importance of a handlebar wiring diagram for Harley Davidson, discuss the different components and connections found in the diagram, and provide step-by-step instructions on how to properly install new handlebars with the help of a wiring diagram. Whether you’re looking to upgrade your handlebars for better ergonomics or to achieve a specific aesthetic, understanding the wiring diagram is a crucial part of the installation process. Let’s dive in and unravel the world of Harley Davidson handlebar wiring!
Understanding the Harley Davidson Handlebar Wiring Diagram
When it comes to working on your Harley Davidson motorcycle, understanding the handlebar wiring diagram is essential. The wiring diagram provides a visual representation of the electrical system and connections for the handlebar controls, allowing you to troubleshoot and repair any issues that may arise.
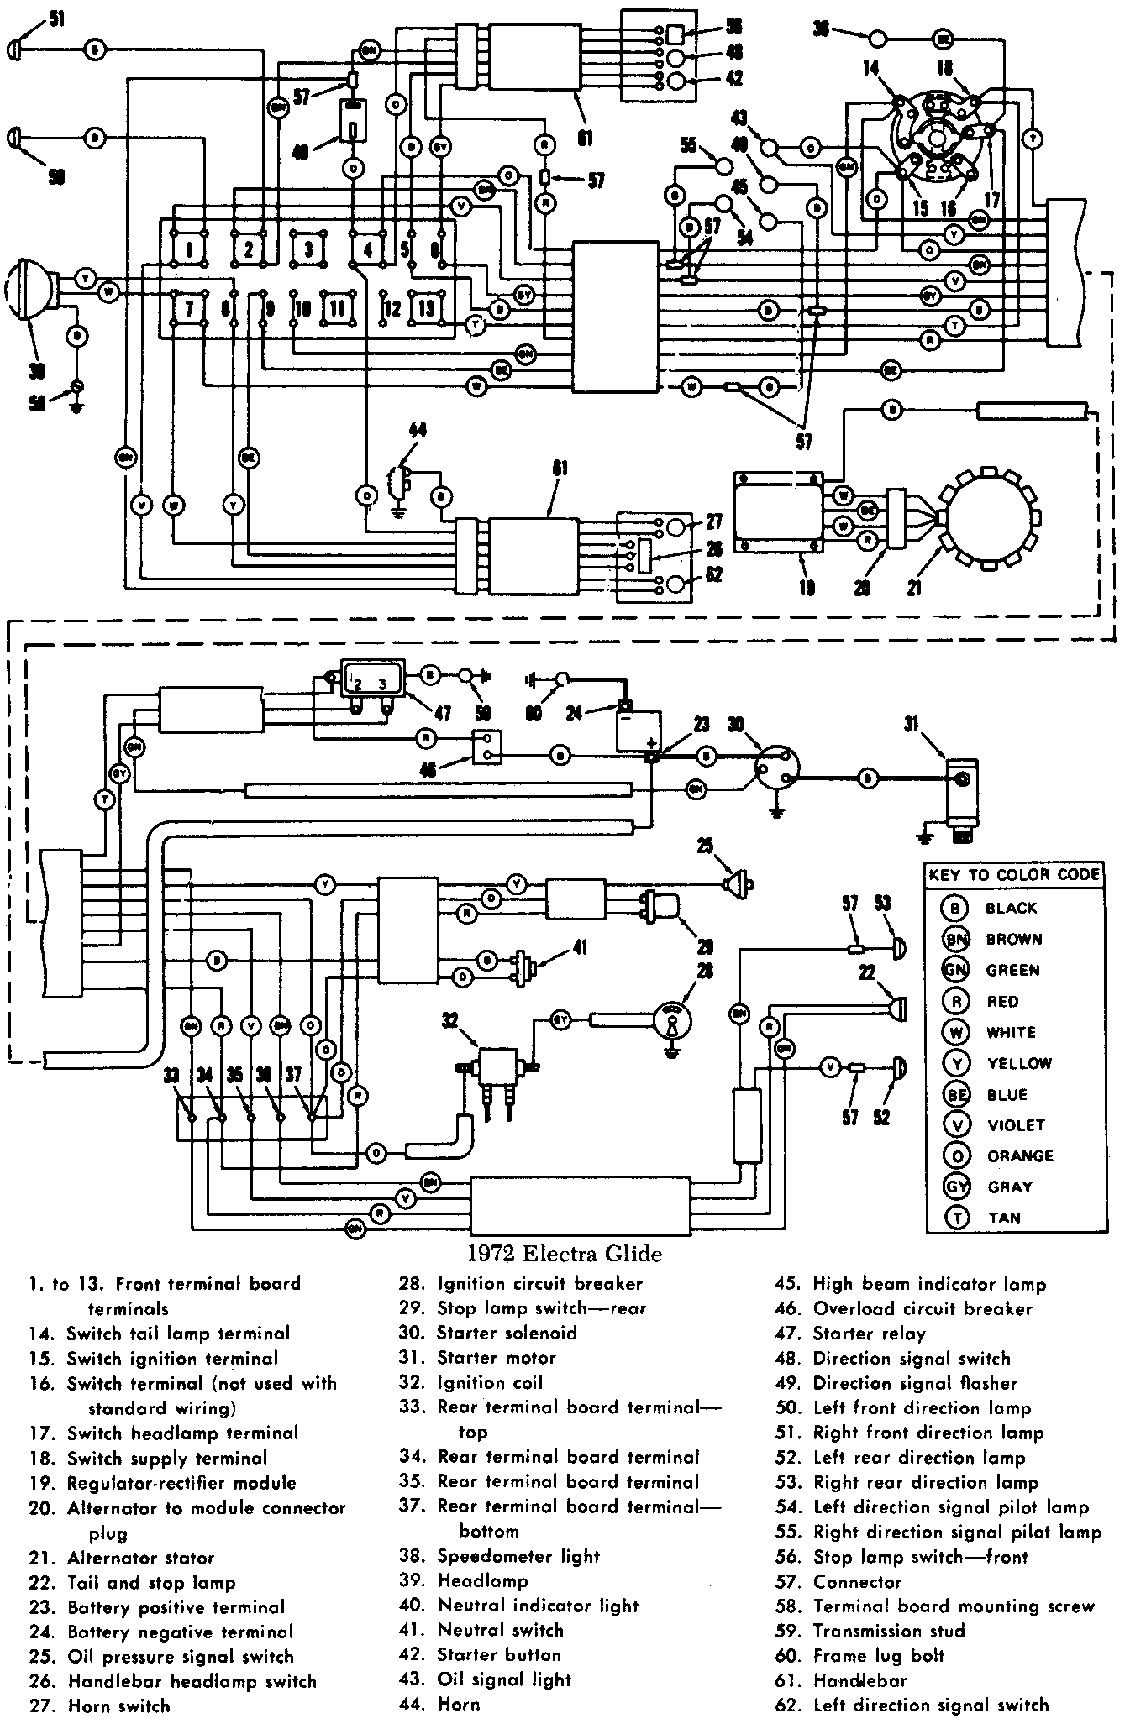
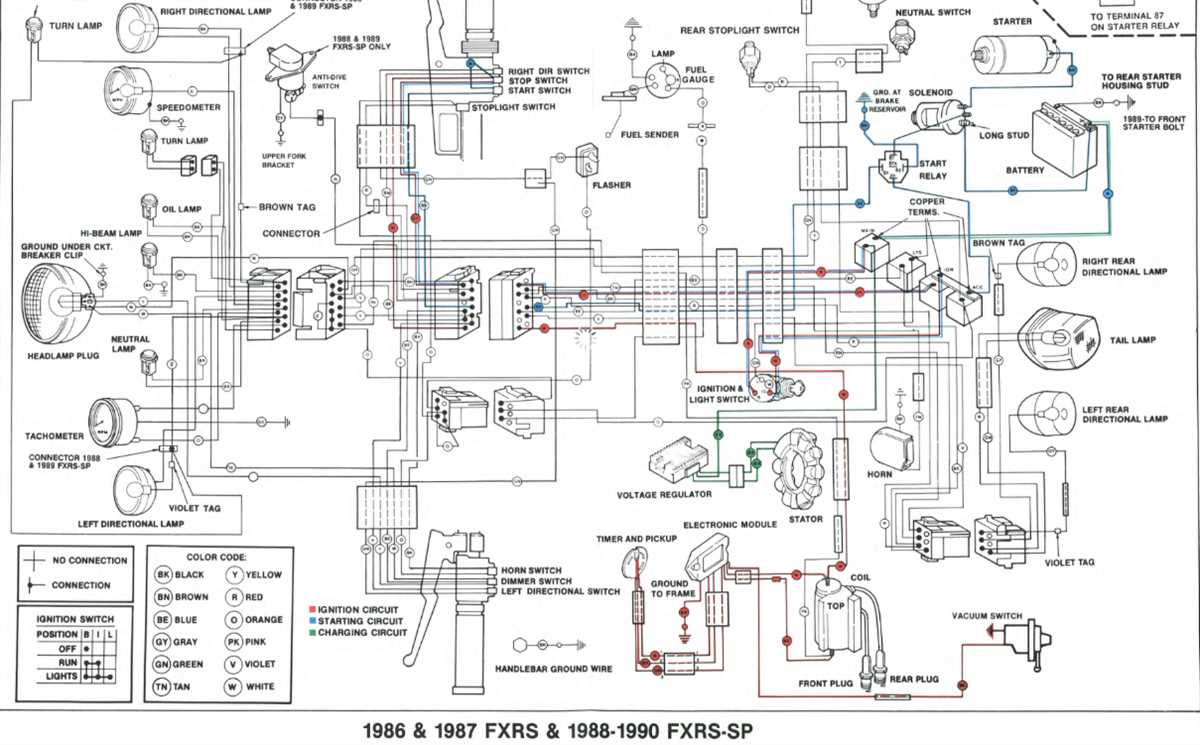
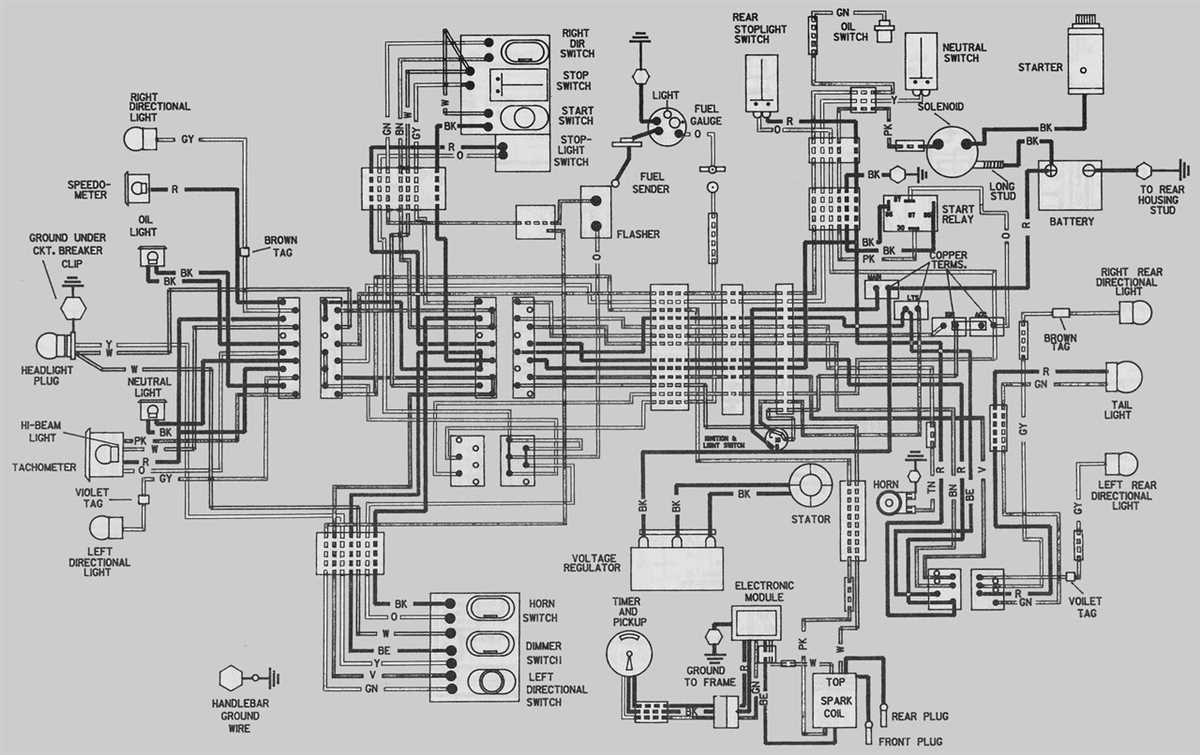
Key Components: The handlebar wiring diagram typically includes various key components such as the ignition switch, starter relay, turn signal module, handlebar control switches, and various connectors. Each component is labeled and connected with lines to show their relationship and electrical connections.
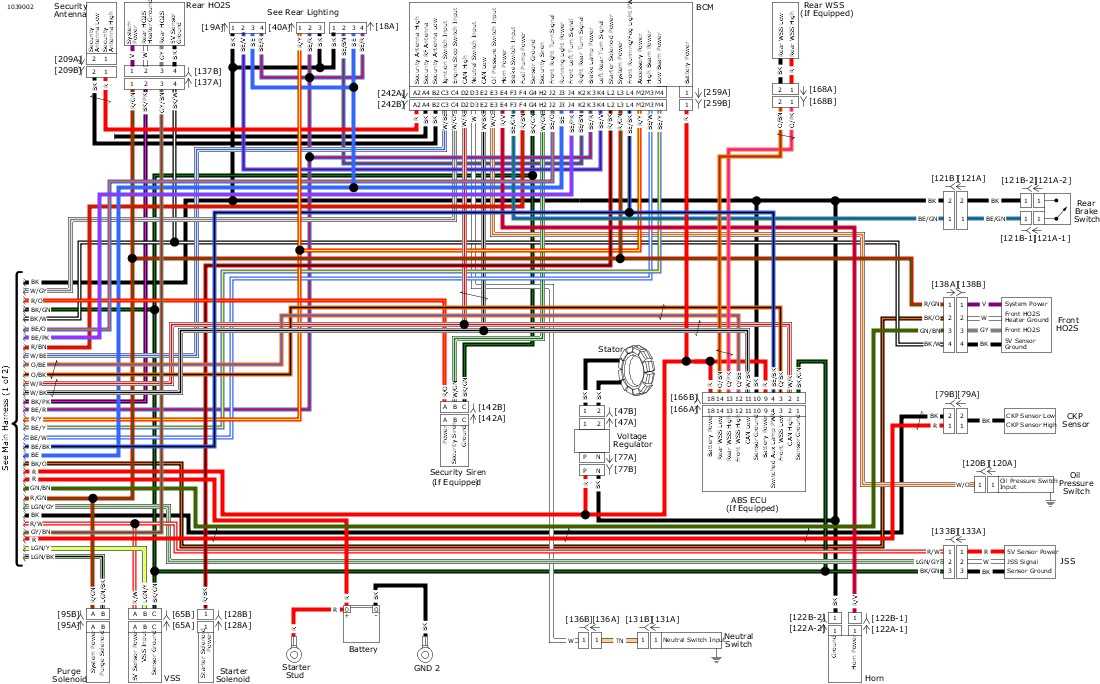
Color Codes: One important aspect of the handlebar wiring diagram is the color coding system. Each wire is assigned a specific color to indicate its purpose and function. For example, black wires are commonly used for grounding, while red wires are often used for power supply. Understanding the color codes will help you easily identify and trace the wires during troubleshooting or modification.
Wire Routes: The handlebar wiring diagram also shows the routes of the wires, indicating where they should be routed through the motorcycle’s frame and other components. This information is crucial when installing or replacing handlebar controls and accessories, as it ensures that the wires are properly secured and protected from damage.
Switch Functions: The handlebar control switches are responsible for various functions such as activating the headlights, turn signals, horn, and other electrical components. The handlebar wiring diagram indicates which wires are connected to each switch position, allowing you to understand how each control affects the electrical system.
Modifications: If you are planning to modify or customize your Harley Davidson’s handlebar controls or add aftermarket accessories, the wiring diagram will be a valuable resource. By referring to the diagram, you can easily identify and tap into the appropriate wires without causing any damage to the electrical system.
Overall, understanding the Harley Davidson handlebar wiring diagram is essential for any motorcycle owner or enthusiast. It provides a detailed overview of the electrical system, helping you troubleshoot issues, make modifications, and ensure that your bike’s wiring is properly connected and functioning.
Components of a Harley Davidson Handlebar Wiring Diagram
A Harley Davidson handlebar wiring diagram is a detailed schematic that outlines the electrical connections and components of the handlebar control system on a Harley Davidson motorcycle. It provides a visual representation of how the various wires, switches, and controls are connected, allowing technicians and DIY enthusiasts to troubleshoot and repair any electrical issues that may arise.
There are several key components that can be found in a typical Harley Davidson handlebar wiring diagram:
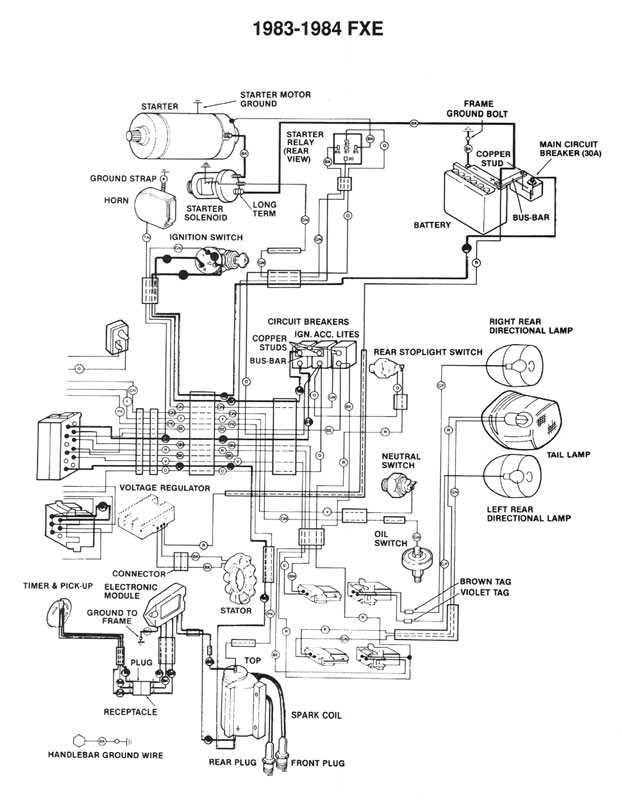
- Ignition switch: This switch is usually located on the right side of the handlebar and is used to turn the motorcycle’s electrical system on and off. It is connected to the battery and acts as a control point for powering the bike.
- Start button: The start button, also known as the starter switch, is used to engage the motorcycle’s starter motor and start the engine. It is typically located on the right handlebar and is connected to the ignition switch and starter motor.
- Turn signal and horn switches: These switches are used to activate the turn signals and horn on the motorcycle. They are typically located on the left handlebar and are connected to the turn signal lights and horn.
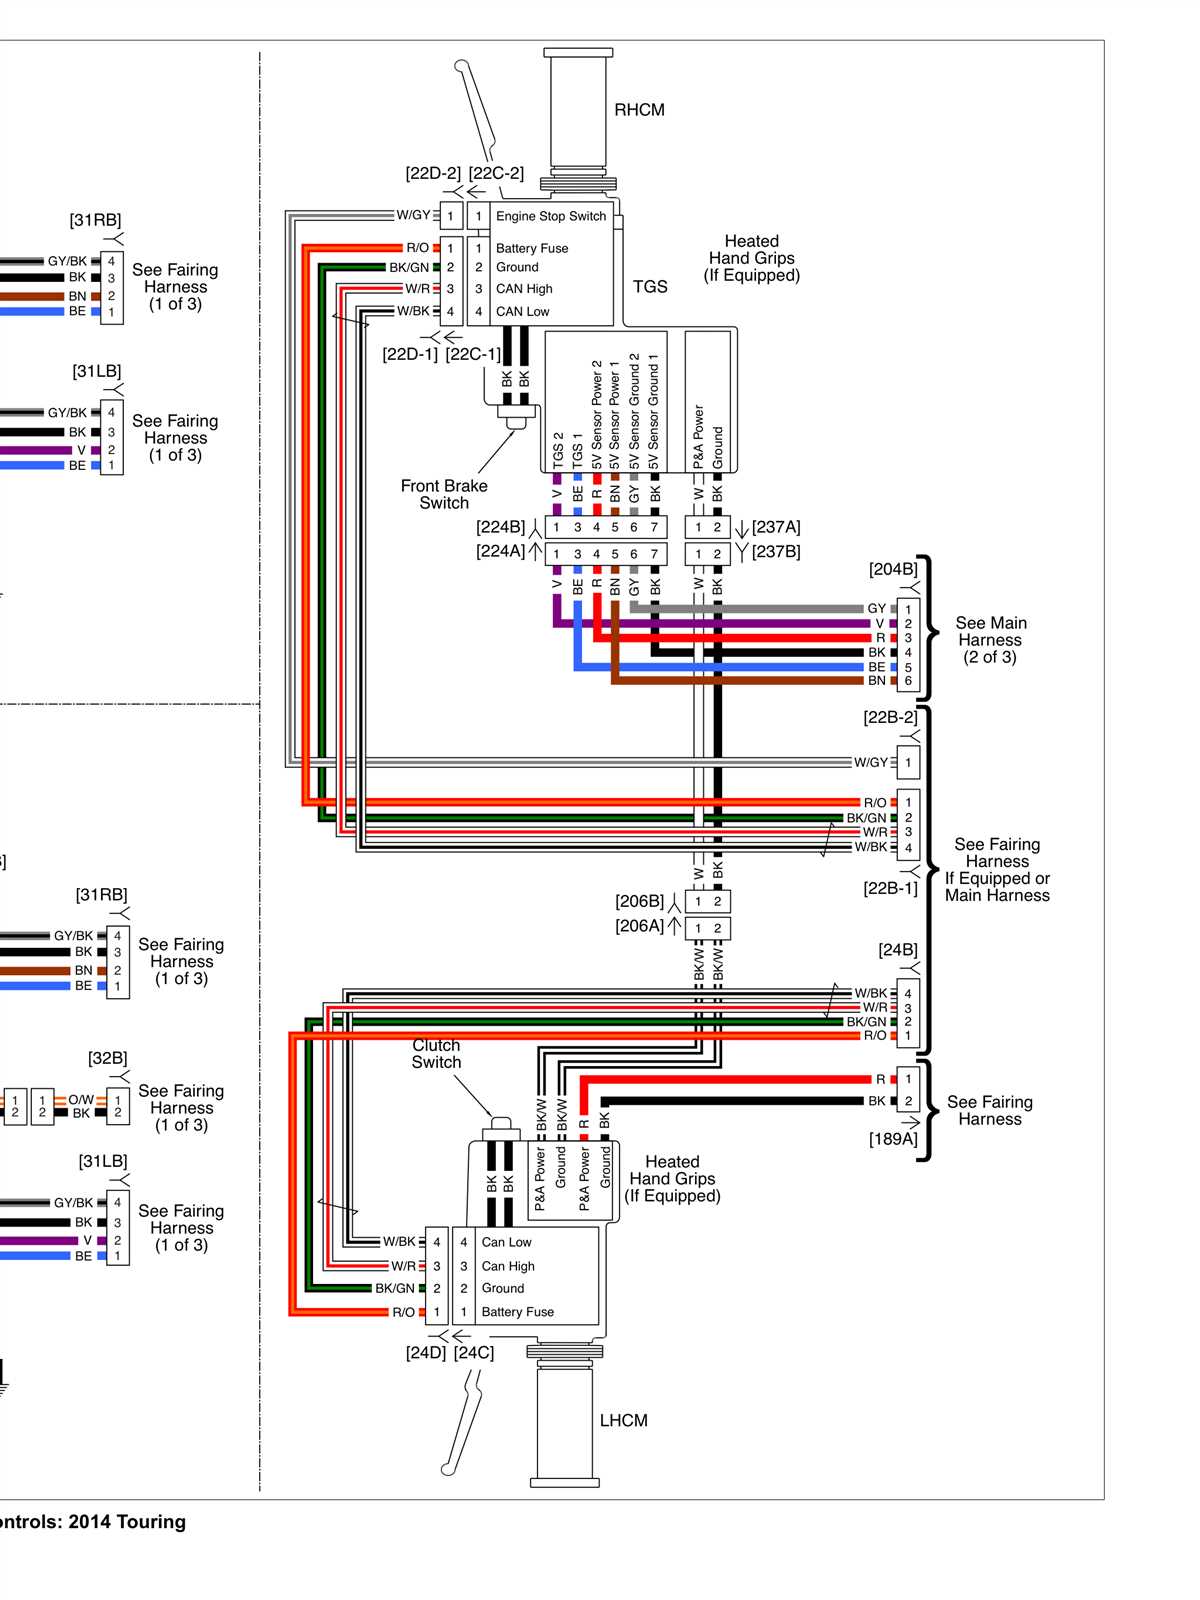
- Handlebar controls: Depending on the model of the Harley Davidson motorcycle, there may be additional controls on the handlebars such as audio controls, cruise control, or accessory switches. These controls will be included in the handlebar wiring diagram and connected to their respective components.
- Wiring harnesses and connectors: The handlebar wiring diagram will also show the various wiring harnesses and connectors that connect the different components together. These harnesses and connectors ensure proper electrical connections and allow for easy removal and replacement of components.
Overall, a Harley Davidson handlebar wiring diagram is an essential tool for understanding and troubleshooting the electrical system of a Harley Davidson motorcycle. It provides a detailed overview of the different components and how they are connected, allowing for efficient repairs and maintenance.
Step-by-Step Guide to Reading a Harley Davidson Handlebar Wiring Diagram
Reading a Harley Davidson handlebar wiring diagram can seem daunting at first, but with a step-by-step approach, it can be easily understood. These diagrams are essential for troubleshooting and making modifications to your motorcycle’s handlebar wiring system. Here is a guide to help you navigate through a Harley Davidson handlebar wiring diagram.
Step 1: Identify the Components

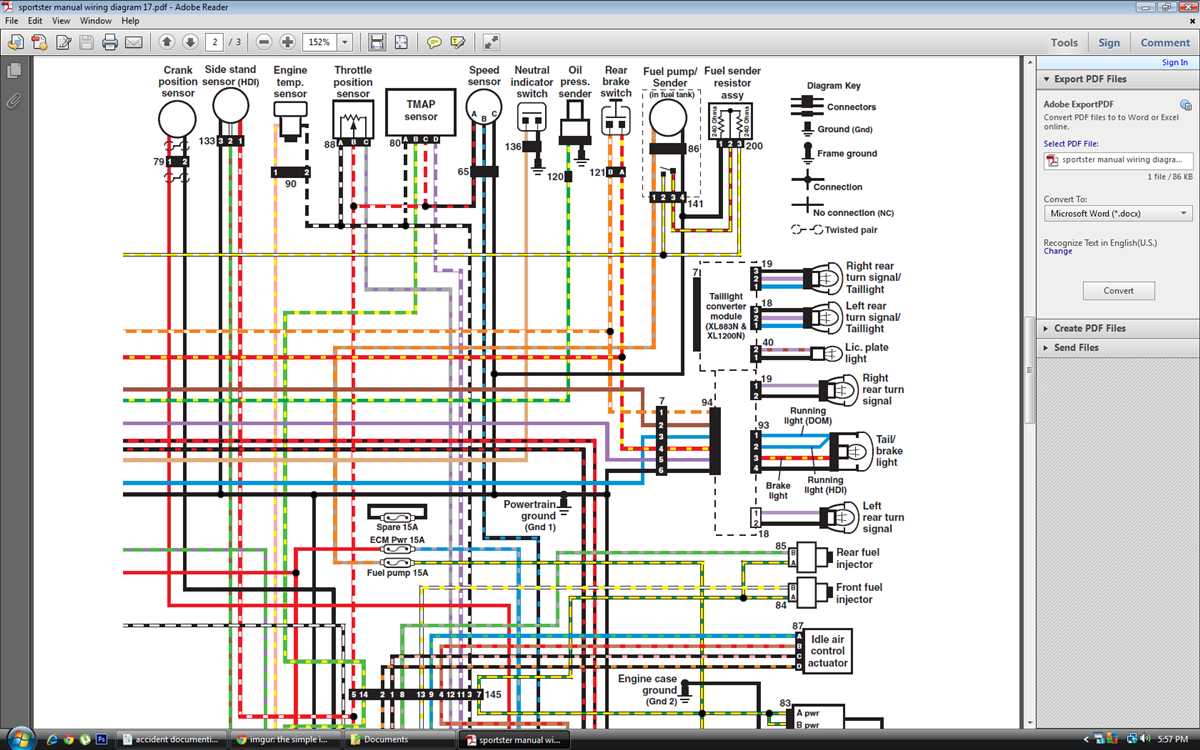
Start by familiarizing yourself with the different components shown in the diagram. These may include switches, connectors, lights, fuses, and other electrical elements specific to your handlebar setup. Each component will be represented by a symbol or icon, which should be referenced in the diagram’s legend or key.
Step 2: Follow the Path of Wiring

Trace the wiring path from one component to another, following the lines in the diagram. Pay attention to the direction of the arrows or lines, as they indicate the flow of electrical current. Make note of any branch points or connections along the way, as these will be important for understanding how the components are interconnected.
Step 3: Interpret Color Codes and Labels
Harley Davidson handlebar wiring diagrams often include color codes and labels to help identify wires and their functions. Refer to the legend or key to understand what each color or label represents. This information will be crucial for diagnosing issues or making modifications to your handlebar wiring system.
Step 4: Understand the Wiring Diagram Symbols
Wiring diagrams use symbols or icons to represent different components and electrical connections. Take the time to familiarize yourself with these symbols, as they will appear throughout the diagram. Common symbols include arrows for electrical current flow, dots for wire connections, and squares for electrical switches or control devices.
Step 5: Refer to the Wiring Schematic
If your handlebar wiring diagram includes a wiring schematic, use it to gain a more detailed understanding of the electrical connections. The schematic will show the actual physical layout of the wires and how they are connected, providing a clearer picture of the wiring system.
By following this step-by-step guide, you will be able to effectively read a Harley Davidson handlebar wiring diagram and confidently troubleshoot any issues or make modifications to your motorcycle’s handlebar wiring system.
Common Issues with Harley Davidson Handlebar Wiring
Harley Davidson motorcycles are known for their unique design and customization options, including the handlebars. However, the wiring in the handlebars can sometimes become a source of frustration for riders. Here are some common issues that riders may encounter with Harley Davidson handlebar wiring:
1. Frayed or Damaged Wiring
One of the most common issues with handlebar wiring is fraying or damage to the wires themselves. This can occur over time due to wear and tear, as well as improper installation or routing of the wiring. Frayed or damaged wiring can lead to electrical shorts, loss of power to certain components, or even complete failure of the electrical system.
2. Incorrect Wiring Connections
Another common issue is incorrect wiring connections. This can happen when riders attempt to install new handlebars or make modifications to the existing wiring. Failing to properly connect the wires can result in poor electrical conductivity, which can lead to issues such as malfunctioning turn signals or non-responsive controls.
3. Pinched or Chafed Wiring
Pinched or chafed wiring is another issue that can occur with Harley Davidson handlebars. When the wiring is not properly routed or secured, it can get pinched between the handlebar and other components, or chafed against sharp edges. This can cause the insulation to wear off, exposing the wires and increasing the risk of electrical shorts or failures.
4. Loose or Corroded Connections
Over time, the connections between the wiring and the various electrical components on the motorcycle can become loose or corroded. This can result in intermittent electrical issues, such as flickering lights or intermittent power to certain components. Regular maintenance and inspection of the connections is important to prevent these issues.
In conclusion, while Harley Davidson handlebar wiring allows for customization and personalization, it can also present challenges for riders. It is important to properly install and maintain the wiring to prevent issues such as frayed or damaged wiring, incorrect connections, pinched or chafed wiring, and loose or corroded connections. Routine inspection and maintenance of the handlebar wiring can help ensure a smooth and reliable electrical system on your Harley Davidson motorcycle.
Tips for Maintaining and Troubleshooting Harley Davidson Handlebar Wiring
In order to keep your Harley Davidson handlebar wiring in good condition, it is important to perform regular maintenance and troubleshooting. Here are some tips to help you maintain and troubleshoot the wiring system:
Regular Inspection:
Regularly inspect the handlebar wiring system for any signs of wear, damage, or loose connections. Look for frayed wires or damaged insulation that can cause electrical problems. Make sure all connectors are securely fastened and there are no loose or corroded terminals.
Proper Routing:
Ensure that the wiring is properly routed to avoid any interference with other components or moving parts. Improperly routed wiring can get pinched, pulled, or damaged, leading to electrical issues. Make sure the wiring is secured using zip ties or clips to prevent any movement or vibration.
Correct Installation:
During installation or modification of handlebars, make sure to follow the manufacturer’s instructions and use the correct wiring diagrams. Incorrect installation can result in short circuits or malfunctioning electrical components. Use the proper gauge and type of wires to handle the current load and avoid overheating or voltage drops.
Use Dielectric Grease:
Apply dielectric grease to all electrical connections to protect against moisture, corrosion, and dirt. This will help maintain a good electrical connection and prevent oxidation or degradation of the connectors. Make sure to clean the connectors before applying the grease.
Troubleshooting:
If you experience any electrical issues with your handlebar wiring, start by checking the battery voltage, fuses, and relays. Inspect the wiring for any visible damage or loose connections. Use a multimeter to test the continuity and resistance of the wires and connectors. Refer to the wiring diagram for your specific Harley Davidson model to identify any potential issues. If you are unsure or unable to identify the problem, consult a professional mechanic or electrician.
Conclusion:
Maintaining and troubleshooting Harley Davidson handlebar wiring is essential for the overall performance and safety of your motorcycle. Regular inspection, proper routing, correct installation, and the use of dielectric grease will help prevent electrical issues and ensure a reliable electrical system. If you encounter any problems, it is recommended to seek professional assistance to avoid further damage or potential safety hazards.