
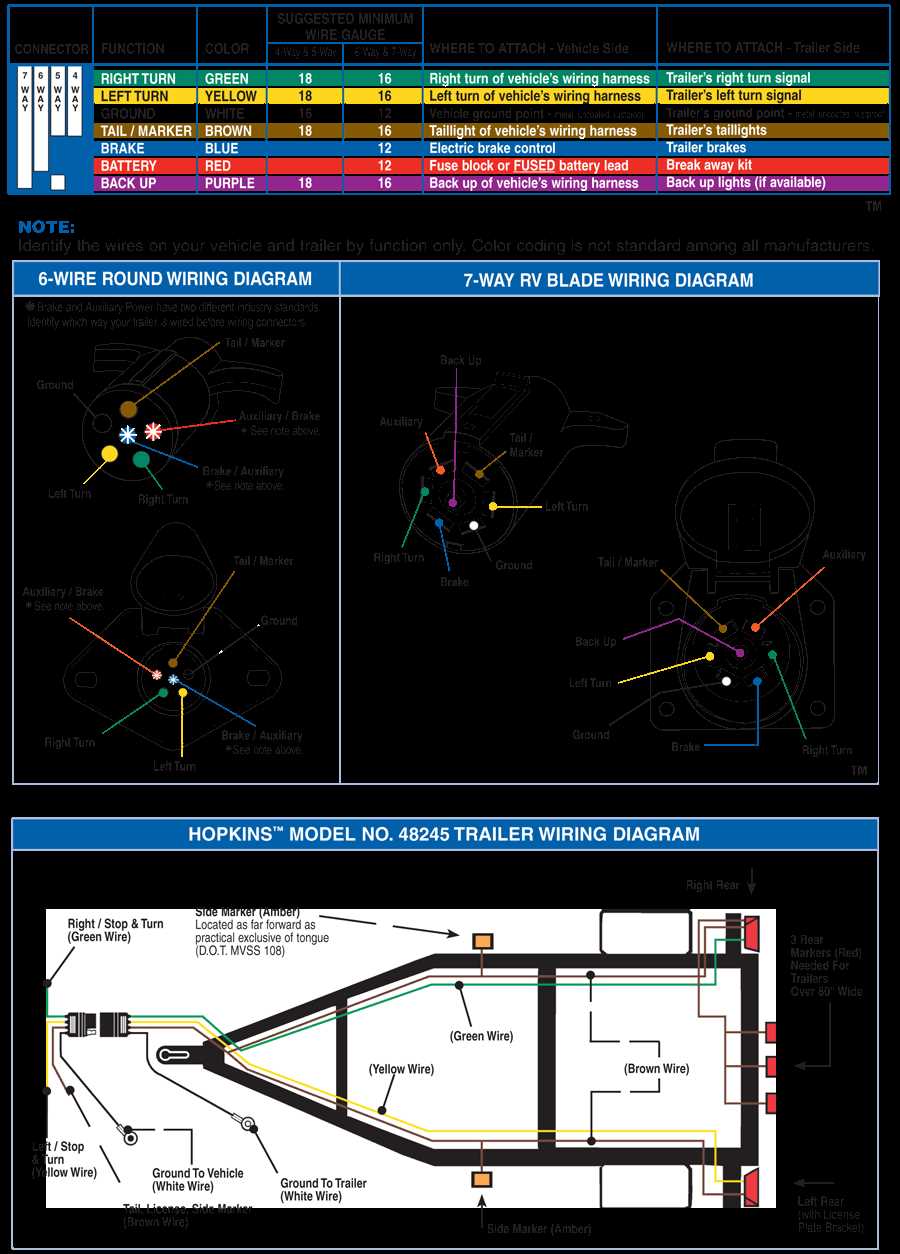
If you’re looking to connect your trailer to your vehicle’s electrical system, a 7-way plug is essential. The 7-way plug allows for the connection of all the necessary electrical components of your trailer, including the lights, brakes, and auxiliary power. Hopkins is a trusted brand when it comes to trailer connectors, and their 7-way plug is known for its durability and reliability.
Before you can start connecting the wires of your Hopkins 7-way plug, it’s important to understand the wiring diagram. The diagram provides a visual representation of how each wire should be connected, making the installation process much easier. It shows which wire should be connected to which function on both the trailer and the vehicle.
The Hopkins 7-way plug wiring diagram consists of seven different wires, each color-coded for easy identification. These wires include the ground wire (white), tail lights wire (brown), left turn wire (yellow), brake wire (blue), battery wire (black), right turn wire (green), and auxiliary wire (red). By following the diagram and properly connecting these wires, you can ensure that your trailer’s electrical system works correctly and efficiently.
Whether you’re a seasoned trailer owner or just starting out, having a reliable wiring diagram is crucial. It simplifies the installation process and helps avoid any potential wiring mistakes that could lead to electrical issues down the line. With the Hopkins 7-way plug wiring diagram, you can confidently connect your trailer to your vehicle and enjoy your travels with peace of mind.
What is a 7-way plug?
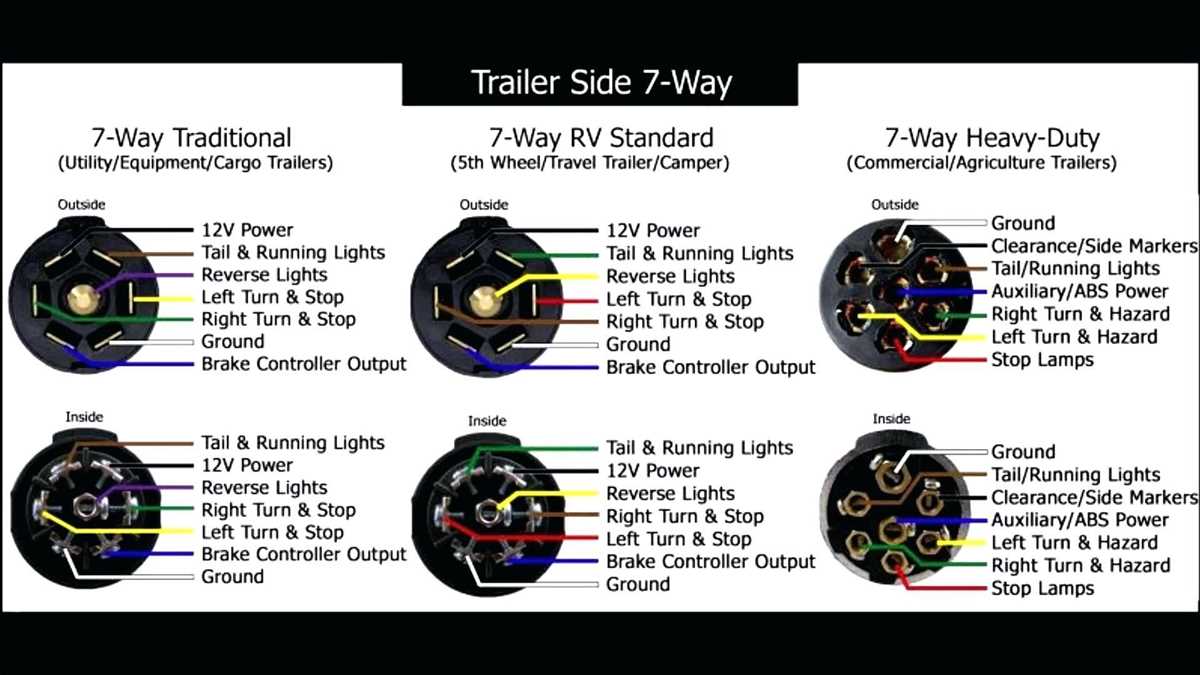
A 7-way plug is a type of electrical connector used for connecting a trailer to a tow vehicle. It is also known as a 7-pin plug or a 7-pin trailer connector. The 7-way plug provides electrical connections for several different functions, including tail lights, brake lights, turn signals, electric brakes, and auxiliary power.
A 7-way plug typically consists of seven pins or blades that are used to transmit electrical signals between the trailer and the tow vehicle. Each pin is assigned a specific function, and the correct wiring of the plug is crucial for proper electrical operation.
The 7-way plug is commonly used for towing a wide range of trailers, including utility trailers, horse trailers, boat trailers, and RV trailers. It allows the tow vehicle to power and control the various electrical components of the trailer, ensuring safe and reliable operation on the road.
When connecting a trailer to a tow vehicle, it is important to match the wiring of the 7-way plug to the corresponding wiring on both the trailer and the tow vehicle. This is where a Hopkins 7-way plug wiring diagram can be useful. The diagram provides a visual representation of the correct wiring configuration, making it easier to ensure a proper connection and avoid electrical issues.
In conclusion, a 7-way plug is an essential component for towing a trailer, providing the necessary electrical connections for various functions. Understanding the wiring and using a wiring diagram can help ensure a successful and safe towing experience.
Why do you need a wiring diagram for a 7-way plug?

When it comes to towing trailers or other heavy-duty equipment, it is crucial to have a well-functioning electrical connection between your vehicle and the trailer. A 7-way plug is commonly used for this purpose, as it provides the necessary connections for a range of functions such as brake lights, turn signals, and power supply. However, due to the complexity of the wiring system, it is important to have a wiring diagram to ensure proper installation and troubleshooting.
A wiring diagram for a 7-way plug serves as a visual representation of the electrical connections and circuits involved. It shows the different pins within the plug and how they should be connected to the corresponding wires. This diagram helps to clarify the wiring scheme and ensures that the correct wires are connected to the appropriate functions on both the vehicle and the trailer.
Without a wiring diagram, it can be challenging to correctly wire the 7-way plug, especially if you are not familiar with automotive electrical systems. Incorrect wiring can lead to malfunctioning lights, brakes, or other electrical components, compromising safety on the road. It can also result in damage to the vehicle’s electrical system or to the trailer itself.
A wiring diagram not only aids in the initial installation of the 7-way plug but also comes in handy when troubleshooting electrical issues. If any of the functions connected to the plug are not working properly, a wiring diagram can help identify the faulty connection or component. It allows for a systematic approach to the diagnosis and repair of the electrical system, saving time and effort in the process.
In summary, a wiring diagram for a 7-way plug is essential for proper installation and troubleshooting of the electrical connections between a vehicle and a trailer. It ensures that the wires are correctly matched to the corresponding functions and helps identify any issues in the system. Whether you are a seasoned mechanic or a DIY enthusiast, having a wiring diagram on hand can make a significant difference in ensuring a safe and reliable towing experience.
Components of a 7-way plug
A 7-way plug is a standard electrical connector used for connecting trailers to the towing vehicle. It provides seven pins or blades, each serving a specific purpose. Understanding the different components of a 7-way plug is important for proper wiring and ensuring a reliable connection.
1. Ground pin: The ground pin is typically located at the top and is used to establish an electrical ground connection between the trailer and the towing vehicle. It ensures the safe transfer of electrical current and offers protection against electrical shocks.
2. Tail lights pin: This pin is responsible for the trailer’s tail lights, including the brake lights and turn signals. It provides the necessary power and signals to illuminate these lights, allowing other drivers to see the trailer’s movements and intentions.
3. Electric brake pin: The electric brake pin is used to supply power to the trailer’s electric brakes. When the driver applies the brakes in the towing vehicle, this pin sends a signal to activate the trailer’s brakes, providing additional braking force and improving overall safety.
4. Battery pin: The battery pin is used to charge the trailer’s battery while it is connected to the towing vehicle. It ensures that the battery remains charged during long trips, allowing the trailer to power its own electrical components, such as interior lights or power outlets.
5. 12V pin: The 12V pin provides a constant 12-volt power supply to the trailer’s auxiliary system. This can be used to power additional accessories or equipment on the trailer, such as refrigerators, TVs, or power tools.
6. Backup lights pin: The backup lights pin is responsible for activating the trailer’s reverse lights when the driver engages the reverse gear in the towing vehicle. These lights illuminate the area behind the trailer, helping the driver to maneuver and park safely.
7. Brake controller pin: The brake controller pin is used to connect the trailer’s brake controller to the towing vehicle. The brake controller helps control the trailer’s braking system, allowing the driver to adjust the amount of braking force applied to the trailer based on the towing conditions.
In conclusion, a 7-way plug consists of several essential components that enable the transmission of power and signals between the towing vehicle and the trailer. Each pin serves a specific function, from providing electrical ground to powering auxiliary systems. Understanding these components is crucial for proper wiring and ensuring a safe and reliable towing experience.
Step-by-step guide to wiring a 7-way plug
Wiring a 7-way plug is an essential step for connecting your trailer to your vehicle’s electrical system. Hopkins provides a reliable and user-friendly wiring diagram for their 7-way plugs, making the installation process easier. Follow these step-by-step instructions to successfully wire your 7-way plug:
Step 1: Gather the necessary tools
Before getting started, gather the necessary tools for the installation. You will need a wire stripper, electrical tape, a pair of pliers, and a voltage tester. Having these tools handy will make the wiring process smoother.
Step 2: Identify the wires
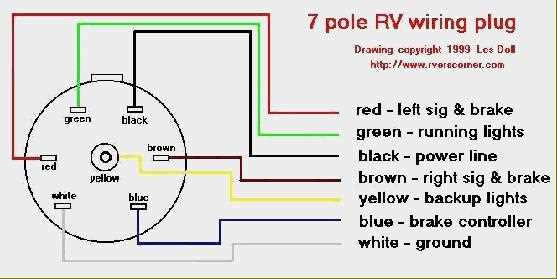
Start by identifying the wires on your 7-way plug. Each wire is color-coded according to its function. The typical wiring colors are as follows:
- White: Ground wire
- Blue: Electric brakes
- Red: Left turn/brake
- Brown: Tail/marker lights
- Yellow: Reverse lights
- Green: Right turn/brake
- Black: 12V power supply
Step 3: Strip the wires
Once you have identified the wires, use a wire stripper to strip about 1/2 inch of insulation from the end of each wire. This will expose the copper wire inside.
Step 4: Connect the wires
Now it’s time to connect the wires to their respective terminals. Refer to the Hopkins 7-way plug wiring diagram to determine which wire goes to each terminal. Use pliers to securely fasten the wires to the terminals. Ensure that the connections are tight to avoid any loose connections.
Step 5: Test the connections
After connecting all the wires, use a voltage tester to verify the connections. This will help you ensure that each wire is providing the correct signal. Test the turn signals, brake lights, tail lights, and other functions to ensure everything is working properly.
By following these step-by-step instructions and referring to the Hopkins 7-way plug wiring diagram, you can confidently wire your trailer’s 7-way plug and safely connect it to your vehicle’s electrical system. By doing so, you will have a reliable and functioning trailer electrical setup for towing purposes.
Tips for Troubleshooting Common Issues with 7-Way Plug Wiring
When dealing with a 7-way plug wiring on your vehicle, you may encounter various issues that can cause problems with the functionality of your trailer’s electrical system. Here are some tips to help you troubleshoot common problems and ensure proper wiring:
- Check the connection: Make sure the plug is firmly connected to the socket, and that all the pins are making good contact. Loose or corroded connections can cause electrical issues.
- Inspect the wiring: Look for any signs of damage or fraying on the wires. If you find any, replace the damaged section with a new wire to ensure reliable connections.
- Test the ground connection: A poor ground connection can cause various electrical problems. Use a multimeter to check the continuity between the ground pin and a known ground point on your vehicle. If there is no continuity, clean or repair the ground connection.
- Check for blown fuses: If certain functions of your trailer’s electrical system are not working, it could be due to a blown fuse. Locate the fuse box in your vehicle and check for any blown fuses. Replace them with the appropriate rating if necessary.
- Verify proper voltages: Use a voltmeter to check the voltage at each pin on the plug. Verify that the correct voltage is present for each function (e.g., turn signals, brake lights, etc.). If the voltages are incorrect, there may be a problem with the wiring or a faulty component.
- Consult the wiring diagram: If you’re still experiencing issues, refer to the Hopkins 7-way plug wiring diagram for your specific vehicle and trailer combination. Double-check that the wires are connected correctly according to the diagram.
- Consider professional help: If you’re unable to diagnose or fix the problem yourself, it may be necessary to seek assistance from a professional mechanic or trailer technician. They will have the expertise and tools to troubleshoot and repair any complex wiring issues.
Remember, proper wiring and troubleshooting can help ensure safe and reliable operation of your trailer’s electrical system. Regular inspections and maintenance will also help prevent potential issues from occurring in the first place.
Q&A:
Why is my 7-way plug wiring not working?
There could be several reasons why your 7-way plug wiring is not working. It could be a loose connection, a blown fuse, or a wiring issue. It’s important to check all of these possibilities before attempting to troubleshoot further.
How do I know if there is a loose connection in my 7-way plug wiring?
If your 7-way plug wiring is not working, one of the first things to check for is a loose connection. You can do this by visually inspecting the wiring and connections. Look for any loose or frayed wires, and ensure that all connections are securely fastened.
What should I do if I find a loose connection in my 7-way plug wiring?
If you find a loose connection in your 7-way plug wiring, you should first turn off the power source and then re-secure the connection. Use a screwdriver or wrench to tighten any loose screws or bolts. Once the connection is secure, test the wiring to see if the issue has been resolved.
How can I determine if a fuse is blown in my 7-way plug wiring?
To determine if a fuse is blown in your 7-way plug wiring, you will need to locate the fuse box for your vehicle. Consult your vehicle’s manual to find the exact location of the fuse box. Once you have found the fuse box, visually inspect the fuses to see if any are blown. If you are unsure, you can use a multimeter to test the fuses for continuity.
What should I do if a fuse is blown in my 7-way plug wiring?
If a fuse is blown in your 7-way plug wiring, you will need to replace it with a new fuse of the same amperage rating. Make sure to turn off the power source before replacing the fuse. Once the new fuse is installed, test the wiring to see if the issue has been resolved.
What should I do if my 7-way plug is not working?
If your 7-way plug is not working, the first thing you should do is check the connections. Make sure all the wires are properly connected and secured. If the connections are good, you can use a multimeter to check for power at the plug. If there is no power, you may need to replace the fuse or check the wiring for any damage or loose connections.
Why am I experiencing intermittent power or signal loss on my 7-way plug?
If you are experiencing intermittent power or signal loss on your 7-way plug, there could be a few possible causes. One common cause is a loose or damaged connection. Check all the connections and ensure they are tight and secure. Another possible cause is a faulty or worn-out plug. If the plug itself is damaged, it may need to be replaced. Finally, the issue could be with the wiring itself. Check the wiring for any damage or loose connections, and repair or replace as needed.